Checkmarx MCP Server - Interacting with Checkmarx One via AI Assistants and Integrations
Overview
Modern development and security workflows are increasingly centered around AI-assisted environments. However, traditional security tooling often requires users to leave these environments to take action, disrupting productivity and reducing engagement. The Checkmarx MCP Server addresses this gap by bringing security operations directly into the tools where users already work — making it easier to adopt, integrate, and act on security insights in real time
The Checkmarx MCP Server acts as a translation layer between MCP-compatible clients and the Checkmarx One REST APIs, enabling developers and security teams to interact with Checkmarx One from AI assistants and supported third-party integrations. Through these clients, users can interact with Checkmarx One using natural language within an IDE, terminal, chat, or other supported interface. Users can trigger scans, retrieve findings, and query security posture within AI workflows without needing to switch to the platform UI. That means that a developer can now request a scan and immediately receive prioritized results and a security lead can query organization-wide coverage and risk trends, without disrupting their workflows.
Built on the Model Context Protocol (MCP), an open standard for connecting AI applications and platforms to external tools and data sources, the Checkmarx MCP Server exposes a curated set of capabilities that map to Checkmarx One functionality. It acts as a controlled interface between AI agents and the Checkmarx APIs, enabling secure, structured access to data and actions through natural language. This release introduces the initial phase of the MCP Server - providing a minimal set of capabilities required to support meaningful, end-to-end workflows for both developers and AppSec teams. We will soon be adding more advanced capabilities such as automated triage, external integrations, and agent-driven workflows.
Who is it for?
Developers - Trigger scans and receive prioritized findings directly within the IDE or terminal, without switching between tools.
AppSec Engineers - Query findings by severity, type, or scanner; manage project and application inventory; and monitor scan status.
Security Leads - Gain organization-wide visibility into scan coverage, risk posture, and trends across teams through simple, natural language queries.
Limitations
Scanners - Currently supported only for SAST, SCA, IaC Security and Secrets. Additional scanners will be added soon.
Tools - The initial phase provides tools in the areas of remediation, scan workflow, project and application management and scan history, but does not support state changes (triage), risk prioritization or other advanced Checkmarx One workflows.
Prerequisites
Certain MCP features require the Checkmarx CLI to be installed and configured. To enable these features, ensure that the Checkmarx CLI is installed and that the MCP can access its executable path.
For best results, use credentials with matching permissions in both the Checkmarx CLI and the MCP server configuration. Permission mismatches may prevent some operations from completing successfully.
Local directory scanning specifically requires access to the Checkmarx CLI and is not available through the MCP alone.
Data Security
Data in encryption in transit - TLS 1.2+ on all connections
No credential storage or logging
Complete tenant segregation
RBAC passthrough enforced - no privilege escalation via MCP
Repo URL credentials always sanitized - never shown to user
No destructive activities (e.g., project deletion) allowed via MCP
Authentication and Permissions
Authentication is done using an OAuth login workflow or by submitting an API Key. Once authenticated, the MCP is able to interact with the relevant tenant account based on the specific set of permissions assigned to the user or API Key.
The MCP is available to all Checkmarx One customers. However, functionality is limited based on:
License Packages - Only tools licensed for your account are available. For example, remediation tools are only available for accounts with Checkmarx One Assist, AI Protection or Checkmarx Developer Assist license. In addition, only licensed scanners can be run.
User Permissions - Tools are only available to users with the relevant permission for each action (based on Checkmarx One IAM). For example, only users with permission to run scans can initiate a scan via the MCP. And, only users with access to a particular project can ask the MCP to view results for that project.
Supported Authentication Methods
Checkmarx MCP supports the following authentication methods:
API Key -Submit a JWT (JSON Web Token) access token. Access tokens are obtained via the Checkmarx web application (UI), see Generating an API Key.
Predefined OAuth Client — Uses a fixed OAuth client that is registered in advance. This is the simpler option, relying on a known, shared client identity. Use this predefined clientId:
cx-mcp-clientDynamic OAuth Client Registration (DCR) — The MCP client registers itself dynamically at runtime by calling the authorization server's registration endpoint, obtaining its own client credentials on the fly.
Caution
There is an upper limit of 500 clients per tenant using DCR authentication. When the limit is reached, the following message is displayed:
Policy 'Max Clients Limit' rejected request to client-registration service
In this case, you must use one of the other authentication methods for some of your users.
Supported Methods by Platform
The following table shows which authentication methods are supported for each platform.
Platform | API Key | Predefined OAuth Client | DCR |
|---|---|---|---|
Claude Code | ✔ | ✔ | ✔ |
Gemini CLI | ✔ | ✔ | ✔ |
Codex CLI | ✔ | x | ✔ |
Copilot CLI | ✔ | x | ✔ |
Cursor IDE | ✔ | ✔ | See note |
VS Code | ✔ | ✔ | ✔ |
JetBrains IDEs | ✔ | x | x |
Windsurf | ✔ | x | ✔ |
Kiro IDE | ✔ | x | ✔ |
Antigravity IDE | ✔ | x | ✔ |
Claude Web and Claude Desktop | x | ✔ | ✔ |
Installation and Configuration
The Checkmarx MCP Server can be integrated with AI assistants and development tools that connect directly to the MCP server, as well as with supported third-party platforms.
AI Assistants and Development Tools — Connect an MCP-compatible AI assistant or development tool directly to the Checkmarx MCP Server. Installation and authentication methods vary by platform.
Third-Party Integrations — Connect a third-party platform, such as Amazon Quick, to the Checkmarx MCP Server. These integrations may require additional configuration within the third-party platform.
Notice
For all installation flows, you will need to provide your Checkmarx One Server Base URL.
AI Assistants and Developer Tools
Before installing the MCP, determine which authentication method you will use. For information about supported authentication methods and platform compatibility, see Supported Methods by Platform.
Installing with API Key Authentication Flow
We offer two methods for installing the MCP using API Key authentication: Installing from CLI and Manual Installation.
For both methods, you will need your Checkmarx Base URL and an API Key.
Notice
To learn how to generate an API Key in Checkmarx One, see Generating an API Key.
You can register, authenticate and enable the MCP from the command line on supported platforms, using industry standards for MCP tools.
You can create a custom integration by installing the MCP manually as a JSON file in the relevant folder in your platform.
{
   "servers":{
      "checkmarx":{
         "url":"<Checkmarx_one_base_url>/api/security-mcp/mcp",
         "headers":{
            "cx-origin":"<your_platform>",
            "Authorization":"<Checkmarx_one_API_key>"
         }
      }
   }
}
Replace the placeholder values as follows:
In the url field, replace the placeholder with the base url for your environment.
For cx-origin, enter the name of the platform that you are using (Possible values: Vscode, Jetbrains, Cursor, Windsurf, Kiro) .
Notice
This is used for analytics tracking.
For Authorization, enter your API key.
Installing with OAuth Authentication Flow
Methods of installation with OAuth authentication flow vary from platform to platform. For all installation flows you will need your Checkmarx Base URL and Tenant Name. The tenant name must be specified as a dynamic path parameter in the endpoint URL, immediately following the /mcp segment.
Claude CLI
Gemini CLI
Codex CLI
Copilot CLI
Cursor IDE
Kiro IDE
Antigravity IDE
Claude Web and Claude Desktop
Checkmarx MCP can be added as custom connectors.
Note
Enterprise Administrators can introduce custom connectors as described here.
Navigate to Organization settings > Connectors.
Click the Add button.
Hover over Custom, then select Web.
Add your connector's remote MCP server URL (e.g. "${CX_BASE_URL}/api/security-mcp/mcp/{tenantName}")
To use a predefined client ID, click “Advanced settings” and specify the following OAuth Client ID:
cx-mcp-clientClick Add.
Third-Party Integrations
Third-party platforms can integrate with the Checkmarx MCP Server to make Checkmarx tools available through their own AI agents and interfaces.
Amazon Quick
Amazon Quick can be integrated directly with the Checkmarx MCP Server, enabling users to access Checkmarx capabilities through the Quick AI agent.
The integration uses server-to-server OAuth authentication. To set up the integration, first create an OAuth client in Checkmarx One, and then use the generated client credentials to configure the integration in Amazon Quick.
Prerequisites
Before configuring the integration, make sure that you have access to:
Amazon Quick with Admin or Author permissions.
The Checkmarx One tenant and environment that you want to connect to.
An OAuth Client ID and Client Secret for that account. To create an OAuth client, see Creating an OAuth Client.
Notice
Ensure that your OAuth client is configured with the appropriate roles necessary for running the MCP integration.
Configure the Amazon Quick Integration
Log in to Amazon Quick.
In the left-hand navigation bar, hover over More and select Connectors.
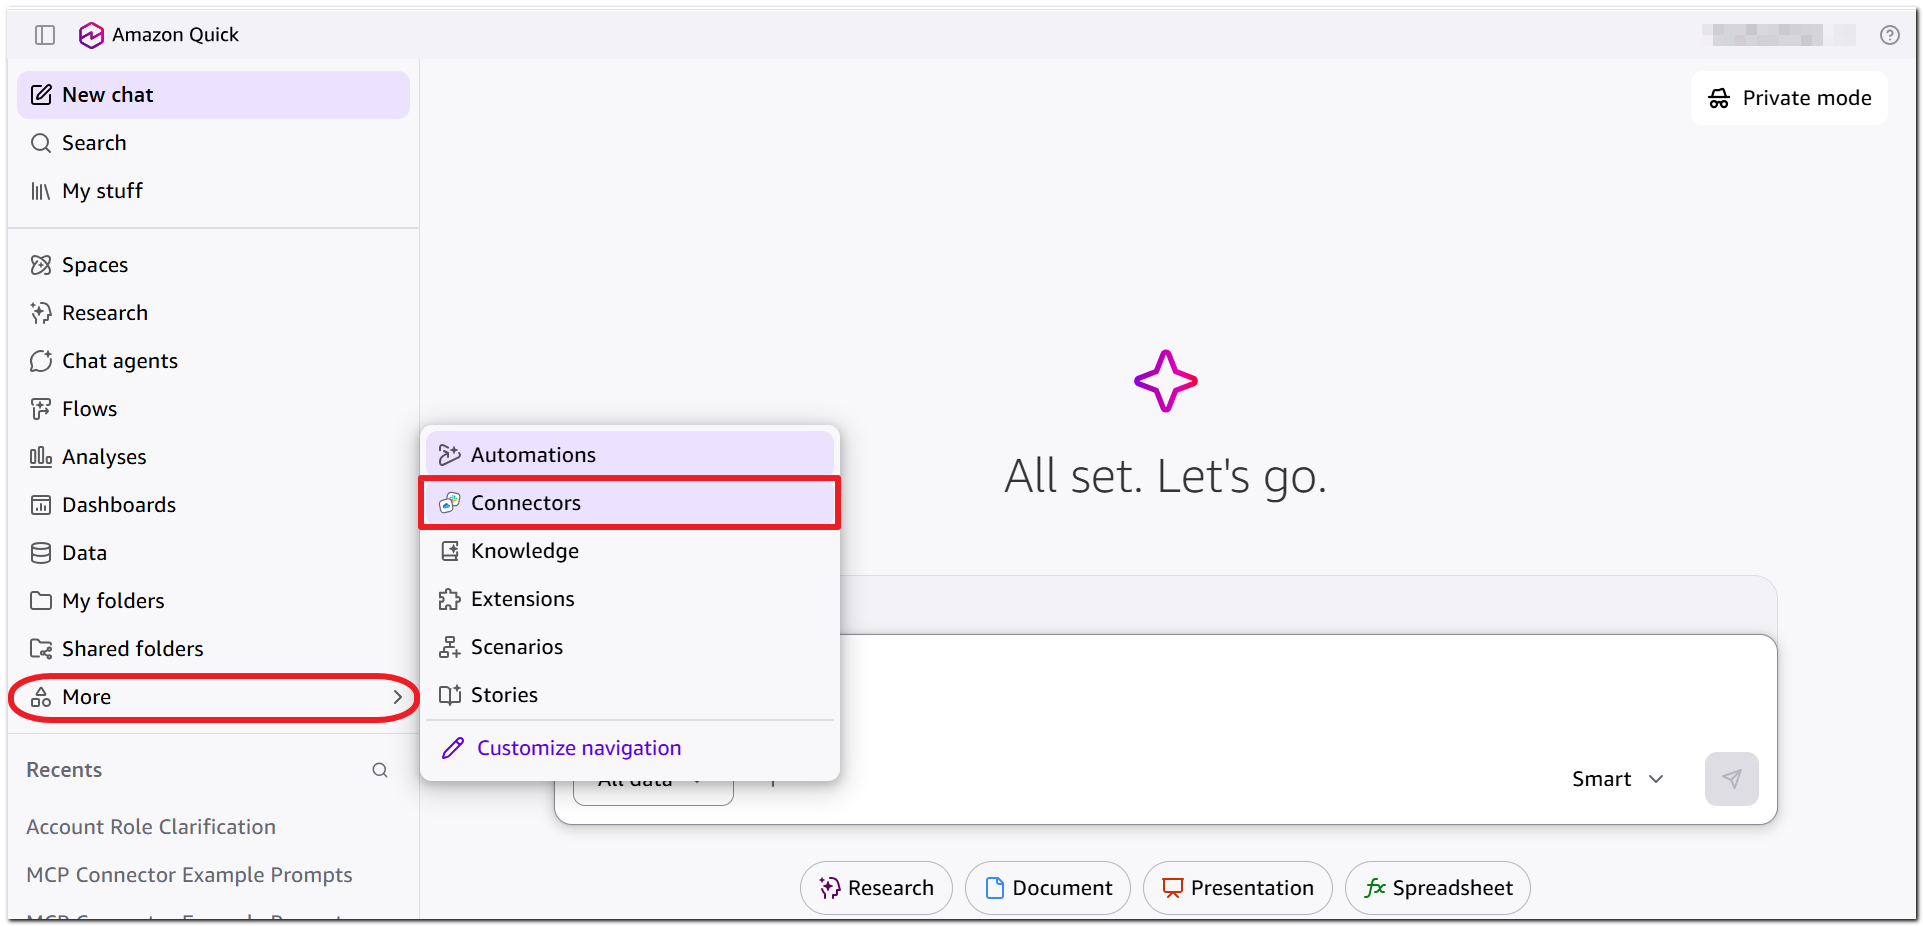
On the Connector page, select Create for your team.
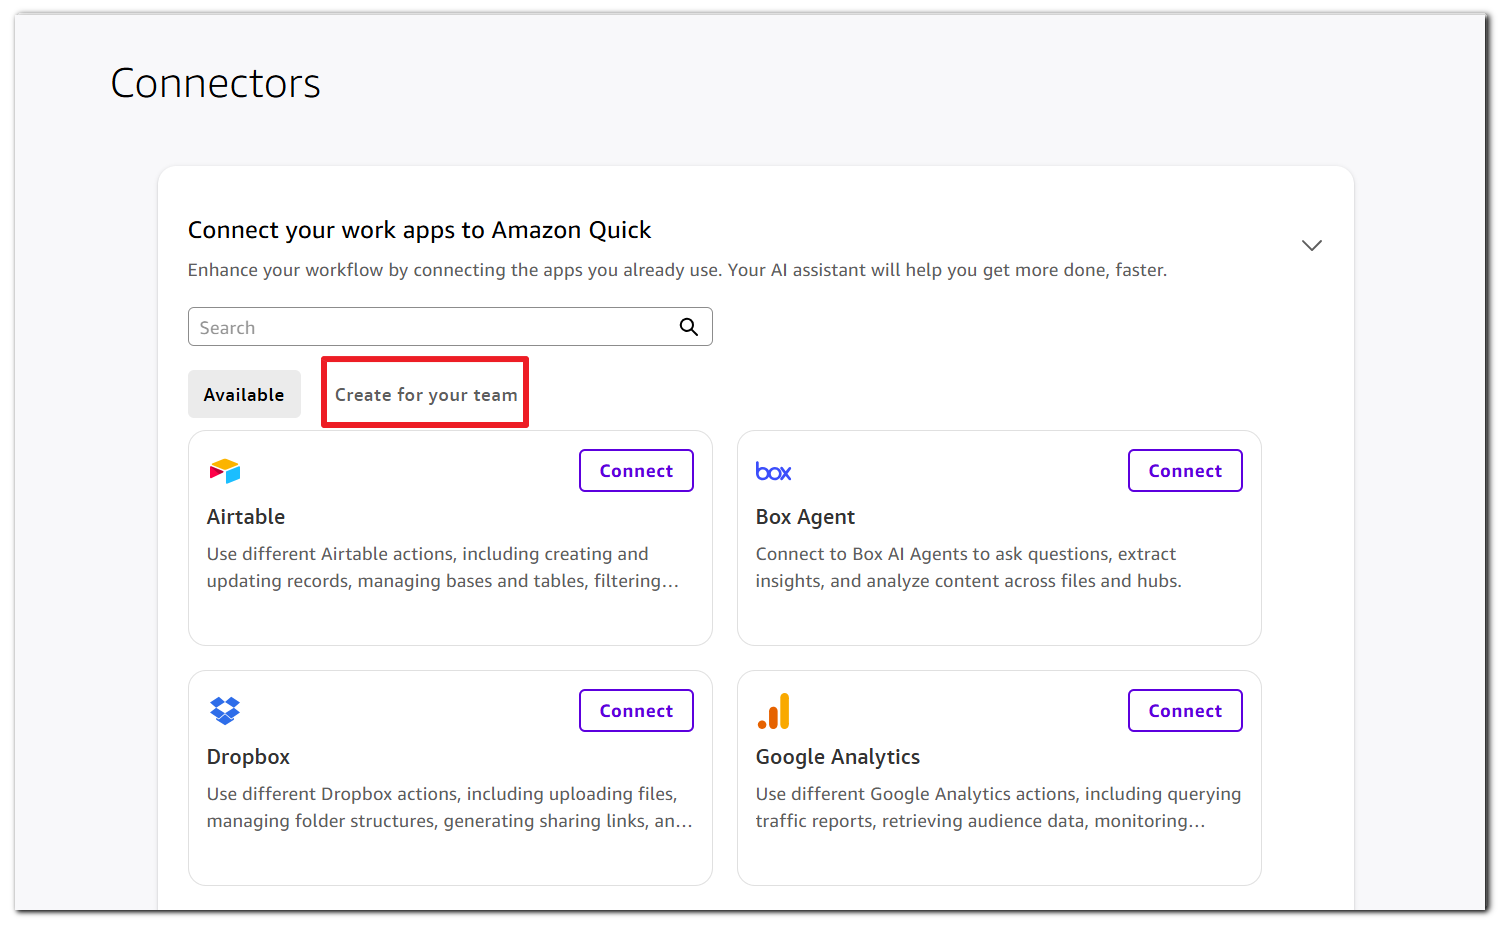
Select the Model Context Protocol tile.
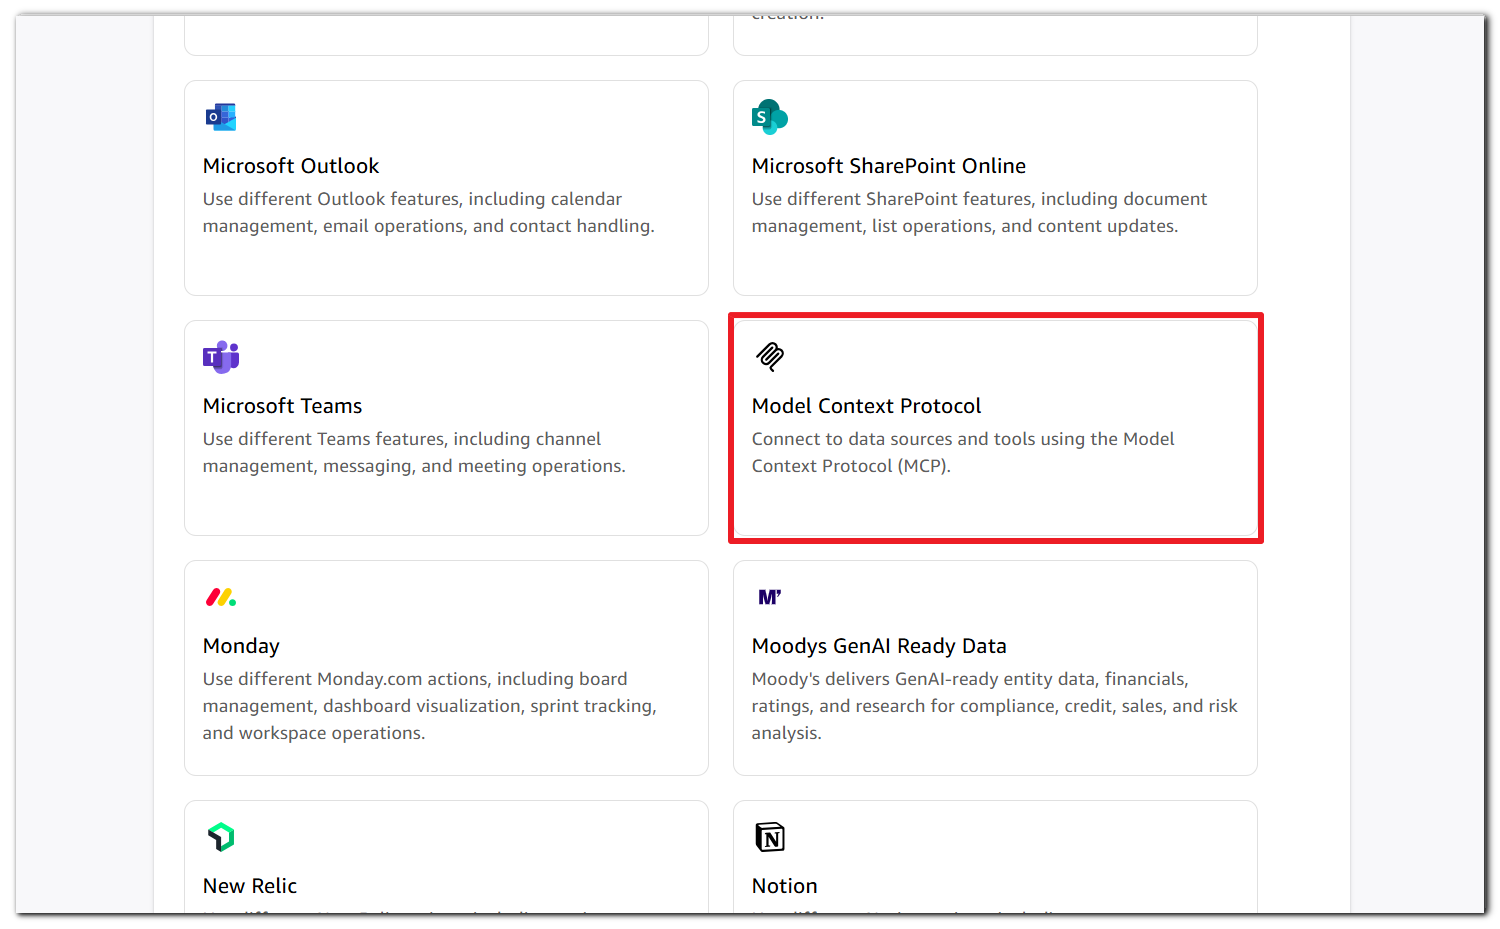
In the Connect step:
Enter a name for the integration (optional).
Enter a description.
For the MCP server endpoint, enter
<CheckmarxBaseURL>/api/security-mcp/mcp. Replace <CheckmarxBaseURL> with your Checkmarx One base URL.
Click Next.
In the Authenticate step:
Select Service authentication.
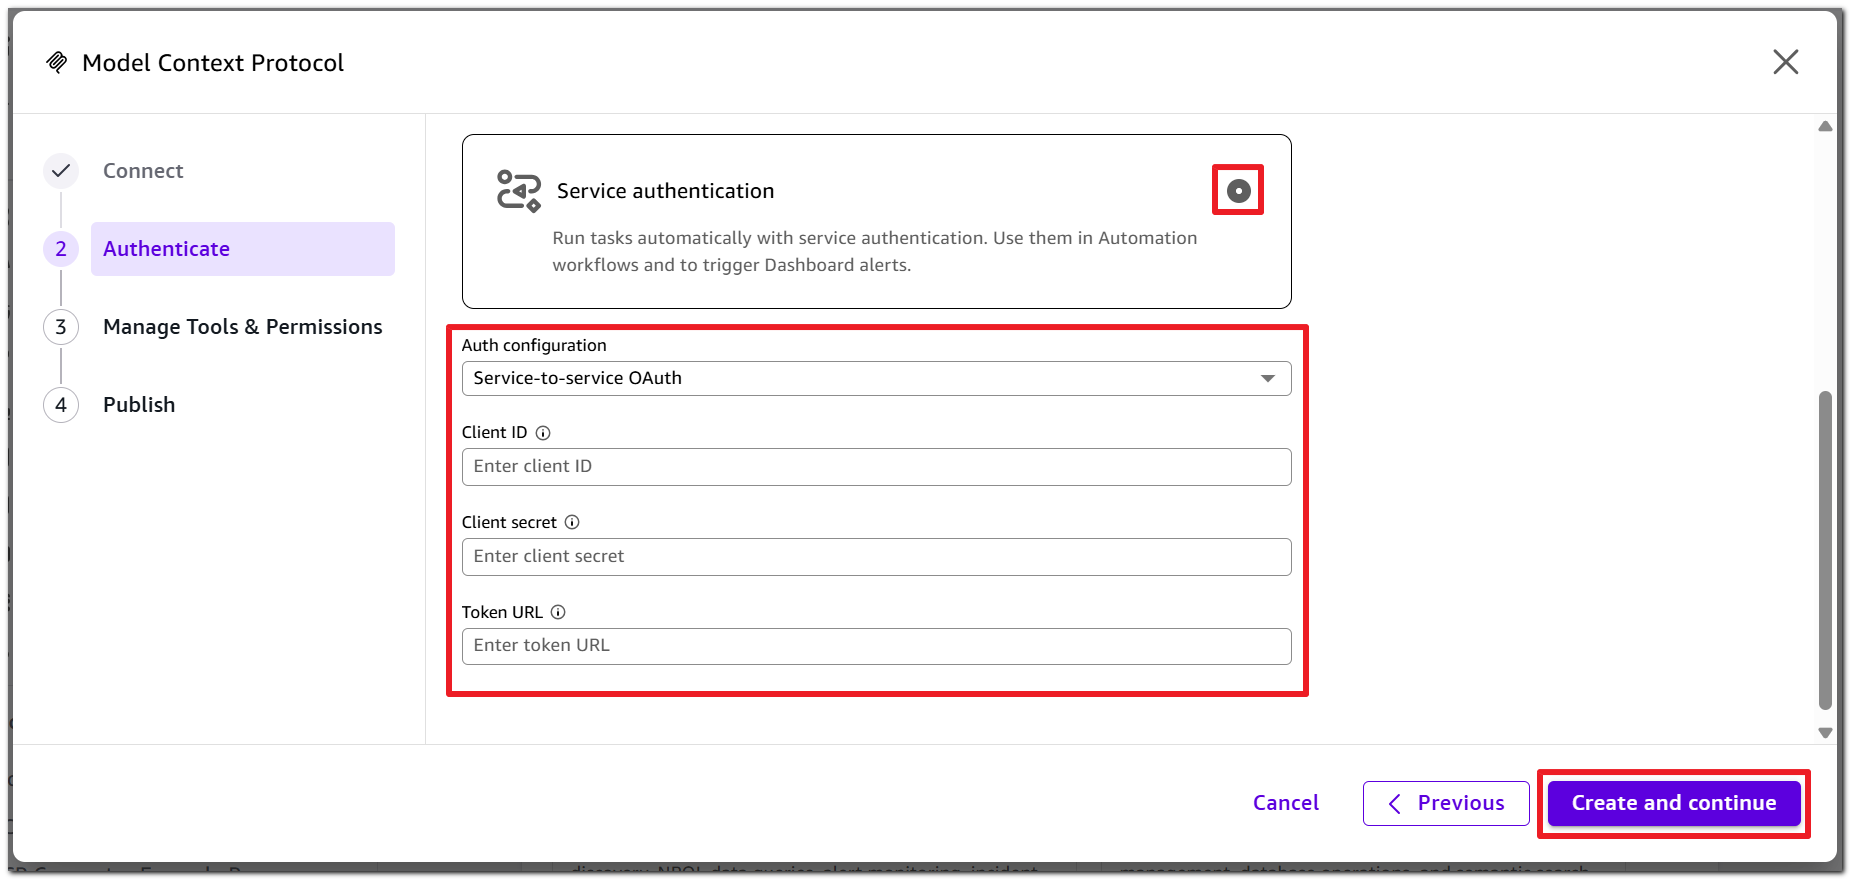
Enter the Client ID and Client secret from your OAuth client.
For Token URL, enter
https://<region>.iam.checkmarx.net/auth/realms/<YourCheckmarxTenant>/protocol/openid-connect/token. Replace <region> and <YourCheckmarxTenant> with the values for your Checkmarx One environment.Click Create and Continue.
In the Manage Tools & Permissions step, verify that Quick has discovered the available Checkmarx MCP tools.
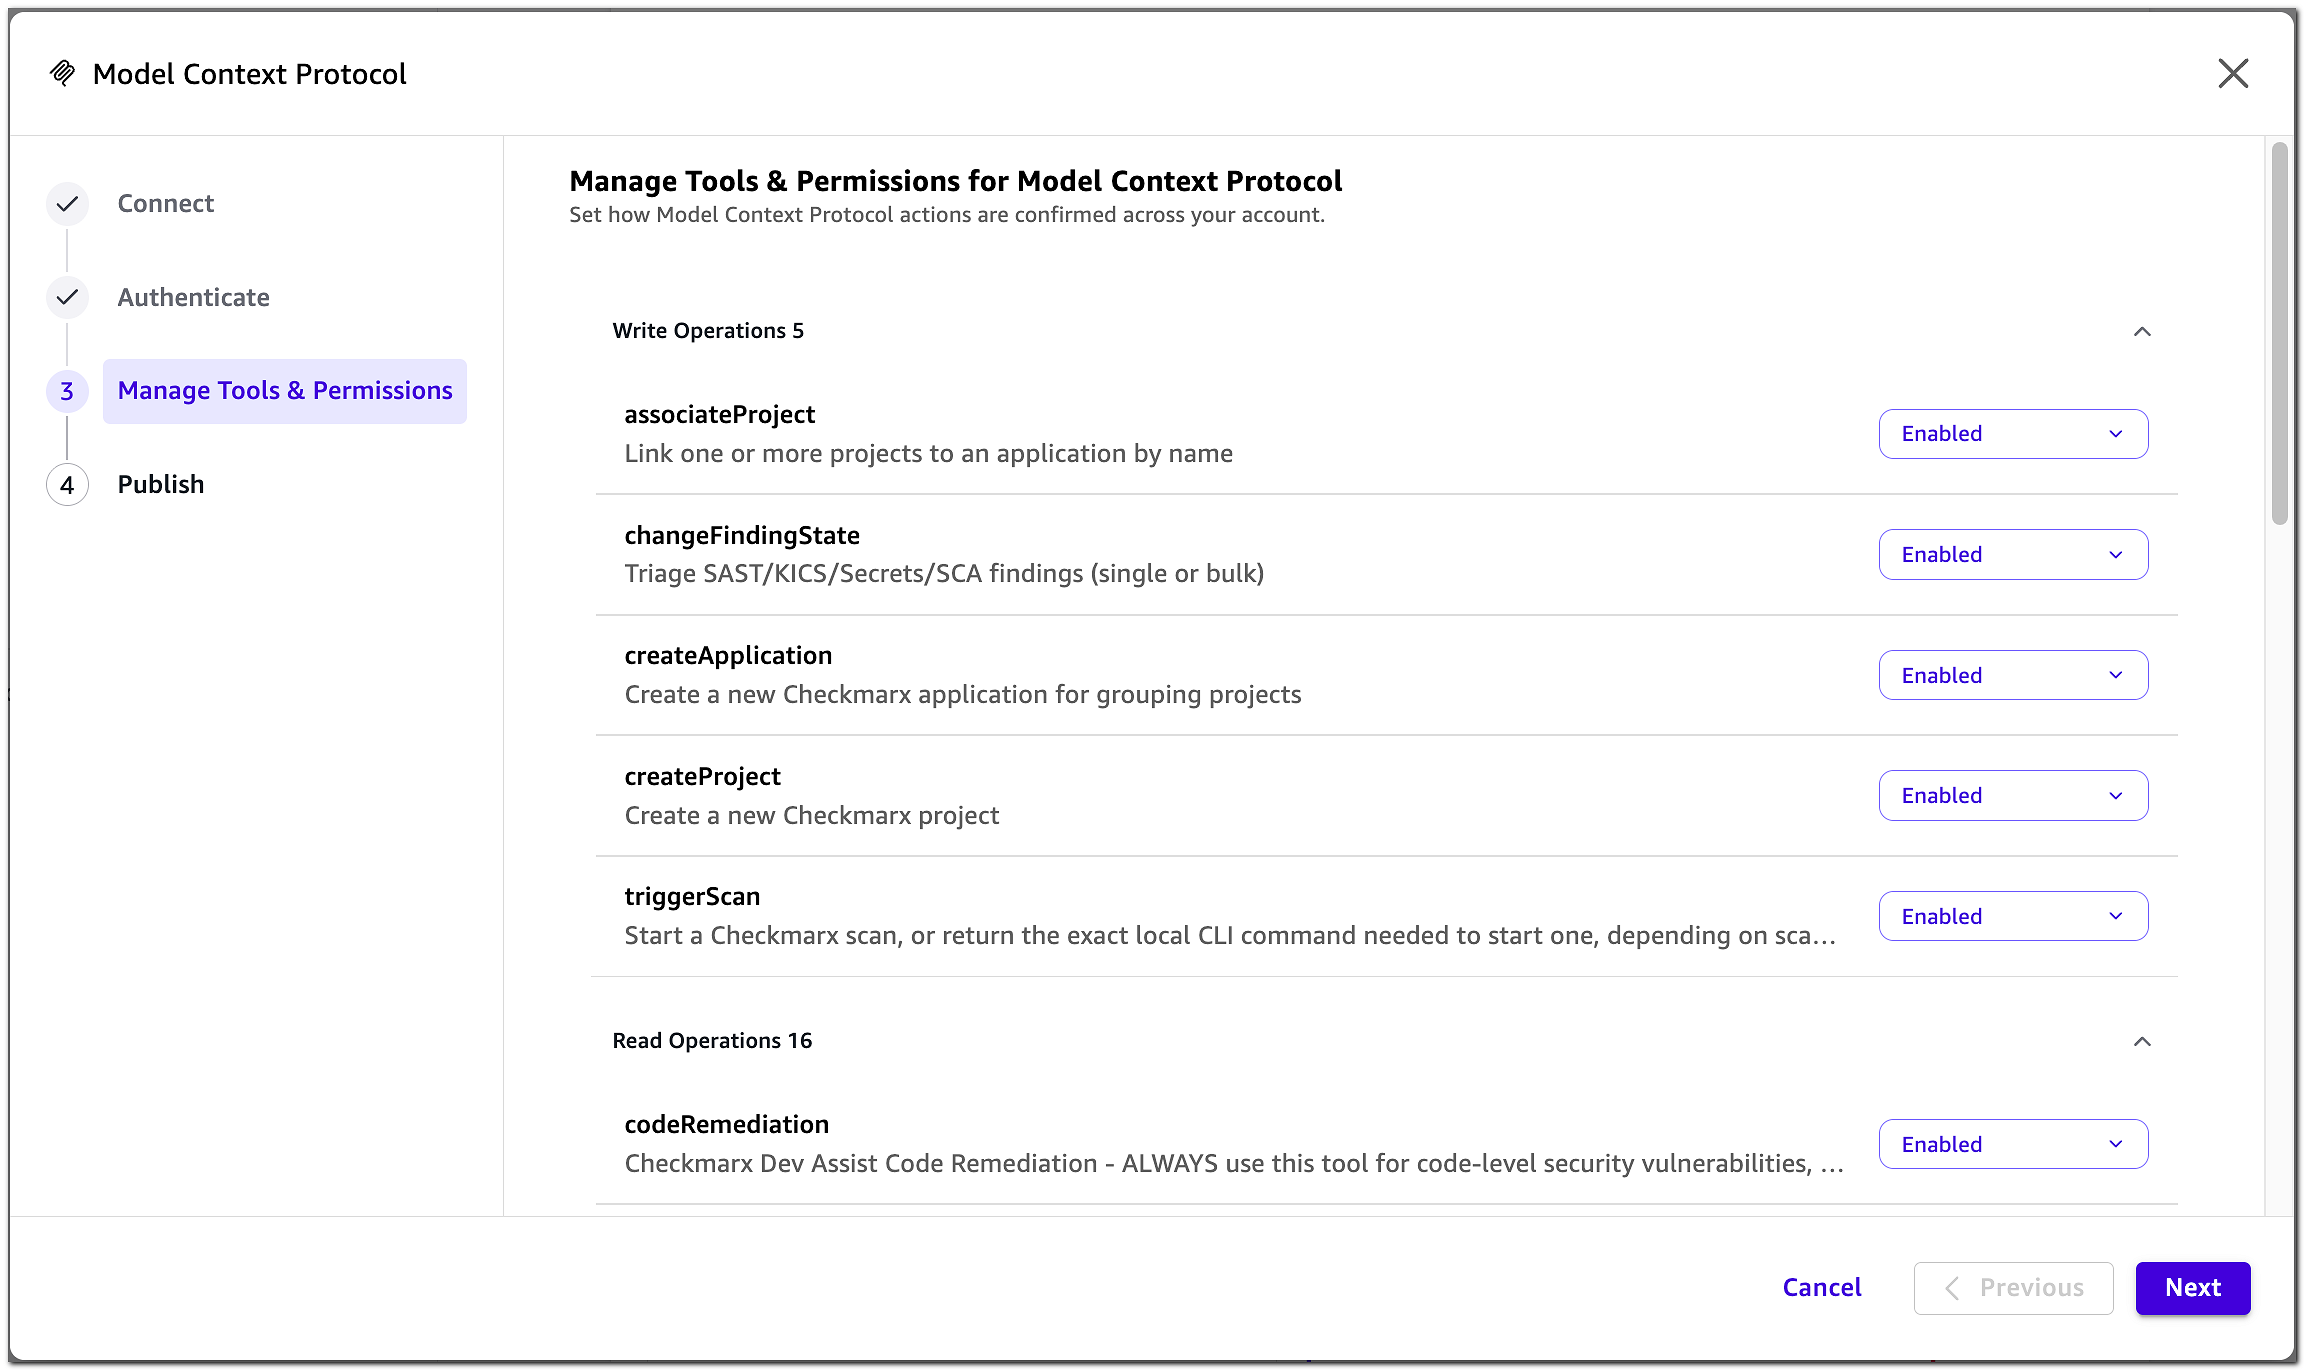
Click Next and then click Publish.
After publishing the integration, open the Quick AI agent and submit a prompt that uses a Checkmarx MCP tool. Verify that the agent can successfully retrieve information from your Checkmarx One environment. For example, ask the agent to list your Checkmarx projects.
Using the MCP
Interact with Checkmarx One via natural language chat in your AI assistant. The MCP interprets your instructions and runs the appropriate tools to provide the requested information and initiate the appropriate activities. A single prompt can trigger a series of tools, with the AI Agent requesting confirmation or additional input before moving from one step to the next.
The following is a list of tools by category. More detailed info about each tool is available below in MCP Tools.
Remediation
packageRemediation
codeRemediation
imageRemediation
Scan Workflow
planScan
triggerScan
getScanDetails
getLatestScans
listFindings
getFindingDetails
getTenantVulnerabilitiesSummary
Project Management
resolveProject
createProject
listProjects
getProjectConfig
Application Management
listApplications
getApplicationDetails
createApplication
associateProject
Scan History
listScans
Sample Workflows
Scan Project
The MCP can be used to run an E2E flow of triggering a scan, viewing results, identifying risks, and remediating those risks. The process begins by the developer entering a chat "scan this project" (or similar prompt). AI Agent runs the following tools, asking for input and/or confirmation before moving from one step to the next:
resolveProject- Checks if a corresponding project already exists in your Checkmarx One account, based on project name.Notice
To identify a project based on repository URL, other prompts are used. For example, trigger the
listProjectstool by asking the agent to "Show Checkmarx projects", and search for the desired repository URL.createProject- If the project doesn't exist, then a new project is created.getLatestScans- For pre-existing projects, checks if a scan has already run on the same commit, enabling display of results from that scan.planScan- Checks file types and determines which scanners to run.triggerScan- The scan is run using the relevant scanners.getScanDetails- Polls the status of the scan, until it is completed.Notice
For longer scans, the scan will continue running in the background and the user needs to prompt to check for completion.
This tool also provides vulnerability summaries by severity upon scan completion.
The developer can drill down further by asking additional questions like, "show me the critical vulnerabilities", "which packages have critical risks", "Show me all revealed secrets" etc. (triggering additional tools such as
listFindingsandgetFindingDetails.After identifying a vulnerability that requires remediaton the user can give instructions to remediate by saying "fix it", "find a safer package", "remediate this finding" etc. (triggering
packageRemediation,codeRemediationorimageRemediation).
Example from Amazon Quick
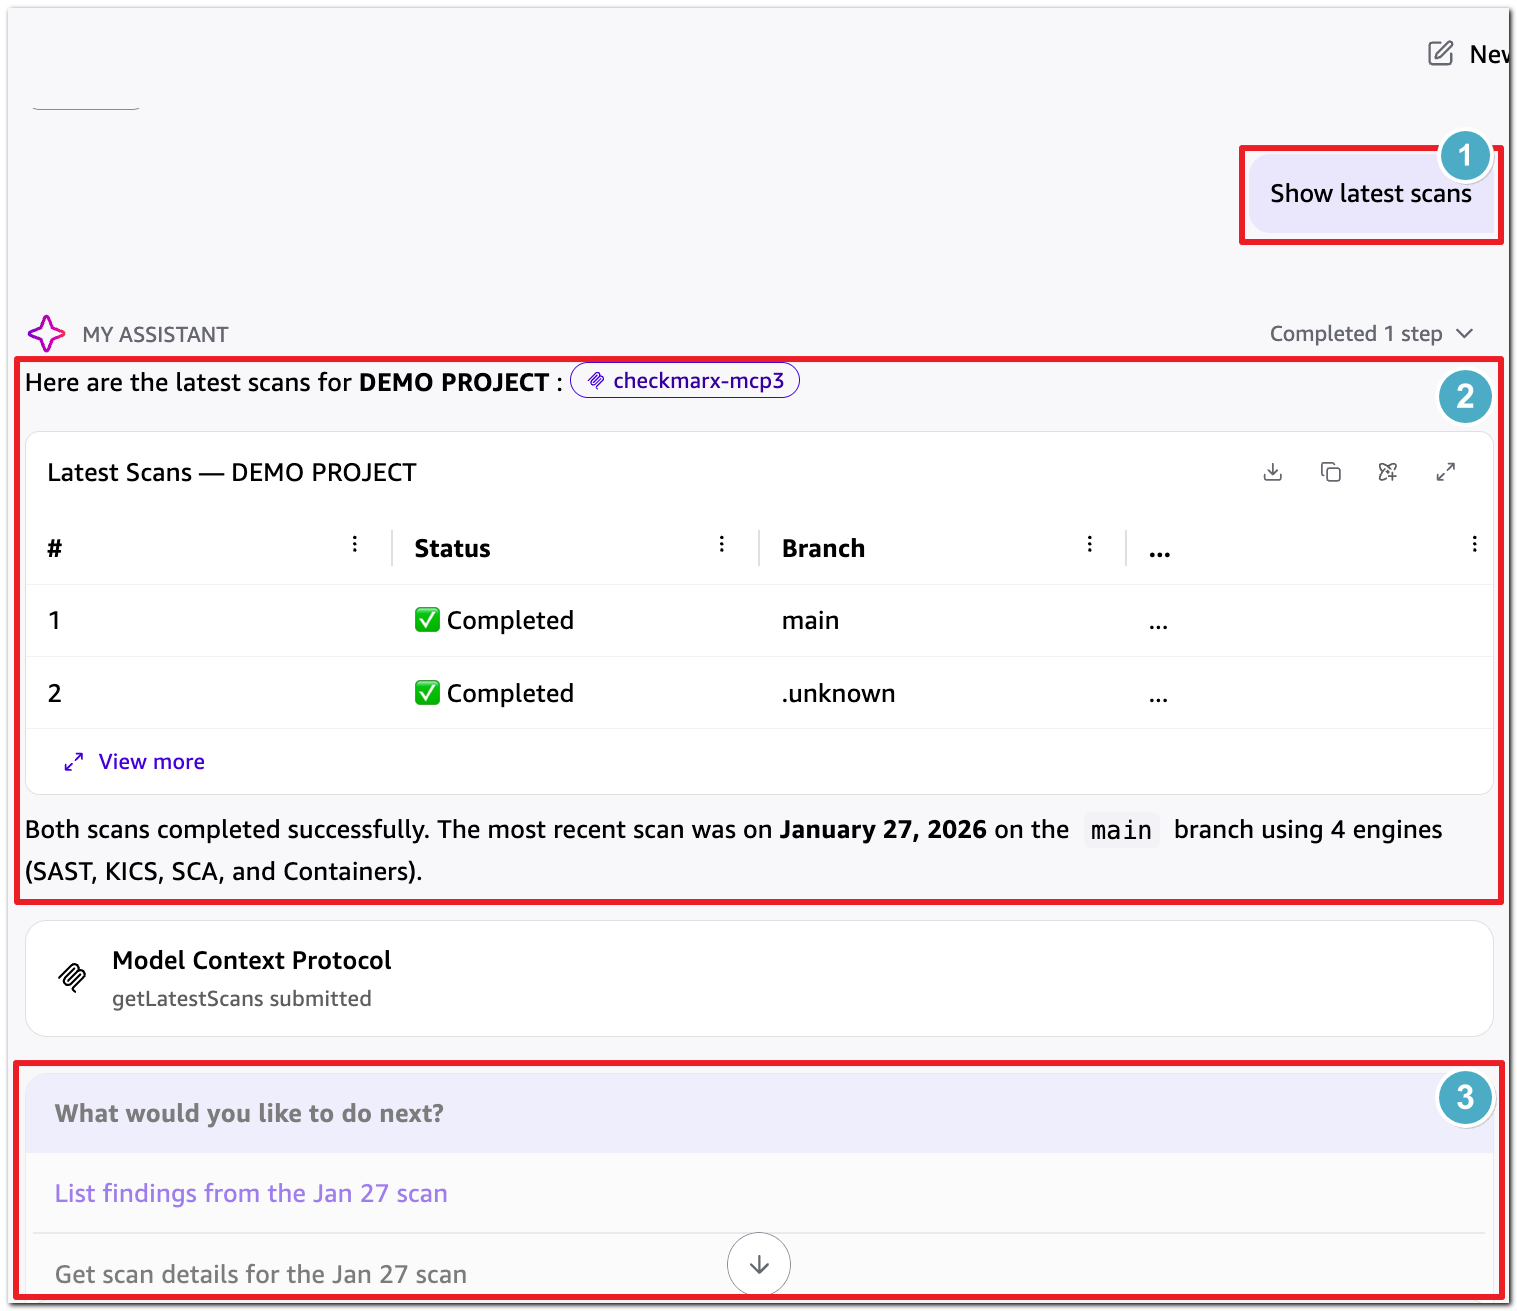 |
In this example, the user asked Quick to "Show latest scans" ( ). The agent uses the
 getLatestScans tool to retrieve the information and presents it in the chat ( ). The agent then suggests next steps (
 ).
).
MCP Tools
The following sections explain the various tools included in the MCP. The tools are grouped by category.
Warning
The "Triggered by (examples)" column is intended to provide general guidance for how these tools can be used. However, the specific phrases haven't been tested and we can't guarentee accurate results.
Remediation
These tools are used to analyze and remediate various types risks.
Warning
These tools require an Checkmarx One Assist, AI Protection or Checkmarx Developer Assist license.
Tool | Triggered by (examples) | Description |
|---|---|---|
|
| Analyze and remediate risk for one specific package or dependency version, including CVEs and malicious package concerns. Use when: user asks whether a specific package is safe, wants to fix a vulnerable dependency, or check if a package is malicious. Requires: packageName, packageVersion, packageManager, issueType. Returns: remediation guidance with safer versions and alternatives when available. |
|
| Provide remediation guidance for one specific code security issue, including SAST findings, exposed secrets, and IaC misconfigurations. Use when: user wants to fix a code vulnerability such as SQL injection, XSS, a hardcoded secret, or an infrastructure misconfiguration. Requires: type (secret/sast/iac). For sast and iac also requires finding metadata. Returns: remediation steps and fix guidance. |
|
| Analyze and remediate risk for one specific container image or base image reference. Use when: user asks whether a container image is safe, wants CVE guidance for an image, or wants a safer base image. Requires: imageName, imageTag. Returns: image-specific remediation guidance and alternatives when available. |
Scan Workflow
Use this set of tools to plan, start, and read scan progress and to view scan summaries and detailed scan results.
Notice
To optimize token usage, summaries are always returned before listing complete findings.
Tool | Triggered by (examples) | Description |
|---|---|---|
|
| Recommend the right Checkmarx scan engines and execution strategy for a target codebase. Use when: scanning requested and engines not specified. Requires:
Returns: recommended engines and whether to use local CLI or repository scanning. |
|
| Start a scan or return the exact local CLI command (via scan_mode). Use when: user asks to scan. Requires: project context and absolute source_path (cli) or project_id + repo_url (api). Returns: scan_id and dashboard URL (api) or local command (cli). |
|
| Get current status of a scan. Use when: user asks for progress or completion. Requires: scan_id. Returns: status and severity summary at completion. |
|
| Return the most recent scans for one project. Use when: recent/latest scans requested. Requires: project_id. Returns: newest-first list. |
|
| Return individual findings from a completed scan with filtering/sorting. Use when: browsing or filtered lists. Requires: scan_id. Returns: triage-ready findings. |
|
| Deep details for one finding. Use when: explain a specific finding by ID. Requires: scan_id, finding_id. Returns: location, data flow, remediation metadata. |
|
| Returns tenant-level vulnerability analytics (engine + time window). Results are not tied to a single scan. To query for engine specific summaries, use the exact engine names: SAST, SCA, IaC or Secret Detection. |
Project Management
Tool | Triggered by (examples) | Description |
|---|---|---|
|
| Find the project matching a given name. Use when: workflows need project_id or existence check. Requires: project_name. Returns: matching project or not-found. |
|
| Create a new project after user approval. Requires: name. Returns: project_id. |
|
| Browse/search projects with pagination. Returns: project list. |
|
| Full configuration for one project by ID. Requires: project_id. Returns: repository settings, tags, timestamps. |
Application Management
Tool | Triggered by (examples) | Description |
|---|---|---|
|
| Browse/search applications with pagination; helpful to obtain Returns: applications page. |
|
| Full details of one application by ID. Requires: Returns: tags, project associations, criticality. |
|
| Create a new application. Requires: name. Returns: |
|
| Link one or more projects to an application without removing existing associations. Requires: Returns: association result. |
Scan History
Tool | Triggered by (examples) | Description |
|---|---|---|
|
| Browse scans by project, status, branch, date range, and source. Returns: paginated scan list. |