Creating a Policy
The policy creation flow involves naming the policy, setting up rules for the policy, and assigning projects to it. There are two types of policy rules, each functioning in fundamentally different ways:
All Scanners - This rule is relevant only for Code Repository Integration projects. The rule is violated if a scan is triggered by a pull request and a "net new" vulnerability (i.e., a new vulnerability being introduced into the protected branch by this pull request) of the specified severity level is identified. This rule applies to vulnerabilities identified by any of the scanners run on the scan. See also All Scanners Policy.
By Scanner - These rules are relevant for all types of projects, regardless of how the scans are triggered. There are specialized rules that can be configured for each specific scanner. You can add several "By Scanner" rules to a policy, and the policy is violated if any one the rules is violated. See also By Scanner Policy.
The Break the build upon violations toggle enables you to set whether or not policy violations will cause the software build to break.
Upon policy violation, the violation is shown in the Policy Management > Incidents tab. In addition, for Code Repository Integration project the violation is included in the PR decoration. For SAST policies, the PR decoration includes the specific conditions that were violated as well as details about each vulnerability that caused the condition to be violated. For additional information, refer to Code Repository Integration Usage & Results
To create a policy:
In the main navigation, select Resource Management
 > Policies.
Click on Create New Policy.
In the Policy Details section, provide the following information:
Policy Name - Enter a name for the policy.
Description (optional) - Add a description.
Associated Tags (optional) - Click to expand the display, and then enter the desired tags for the policy.
Click Save & Continue
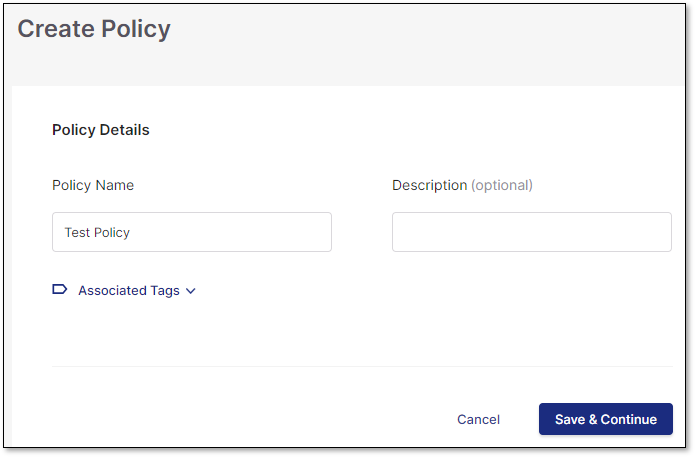
The screen expands to present the Rules and Project sections.
Policy Types
When creating a policy, you can choose from different policy types to control how scan results are evaluated. Each policy type defines how and when rules are applied.
All Scanners Policy
The All Scanners Policy applies only to Code Repository Integration projects where scans are triggered by a Pull Request (PR).
When a PR is created from a source branch to a target branch:
A scan runs on the source branch.
When the scan completes, the results are compared with the most recent scan of the target branch.
Any findings present in the source branch but not in the target branch are identified as new vulnerabilities.
If Break Build is enabled for this policy, the PR will be blocked until those vulnerabilities are resolved.
When to use this policy type
Use the All Scanners Policy when you want to block merges only for vulnerabilities that are new compared to the target branch, regardless of which scanner (SAST, SCA, etc.) detected them.
Limitations
Applies only to PR scans triggered through SCM integration webhooks.
Always applies to all scanners; it cannot be limited to a specific scanner type.
By Scanner Policy
The By Scanner Policy can be applied to any type of project, regardless of how the scan is initiated (PR webhook, CLI, plugin, or pipeline).
When a scan completes:
The policy rules are applied to the results of the current branch only.
If any rule is violated and Break Build is enabled, the PR will be blocked or the pipeline will fail.
When to use this policy type
Use the By Scanner Policy when you want the policy to evaluate only the current branch scan results and/or to enforce rules for specific scanners (for example, SAST only).
Limitations
For PR scans, this policy checks only the source branch results. No comparison is made with the target branch to identify new issues.
Rules section
Set up a single rule for all scanners or set up one or more rules for individual scanners.
To break software builds for a scanned repository that violates the configured rules, toggle on the Break the build upon violations option. This option is available for both the single rule for All scanners and for Individual rules.
All Scanners - Set up a rule for "net new" vulnerabilities identified by all scanners, and select which severities for detected vulnerabilities will trigger a policy violation.
By Scanner - Set up a one or more rules for individual scanners.
Policies can be set for the following scanners:
SAST scanner - SAST Policy Conditions.
SCA scanner - SCA Policy Conditions.
IaC Security scanner - IaC Security Policy Conditions.
Container Security scanner - Policy Management - Container Security Conditions
To create an All Scanners rule:
Click on All Scanners.

Use the Net New Vulnerabilities option to specify the severity level of the new vulnerability to which this rule applies: Critical, High, Medium, and/or Low. Select the checkbox next to each severity level for which a newly identified vulnerability is considered a policy violation.
If violation of this policy will break the build, turn on the Break build toggle.
To add one or more By Scanner rules:
Select the By Scanner radio button.
Notice
If a policy has multiple rules, if any one rule is violated, then the policy is considered violated (OR operator).
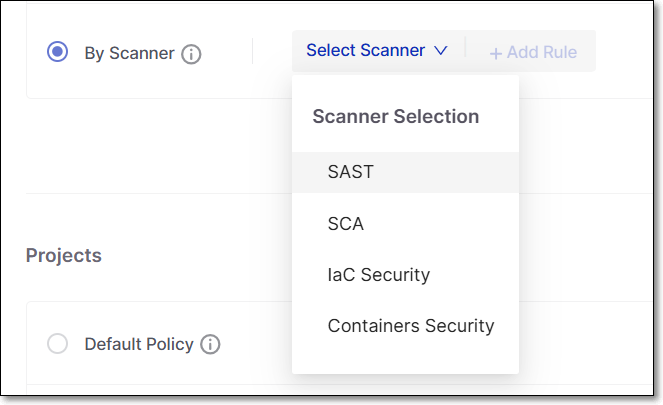
Click on Select Scanner to open the dropdown menu, and select the scanner for which you would like to add a rule.
Use the Net New Vulnerabilities option to specify the severity level of the new vulnerability to which this rule applies: Critical, High, Medium, and/or Low. Select the checkbox next to each severity level for which a newly identified vulnerability is considered a policy violation.
Click on + Add Rule.
The rule configuration panel opens on the right side of the screen.
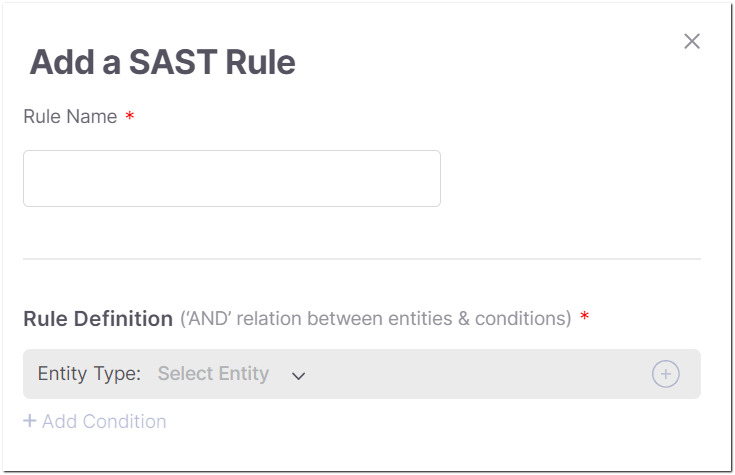
In the Rule Name field, enter a name for the rule.
Click + Add Condition and configure the condition. Options for condition configuration differ according to the scanner for which the rule is being created. The configuration options for each scanner are described below.
Projects section
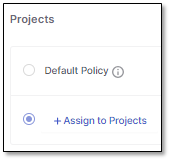
You can designate the policy you're creating as the default policy. This policy will then be applied to all scans of both new and existing projects. Alternatively, you can apply the policy to specific projects only.
To set the policy as the default policy, select the Default Policy checkbox. Note that only one default policy can be activated at a time.
To assign the policy to one or more specific projects:
Click + Assign to Projects.
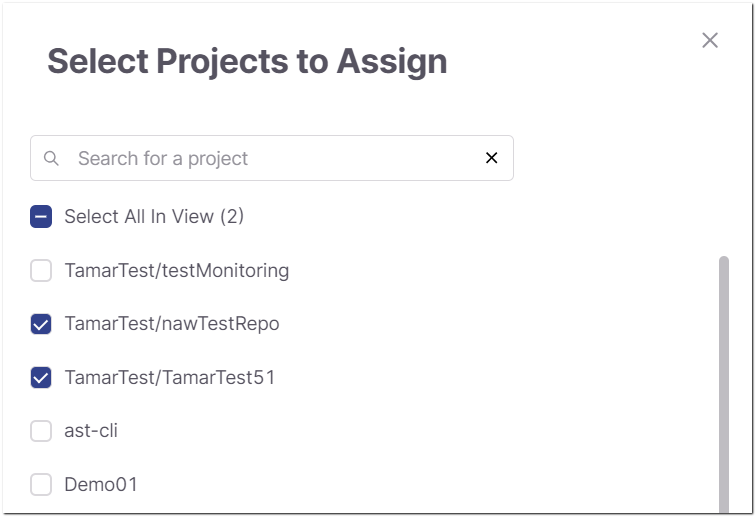
The Select Projects to Assign panel opens on the right side of the screen.
Select the checkbox next to each project you would like to assign.
It is possible to search for projects using the Search field. You can also select the Select All in View option to select all currently loaded projects.
Click Assign Projects.
Click Save Policy.
The policy is created and activated.
Configuring Policy Conditions
Each By Scanner rule specifies one or more policy conditions that relate to a specific scanner. The options for defining conditions differ for each scanner. The following sections explain the options for configuring conditions for each type of scanner.
SAST Policy Conditions
Overview
A SAST rule comprises one or more groups containing one or more conditions. A rule is considered violated (i.e., it will break the build) only if all groups are satisfied. Within each group, all conditions must apply to the same result for the group to be considered satisfied. Grouping allows for more granular control over rule evaluation, enabling you to define complex policies such as: "Break the build if there are more than 2 High severity vulnerabilities that are also older than 10 days."
Currently, only conditions that relate to vulnerabilities are supported for the SAST scanner.
Important
All conditions are placed in a single group by default when creating a new rule.
You can manually create multiple groups to define more advanced logic.
The following table describes the elements used to create a SAST condition:
SAST Vulnerability Conditions
Rule Subject | Options | Operator | Value |
|---|---|---|---|
Severity |
| > >= <+ < = | Integer The number of vulnerabilities by severity. |
Result Status |
| > >= <= < = | Integer The number of vulnerabilities by status. |
Query Name | In Contains |
| |
Aging | > >= <= < = | Age of the result since its first detection. | |
Categories | In Contains |
|
Grouping in Policy Management
You can create two kinds of groups: single and multiple.
Single groups must have all the conditions applied to the same result, or the rule will be violated.
Example: Given a group with the following conditions:
Severity: Critical > 0
Aging: < 10
The rule is violated if at least one result is Critical and less than 10 days old.
Multiple groups are evaluated independently. All groups must be satisfied for the rule to be violated.
Example: Given two groups with the following conditions:
Group 1:
Severity: Critical > 0
Aging: < 10
Group 2:
Status: New > 0
The rule is violated if at least one result is Critical and < 10 days old (Group 1) and at least one result is New (Group 2).
Scenario | Conditions Evaluation | Rule Outcome |
|---|---|---|
Result 1: Severity = Low, Aging = 9 Result 2: Severity = Medium, Aging = 100 | Group 1: Aging < 10 Group 2: Severity = Medium | Rule breaks |
Result 1: Severity = Medium, Aging = 100 Result 2: Severity = Low, Aging = 100 | Group 1: Aging < 10 Group 2: Severity = Medium | Rule does not break |
Result 1: Severity = Medium, Aging = 9 Result 2: Severity = Medium, Aging = 100 | Group 1: Aging < 10 Group 2: Severity = Medium | Rule breaks |
Important
The relationship between groups is always AND.
The grouping mechanism only affects how conditions are evaluated, not their logical relationship.
Only 1 severity can be added to each group.
When using severity and status on the same group, both conditions will have the operator and value assigned in the first condition.
SCA Policy Conditions
The following sections describe the various types of SCA policy conditions that can be configured.
Package Conditions
Type | Description | Values specified |
|---|---|---|
Is Used | The rule applies only to packages that are being used in the project. TipAvailable only for projects that support the Exploitable Path feature. | none |
Is Outdated | The rule applies only to packages for which a more recent version is available. | none |
Named | The rule applies only to packages with the specified name. | Full name of the package. |
Name Contains | The rule applies only to packages that have the specified string in their name. | String that is contained in the package name. |
Version is Higher than | The rule applies only to packages with a version higher than the specified version. | The minimum allowed version number. If the current version number is below this value, it will violate the policy. |
Version is Lower than | The rule applies only to packages with a version lower than the specified version. | The maximum allowed version number. If the current version number is below this value, it will violate the policy. |
Is not a Dev dependency | The rule only applies to packages that aren’t Dev dependencies. | none |
Is not a Test dependency | The rule only applies to packages that aren’t Test dependencies. | none |
Is a Direct dependency | The rule only applies to Direct dependencies (not to Transitive dependencies). | none |
Is Malicious | you can now create conditions based on specific types of malicious attacks (e.g., Typosquatting, Chainjacking etc.). You can also create conditions based on thresholds for the following package integrity metrics: Contributor Reputation, Reliability Score and Behavioral Integrity. | none |
Is Not a Commercial License package | The rule only applies to packages for which the organization doesn't have a commercial license. | none |
Contributor Reputation score greater or equal to | The rule only applies to packages whose Contributor Reputation score is greater than or equal to the number indicated. See Preventing Malicious Software Attacks | number from 0 - 10 |
Reliability score greater or equal to | The rule only applies to packages whose Package Reliability score is greater than or equal to the number indicated. See Preventing Malicious Software Attacks | number from 0 - 10 |
Behavioral Integrity score greater or equal to | The rule only applies to packages whose Behavioral Integrity score is greater than or equal to the number indicated. See Preventing Malicious Software Attacks | number from 0 - 10 |
Outdated by # of major versions | The rule only applies to packages that are outdated by the specified number of major versions. | number |
Outdated by # of minor versions | The rule only applies to packages that are outdated by the specified number of minor versions. | number |
Number of days since publication is greater than | The rule only applies to packages for which the specified amount of time has elapsed since the package version that you are using was published. | number |
Vulnerability Conditions
Type | Description | Values specified |
|---|---|---|
has Exploitable Path | There is an Exploitable Path through which the vulnerable methods are actually used in your code. See Exploitable Path TipThis is only supported for Projects in which the Exploitable Path feature is activated. | none |
has a Remediation Recommendation | Checkmarx offers a remediation recommendation for eliminating the vulnerability from your Project. See Remediation Tasks Tab TipThis is only supported for Projects in which the Exploitable Path feature is activated. | none |
CVSS score is greater than or equal to | The CVSS score of the vulnerability is greater than or equal to the specified value. TipThe latest available CVSS version is used for this assessment. | Specify the minimum CVSS score for this condition. |
Severity level is | The vulnerability has the specified severity level. | Select one or more severity levels (Critical, High, Medium, Low, Info) for the vulnerabilities in this condition. |
CWE Category is | The vulnerability has the specified CWE. | Specify the number of the CWE. |
CVE ID is | The vulnerability has the specified CVE ID. | Specify a CVE ID, e.g., CVE-2019-2391. |
number of Days Since Publication is greater than | The number of days since the vulnerability was published is greater than the specified value. | Specify the maximum allowed number of days. If the current number of days is above this value, it will violate the policy. |
number of Days Since Detection is greater than | The number of days since the vulnerability was detected is greater than the specified value. | Specify the maximum allowed number of days. If the current number of days is above this value, it will violate the policy. |
EPSS score is greater than or equal to | The EPSS score of the vulnerability is greater than or equal to the specified value. | Specify the minimum EPSS score for this condition. |
EPSS percentile is greater than or equal to | The EPSS percentile of the vulnerability is greater than or equal to the specified value. | Specify the minimum EPSS percentile for this condition. |
Vulnerability state is | The vulnerability has the specified state. | Select one or more states (To Verify, Proposed not Exploitable, Confirmed, Urgent) for the vulnerabilities in this condition. |
Vulnerability status is | The vulnerability has the specified status. | Select a status (New or Recurrent) for the vulnerabilities in this condition. |
Suspected Malware Risk Conditions
Type | Description | Values specified |
|---|---|---|
Severity level is | The rule only applies to a Suspected Malware risk with the specified severity level. | Select one or more severity levels (Critical, High, Medium, Low, Info) for the vulnerabilities in this condition. |
Risk Type | The rule only applies to the specified malware risk types. See Preventing Malicious Software Attacks | Select one or more risk types from the dropdown list. |
License Conditions
Type | Description | Values specified |
|---|---|---|
Named | Specify one or more specific licenses for this condition. | Select one or more licenses from the dropdown list of licenses in your account. |
License severity is | The Legal Risk has the specified severity level. | Select one or more severity levels (Critical, High, Medium, Low, Info) for this condition. |
License state is | Indicates whether or not this license is the "effective" license for your organization's use of this package. | Select one or more states from the dropdown list (To verify, Effective, Not Effective) |
License family is | Specify one or more license families for this condition | Select one or more license families from the dropdown list |
License copyleft is | The package's copyleft license status | Select one or more copyleft license statuses (Full, Partial, No, Unknown) |
IaC Security Policy Conditions
An IaC Security rule consists of one or more conditions. A rule is considered violated only if all conditions are fulfilled (AND operator). However, each condition is assessed independently so that not all conditions need to be fulfilled in relation to a single entity for the rule to be violated.
For example, if you set one condition for 3 or more High severity vulnerabilities, and another condition for 2 or more New vulnerabilities. If there are 5 High severity vulnerabilities that are all Recurrent and also 3 New vulnerabilities that are all Low severity, the rule will nonetheless be considered violated.
Currently, only conditions that relate to vulnerabilities are supported for the IaC Security scanner.
The following table describes the elements used to create an IaC Security condition.
IaC Security Vulnerability Conditions
Rule Subject | Options | Operator | Value |
|---|---|---|---|
Severity |
| > >= <= < = | Integer The number of vulnerabilities of the specified severity. |
Result Status |
| > >= <= < = | Integer The number of vulnerabilities in the specified status. |
Aging | > >= <= < = | Specify the age of the result, i.e., how long since the result was found for the first time (in days). |
Container Security Policy Conditions
Container Security rules are comprised of Conditions and Condition Groups.
Condition - A Condition is made up of a Property, a Condition and a Value that define which results fulfill this condition. For example, a condition with Property = "a Vulnerability", Condition = "Is" and Value = "Critical" will be fulfilled if at least one critical severity risk is identified in the scan.
For some conditions, it is possible to specify multiple values. In this case, an OR operator is applied between values. For example, if "Critical" and "High" are both specified, then either a critical or high severity vulnerability will fulfill the condition.
Condition Group - A Condition Group is a set of related conditions. All of the conditions in a single group must be fulfilled (an AND operator), and they must exist in relation to the same instance in order for the overall condition group to be considered fulfilled. So, in the previous example, if we would add a condition to the group with Property = "an Image Name", Condition = "Contains", and Value" = "production", then only a critical or high severity vulnerability in a "production" image would fulfill the group of conditions.
You can add multiple Condition Groups to a rule. In this case, all condition groups must be fulfilled (AND operator), but the conditions in each group do not need to apply to the same instance. So, in the previous example, if each condition was added as a separate group, then the rule would be violated if there was a critical or high severity vulnerability anywhere in the project, and it would also be violated if there was an image with a name containing "production" even if there were no risks in that image.
Image Conditions
Type | Operators | Values | Multiple values |
|---|---|---|---|
Image Name | is is not in not in contains does not contain starts with ends with | Free text |
|
Image Tag | is is not in not in contains does not contain starts with ends with | Free text |
|
Package Conditions
Property | Operators | Values | Multiple values |
|---|---|---|---|
Name | is is not in not in contains does not contain starts with ends with | Free text |
|
Version | is is not is greater than is less than is equal to | e.g, 1.2.3 |
|
Is Malicious | is | True / False |
|
Vulnerability Conditions
Property | Operators | Values | Multiple values |
|---|---|---|---|
CVE ID | is is not in not in contains does not contain starts with ends with | Free text following CVE ID format, e.g., CVE-2019-2391. |
|
Severity level | is is not in not in | Critical, High, Medium, Low, None |
|
State | is is not in not in | To Verify Not Exploitable Proposed Not Exploitable Confirmed Urgent |
|

