- Checkmarx Documentation
- SAST/SCA Integrations
- CI/CD Plugins
- AWS CodeBuild
AWS CodeBuild

AWS CodeBuild is a fully managed Continuous Integration service that compiles source code, runs tests, and produces software packages that are ready to deploy. AWS CodeBuild belongs to a family of AWS Code Services, which you can use to create complete, automated software release workflows for continuous integration and delivery (CI/CD). You can also integrate CodeBuild into your existing CI/CD workflow.
General
Checkmarx integrates with AWS CodeBuild, enabling the identification of new security vulnerabilities when the CI/CD pipeline is executed. AWS CodeBuild triggers Checkmarx scans, as defined by the YAML file (buildspec.yml) placed in the root of the source directory. If configured, once a scan is completed, tickets will be automatically created & closed within your Bug Tracker (if supported by Checkmarx). Both CxSAST and CxSCA are supported within the AWS CodeBuild integration.
Checkmarx Integration Overview
Checkmarx provides a docker container that has a Command Line Interface which enables the initiation of scans and orchestrates the results. It is the main automation driving the AWS CodeBuild and Checkmarx integration. Some features of the Checkmarx integration include:
Automated project creation
Facilitates feedback channels in a closed loop nature
Channels include JIRA, Rally, ServiceNow and Source Control Management (SCMs) Issue tracking.
Enables customers to incorporate Checkmarx into their DevOps/Release pipelines as early as possible
Controls the “breaking” of builds
Checkmarx Integration is an open source project written and maintained by Checkmarx. Please refer to CxFlow Wiki for detailed information.
AWS CodeBuild Integration Flow
There are several ways of integrating Checkmarx security scans into AWS CodeBuild ecosystem. This document specifically outlines how to integrate AWS CodeBuild with Checkmarx’s Containerized CxFlow CLI.
The following steps represent the containerized CxFlow CLI integration flow:
AWS CodeBuild CI/CD pipeline is triggered.
During the pre build stage of AWS CodeBuild CI/CD pipeline, Checkmarx’s containerized CxFlow CLI is invoked.
CxFlow CLI triggers a security scan via the Checkmarx Scan Manager.
Results can be viewed in the Checkmarx Manager UI (to have results automatically created in your Bug Tracker, please see Advanced Options).
Notice
Within AWS CodeBuild, CxFlow CLI will zip the source directory of the repository and send it to the Checkmarx Scan Manager to perform the security scan.
Requirements
A running Checkmarx CxSAST Server with an up-to-date Checkmarx license.
If performing CxSCA scans, you must have a valid CxSCA license.
AWS Server must be be able to access the CxSAST server and/or the CxSCA server.
Step-By-Step Directions
These are the step-by-step directions for a creating a new project within AWS CodeBuild. Navigate to “Create AWS CodeBuild project” which can be found in the Developer Tools within AWS.
Project Configuration
Name the project name something specific to the codebase you are scanning (i.e., FrontEnd)
Add a description of the project (this is optional)
Leave “Enable build badge” unchecked (this is optional)
Leave “Restrict number of concurrent builds this project can start unchecked (this is optional)
In Additional Configuration, add tags if needed
Source
Add the Source Provider - Amazon S3, AWS CodeCommit, GitHub, BitBucket, or GitHub Enterprise
Depending on the Source Provider, input the repository location
Input Access Token
Enter Source Version if you want a specific branch or commit ID (this is optional)
In Additional Configuration, add source control depth if needed and/or submodules (this is optional)
Primary source WebHook events
Enable Webhook: Select “Rebuild code every time a code change”
Select “Single Build: Triggers Single Build”
Choose Event Type
PUSH
PULL_REQUEST_CREATED
Leave “Start a build under these conditions” empty
Leave “Don’t start a build under these conditions” empty
Environment
For “Environment image”, choose “Custom Image”
For “Environment type”, choose “Linux”
For “Image Registry”, choose “Other registry”
In the “External registry URL”, type “checkmarx/cx-flow” (without the quotations)
Leave “Registry credential - optional” empty
Keep “Privileged: Enable this flag if you want to build Docker images or want your builds to have elevated privileges”
Choose a service role, either “New service role” or “Existing service role”
Check “Allow AWS CodeBuild to this service role so it can be used with this build project”
For additional configuration, you can leave it as the default values but if you feel your scan will last more than an hour, you can increase the time in “Timeout: Hours”
Select to “Install certificate from your S3 bucket” if you are using a certificate, otherwise select “Do not install any certificate”
Choose a VPC
Choose the Compute power of the instance - this depends on the amount of source code you are scanning
For Environment Variables, Checkmarx needs to add the following Names and Values:
Notice
You can override any variable set in the buildspec.yml file in the Environment Variables. For example, if you want to use a different preset than the default, add an Environment Variable "CHECKMARX_SCAN_PRESET” here. See the buildspec.yml file for more variables that you can override.
Name | Note |
|---|---|
CHECKMARX_BASE_URL | URL of the Checkmarx Server |
CHECKMARX_USERNAME | User who has role to create projects and initiate scans |
CHECKMARX_PASSWORD | |
CX_TEAM | Team name (i.e., ‘/CxServer/TeamA’). Forward slashes, no slash at the end |
SCA_TENANT | This option is for organizations with CxSCA |
SCA_USERNAME | User who has role to create projects and initiate scans |
SCA_PASSWORD | |
SCA_TEAM | Team name (i.e., ‘/CxServer/TeamA’). Forward slashes, no slash at the end |
14. You can leave File Systems empty.
Buildspec
Select “Use a buildspec file”. Note, you can use “Insert build commands” but it is easier to reuse the buildspec file for other projects.
Leave the “Buildspec name empty”. It will use the default location and name, ‘buildspec.yml’ located in the root directory of the repository. Note, you can place it anywhere you like.
Batch configuration
Leave “Define batch configuration” unchecked. This is optional.
Artifacts
Leave the Type as “No artifacts”
Leave “Additional Configurations” as blank
Logs
Enable “CloudWatch logs”
This allows you to see logging in real time
Leave “Group name” empty
Leave “Stream name” empty
Leave “S3 logs” unchecked. This is optional
WebHook
After you created your project, verify that the Webhook was created. For example, if you are using GitHub as your Source Code repository, verify in the settings that there is a Webhook for codebuild.

BuildSpec
AWS CodeBuild expects a YAML file to be created to define the stages of the build. By default, a yaml file named “buildspec.yml” should be created in the root directory of the project (though it can be defined in any place in your configuration). Below is an example of a working buildspec.yml for a CxSAST scan:
version: 0.2

env:
  variables:
    CX_FLOW_BUG_TRACKER: "None"
    CX_FLOW_BUG_TRACKER_IMPL: ${CX_FLOW_BUG_TRACKER}
    CX_FLOW_EXE: "java -jar /app/cx-flow.jar"
    CHECKMARX_VERSION: "9.0"
    CHECKMARX_SETTINGS_OVERRIDE: "false"
    CHECKMARX_EXCLUDE_FILES: ""
    CHECKMARX_EXCLUDE_FOLDERS: ""
    CHECKMARX_CONFIGURATION: "Default Configuration"
    CHECKMARX_SCAN_PRESET: "Checkmarx Default"
    CX_FLOW_FILTER_SEVERITY: "High"
    CX_FLOW_FILTER_CATEGORY: ""
    CX_FLOW_FILTER_CWE: ""
    CX_FLOW_FILTER_STATUS: ""
    CX_FLOW_FILTER_STATE: ""
    CX_FLOW_ENABLED_VULNERABILITY_SCANNERS: sast
    CX_TEAM: "/CxServer/"
    CX_FLOW_BREAK_BUILD: "false"
    SCA_FILTER_SEVERITY: ""
    SCA_FILTER_SCORE: ""
    SCA_THRESHOLDS_SCORE: ""
    SCA_TEAM: ""
    PARAMS: ""
phases:
  pre_build:
    commands:
       - export CX_REPO_NAME=$(basename "$CODEBUILD_SOURCE_REPO_URL" .git)
       - export CX_REPO_BRANCH=$(basename "$CODEBUILD_WEBHOOK_HEAD_REF")
       - |
         if expr "${CX_REPO_BRANCH}"; then
           export CX_PROJECT=$(echo "$CODEBUILD_BUILD_ID" | cut -f1 -d:)-${CX_REPO_BRANCH}
         else
           export CX_PROJECT=$(echo "$CODEBUILD_BUILD_ID" | cut -f1 -d:)
         fi
       - |
         ${CX_FLOW_EXE} \
          --scan \
          --app="${CX_REPO_NAME}" \
          --namespace="${CX_REPO_NAME}" \
          --repo-name="${CX_REPO_NAME}" \
          --repo-url="${CI_REPOSITORY_URL}" \
          --cx-team="${CX_TEAM}" \
          --cx-project="${CX_PROJECT}" \
          --branch="${CX_REPO_BRANCH}" \
          --spring.profiles.active="${CX_FLOW_ENABLED_VULNERABILITY_SCANNERS}" \
          --f=.
          ${PARAMS}
Create a Scan
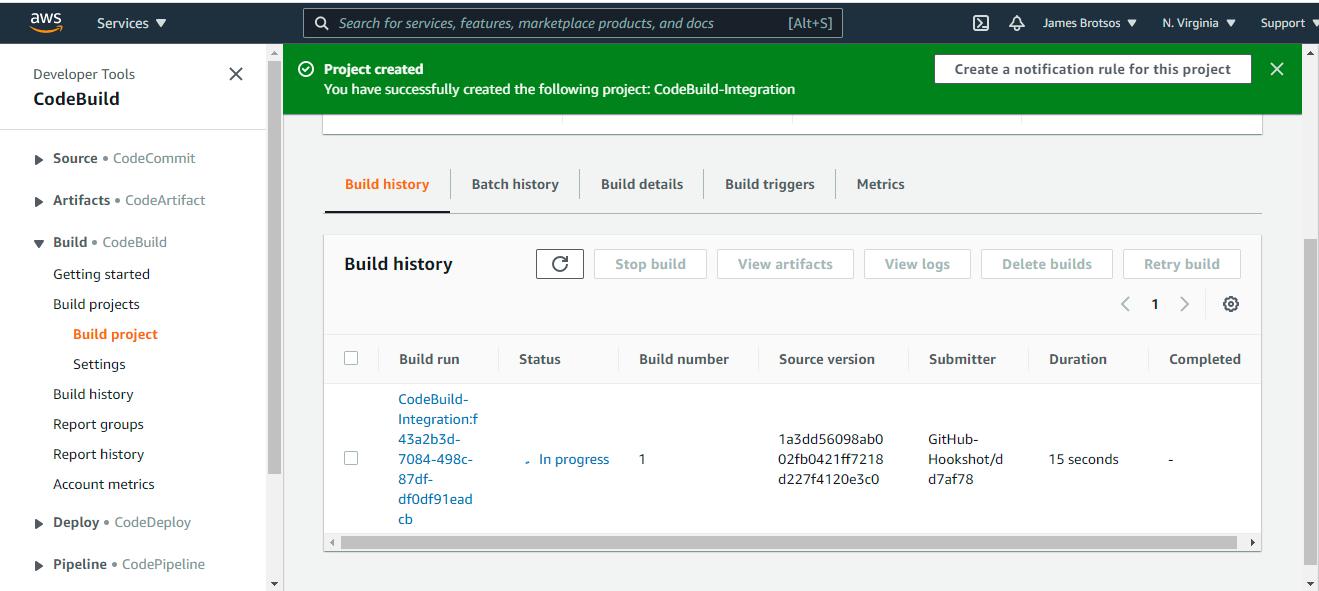
To initiate a scan, simply create a push event or a pull request within your Source Control Manager. You will see the build “In Progress” as the Status.

Results will be within the Checkmarx Manager User Interface.
Advanced Options
Bug Tracking
To be described.