AWS ECR Integration
Checkmarx One provides an integration with AWS ECR, enabling you to automatically pull images from your private ECR repos and scan them using the Checkmarx One Container Security scanner. The integration is done by creating an "Assume Role" in ECR (Role ARN), which grants access to Checkmarx to pull images from your repos.
We provide a convenient wizard on the Checkmarx One Integrations page that enables you to create the integration by submitting info about the "Assume Role" (Role ARN and External ID) that you created, and the repo that you are granting access to.
Notice
In AWS, you can create a role that grants access to multiple repos. However, in Checkmarx One you need to create a separate integration for each repo.
This integration will streamline the process of pulling and analyzing container images from private ECR registries without the need to access the customer’s AWS users directly.
Step 1 - Create an ECR Policy
Create a policy that will grant permission to interact with the ECR registry and perform the necessary actions like checking if images exist, generating tokens for pulling images, and retrieving manifests.
Create Policy with Permissions
In the AWS IAM console, go to Policies and click on Create Policy.
In the Policy editor section, select JSON
Copy the following JSON (containing the required action permissions) and paste it into the editor.
{
  "Version": "2012-10-17",
  "Statement": [
    {
      "Effect": "Allow",
      "Action": "ecr:GetAuthorizationToken",
      "Resource": "*"
    },
    {
      "Effect": "Allow",
      "Action": [
        "ecr:GetDownloadUrlForLayer",
        "ecr:BatchGetImage",
        "ecr:BatchCheckLayerAvailability",
        "ecr:DescribeRepositories",
        "ecr:GetRepositoryPolicy",
        "ecr:ListImages",
        "ecr:BatchCheckLayerAvailability",
        "ecr:DescribeImages"
      ],
      "Resource": [
        "<your_repo_url01>",
        "<your_repo_url02>"
      ]
    }
  ]
}
In the "Resource" section at the bottom of the JSON, replace the placeholders with the names of one or more repos that you would like to allow Checkmarx One to access.
Notice
You can put "*" to replace the placeholders if you would like to allow access to all repos in your account.
Click Next.
On the Review and create screen, enter a Policy Name (e.g., TrustedEcrPullPolicyCheckmarx) and a Description (optional).
Click Create Policy.
Step 2 - Create an Assume Role
Create a Role ARN and attach the created Policy
In the AWS IAM console, go to Roles and click on Create role.
Select Custom trust policy.
Under Use case, select Elastic Container Registry.
Click Next.
In the Add Permissions section, search for the Policy that you created in Step 1 (e.g TrustedEcrPullPolicyCheckmarx) and select the checkbox.
On the Name, review, and create screen, copy the following JSON (which grants access to a pre-configured Checkmarx user via an AssumeRole) and paste it into the Trust policy section.
{
    "Version": "2012-10-17",
    "Statement": [
        {
            "Effect": "Allow",
            "Principal": {
                "AWS": "arn:aws:iam::842737970584:role/CheckmarxCrossAccountScannerRole"
            },
            "Action": "sts:AssumeRole",
            "Condition": {
                "StringEquals": {
                    "sts:ExternalId": "<specify_external_id>"
                }
            }
        }
    ]
}
In the JSON, under "Condition" > "StringEquals", replace the placeholder by specifying an ExternalId that you will use as an extra layer of security for this role. Limitations: up to 1224 characters, A-Z, a-z,0-9,+=.@-_:/ )
Notice
Make a note of this value, as you will need to provide it in the Checkmarx One integration wizard.
Click Next.
Enter a meaningful Role name (e.g., TrustedEcrPullRoleCheckmarx) and a Description (optional).
Click Create Role.
In the Summary section of the role, make a note of the ARN, as you will need to provide this in the Checkmarx One integration wizard.
Step 3 - Use the Checkmarx One Wizard to Set Up the Integration
To set up an ECR integration:
In the main navigation, select Integrations
 > Cloud Connections.
In the Setup tab, under Private Registries for Containers, hover over the ECR tile and click on Configuration.
In the side panel that opens, click Start.
The ECR Integration wizard opens.
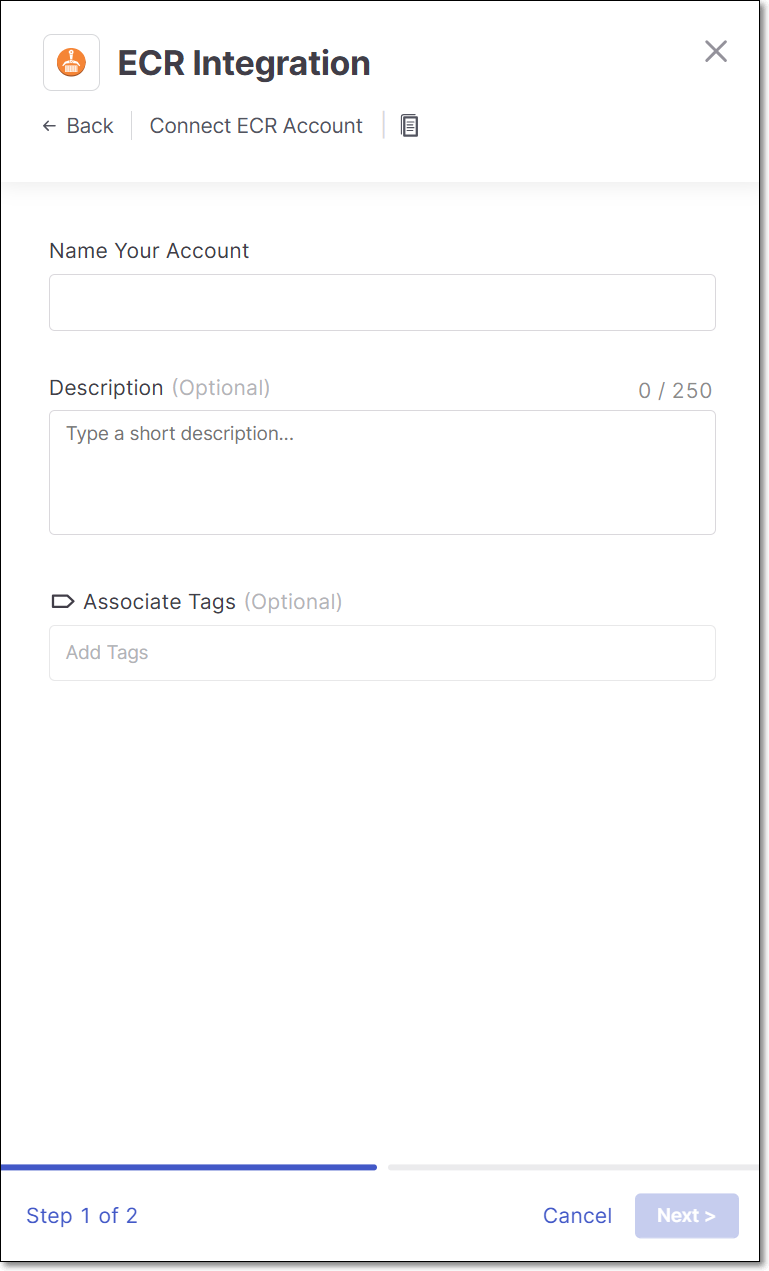
Name Your Account and optionally fill in the Description and Associate Tags fields, then click Next.
In the Role ARN field, enter the Role ARN of the ECR role that you created in Step 2.
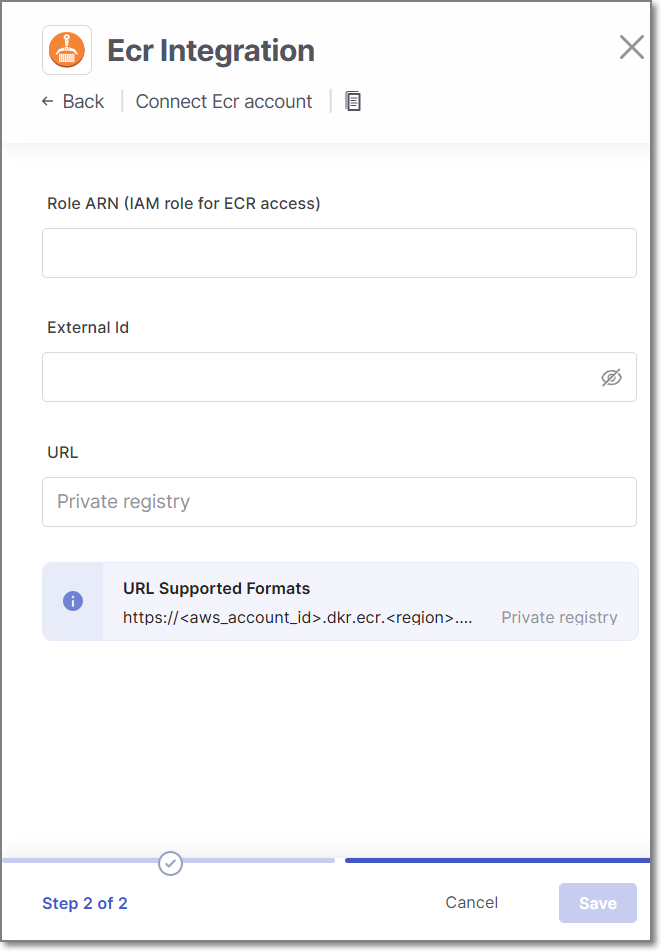
In the External Id field, enter the ExternalId that you specified in your ECR Trust policy.
In the URL field, enter the URL of the ECR repo that you would like to allow Checkmarx One to access using the format
<aws_account_id>.dkr.ecr.<region>.amazonaws.com/<repository_name>.Notice
You need to create a separate integration for each repo.
Click Add Account.
Monitoring Integration Status
You can monitor the status of your ECR integrations to see whether or not the integration is connected. Possible statuses are:
Pending - The integration was just set up and hasn't connected yet.
Connected - The integration is running and you are able to scan images in your ECR repo.
Disconnected - Checkmarx One is not currently able to access your private ECR repo.
To monitor the integration status:
In the main navigation, select Integrations
> Cloud Connections.In the Cloud Connections tab, check the Status column for each of your integrations.