Container Security
Caution
This page describes new Container Security scanner in Checkmarx One. This scanner now functions independently from SCA. This affects how scan are triggered as well as how the results are shown. The new Container Security scanner is easier to use and provides improved functionality.
For SCA standalone users, container scan functionality remains part of SCA, see Container Scans.
Overview
The Container Security scanner scans the Dockerfiles in your project to identify the container images used in your project and the risks associate with those images. Checkmarx extracts all layers of each public base image located in the Dockerfile, and identifies the packages used by each layer. In addition to scanning the Dockerfile itself, we also scan the image that is created from the Dockerfile, using the Syft open source tool. This enables greater visibility into all packages used in the image for all languages supported by Checkmarx SCA as well as many non-supported languages (e.g., Dart, Haskell, Swift etc.).
In addition, you can use the Checkmarx One CLI tool to submit specific images from public or private registries for analysis.
Key Features
Simple workflow - Scanning of built images is done in the cloud, with no need to install additional tools.
Triage vulnerabilities - Change State, Severity level and risk score of vulnerabilities and add comments.
Remediation recommendations - Shows alternative versions of base images with fewer vulnerabilities.
Malicious packages - In addition to vulnerable packages, this scanner also identifies malicious packages.
Runtime usage - Prioritize remediation efforts based on runtime usage data, obtained via integration with Sysdig.
Scan Risk Report - Scan risk reports contain a dedicated section for containers. This includes customized container data such as breakdown of images and layers in each scanned file.
Policy Management - You can create customized policies for Container Security results based on a series of conditions and condition groups. These policies make it easy to identify projects that don't comply with your organization's security standards
Custom Filters - Container Security has a specialized set of filter settings that enable users to configure their scans for precision and relevance. Filters can be applied to files, folders, packages and images. You can also limit the scan to include only final deployable images.
Images in Files
Dockerfile base images
Helm charts and yaml/yml files
Docker-compose file images
Private Images
Scan images directly from private registries (using Checkmarx One CLI)
Runtime Images (Containers)
Integration with Sysdig for runtime analysis
Running Container Security Scans
A container scan can be triggered by selecting the Container Security scanner when initiating a scan via the web application, CLI or API. This will scan the Dockerfile in your project. When you run a scan via the CLI, there is an additional option to specify a specific image to be scanned from a public or private repository.
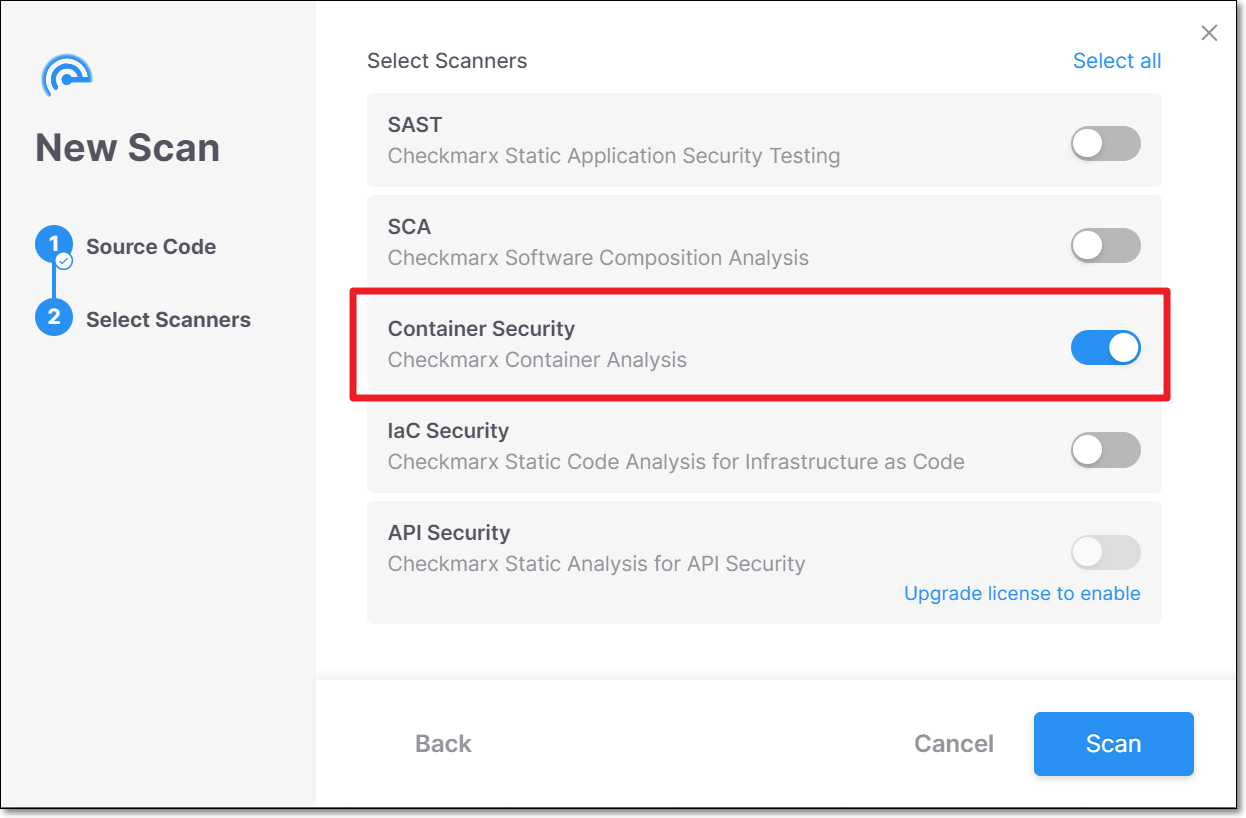
Running Scans via the Web Application
Follow the normal procedure for running a scan, making sure that the Container Security scanner is selected.
 |
Running Container Security Scans via the CLI
When running scans via the CLI you can choose to scan the project files in order to analyze the Dockerfile in your project or you can submit specific images for scanning.
Container Security scans are run via CLI by running scan create and specifying container-security in the --scan-types.
As of CLI version 2.3.29, by default scans are run in the cloud. You can submit the flag --containers-local-resolution to run container resolution locally.
Scanning Private Repos
By default, the CLI runs scans in the cloud. If you have set up an integration to allow Checkmarx One to access your private registry then the scan will include those registries. For more information about private registry integrations, see Private Registry Integration for Container Security Scanner. Using these integrations is the recommended workflow.
If your repos are in an unsupported private registry or you haven't yet configured the integration, then you will need to scan your private registries locally, as described in the following section.
Scanning Private Repos Locally
You can run Container Security scans locally by adding the flag --containers-local-resolution to the scan create command. In this case, in order to access private registries you need to be authenticated in your container registry at the time that you run the scan via Checkmarx One CLI.
Authentication can be done via Docker or Podman.
Before running the scan, it is recommended to verify that you are able to access the image on your local machine.
For details about authentication for specific registries, see Authentication for Scanning Registries Locally.
Scan Procedure
Run the
scan createcommand with all required parameters, and specifycontainer-securityin the--scan-types../cx scan create --project-name <Project Name> -s <Repository URL> --branch <branch name> --scan-types container-security
If you would like to apply filters, you can configure the specialized Container Security filters as described in Filters for Container Security Scanner.
If you would like to scan specific images, add the
--container-imagesflag followed by a comma separated list of images. Specify each image using the following syntax {image_name}:{image_tag}../cx scan create --project-name <Project Name> -s <Repository URL> --branch <branch name> --scan-types container-security --container-images “mycompany/myimage:myimagetag”
Notice
For the syntax for images in specific registries, see Scanning Specific Images.
If you want to scan only the specified images (not an entire project), do the following:
Notice
In the context of scanning a specific image, the
-sparameter isn't actually relevant. However, it is a required parameter, requiring the following workaround.Similarly, when scanning an image, the
--branchparameter doesn't represent an actual repo branch, rather you should assign a name that represents this scan in the system.Create a "dummy" folder (for use in the
-sparameter) and give it a name that indicates that it is used for scanning images, e.g., scan_ecr_image.In the CLI scan command, for the
-sparameter give the path to the "dummy" folder that you created, e.g.,/Users/DemoUser/scan_ecr_image.
If you are scanning images that are in a private repository that is not integrated with Checkmarx One, add the
--containers-local-resolutionflag and make sure that you are authenticated locally for accessing the repo, as explained in Authentication for Scanning Registries Locally.
Scanning Specific Images
If you would like to specify specific images for scanning, add the --container-images flag followed by a comma separated list of images. Specify each image using the following syntax {image_name}:{image_tag}. The following are some examples of the syntax used for different registries:
ghcr.io/company/image-name:image-version
123456789012.dkr.ecr.us-west-2.amazonaws.com/image-name:image-version
companyregistry.azurecr.io/image-name:image-version
quay.io/company/image-name:image-version
docker.io/company/image-name:image-version
nexus.company.com/repository/docker-hosted/image-name:image-version
harbor.mycompany.com/dev/image-name:image-version
Alternatively, the reference can be given as A tar file path: <filename>.tar or a prefixed reference using supported providers.
To learn more about precise syntax for each type of reference as well as best practices and troubleshooting suggestions, see Scanning Container Images via Checkmarx One CLI - Flag Validation and Best Practices.
The following sections give more details about the naming syntax for specific registries.
The value submitted for the --container-images parameter for ECR uses the following syntax {repository_uri}:{image_tag}.
The following procedure describes how to obtain these values via the CLI.
To obtain the repository uri, run the CLI command
aws ecr describe-repositories --repository-name {your_repo_name}, and make a note of the value returned forrepositoryUri.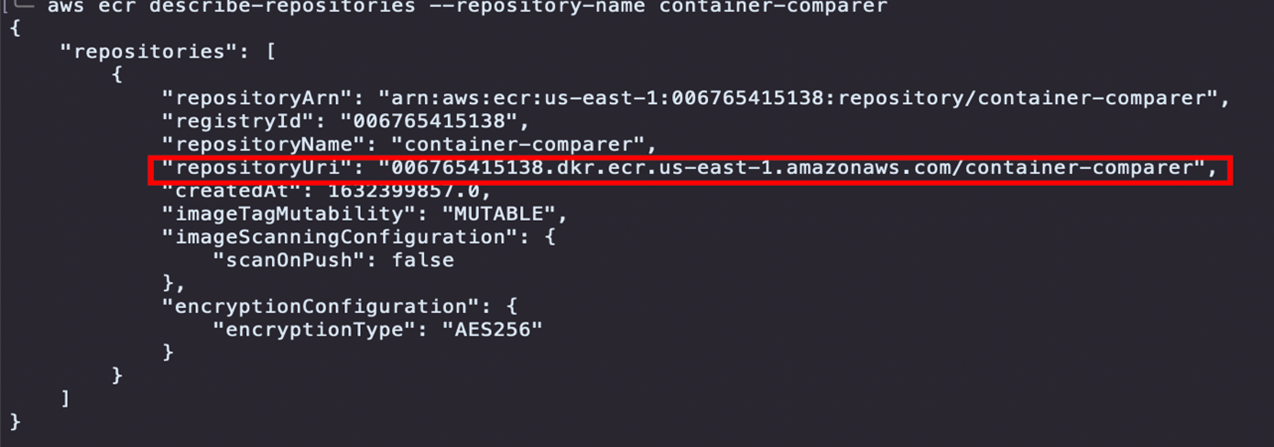
Example for repo named "container-comparer"
To obtain the image tags of the images in the repo, run the CLI command
aws ecr list-images --repository-name {your_repo_name}, and make a note of the value returned forImageTagfor the desired image.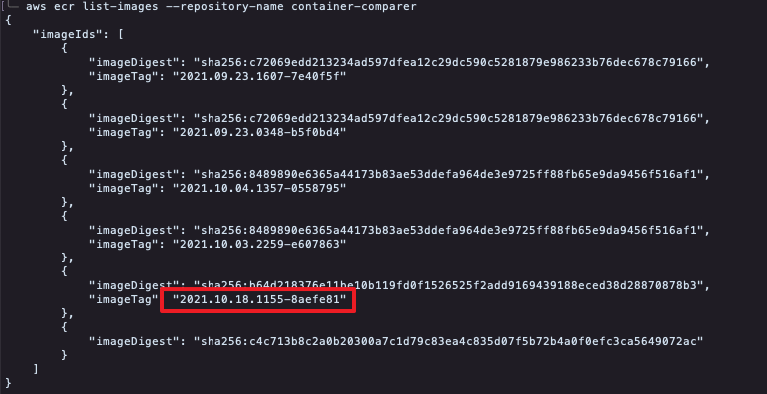
Example for repo named "container-comparer"
Run the CLI command with the
--container-imagesflag specifying the desired images using the syntax {repository_uri}:{image_tag}. For example:--container-images 006765415138.dkr.ecr.us-east-1.amazonaws.com/container-comparer:2021.10.18.1155-8aefe81
The value submitted for the --images parameter for GAR uses the following syntax {gar_region}-docker.pkg.dev/{project_id}/{image_name}:{image_tag}.
Obtain the values needed to identify this image.
Run the CLI command with the
--scan-containersflag, and add the--container-imagesflag specifying the desired images using the syntax gcr.io/{project_id}/{image_name}:{image_tag}. For example:--container-images us-docker.pkg.dev/symbolic-eye-1234/quickstart-image:tag1
The value submitted for the --container-images parameter for GCR uses the following syntax gcr.io/{project_id}/{image_name}:{image_tag}.
Obtain the value needed to identify this image. The following is on possible method for obtaining this info:
Open GCR in the Google Cloud portal and navigate to the image and tag of the desired image. Then, in the PULL tab, copy the value given in the Pull by tag snippet (without the "docker pull" command).
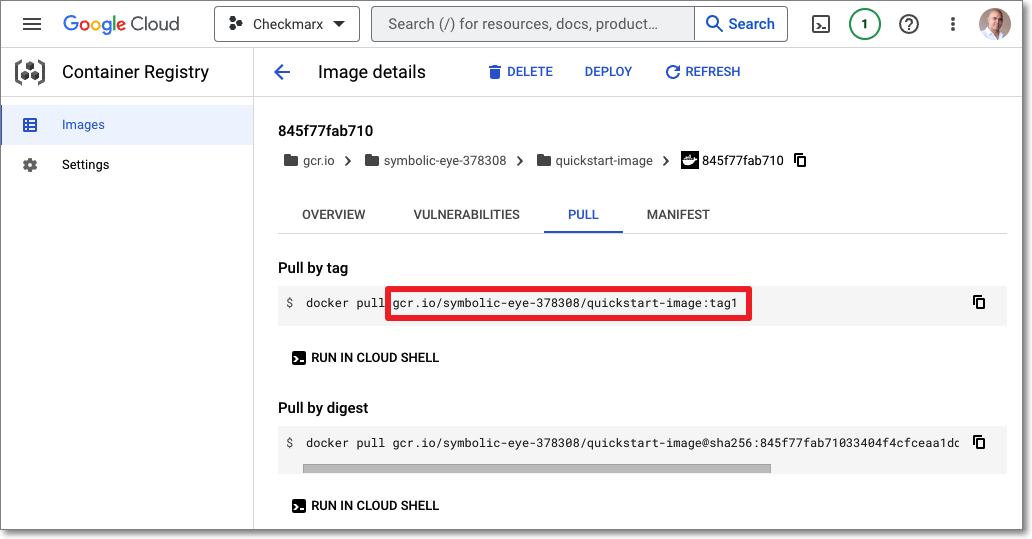
Run the CLI command with the
--container-imagesflag specifying the desired images using the syntax gcr.io/{project_id}/{image_name}:{image_tag}. For example:--container-images gcr.io/symbolic-eye-1234/quickstart-image:tag1
Authentication for Scanning Registries Locally
If you are running the container scan locally, then you need to be authenticated for the registry on your local machine. The following sections explain how to authenticate for specific registries.
Before running scans via the CLI, make sure that your AWS IAM user is authenticated, and that the token is in the credentials file (AWS_SESSION _TOKEN) as explained here. And, if you are scanning images in a different region, then make sure that the region is correctly configured in the credentials file (REGION).
The Checkmarx One CLI is configured to scan your AWS ECR repo assuming that the default values/paths are in use. If the “credentials” file is in the default AWS path, and you are using the “default” profile, then no action is needed. If you have changed these settings, then you need to configure the following environment variables.
AWS_PROFILE (default value: “default”)
Note
You can configure multiple profiles, e.g., for different environments.
AWS_CONFIG_FILE (default path: “~/.aws/config”)
AWS_SHARED_CREDENTIALS_FILE (default path: “~/.aws/credentials”)
Example of Credentials File
File ““~/.aws/credentials”
[default]
aws_access_key_id=ASI
aws_secret_access_key=abcd
region=us-west -1
aws_session_token=Absd
[prod]
aws_access_key_id=AKI
aws_secret_access_key=xyz
region=us-west -1
Before running scans via the CLI, make sure that you are authenticated in GAR. ou can test this by running the docker pull command for the desired image. Learn about possible authentication methods here.
The recommended authentication is using gcloud.
To authenticate using gcloud:
If it is the first time that you are pulling images, run the following command on your machine
gcloud auth configure-docker us-docker.pkg.devNotice
This command assumes that you are using the US region of GAR. If you are using a different region, then replace "us" with the name of your region.
Before running scans via the CLI, make sure that you are authenticated in GCR. You can test this by running the docker pull command for the desired image. Learn about possible authentication methods here.
The recommended authentication is using gcloud.
To authenticate using gcloud:
Log in to gcloud as the user that will run Docker commands and run the command
gcloud auth login.Configure Docker using the following command
gcloud auth configure-docker.Your credentials are saved in your user home directory.
Linux: $HOME/.docker/config.json
Windows: %USERPROFILE%/.docker/config.json
Running Container Scans via API
You can run a Container Security scan using POST /scans. In the config section specify the type as containers.
Warning
When running the Container Security scanner together with SCA, it is recommended to include the SCA config enableContainersScan and set it as false.
Sample request body:
{
    "type": "git",
    "handler": {
        "repoUrl": "https://github.com/myOrg/demorepo",
        "branch": "demoBranch"
    },
    "project": {
        "id": "71eacb3b-ae1d-4961-a96f-2b8593ff3dc7",
        "tags": {}
    },
    "config": [
     {
      "type": "sca",
      "value": {
        "enableContainersScan": "false"
      }
    },
     {
            "type": "containers",
            "value": {}
        }
    ],
    "tags": {}
}
Applying Filters
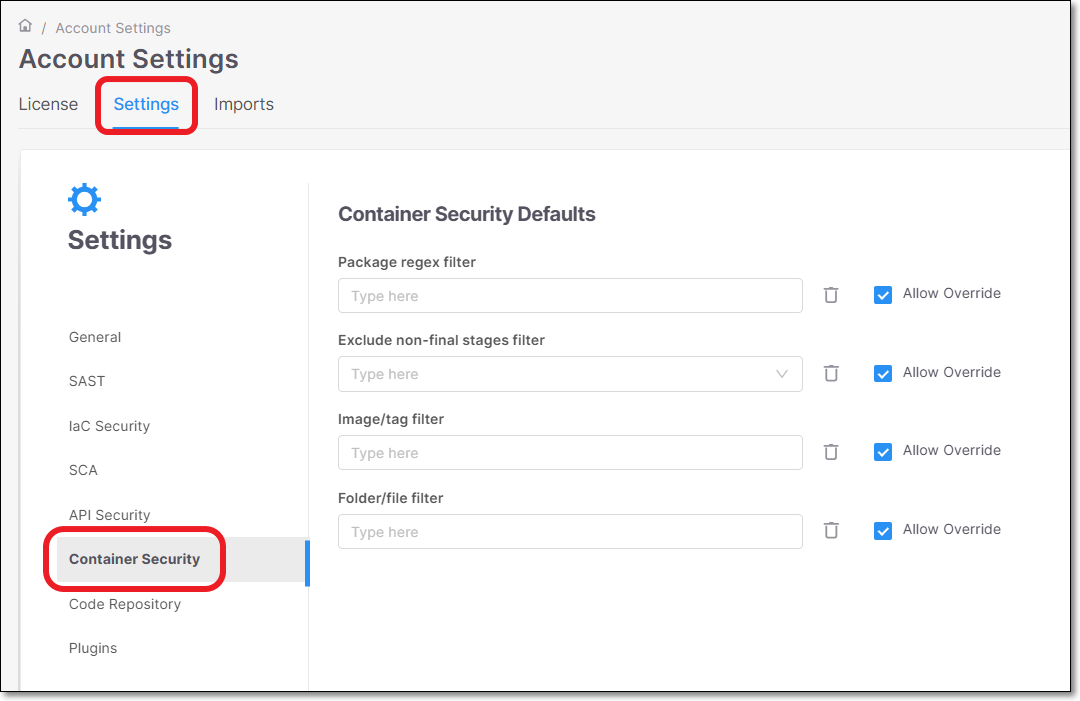
Checkmarx One offers robust filter settings to enhance container security by enabling users to configure their scans for precision and relevance. Below is an overview of the four available filter settings, designed to reduce noise and focus on critical vulnerabilities in your scans.
These filters can be applied either on the account level or for specific projects.
Notice
These filters can also be added in the scan create command in the CLI, see Filters for Container Security Scanner.
To apply filters on the account level, go to Global Settings > Container Security section.
 |
To apply filters to a specific project, go to the project page > Settings tab and add a Rule for Container Security, specifying the filter details.
For an overview of the filter options, see here.
Additional details about the usage and syntax for these filters is available in Filter Usage Details.
Policy Management
In the context of the Checkmarx One Policy Management feature, there are specialized conditions related to the Container Security scanner that can be used to create policy rules. For more info, see Container Security Conditions.
Authentication for Scanning Registries Locally
If you are running the container scan locally, then you need to be authenticated for the registry on your local machine. The following sections explain how to authenticate for specific registries.
Before running scans via the CLI, make sure that your AWS IAM user is authenticated, and that the token is in the credentials file (AWS_SESSION _TOKEN) as explained here. And, if you are scanning images in a different region, then make sure that the region is correctly configured in the credentials file (REGION).
Configuring Environment Variables for AWS ECR
The Checkmarx One CLI is configured to scan your AWS ECR repo assuming that the default values/paths are in use. If the “credentials” file is in the default AWS path, and you are using the “default” profile, then no action is needed. If you have changed these settings, then you need to configure the following environment variables.
AWS_PROFILE (default value: “default”)
Note
You can configure multiple profiles, e.g., for different environments.
AWS_CONFIG_FILE (default path: “~/.aws/config”)
AWS_SHARED_CREDENTIALS_FILE (default path: “~/.aws/credentials”)
Example of Credentials File
File ““~/.aws/credentials”
[default]
aws_access_key_id=ASI
aws_secret_access_key=abcd
region=us-west -1
aws_session_token=Absd
[prod]
aws_access_key_id=AKI
aws_secret_access_key=xyz
region=us-west -1
Before running scans via the CLI, make sure that you are authenticated in GAR. ou can test this by running the docker pull command for the desired image. Learn about possible authentication methods here.
The recommended authentication is using gcloud.
To authenticate using gcloud:
If it is the first time that you are pulling images, run the following command on your machine
gcloud auth configure-docker us-docker.pkg.devNotice
This command assumes that you are using the US region of GAR. If you are using a different region, then replace "us" with the name of your region.
Before running scans via the CLI, make sure that you are authenticated in GCR. You can test this by running the docker pull command for the desired image. Learn about possible authentication methods here.
The recommended authentication is using gcloud.
To authenticate using gcloud:
Log in to gcloud as the user that will run Docker commands and run the command
gcloud auth login.Configure Docker using the following command
gcloud auth configure-docker.Your credentials are saved in your user home directory.
Linux: $HOME/.docker/config.json
Windows: %USERPROFILE%/.docker/config.json