Enabling SSL Support on the CxEngine
The following instructions describe enabling SSL support on the CxEngine for Windows and Linux. The SSL support can be configured with Self-Signed certificates or CA certificates.
To configure SSL between CxManager and CxEngine, see Configuring SSL between CxManager and CxEngine.
Windows
This section explains how to enable SSL support when running CxEngine under Windows. The CxEngine is working on a WCF (Windows Communication Foundation) service that is not managed via the IIS console.
CxEngine Host
Notice
It is recommended to use the PowerShell command New-SelfSignedCertificate as explained for self-signed certificates.
The certificate must have the following key usages: DigitalSignature, KeyEncipherment
The command’s syntax differs between PowerShell versions.
Create a certificate (Certificate Authority (CA) or self-signed).
Place the certificate in the store under Local Machine\Personal\Certificates.
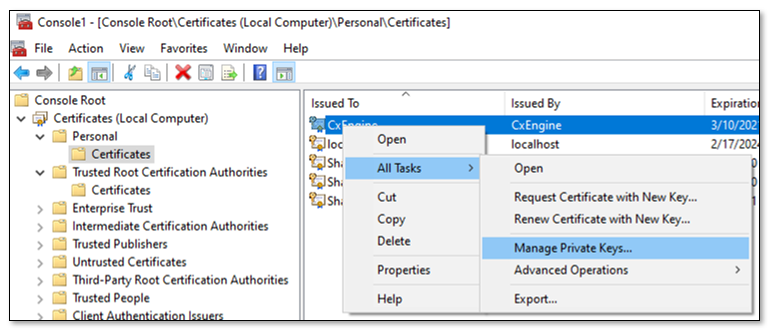
Make the private key available to the service. To do so, go to Local Machine\Personal\Certificates and then to Manage Private Keys on the certificate.
Add “Network Service” to the list of authorized users. Read permissions are sufficient.
Copy the certificate to Local Machine\Trusted Root Certification Authority\Certificates.
Set these environment variables on the host (machine) level as explained below.
 |
To set the environment variables:
Notice
Before setting the environment variables, you have to know the Certificate-Subject.
To obtain the pfx certificate subject name, open the PowerShell and run.
Get-PfxCertificate –FilePath <full path of the PFX file>, for example
Get-PfxCertificate -FilePath "C:\Users\Administrator\Desktop\myCert.pfx".
Enter your certificate’s password when prompted. The Certificate-Subject appears as illustrated below.

Set the following environment variables as follows, which includes entering the certificate subject that you just obtained:
SETX CX_ENGINE_TLS_ENABLE true /m
SETX CX_ENGINE_CERTIFICATE_SUBJECT_NAME Certificate-Subject /m, for example
SETX CX_ENGINE_CERTIFICATE_SUBJECT_NAME CN=cx_example.com /m
Restart the CxEngineService.
Linux
Use a pfx (pkcs12) certificate.
Engine Host
The CxEngine server package consists of the components listed below. The Linux installation instructions provide additional information.
cx-engine-server.tar (CxEngine image)
readme.md
run.sh
server.env
To establish a secure connection:
Copy the certificate to the location of your certificates, for example, /usr/my/certificates
Update the following environment variables in the server.env file:
CX_ENGINE_TLS_ENABLE=true
CX_ENGINE_CERTIFICATE_SUBJECT_NAME=Certificate-Subject
CX_ENGINE_CERTIFICATE_PATH=certificat_full_path
CX_ENGINE_CERTIFICATE_PASSWORD=certificat_passwordExample:
CX_ENGINE_TLS_ENABLE=true
CX_ENGINE_CERTIFICATE_SUBJECT_NAME=CN=www.myhost.com
CX_ENGINE_CERTIFICATE_PATH=/app/certificate/mycert.pfx
CX_ENGINE_CERTIFICATE_PASSWORD=12345Notice
The cx_engine_certificate_path must be relative to the location of your certificate inside the container.
Add the location of the certificate to the container, as illustrated in the example below.
run.sh script
#!/bin/bash
CX_SERVER_TAR=./cx-engine-server.tar
CX_SERVER_ENV=./server.env

docker_run_args=(
##Run container in background
-d
##Restart policy
--restart=always
##Automatically remove the container when it exits
#--rm
##Environment variable file
--env-file $CX_SERVER_ENV
##Publish a container's port to the host
-p 0.0.0.0:8088:8088
##Volume checkmarx logs directory
-v /var/checkmarx:/var/checkmarx
##Volume certificates directory (use when TLS enabled)
-v /var/certs:/app/certificate/
##Checkmarx engine server image
cx-engine-server
)

echo loading checkmarx engine server image
docker load < $CX_SERVER_TAR

echo deploying checkmarx engine server container
docker run "${docker_run_args[@]}"