Installation and Configuration of MID Server for Vulnerability Response Integration with SAST
This page covers the initial setup of the ServiceNow MID Server, a mandatory component for the on-premises SAST integration. It also outlines the primary configuration steps for integrating ServiceNow with both Checkmarx SAST and SCA.
Installation and Configuration of MID Server
A ServiceNow MID (Management, Instrumentation, and Discovery) Server is required to act as a secure communication bridge between your ServiceNow cloud instance and your on-premise SAST server.
Follow these steps to set up the MID Server:
Create a MID Server User and Role: Before installing the MID Server, you must create a dedicated user in your ServiceNow instance and grant it the
mid_serverrole. For detailed instructions, see Setup MID Server Role .Download the MID Server Files: Download the appropriate MID Server installation package from your ServiceNow instance to the host machine that will communicate with your Checkmarx SAST server. See Download MID Server Files .
Install the MID Server: Follow the platform-specific instructions to install and configure the MID Server. You will need to provide your ServiceNow instance URL and the credentials for the MID Server user you created. See Install MID Server on Windows .
Validate the MID Server: After installation, ensure the MID Server connects successfully to your instance and that its status appears as "Up" in the MID Server list. See Validate MID Server .
Configuring the Checkmarx Vulnerability Integration
Important
Switching between multiple Checkmarx SAST instances within the same ServiceNow integration instance is not supported and may lead to data inconsistencies or incorrect vulnerability data. Each integration instance should be configured for a single Checkmarx SAST instance only.
This is a one-time activity performed after the initial installation has been completed.
Important
Only one integration can be tested and saved at a time. To configure both SAST and SCA, please follow this sequence:
Select the Configure SAST checkbox, fill in all required SAST fields, and then click Save and Test Credentials .
After the page reloads, uncheck the Configure SAST checkbox.
Select the Configure SCA checkbox, fill in all required SCA fields, and then click Save and Test Credentials .
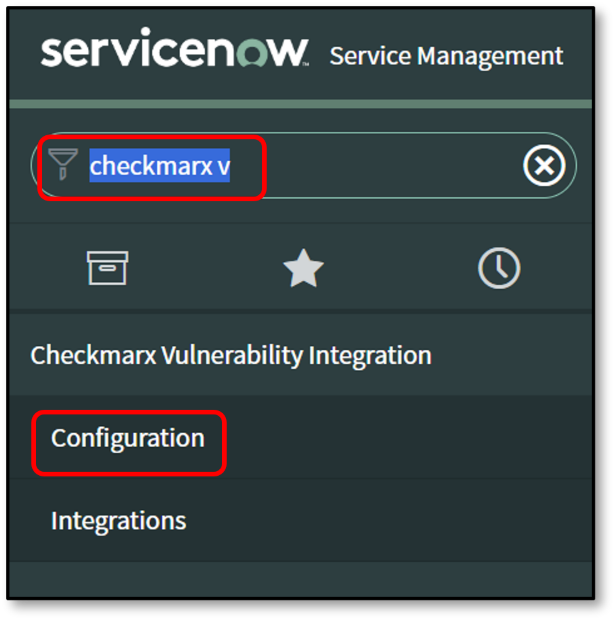
In your ServiceNow instance, navigate to Checkmarx Vulnerability Integration > Configuration.
Select the Checkmarx SAST or Checkmarx SCA tab.
Select the Configure SAST or Configure SCA checkbox to enable the fields for that scanner.
Fill in the required information as described in the tables below.
Click Save and Test Credentials to validate and save your configuration.
SAST Configuration Parameters
Caution
Switching between multiple Checkmarx SAST server instances or SCA tenants within the same ServiceNow integration instance is not supported and may lead to data inconsistencies or incorrect vulnerability data. Each integration instance should be configured for a single Checkmarx SAST server or SCA tenant only.
Parameter | Description |
|---|---|
Configure SAST | Select this checkbox to enable the Checkmarx SAST integration and its configuration fields. |
Checkmarx Server URL | The base URL of your on-premise Checkmarx SAST server (e.g., |
User Name | The username for the dedicated SAST integration user. |
Password | The password for the SAST integration user. |
MID Server | Select the configured MID Server that has network access to your SAST server. |
Category Name | If a value is provided, all imported SAST vulnerabilities will be assigned this category name. If left blank, the category name from Checkmarx SAST is used. |
Filter Project | Select how to filter SAST projects: |
Enter Project IDs | (Active when "Filter Project" is "By Id") Enter a semicolon-separated (;) list of SAST project IDs to include or exclude, e.g. Include Mode: Exclude Mode: |
Enter Project Names | (Active when "Filter Project" is "By Name") Enter a semicolon-separated (;) list of project names (or substrings) to include. |
Team Names | Enter a semicolon-separated (;) list of full team paths to exclude their projects from the import (e.g., |
Enter Project Custom Fields | Filter projects that have specific custom fields. Enter as |
Result States | Enter a semicolon-separated (;) list of result states from SAST to import (e.g., |
SAST Severity | Select the vulnerability severity levels to import from SAST (Critical, High, Medium, Low, Info). |
Import Scan Custom Fields | Select this checkbox to import scan-level custom fields from SAST. |
Include First Detection Date | When enabled, the "DetectionDate" from SAST will be mapped to the "First Found" field in the Application Vulnerable Item (AVI). |
Import Audit Result | When enabled, the integration imports the audit trail results and updates the scans and AVITs |
Triaging in ServiceNow | When checked, all imported AVIs are set to an Open state, allowing you to use ServiceNow's triage workflows. If unchecked, AVIs will retain their original state from Checkmarx (e.g., Not Exploitable). |
Close AVITs of Deleted Project of SAST | When enabled, if a project is deleted in SAST, its open AVIs in ServiceNow will be automatically closed during the next closure integration run. |
SCA Configuration Parameters
Parameter | Description |
|---|---|
Configure SCA | Select this checkbox to enable the Checkmarx SCA integration and its configuration fields. |
Checkmarx SCA Access control server URL | The base URL of the SCA Identity and Access Management (IAM) service (e.g., |
Checkmarx SCA API URL | The base URL of your SCA Environment API (e.g., |
Checkmarx SCA Web App URL | The base URL of the SCA user interface, used for deep links. |
SCA Username | The username for the dedicated SCA integration user. |
SCA Password | The password for the SCA integration user. |
Tenant | The name of your organization's SCA tenant. |
Filter Project By IDs | Enter a semicolon-separated (;) list of SCA project UUIDs to include or exclude. Include Mode: Exclude Mode: |
SCA Severity | Select the vulnerability severity levels to import from SCA (Critical, High, Medium, Low). |
Close AVITs of Deleted Project of SCA | When enabled, if a project is deleted in SCA, its open AVIs in ServiceNow will be automatically closed during the next closure integration run. |
Import Exploitable Path | When enabled, the integration will import exploitable path information for SCA vulnerabilities, if available. |
Triaging in ServiceNow | When checked, all imported AVIs are set to an Open state, allowing you to use ServiceNow's triage workflows. If unchecked, AVIs will retain their original state from Checkmarx. |
Troubleshooting Common Configuration Issues
If you encounter errors during the "Save and Test Credentials" step or during an integration run, review the common issues listed below.
MID Server Timeouts
If the connection to your on-premise SAST server times out, you may need to adjust a ServiceNow system property.
Navigate to System Properties > All Properties (
sys_properties.list).Click New to create a new property.
Configure the property with the following values:
Name:
glide.http.outbound.max_timeout.enabledType:
true | falseValue:
falseApplication: Ensure the scope is set to
Global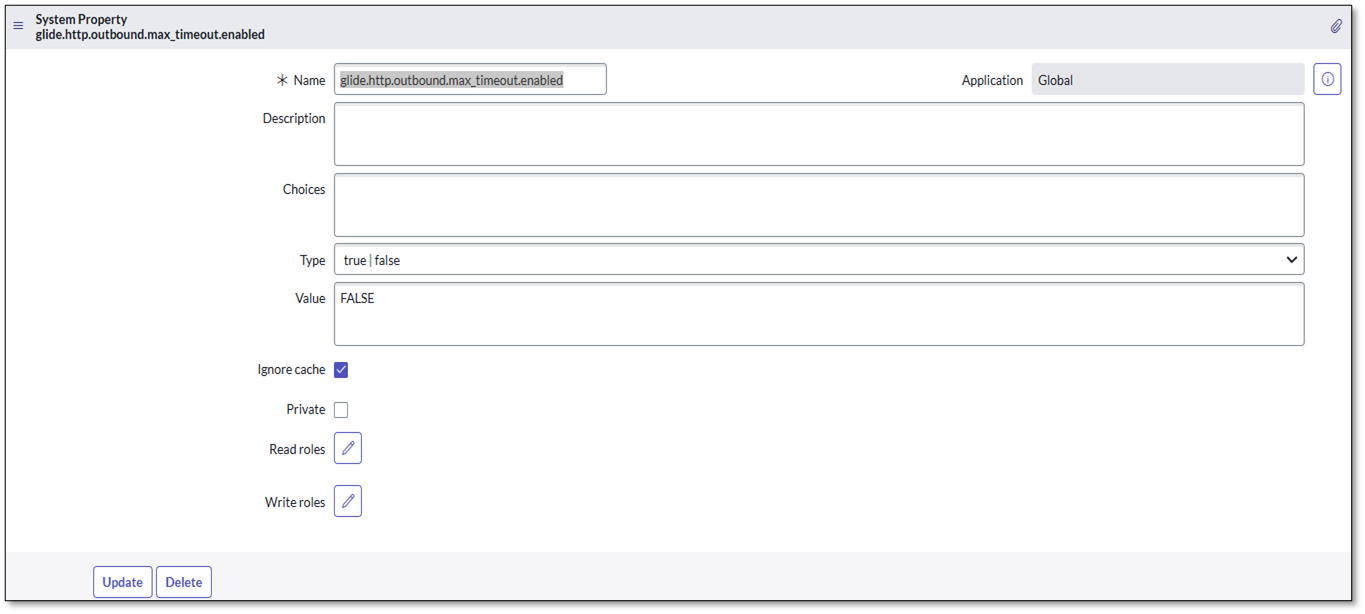
Click Submit.
Untrusted Certificate Errors
This error ( HttpException: Session contains no certificates – Untrusted ) indicates that the SSL certificate of your Checkmarx SAST server is not trusted by the MID Server. Contact your network or security team to ensure the SAST server's certificate chain is imported into the MID Server's truststore.
Payload Size Exceeded
If you see an error message like The payload size of ... bytes exceeded the maximum of 20000000 bytes , you need to increase the maximum payload size allowed by the MID Server.
Navigate to MID Server > Properties .
Search for the property named
mid.eccq.max_payload_size.If the property exists, increase its value (in bytes) to accommodate your largest expected reports.
If the property does not exist, create it and set the desired value.