CxLink
Notice
This feature is available for all Multi-Tenant users. To make it available on Single-Tenant, please contact your CSM.
CxLink, using Zrok tunneling technology, acts as a proxy to simplify and secure integrations between your protected services (e.g., code repositories, private artifactories, bug tracking systems) and CheckmarxOne. With CxLink, you can eliminate the need to manually configure networks or open firewalls.
Note
CxLink does not require any zrok.io resources. CxLink infrastructure is fully managed within Checkmarx One cluster, ensuring your data remains under Checkmarx control at all times.
CxLink supports two tunneling options:
http: for code repositories, artifactories, bug tracking systems, or other on-premises services
socks5: specifically for DAST scans
Prerequisites
System Requirements
Run the CxLink client on a host capable of running Docker (see Install Docker below). Size the host to your expected scan volume:
Resource | Proof of Concept (POC) / low throughput | Production / high throughput (~2,000 scans per hour) |
|---|---|---|
CPU | 1 vCPU | 4 vCPU |
Memory | 4 GB RAM | 16 GB RAM |
Disk (install + logs) | 200 MB | 1 GB |
The host also needs:
Outbound connectivity to the Checkmarx One tunneling service. This is the secure tunnel the client establishes (no inbound firewall changes required).
Network access to the protected services it proxies (code repositories, artifactories, bug tracking systems, or DAST targets).
Note
These are starting points. Resource needs may rise with actual scan volume and complexity; enabling verbose logging (-v) will also increase disk usage over time.
Install Docker: https://docs.docker.com/get-started/get-docker/
Docker hub URL: https://hub.docker.com/r/checkmarx/link-client
Important
Upgrade and ensure you are using the newest version of the Docker image by confirming the tags here: https://hub.docker.com/r/checkmarx/link-client/tags.
Setup
To set up a CxLink:
Create a new CxLink on the CxLink tab of the Account Settings screen. Upon creation, you will be able to generate a command line to run the CxLink client in Docker (Docker Compose and Kubernetes are not yet supported).
Install the CxLink Client as a Docker container using the provided Docker command.
Once the client is installed, it must be updated with the token obtained during registration. This allows it to establish a secure tunnel to Checkmarx One. Ensure the connection appears on the Account Settings page.
Once the secure tunnel is set up, you can import repositories by entering the hostname, which is resolved through the tunnel using the client ID and secret. This is explained in more detail in the sections that follow.
Permissions
In case the CxLink option is not visible in the Settings dropdown (see screenshot below), ensure you have the necessary Access Management permissions:
Navigate to Identity and Access Management → Users.
Click Edit in the dropdown menu at the end of your user row.
In Roles Mapping, ensure view-links, create-links, edit-links, and delete-links are selected (these permissions are included in the ast-admin and ast-risk-manager roles).
Accessing CxLink
Perform the following to access and manage your CxLinks:
Click
 then CxLink. The CxLink tab under Account Settings opens.
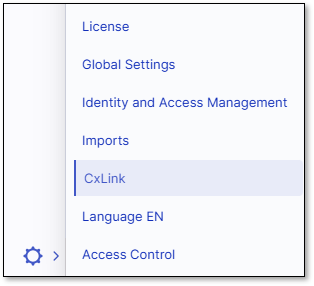
The CxLink tab displays a table with the following columns:
Name
Description
Private URL (on-prem service URL)
Date Created
Connection Status
Note
Applicable to Single-Tenant customers only:
As an alternative to using CxLink, you may consider a Site-to-Site VPN solution.
Please review the following AWS documentation describing this approach:
https://docs.aws.amazon.com/vpn/latest/s2svpn/VPC_VPN.html
Note that AWS pricing applies to this solution and is independent of Checkmarx pricing.
Creating and Connecting a New CxLink
Perform the following to create a new CxLink:
Click the +New button to create a new link. Fill out the form and click Generate.

On the following window, select Docker Command. Copy and save the command below before clicking Done and closing the window!
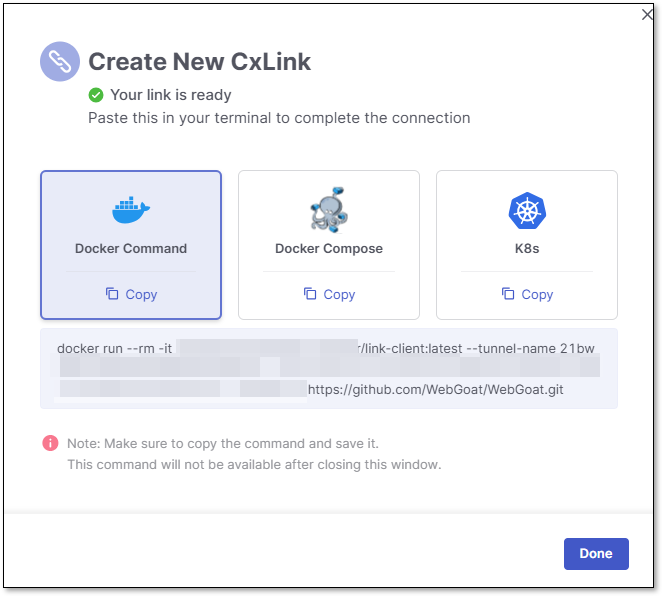
Notice
Once a link is created, you can only delete it or edit the name and description in the CxLink Details panel. Perform the following to edit the link:
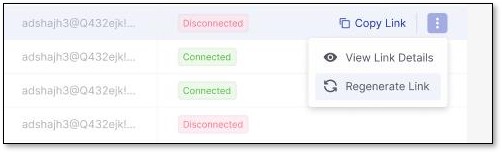
Click
 at the end of a link row.
Select View Link Details.
Click
 by the description box.
Click Save when done.
To delete the link, click
 next to the link name. The CxLink and Private URL remain unchanged.
You can also use the following options when creating your CxLink by editing the Docker command line that was generated when the link was created:
[ -n | --tunnel-name string]
Unique name for the tunnel (required)
[ -s | --tunnel-server-url string]
The CxOne tunneling service URL (required)
[ -z | --link-token string]
Authentication token for the tunnel (required)
[ -r | --private-url string]
The private resource URL to be shared (required)
[ -i | --insecure]
Allow insecure TLS certificate validation for private url (optional)
[ -b | --allow-trailing-slash]
Allow trailing slash at the end of private URL (optional)
[ -v | --verbose]
Enable extra logging (optional)
[ -t | --timeout int]
Timeout for connection in seconds (default 30 seconds, optional)
[ -c | --cleanup]
Clean up existing tunnel connections to prevent share conflicts when restarting tunnel (optional)
After creating the link, you must connect it by performing the following:
Open your command prompt terminal.
Paste and run the provided Docker command at the end.
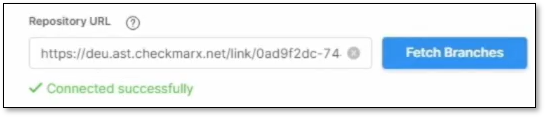
Verify your connection is successful by seeing this in your code

and a Connected status by the CxLink.

Now connected, run a scan and copy and paste the CxLink (CxLink from the table) into the Repository URL field.
Tip
You can use the same copied link alias in one or several projects.
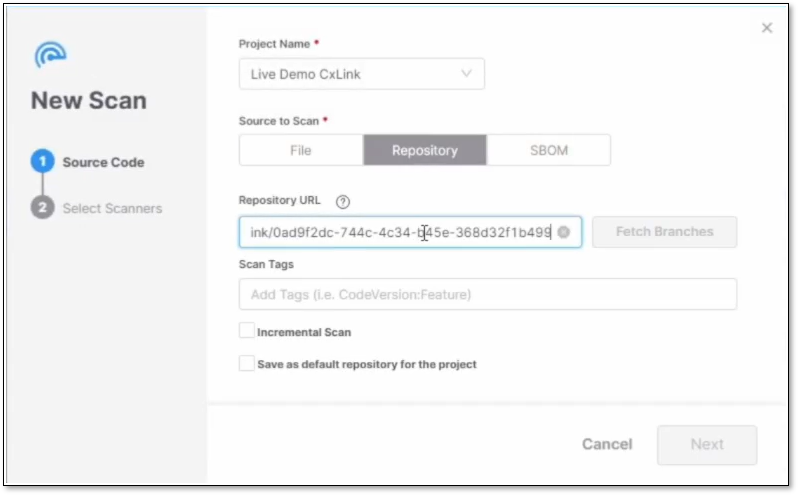
Click Fetch Branches to ensure it is connected successfully.
Click Next to select your scanners and Scan when done.
Warning
Do not close your tunnel while running; your connection will drop and fail.
Regenerating a Link
Click Regenerate Link to issue a new token and continue use of the same Link alias even if the connection is unexpectedly terminated. The regenerated link replaces the previous one and provides an updated Docker command with a fresh token. To reuse it for other projects, copy and paste it into your Docker console- no manual updates needed.
Example Docker Command: docker run --rm -it checkmarx/link-client:1 --tunnel-name <tunnel_name> --tunnel-server-url <tunnel_url> --link-token <token> --private-url <private_url>
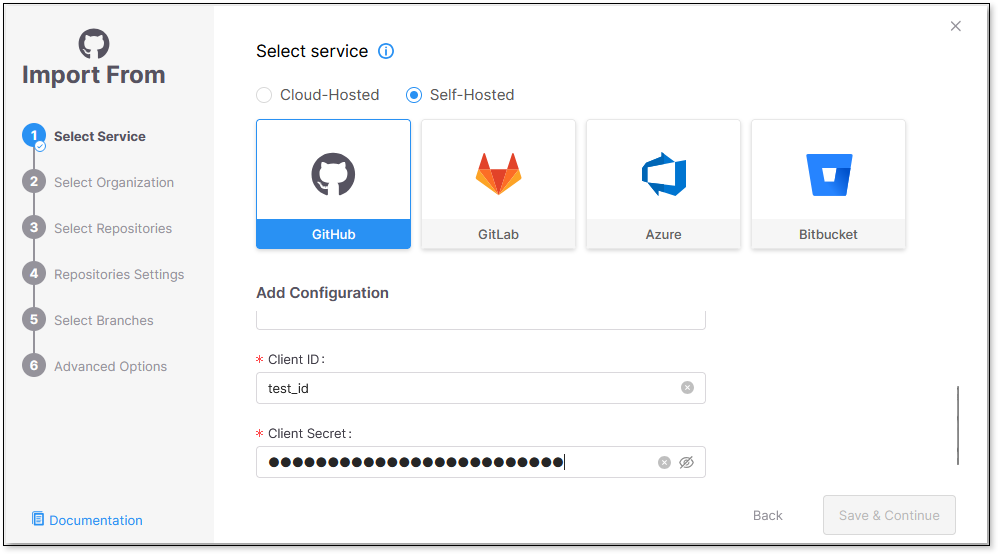
Configuring SCM
Perform the following to configure your SCM:
Copy the alias CxLink generated when creating the new link.
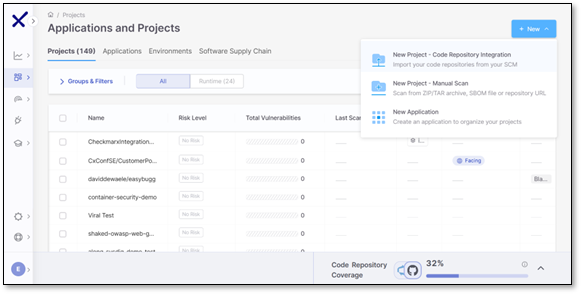
Select the New Project—Code Repository Integration option to import your code from the SCM when creating a new project.
Choose your SCM and specify Self-Hosted.
Note
CxLink is unavailable for cloud-hosted SCM configurations.
Enter a new instance name, paste the CxLink in the URL field, and enter your unique ID and secret.
Once all mandatory fields are filled out, the Save & Continue button will become available. Click it to proceed with the import.