- Checkmarx Documentation
- SAST/SCA Integrations
- CI/CD Plugins
- Azure DevOps Plugin
- Running a Scan from Azure DevOps
Running a Scan from Azure DevOps
To run a scan using SAST, you must create a SAST build task. SCA can now be accessed via the Master Access Control.
Follow these instructions to create a building task.
Click <New Pipeline> to start creating a pipeline.
Select the platform that hosts your code, for example,
 Other Git.
Confirm your selection and click <Continue>. The Select a Template dialog appears.
Click
 Empty job to open the Pipeline tasks page.
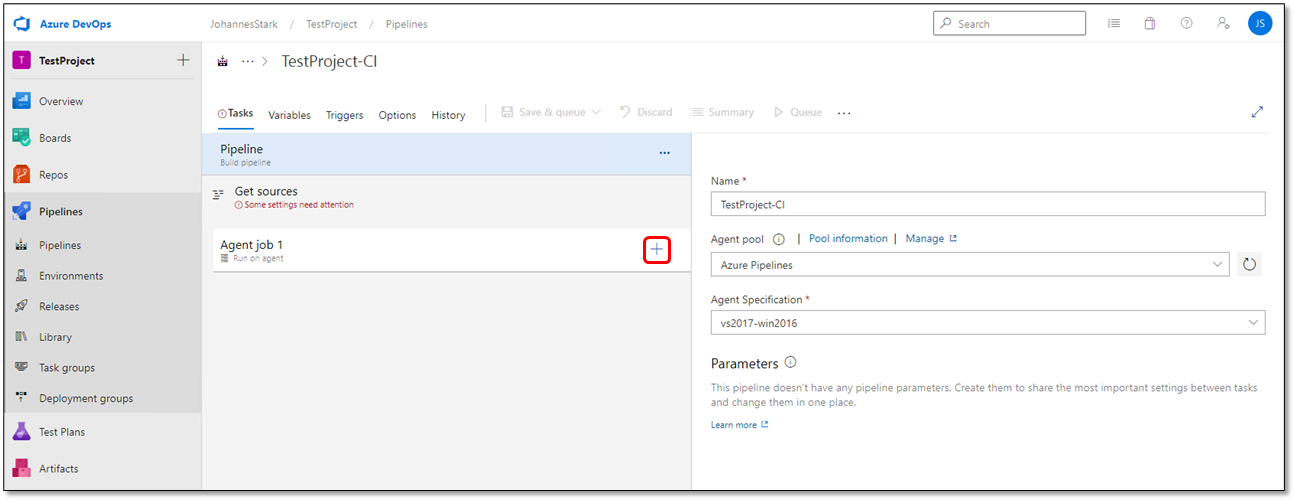
Click + Add a Task to Agent Job #. The Add Tasks list is displayed.
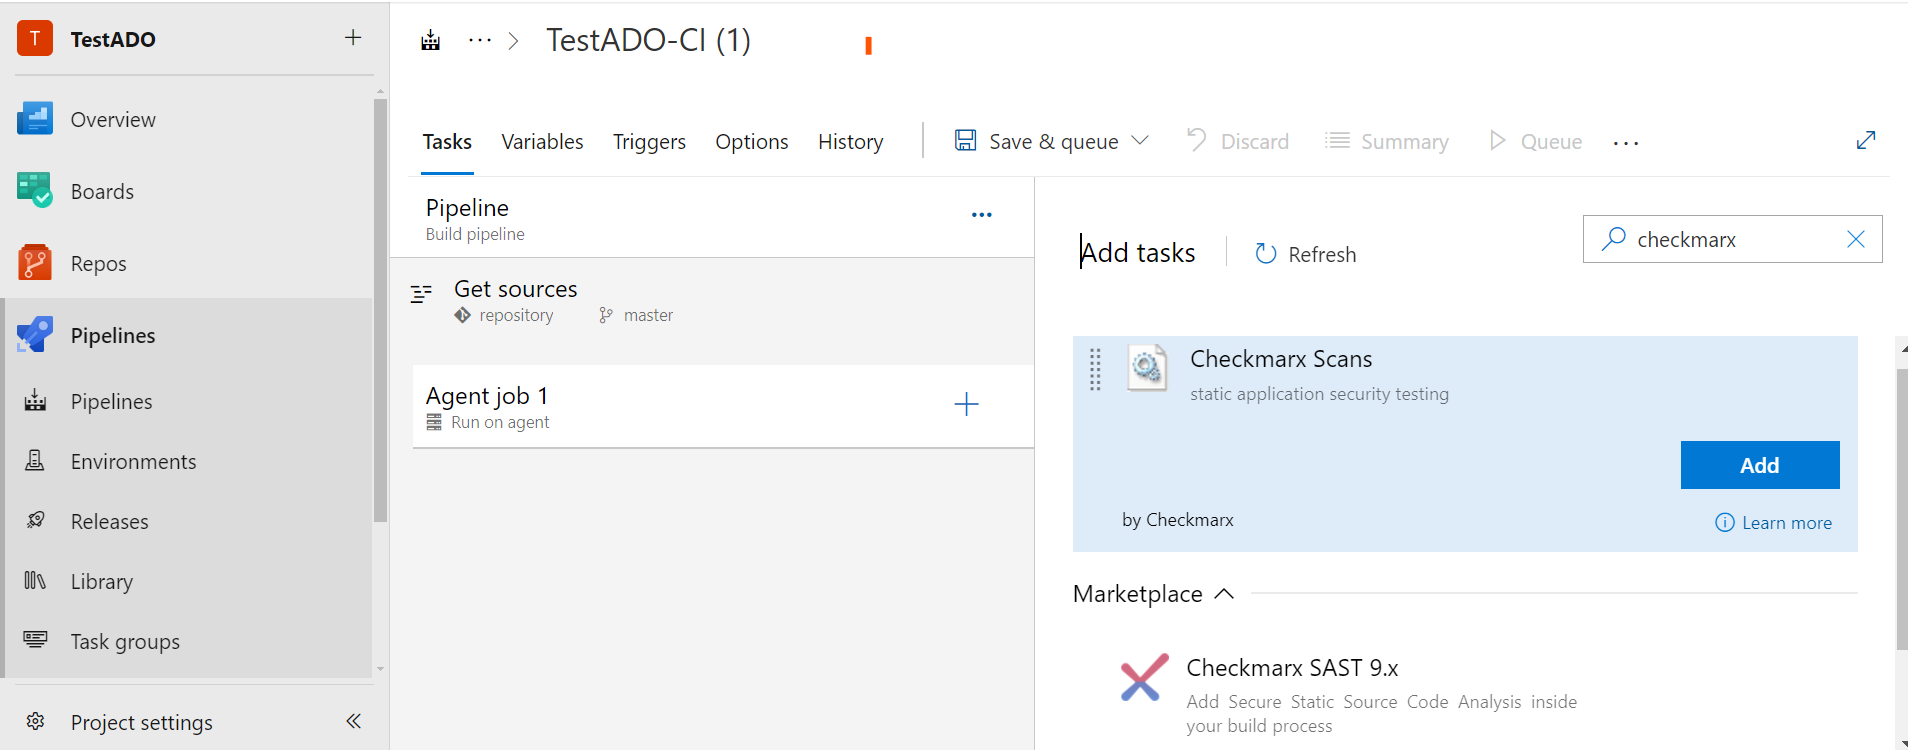
Use the Search field to locate the Checkmarx SAST tasks.
Notice
The user running the Azure DevOps plugin scan must have both 'Scanner' and 'Reviewer' role permissions.
Select the desired Checkmarx task and then click <Add>. The Checkmarx task is displayed in the Tasks list of the pipeline.
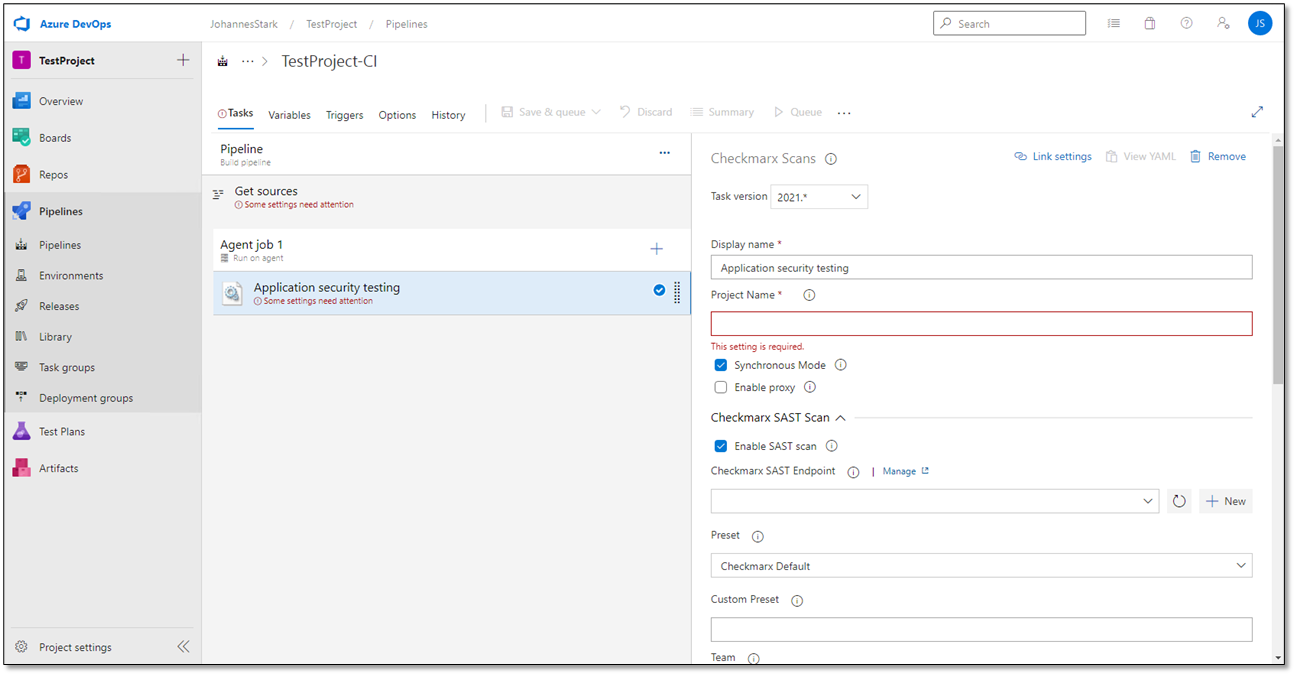
Define the Checkmarx Server definitions as illustrated and listed in the table below.
Definition | Description |
|---|---|
Task Version | The plugin supports multiple server versions (for upgrades only). Select the plugin version corresponding with your server version. Select 2021* for version 9.0 and higher with SCA support and without OSA support. |
Display Name | Enter the display name for the Checkmarx task, for example, Checkmarx CxSAST Scan |
Project Name | Enter a project name by selecting an existing project from the list or by typing in a name to create a new scan project. |
Synchronous Mode | Enabled (default) - This causes the build step to wait for SAST and SCA scan results. You can view the scan results in the Checkmarx plug-in results window Disabled - The results are only displayed on the respective Checkmarx web platform. The build results in Azure DevOps include a SAST/SCA link to the scan results on the SAST web platform. |
Enable Proxy | Disabled (default) - Check to enable the proxy setting in the build. Notice
|
Checkmarx SAST Scan | |
Enable SAST Scan | Enabled (default) - the Checkmarx SAST scan settings are available and the SAST scan for this job/project is initiated. |
Checkmarx Endpoint | Select an existing endpoint (entry point to the service) from the drop-down list, or set up a new endpoint by clicking <+ New>. For further information, refer to Setting up a New Service Endpoint. NoticeSelect the Checkmarx Endpoint that corresponds with the selected plugin version. |
CxSAST Proxy URL | Enter the URL of the proxy to run the SAST scan. The scan runs directly and not via a proxy service if no URL is provided. This option is available if Enable Proxy is checked. |
Enable SAST Branching | Enable to support branching. This is supported only when creating a new project. |
Master Branch Project Name | The SAST project will be created from the branch name provided in this parameter value. This option is available if the Enable SAST Branching is checked. |
Preset | Select a predefined set of queries (preset) from the list. Predefined presets are provided by Checkmarx or you can configure your own. The default is Checkmarx Default. If an optional preset value is provided in the Service Connection, it will override the preset available in the pipeline and use the one from the Service Connection instead. However, if the preset in the Service Connection is left blank, the preset from the pipeline will be used. A new preset (0 for Project Default ) has been introduced. This setting causes SAST to continue using the preset defined for an existing SAST project. If this setting is used for a new project, the Checkmarx Default preset is used instead. |
Custom Preset | Select a custom set of queries (custom preset) from the list. Custom presets are provided in cases where the desired preset is unavailable with the Checkmarx presets. NoticeSpecifying a custom preset overrides any predefined preset provided above. |
Source Character Encoding (Configuration) | Enables users to select the required Engine Configuration ID with specific options to revert to the current project settings for SAST. A new Configuration (Fast Scan) has been introduced. This new mode significantly decreases the scanning time of projects, making it quicker to identify relevant vulnerabilities than the standard scan mode. Scanning code using this mode makes it faster to detect relevant vulnerabilities and ensure that security standards are followed. This feature is available for SAST Engine version 9.6.3 and above. |
Team | Enter the full team name, for example, CxServer\SP\Company\Users , with which the project is associated. If an optional Team value is provided in the Service Connection, it will override the Team available in the pipeline and use the one from the Service Connection instead. However, if the Team in the Service Connection is left blank, the Team from the pipeline will be used. |
Override Project Settings | Check to update project settings like Preset and EngineConfigurationID in the SAST project. These settings are always saved for new SAST projects. |
Incremental Scan | Check Incremental Scan to reduce the scan time. In this case, only changes made after the last scan are scanned. Uncheck to make Forced Scan available. |
Schedule Periodic Full Scans | Check to schedule a full scan after a certain number of incremental scans. You are asked to specify the number of incremental scans, after which a full scan will run. |
Number of Incremental Scans Between Full Scans (1-99) | Specify the number of incremental scans between periodic full scans, for example, 10. In this case, 10 incremental scans are performed before the next full scan runs. The supported range is 1-99. |
Folder Exclusion | Comma-separated list of folders to exclude from the scan. Entries in this list are automatically converted to exclude wildcard patterns and appended to the full pattern list provided in the 'Include/Exclude Wildcard Patterns' setting. Define a comma-separated list of folders to be excluded from the scan, for example, dto,target,WEB-INF. Entries in this list are automatically converted to exclude wildcard patterns and appended to the full pattern list provided in the 'Include/Exclude Wildcard Patterns' setting. |
Include/Exclude File Extension | Define a comma-separated list of include or exclude wildcard patterns. Exclude patterns start with an exclamation mark ! .
NoticeThis option is available if Enable Dependency Scan is enabled. |
Scan Timeout In Minutes | Define a timeout period for which the scan will then fail if exceeded. |
Waiting Time Before Retry Scan In Seconds | Define a waiting time before retrying the scan in seconds. |
Project Level Custom Fields | Define project-level custom fields for the SAST project on the Checkmarx server, for example, field1:value1,field2:value2 |
Scan Level Custom Fields | Define scan-level custom fields, for example, field1:value1,field2:value2 |
Deny New Checkmarx Projects Creation | Check to prevent new projects from being created via Azure DevOps. In this case, Azure DevOps only runs existing projects. |
Comment | Add a comment (free text) |
Post Scan Action | Define a post-scan action to be automatically performed after a scan. |
Enable CxSAST Vulnerability Threshold Level | Check to enable the vulnerability threshold option. Set the maximum number of vulnerabilities of a given severity before the scan fails. NoticeThis option is available if Synchronous Mode is enabled. |
Enable fail the build for new CxSAST vulnerabilities | Check to enable failing the build when new vulnerabilities are detected during the scan. NoticeThis option is available if the vulnerability threshold option is enabled. |
Fail build for following new severity or greater | Check to enable failing the build when vulnerabilities of the selected vulnerability or a higher severity are detected during the scan; for example, if Medium is selected and at least one new vulnerability of the severity Medium or High is detected, the build fails. NoticeThis option is available, if Enable fail the build for new CxSAST vulnerabilities is enabled and Critical supports for above SAST 9.6 version. |
CxSAST Critical | Define a threshold for critical severity vulnerabilities. The build fails if the number of critical severity vulnerabilities exceeds the threshold. This option is available if the vulnerability threshold option is enabled and is supported in SAST versions above 9.6. |
CxSAST High | Define a threshold for high-severity vulnerabilities. The build fails if the number of high-severity vulnerabilities exceeds the threshold NoticeThis option is available if the vulnerability threshold option is enabled. |
CxSAST Medium | Define a threshold for medium-severity vulnerabilities. If the number of medium-severity vulnerabilities exceeds the threshold, the build fails. The threshold must be 0 or higher or left blank for no threshold. NoticeThis option is available if the vulnerability threshold option is enabled. |
CxSAST Low | Define a threshold for low-severity vulnerabilities. If the number of low-severity vulnerabilities exceeds the threshold, the build fails. The threshold must be 0 or higher, or leave blank for no threshold. NoticeThis option is available if the vulnerability threshold option is enabled. |
Enable Project's Policy Enforcement | Mark the build as failed if the policy is violated. Notice
|
Avoid Duplicate Project Scans in Queue | If enabled, blocks sending a new scan request, if there is currently a scan in Queue or Working mode. True=Enabled |
Notice
The task Version-New Pipeline must be created using the latest version.
The Checkmarx SAST Scan section is expanded by default in the Pipeline view. If you clear the Enable SAST Scan checkbox, this section collapses.
Upon upgrading from previous versions of this plugin, Enable SAST Scan is always enabled.
If you select the Asynchronous mode, the following message appears: The scan runs in asynchronous mode. Once completed, the link to the results can be found in the log.
To define a scan using CxSCA, do the following:
Click Checkmarx SCA Scan
 to expand the Checkmarx SCA Scan section.
Check
 Enable Dependency Scan.
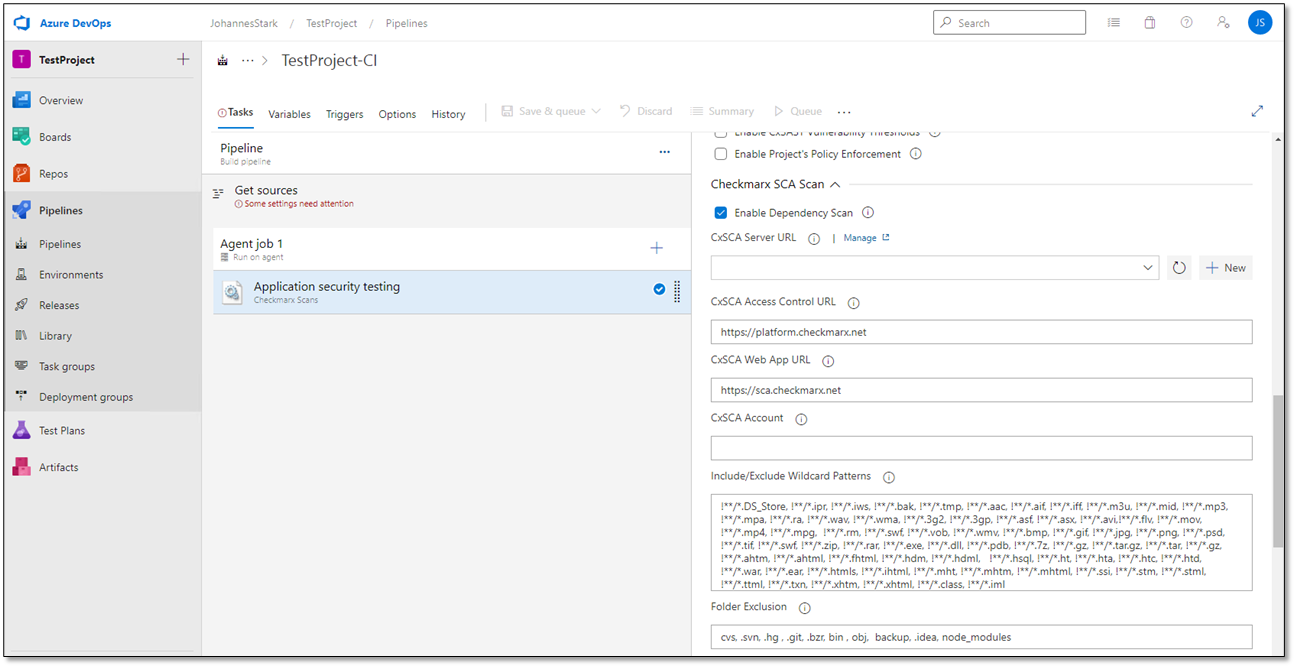
Define the Checkmarx server as outlined in the table below.
Parameter | Description |
|---|---|
Enable Dependency Scan | Check to initiate the dependency scan for this project/job. The Checkmarx SCA Scan settings become available. By default, Dependency Scan is disabled. |
CxSCA Server URL | The URL of the SCA API endpoint. This address must be accessible to the node that runs the plugin. The scanned code is delivered to this address for analysis as part of the scan workflow. In addition to the default SCA cloud, the Azure DevOps plugin also supports the CXSCA EU cluster. The default is https://api-sca.checkmarx.net The default for the SCA EU cluster is https://eu.api-sca.checkmarx.net NoticeThis option is available only if Enable Dependency Scan is enabled. |
CxSCAProxy URL | Enter the URL of the proxy to run the SCA scan. The scan runs directly and not via a proxy service if no URL is provided. This option is available if Enable Proxy is checked. |
CxSCA Access Control URL | The URL of the SCA Access Control server. This address must be accessible to the node that runs the plugin. The default is https://platform.checkmarx.net The default for the CxSCA EU cluster is https://eu.platform.checkmarx.net NoticeThis option is available only if Enable Dependency Scan is enabled. |
CxSCA Web App URL | The SCA Web App URL. This address must not be accessible to the node that runs the plugin. It is used for report links. The default is https://sca.checkmarx.net The default for the SCA EU cluster is https://eu.sca.checkmarx.net NoticeThis option is available only if Enable Dependency Scan is enabled. |
CxSCA Account | For example plugins The SCA account that you are using. NoticeThis option is available only if Enable Dependency Scan is enabled. |
Include/Exclude wildcard patterns | Define a comma-separated list of include or exclude wildcard patterns. Exclude patterns start with an exclamation mark ! .
NoticeThis option is available only if Enable Dependency Scan is enabled. |
Folder Exclusion | Comma-separated list of folders to be excluded from the scan. Entries in this list are automatically converted to exclude wildcard patterns and appended to the full pattern list provided with Include/Exclude Wildcard Patterns. The conversion is performed as follows: folder1, folder2, folder3 are converted to: !**/folder1/**, !**/folder2/**, !**/folder3/** NoticeThis option is available only if Enable Dependency Scan is enabled. |
Team | Select the full team with which the project is associated. |
Package Manager's Config File(s) Path | This parameter defines the package managers' configuration files and their paths used in the project, such as Settings.xml for Maven, Nuget.config for Nuget, .npmrc for npm , etc. The SCA agent attempts to perform dependency resolution using the package manager's configuration files provided. You may provide multiple comma character separated file paths, for example, C:/user/.m2/settings.xml, C:/user/npm/.npmrc NoticeThis option is relevant for projects that use the private artifactory and the SCA agent to perform the scan. |
Private Registry Environment Variable | In many cases, package manager configuration files reference environment variables, often providing credentials without storing them in a file. Use this option to pass all those variables. To do so, enter, for example, param1:value1, param2:value2 NoticeThis option is relevant only, if package manager config files are provided. |
Include Source | Check to include the entire source code in the zip archive to be sent to the cloud for processing. NoticeOnly the fingerprints and manifest files are sent to the CxSCA cloud when this option is not selected. For more information about these options, refer to Understanding How Checkmarx SCA Scans Run Using Various Methods. |
Enable Exploitable Path | This functionality has been deprecated. It was based on the SCA agent, which SCA Resolver has replaced. This plugin now supports detecting exploitable paths in scans using SCA Resolver. Additional parameters required for exploitable path detection are in this table's section, SCA Resolver Additional Parameters . For additional information on this functionality, refer to Exploitable Path as part of the SCA documentation. If checked, the functionality is active. NoticeIf this option is enabled, ensure it is also enabled for the project in SCA. |
Checkmarx SAST Endpoint | The URL of the SAST server. For example https://cxsasthost:port Select the Checkmarx server endpoint from the list or create a new one. The Checkmarx SAST Endpoint retrieves the scan results from the SAST server, which are required for the SCA scan to detect exploitable paths. NoticeThis option is available only if Enable Exploitable Path is enabled. This option is required only if Include Source is not selected. |
Project Full Path | The SAST project name with its full path used for scanning the project source code, for example, CxServer/team1/projectname This project name and its full path are used to retrieve scan results from the SAST server, which are required for the SCA scan to detect exploitable paths. Notice
|
Project ID | The ID of the SAST project is used to scan the project source code. It retrieves scan results from the SAST server required for Exploitable Path detection by the SCA scan. Notice
|
Project Custom Tags | Project Custom Tags can be provided as a string in the pipeline. It is a key: value pair and multiple tags can be separated using a comma (,). (E.g., Language: JAVA, Development: ENV:DEV) NoteThis option is available only if Enable Dependency Scan is enabled. |
Scan Custom Tags | Scan Custom Tags can be provided as a string in the pipeline. It is a key: value pair and multiple tags can be separated using a comma (,). (E.g.: ProjectType:github, Testing: , Reviewer:John) NoteThis option is available only if Enable Dependency Scan is enabled. |
Enable CxSCA Project's Policy Enforcement | If the project's policy is violated, check to define the build as failed or unstable. The project's policy is defined from within SAST. If used without policy assigned, the output still indicates it is 'policy compliant.' In the case of an SCA scan, the build is reported as failed if any rules and policies were set to Break The Build , and the names and descriptions of all violated policies and rules are listed. |
Enable CxSCA Vulnerability Thresholds | Check to enable the vulnerability threshold option. Set the maximum number of vulnerabilities of a given severity before the scan fails. NoticeThis option is available if Synchronous Mode is enabled. |
CxSCA Critical | Define a threshold for critical severity vulnerabilities. The build fails if the number of critical severity vulnerabilities exceeds the threshold. This option is available if the vulnerability threshold option is enabled. |
CxSCA High | Define a threshold for high-severity vulnerabilities. The build fails if the number of high-severity vulnerabilities exceeds the threshold. NoticeThis option is available if the vulnerability threshold option is enabled. |
CxSCA Medium | Define a threshold for medium-severity vulnerabilities. If the number of medium-severity vulnerabilities exceeds the threshold, the build fails. NoticeThis option is available if the vulnerability threshold option is enabled. |
CxSCA Low | Define a threshold for low-severity vulnerabilities. The build fails if the number of low-severity vulnerabilities exceeds the threshold. NoticeThis option is available if the vulnerability threshold option is enabled. |
Enable SCA Resolver | Enable the SCA resolver utility to perform an SCA scan. Plugins will automatically download the ScaResolver tool under the user’s home directory. For additional information on this utility, refer to the Checkmarx SCA Resolver section in the SCA documentation. |
SCA Resolver Path | The directory path where the SCA Resolver tool is installed on the agent machine. The SCA Resolver tool will be downloaded automatically if it's not mentioned. For example, C: UsersInstallationsScaResolver-win64 or /opt/ScaResolver-linux64. NOTE: This option is available only if Enable SCA Resolver is enabled. |
SCA Resolver Additional Parameters | You may run the SCA Resolver utility in Offline mode by adding additional command line arguments as outlined below: Provide arguments to ScaResolver in the same format as supported by ScaResolver. ScaResolver is executed in Offline mode by using the mandatory parameters '-s', '-n' , and '-r' , for example, -s C:\Users\SampleProject -n ProjectName -r c:\output, where the parameters stand for the following:
In addition, the following parameters can be added to enable Exploitable Path: --sast-result-path d:\deleteit1\sast\rst.json --cxuser <sast user> --cxpassword <password> --cxprojectname <project name in sast> --cxserver <sast server url>. Notice
|
Manifest Pattern | Manifest pattern can be provided as a string in the pipeline. The comma-separated file or folder patterns can be included or excluded in the manifest pattern. In addition to the user-provided manifest pattern, the default pattern retrieved from the CxSCA service will also be used. Example 1: **/folder1/**,!**/folder2/** (Here, folder1 will be included, folder2 will be excluded). Example 2:**/file1.json,!**/file2.xml (Here, file1.json will be included, file2.xml will be excluded). NoteThis option is available only if Enable Dependency Scan is enabled. *Default Manifest Pattern expanded in the sidebar below.* |
Fingerprint Pattern | Fingerprint pattern can be provided as a string in the pipeline. The comma-separated file or folder patterns can be included or excluded in a fingerprint pattern. In addition to the user-provided fingerprint pattern, the default pattern retrieved from the CxSCA service will also be used. Example 1: **/folder1/**,!**/folder2/** (Here, folder1 will be included, folder2 will be excluded). Example 2:**/file1.json,!**/file2.xml (Here, file1.json will be included, file2.xml will be excluded). Default Fingerprint Pattern: ‘!/node_modules/,!/bower_components/ ’ NoteThis option is available only if Enable Dependency Scan is enabled. |
Scan Timeout In Minutes | Define a period for the CxSCA scan, after which the scan will fail if it exceeds the timeout. Timeout should be provided in minutes. NoteThis option is available only if Enable Dependency Scan is enabled. |
CxSCA Critical | Define a threshold for critical severity vulnerabilities. The build fails if the number of critical severity vulnerabilities exceeds the threshold. This option is available if the vulnerability threshold option is enabled. |
Waiting Time Before Retry SCA Scan In Seconds | Define a waiting time (in seconds) before retrying the SCA scan. |
‘/package.json,/package-lock.json,/lerna.json,/.npmrc,/*.gradle,/gradle-wrapper.properties,/build.gradle.kts,/.csproj,/directory.packages.props,/nuget.config,/packages.config,/pom.xml,/settings.xml,/build.sbt,/requirements.txt,/requirements-.txt,/requirement.txt,/requirement-.txt,**/.whl,/*.tar.gz,/*.zip,/packages.txt,/yarn.lock,/.yarnrc,/composer.json,/composer.lock,/bower.json,/.bowerrc,/build.properties,/plugins.sbt,/gradle.properties,/gradlew,/gradlew.bat,/gradle-wrapper.jar,/versions.properties,/version,/dockerfile**,/.env_cxsca-container-build-args,/.env,/package.swift,/cartfile,/cartfile.private,/cartfile.resolved,/podfile,/podfile.lock,/go.mod,/go.sum,/pyproject.toml,/poetry.lock
Notice
In the Pipeline view, the Checkmarx SCA Scan section always collapses, even if Enable Dependency Scan is enabled.
If running in Asynchronous mode (SAST & SCA), the following message is displayed in the Checkmarx dashboard:
The scan is running in asynchronous mode. Once completed, the log contains a link to the results.
When configuring the SCA endpoint definitions, you can select an existing service endpoint from the drop-down list or define a new one by doing one of the following to access the New Service Connection dialog.
In the Pipeline view, check
 Enable Dependency Scan.
Next to the CxSCA Server URL field, click <+ New>. The New Service Connection dialog appears.
Go to
 Project Settings. The Project Settings menu appears.
From the Project Settings menu, select
 Service Connections. The existing service connections appear listed.
Click
 New Service Connection. Service connection types are displayed for selection.
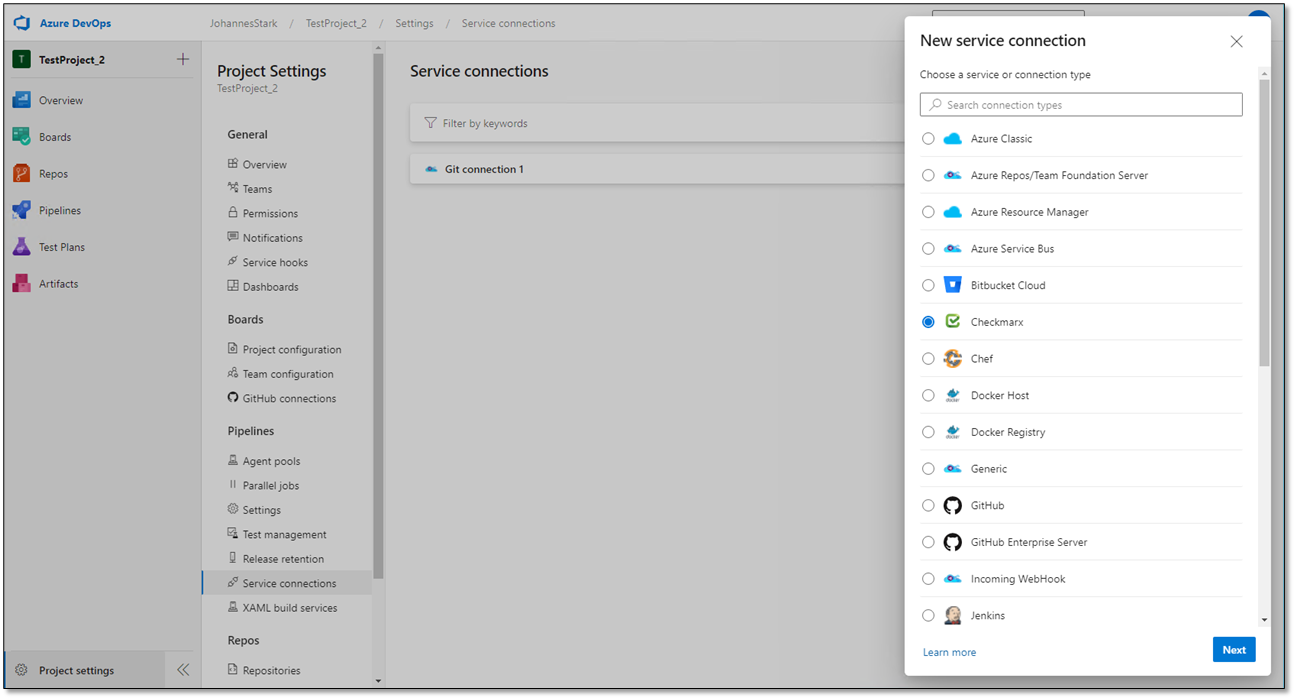
Select Checkmarx and then click <Next>. The New Service Connection dialog appears.
In the New Service Connection dialog, enter the parameters in the table below and click <Save>.
Parameter | Description |
|---|---|
Server URL | The URL of the SCA API endpoint. |
Access Control URL | The SCA Access Control URL. This address must be accessible to the node that runs the plugin. |
Web App URL | The SCA Web App URL. This address must not be accessible to the node that runs the plugin. It is used for report links. |
Account | The SCA account that you are using. |
Authentication | |
Username | Your SCA username |
Password | Your SCA password |
Details | |
Service Connection Name | Assign a name to the new connection. |
Description | Add a description (optional, free text). |
Security | |
Grant Access Permissions to all Pipelines | Check to enable all pipelines to access the new connection. |
Create a new SCA Service Connection to preserve the existing ones.
Under Access Control URL, enter the Master Access Control URL, for example. For further information and instructions on setting up a Master Access Control for CxSCA, refer to Using Master Access Contro.
Under Authentication, enter the username and password for your Master Access Control.
Save the new/updated service connection.
To define Checkmarx Control Options, do the following:
Click Control Options
 to expand the Checkmarx Control Options section.
Define the control options as explained in the table below and select
 Save & Queue. Save options appear.
Select
 Save.
Save.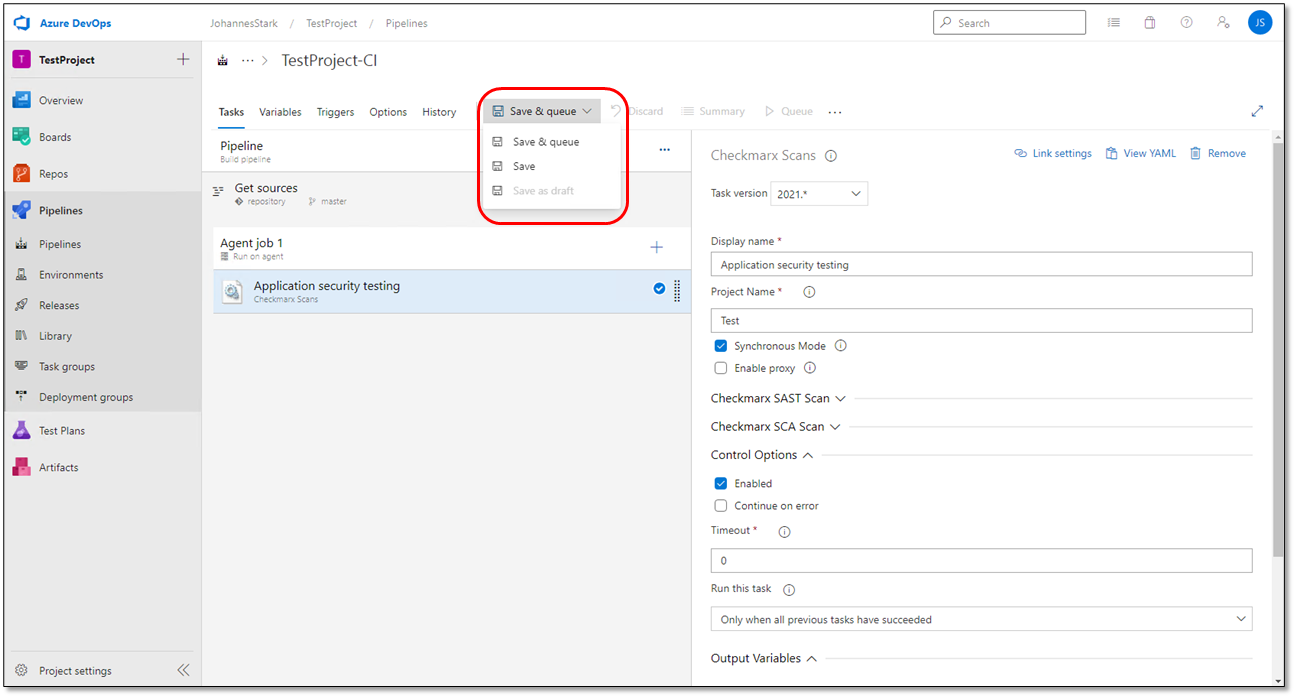
Once you complete the configuration of Application Security Testing, select
 Save & Queue and then select
  Save & Queue. For Save options and what they mean, refer to the table below.
Save Option | Description |
|---|---|
Save & Queue | Saves the task configuration and opens the Run pipeline popup. |
Save | Saves the task configurations without running the pipeline option. The following options are available:
|
Save as Draft | Saves the task configuration without running the pipeline and without the Queue option. The following options are added to the task configuration bar:
|
Once you have saved and queued the task, the Run Pipeline dialog appears, and you can run the pipeline.
Click Run Pipeline .

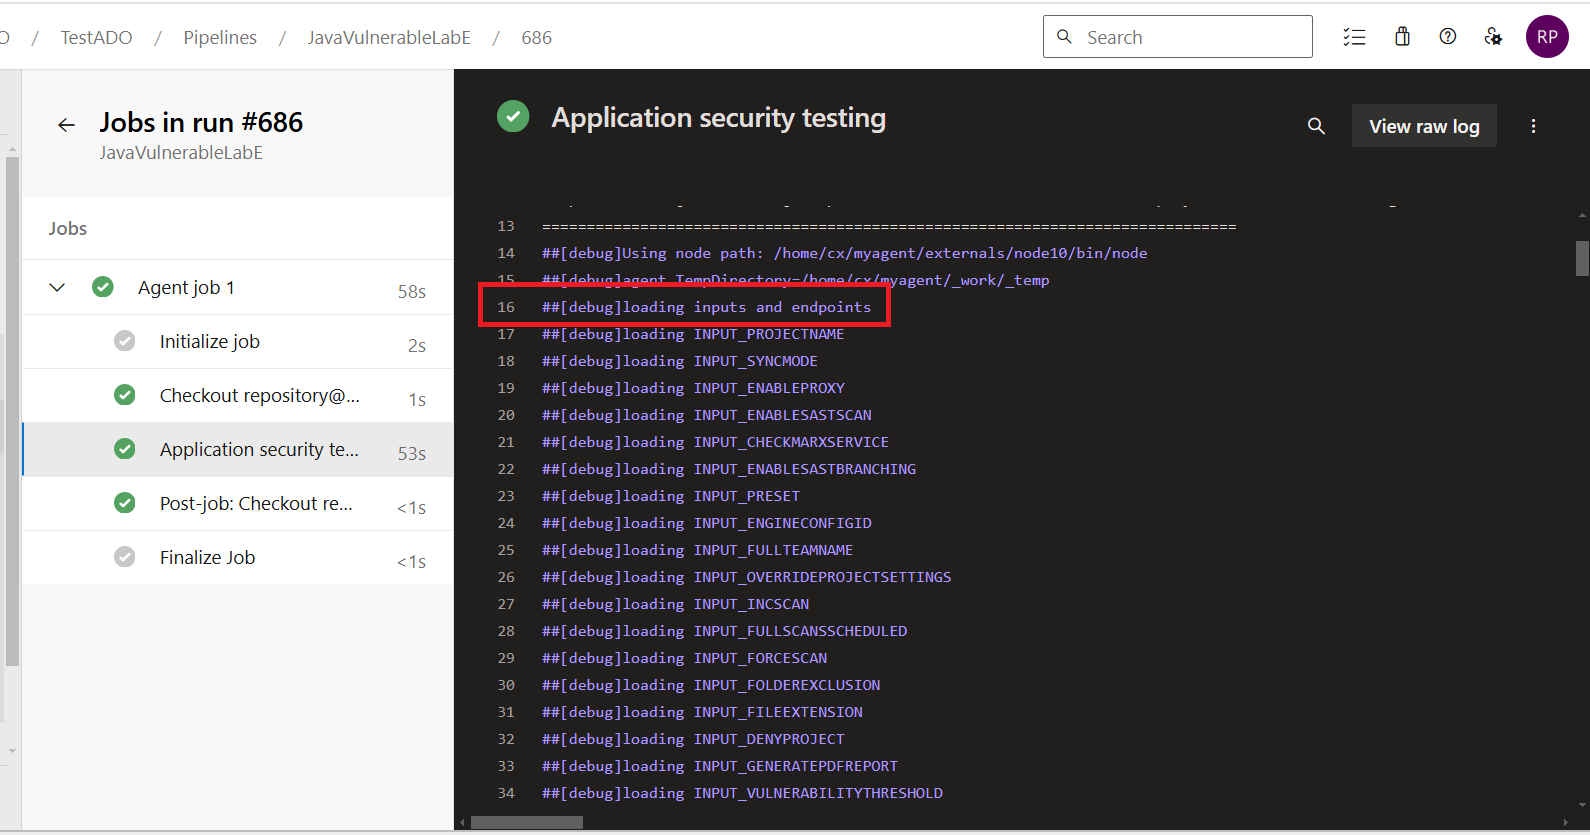
The Run Pipeline dialog appears. To enable debug log click Advanced options → Variables.
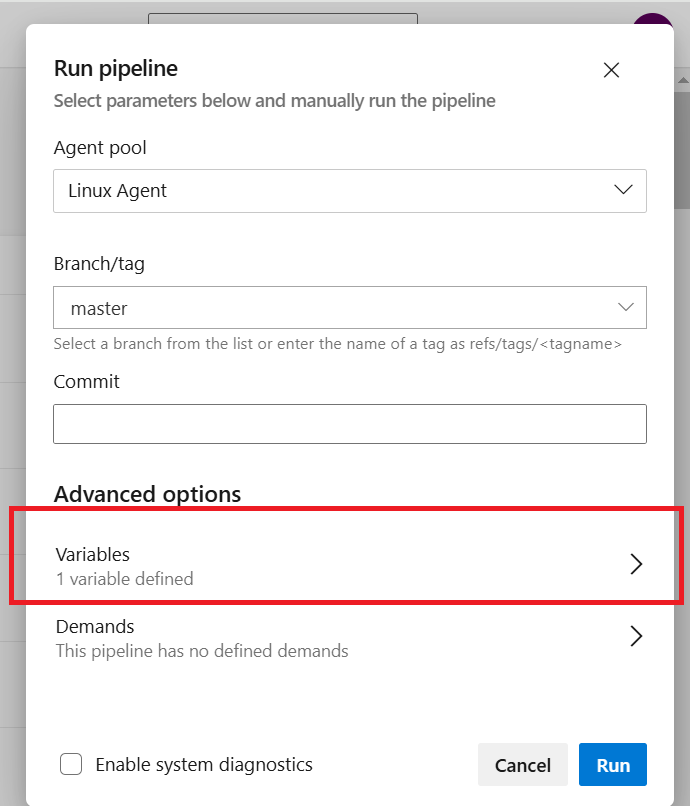
Update the
system.debugvariable astrueand click Run.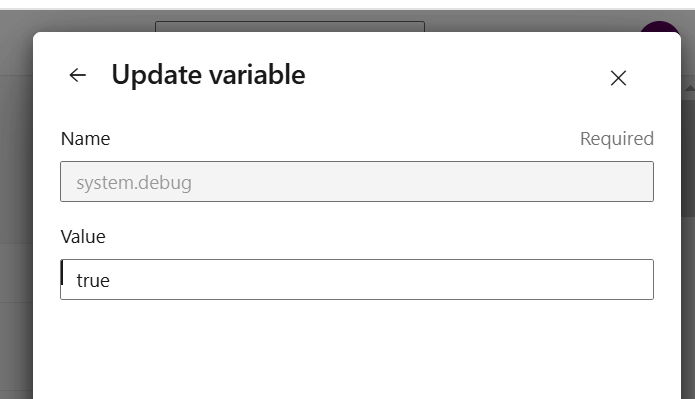
After the pipeline execution is complete, the debug logs can be viewed under Summary → Application Security Testing Stage.
You can select an existing service endpoint from the drop-down list when you are configuring the Checkmarx endpoint definitions (which must correspond to the selected plugin version – see Adding CxSAST as a Build Task), or you can create a new service endpoint as follows:
In the Checkmarx Task Definitions dialog, navigate to the Checkmarx Endpoint field and click <Manage>. The Service Connection screen is displayed.
Notice
Depending on how you set up your project, you might not see the <Manage> button. In this case, go to Project Settings (at the bottom left of the screen), and select Service Connections -> New Service Connection. The Service Connection screen is displayed
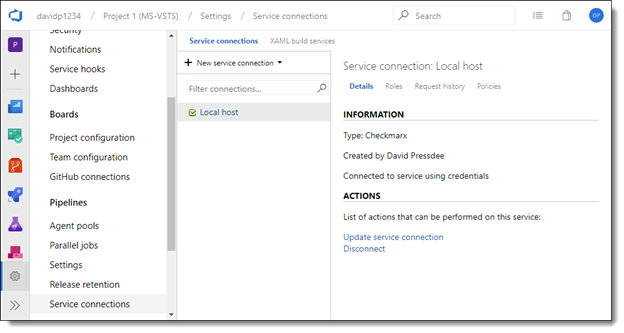
Click the New Service Connection drop-down and select Checkmarx. The Service Endpoint screen is displayed.
Define the CxServer authentication definitions as outlined in the table below.
Click <OK> to complete adding the service connection.
Definition | Description |
|---|---|
Connection Name | Enter the Connection Name, for example, CxEndPoint. |
Server URL | Enter your server URL. The URL must start with the http(s)://<serverurl>. |
Preset (Optional) | Predefined sets of queries that you can select when creating, configuring, and branching projects. If a preset is specified here, it overrides the preset specified in the pipeline details. |
Team (Optional) | Enter a team (group), which the project is associated with. If a team is specified here, it overrides the team specified in the pipeline details. |
User Name | Enter your Checkmarx username |
Password | Enter your Checkmarx password |
Notice
Server URL, User Name, and Password definitions are provided by Checkmarx following your registration. Refer to Checkmarx for Azure DevOps Registration for additional information.
cvs, .svn, .hg , .git, .bzr, bin , obj, backup, .idea, node_modules
cvs, .svn, .hg , .git, .bzr, bin , obj, backup, .idea, node_modules
