Quick Start: Checkmarx DAST Onboarding Guide
Overview
Notice
This feature is currently available only for Early Access adopters.
The Checkmarx DAST onboarding wizard simplifies configuring scans, setting up authentication, and launching public and private application scans. It also helps you generate YAML configuration files and manage setup flows for new or existing environments - all in a streamlined interface.
You can quickly configure authentication using simple form fields - no manual YAML editing is required. Choose from multiple login methods, such as TOTP (2FA), browser-based, or recorder-driven authentication, or upload an existing configuration. Built-in pre-scan verification lets you test authentication before starting a full scan.
Navigating the Onboarding Wizard
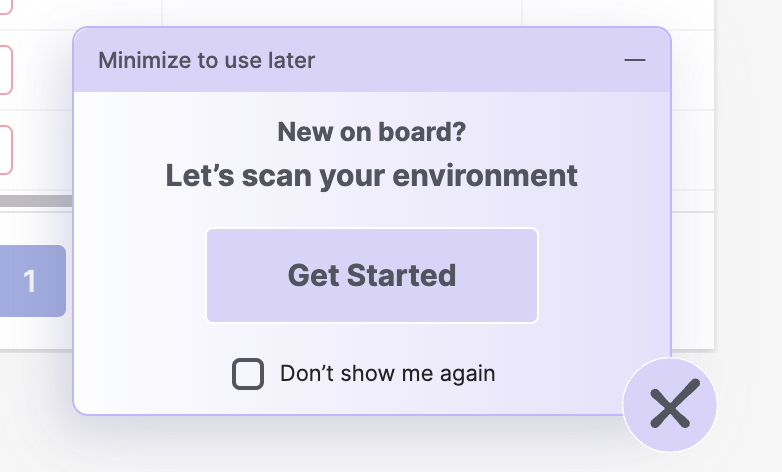
Click Get Started in the onboarding wizard pop-up on the Environments page to begin configuring a new environment from scratch.
Alternatively, you can start the wizard by clicking + New Environment and selecting Create and Configure Environment.

To start the onboarding wizard on an existing environment, hover over its row and click + Config File.

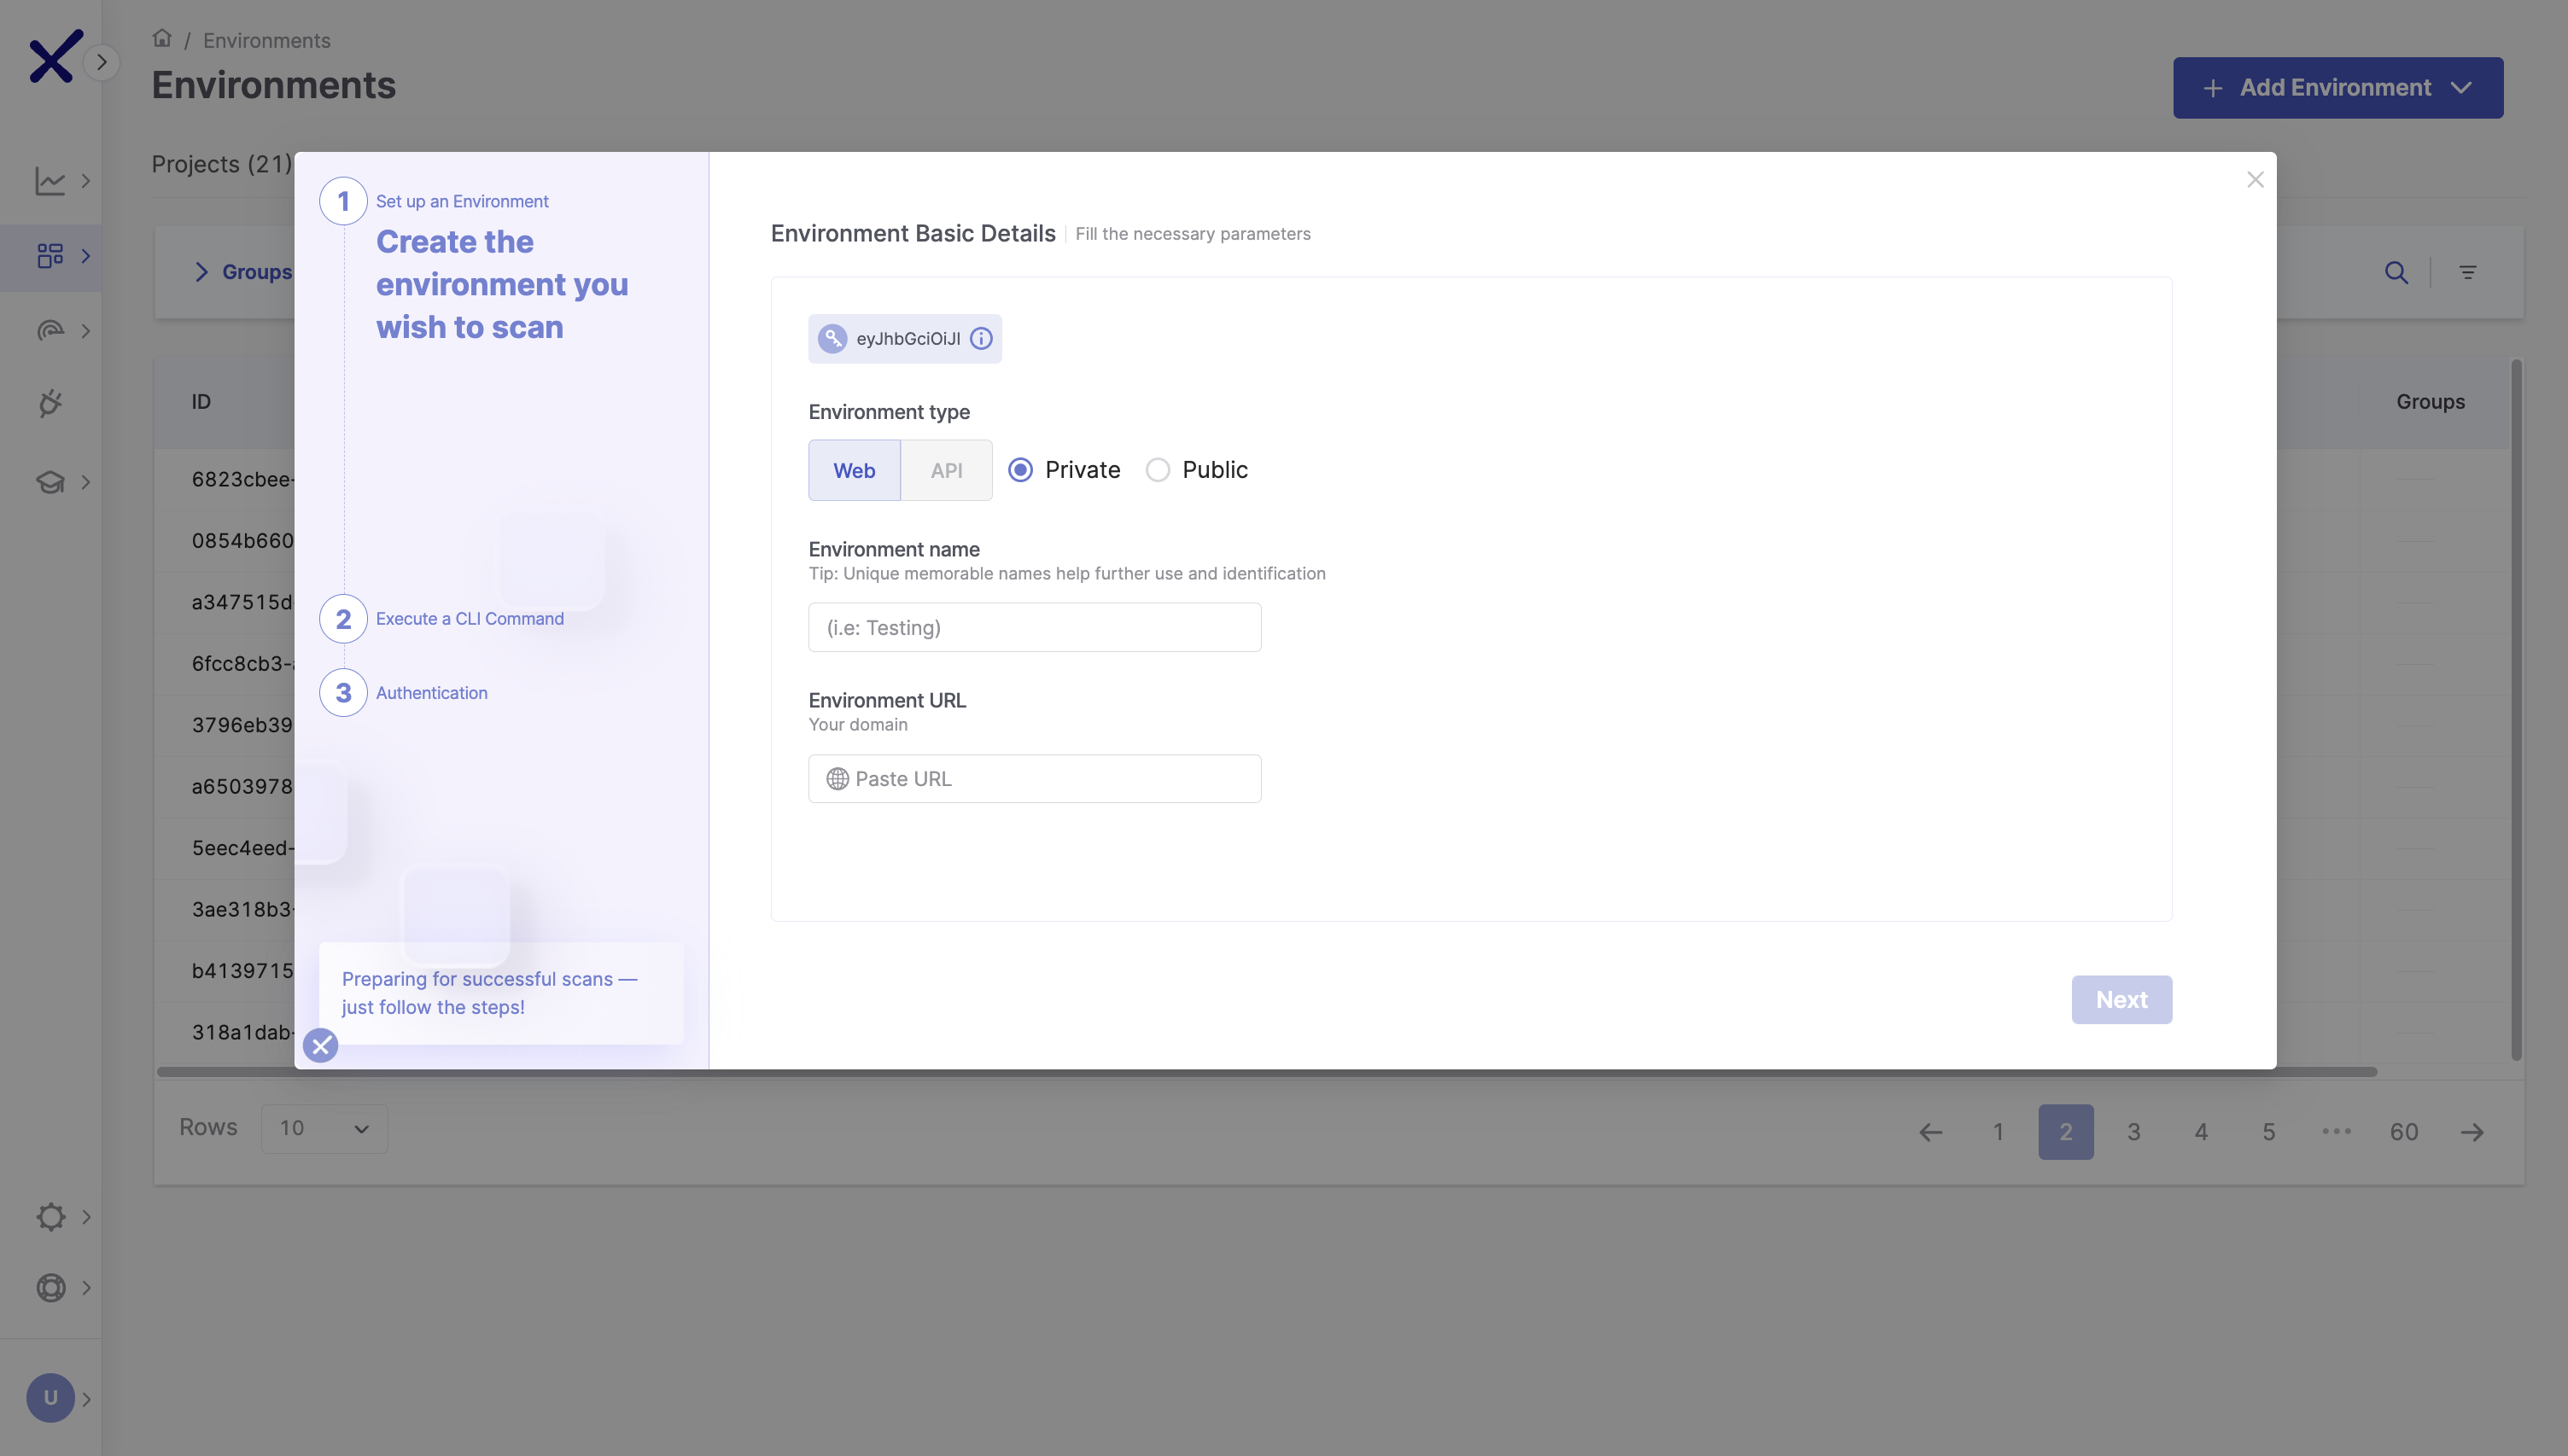
Configure the following settings to set up your Environment:
CxOne API Key (informative): The CxOne API key is generated automatically - no action is required. This key will run the setup command in the next step.
Environment Type:
Web or API: Select whether the environment is Web or API based.
Notice
Currently, only Web-based environments are supported.
Private: Select this if the target application is internal and not externally accessible.
Public: Select this if the target application is accessible online.
Environment Name: Enter the web application name you want to scan and track.
Environment URL: Provide the base URL of the web application.
Once you click NEXT, the new environment will be created and added to the Environments list.
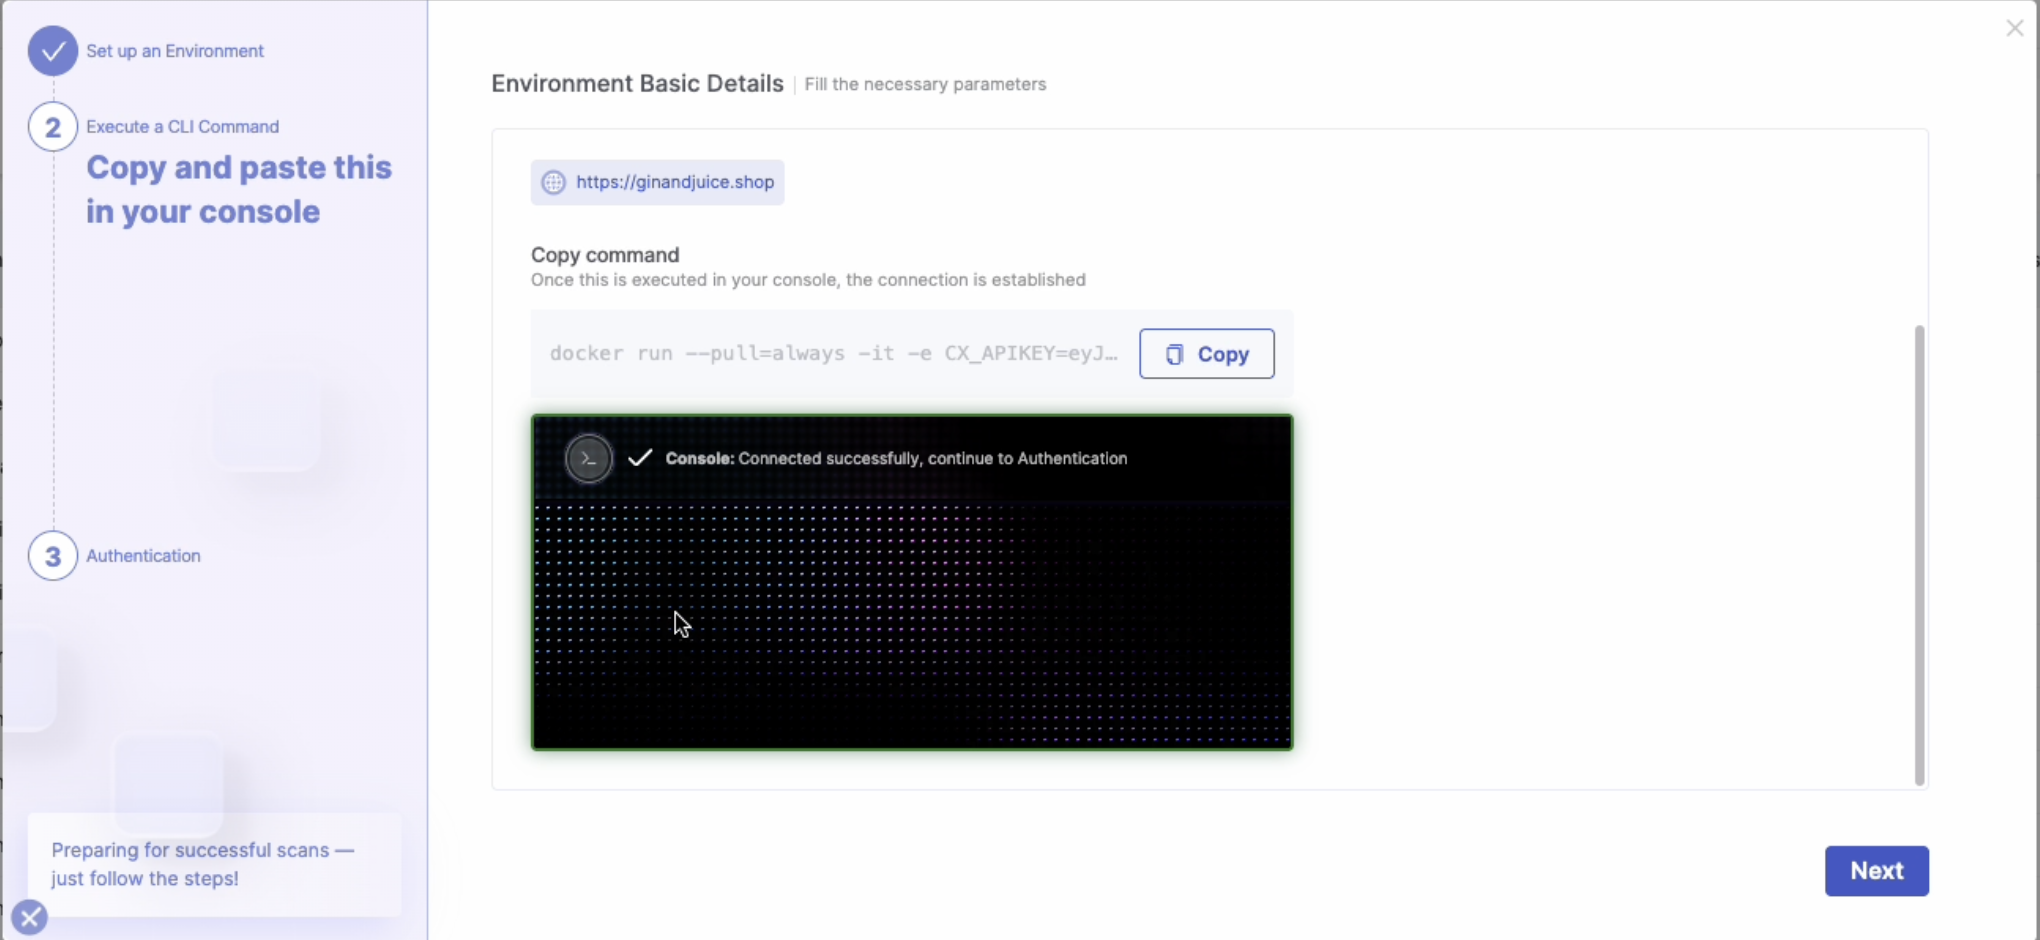
Copy and run the setup command in your local terminal. This command is essential to initiating a secure, interactive session between the DAST CLI and the UI. It also enables CxDAST to connect with the onboarding wizard, send real-time updates, and securely synchronize scan configuration and authentication.
Click Copy to copy the setup command shown on the screen.
Paste and run the command in your terminal.
Once executed, a connection will be established, and you will see the status update in the terminal and the UI.
Note
The Set Up command only runs during the onboarding process.
After the command runs, a live status indicator in the lower left corner of the wizard will show whether the CLI is currently connected.
If the CLI is connected, continue.
If the CLI is not connected, re-run the setup command.
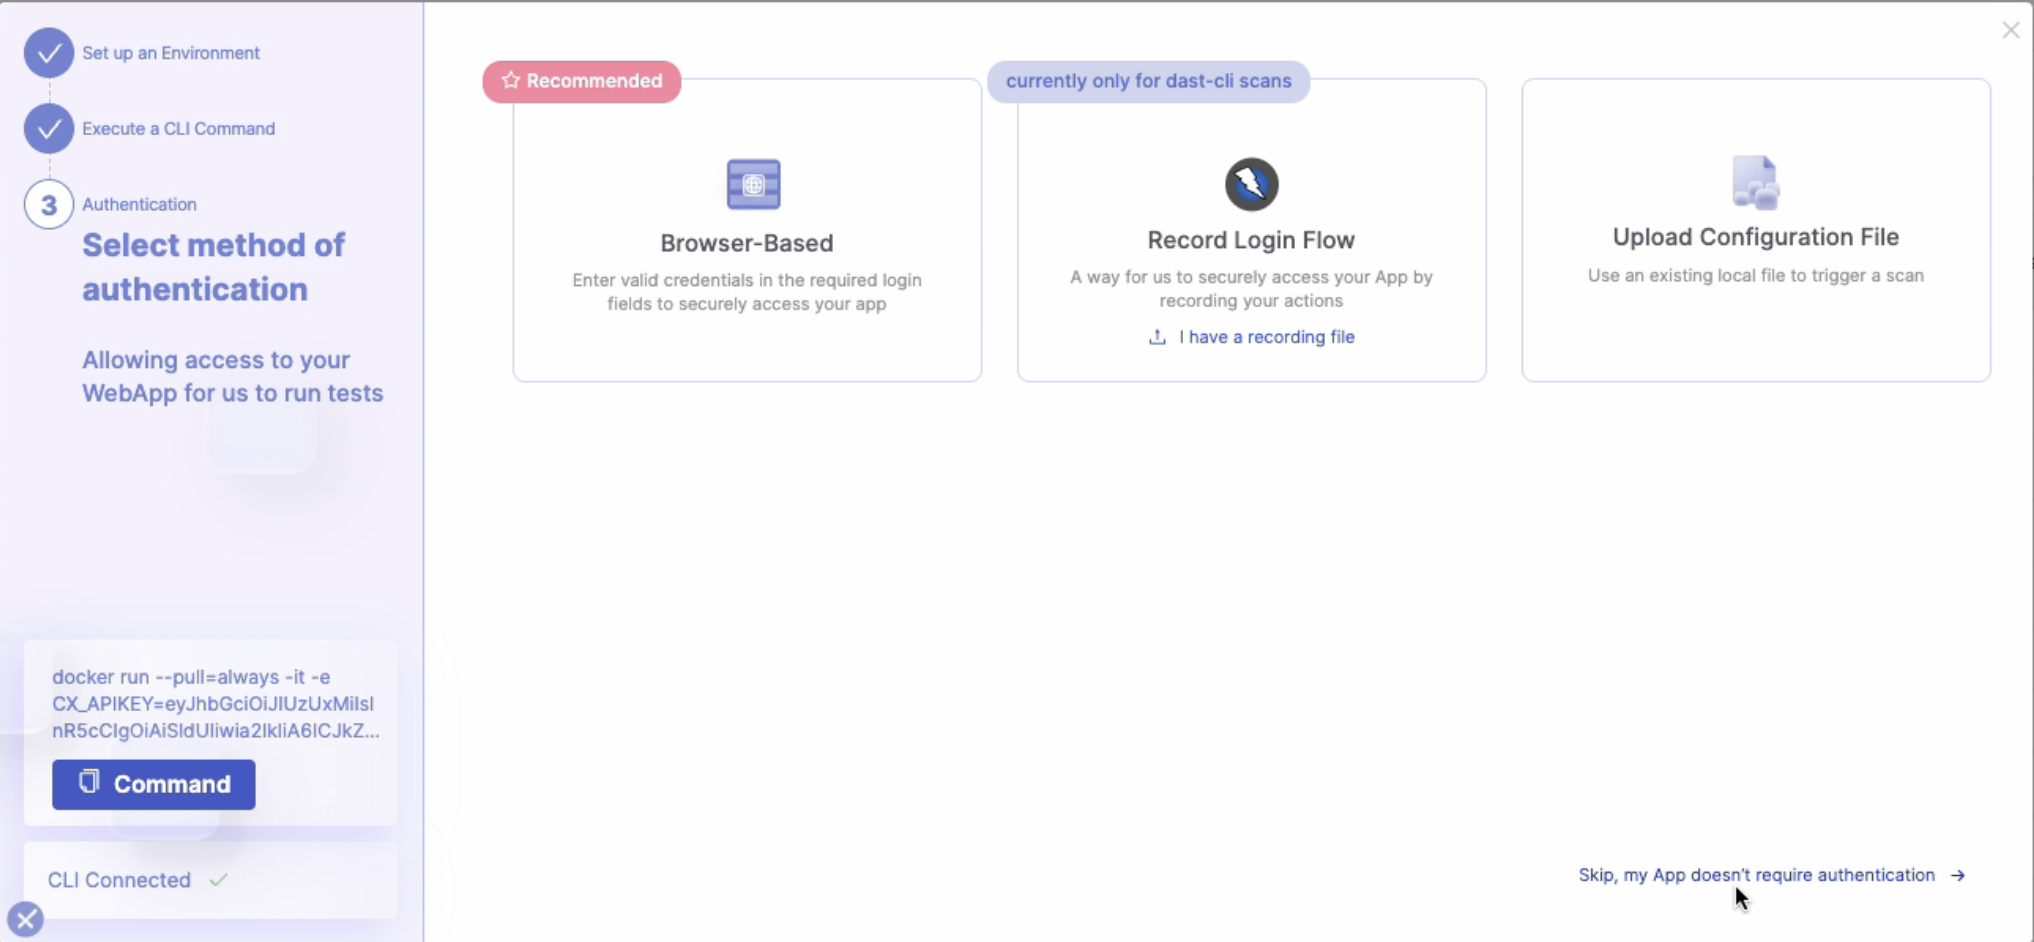
Before a scan runs, this step verifies access to protected applications and APIs, helping you catch and resolve authentication issues early. Select your preferred authentication method by clicking on the appropriate option:
Browser-Based: Enter your login credentials directly on the login page.
Recorder-Based: Follow the prompts to record a live login session.
Note
All credentials are handled securely and are only used to perform scans.
Upload Config file: Import an existing authentication configuration file, if available.
If your application does not require authentication, skip this step by clicking Skip.
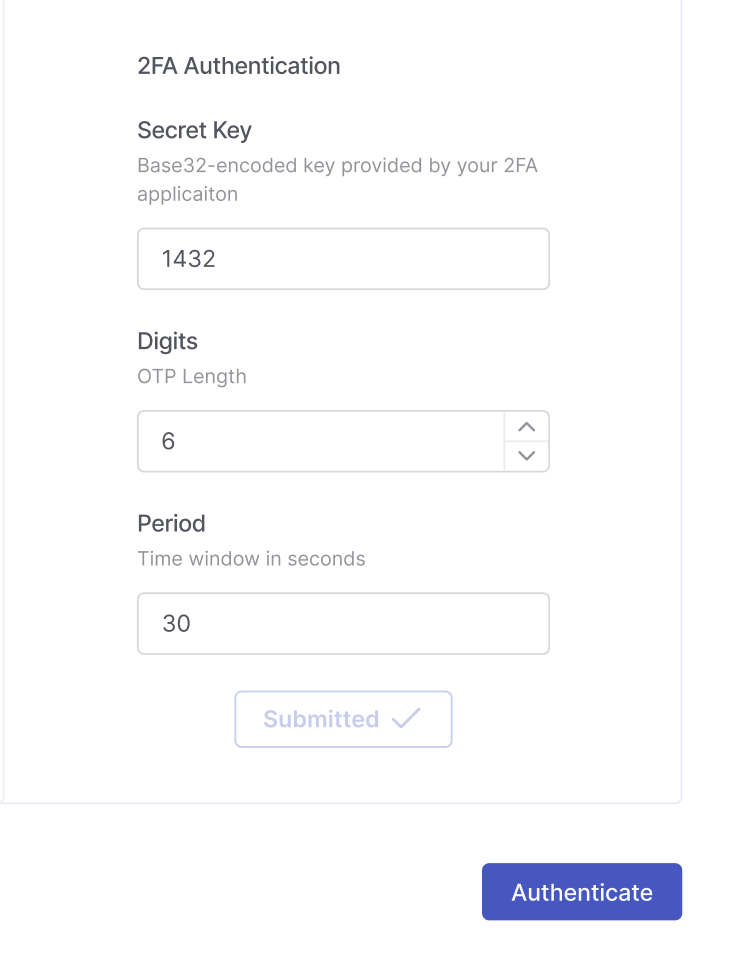
(optional) Some applications require an additional layer of authentication using TOTP (Time-Based One-Time Passwords). TOTP generates a unique passcode based on the current time, valid only for a short period. This code is used during each authentication attempt to verify access to secured areas of your web application.
CxDAST supports form-based authentication using TOTP by allowing you to provide a shared secret key.
When you enable 2FA in your application, it typically shows a QR code for scanning with an authenticator app (e.g., Google Authenticator, Authy, Microsoft Authenticator). Most apps also offer a manual setup option, which displays the secret key - a Base32-encoded string, such as:
JBSWY3DPEHPK3PXP
Paste this TOTP secret key into the Secret Key field in CxDAST.
Tip
The secret key is often shown alongside the QR code with a label like:
"Can’t scan the code? Enter this key manually:"
If the application only displays a QR code and doesn't show the key explicitly, you can extract the key using a QR scanner app that reveals the raw data behind the code.
Example using Microsoft Lens:
Open the Microsoft Lens app.
Switch to Actions → Select QR Code.
Scan the QR code.
The app will display a URL like:
otpauth://totp/MyApp:user@example.com?secret=JBSWY3DPEHPK3PXP&issuer=MyApp
From this URL, extract the value of the secret parameter:
secret = JBSWY3DPEHPK3PXP
Use this value in CxDAST as your secret key.
Digit (Default: 6)
Specifies the number of digits in the generated OTP. Most systems use 6 digits.
Period (Default: 30 seconds)
Determines how long each OTP remains valid before a new one is generated.
Leave these fields unchanged unless your authentication system requires different values.
After completing the authentication setup, you can verify it to ensure everything is configured correctly before launching a full scan.
Notice
Reach out to Support if you require more assistance.
Once all required fields are filled, the Authenticate button will become active.
Click Authenticate to verify your authentication setup.
Important
Do not close the wizard tab during authentication - the process may take a few moments.
If authentication succeeds, you will be redirected to the next screen, where you can start the scan directly from the UI or copy the scan command for CLI execution.
If authentication fails, an error screen will appear with the following troubleshooting suggestions:
Verify that the username and password are correct.
Use your stable, non-expiring credentials for authentication.
Using 2FA by TOTP? Fill out the 2FA form (optional) to help validate your setup.
If using the Recorder-based authentication method, always complete the full login flow in the browser recorder — do not stop immediately after entering credentials. Also, avoid using incognito mode or extensions that block cookies/session data while recording.
After successful authentication, you will be directed to the Scan Initiation screen, where you can choose how to proceed: from the Environments page by clicking Finish, or the onboarding wizard's last page by clicking Finish and Scan.
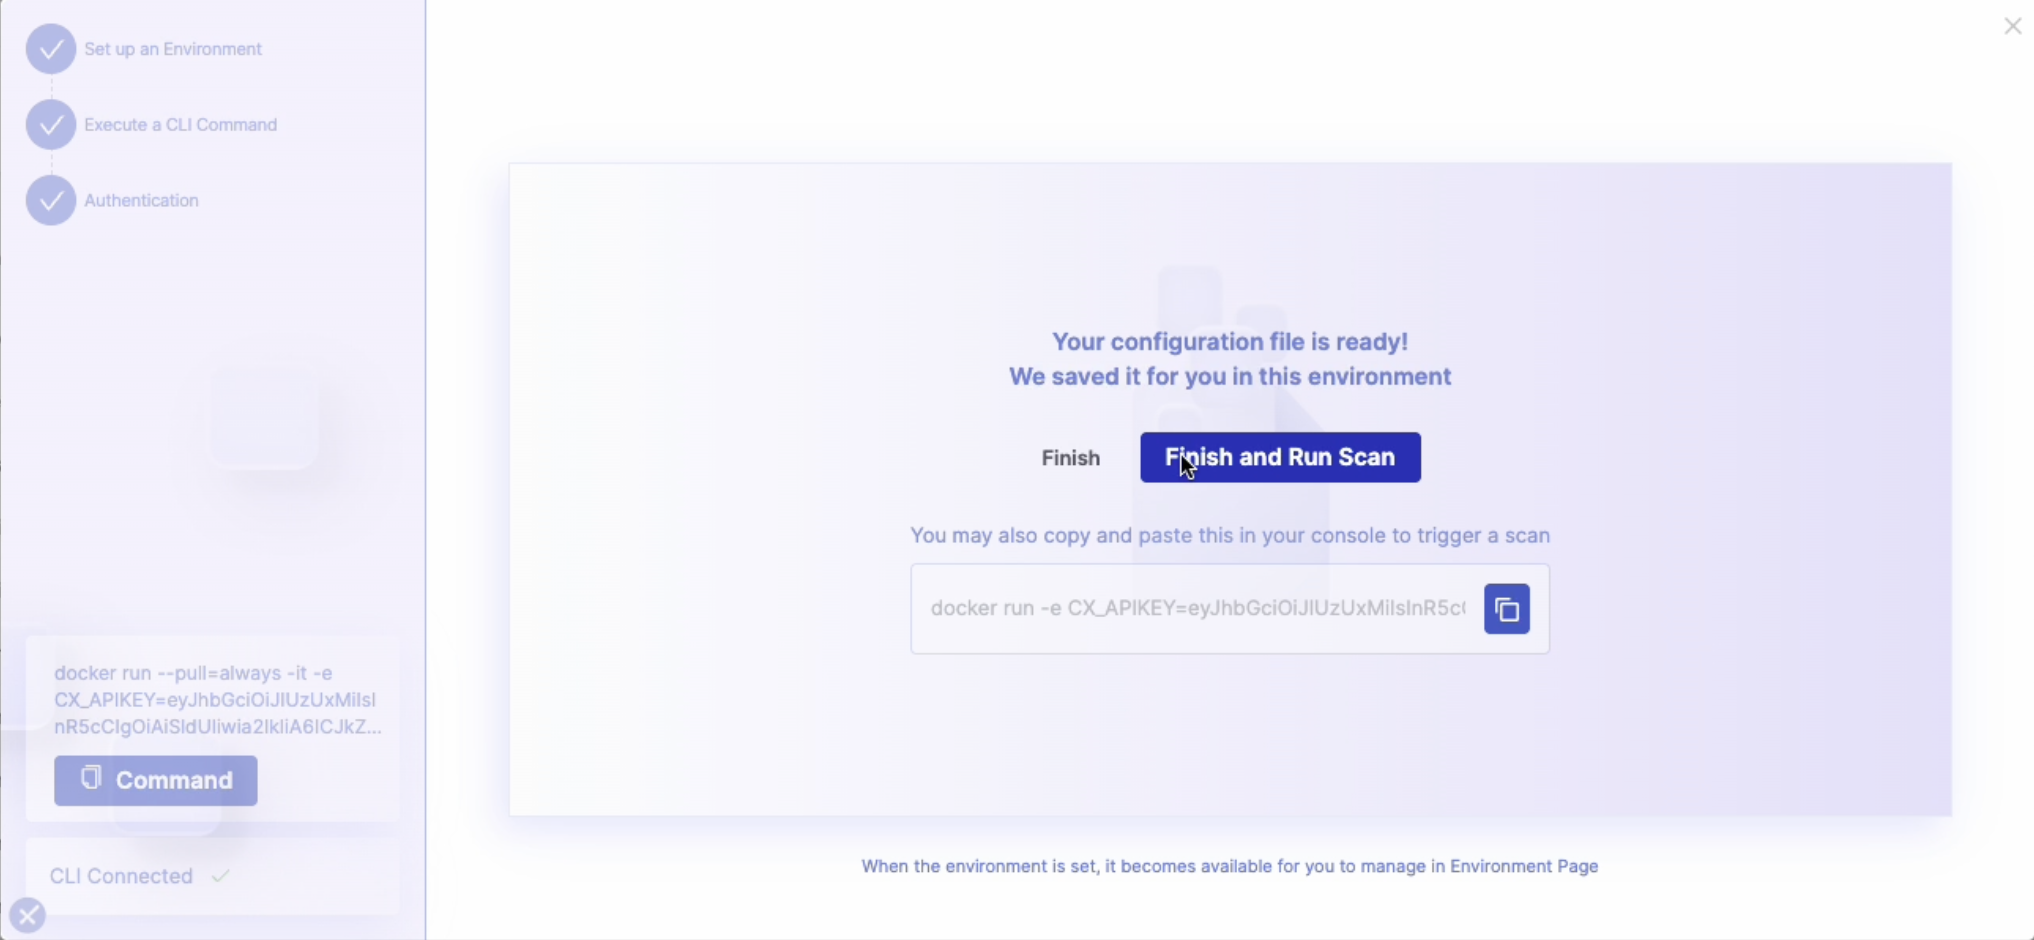
CxDAST automatically saves your configuration file, so you can reuse it for future scans without reconfiguring everything.
To launch your scan, perform the following:
Start Scan from the UI-Trigger the scan immediately with a single click- Optional for public apps
Copy the CLI Command
Ideal for integrating into your CI/CD pipeline.
Optional for public apps
Required for private apps, where local execution may be necessary due to network restrictions.
Note
Due to security reasons, the recorder authentication method is currently available only for scans initiated via the DAST-CLI.
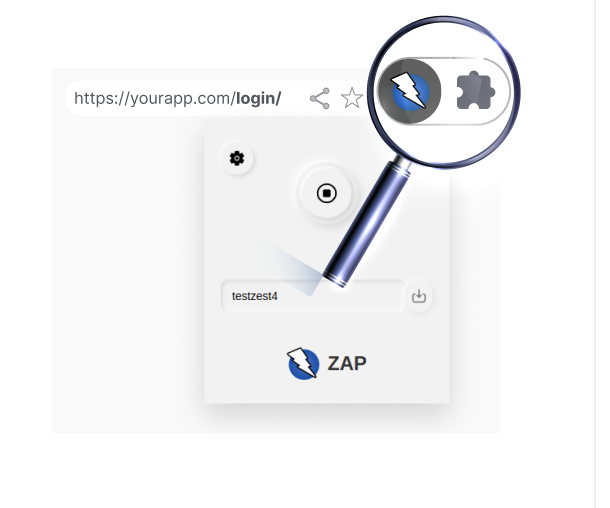
The browser extension allows you to record your login interactions for authentication setup.
This method is a quick and visual way of creating authentication flows and allows you to record an authentication session.
The ZAP by Checkmarx extension is available for both Chrome and Firefox.
To record your login session, follow these steps:
Add the ZAP by Checkmarx Recorder extension to your browser by selecting the appropriate link for your browser- Chrome Extension or Firefox Extension support.
If the extension is installed on your browser, you can skip to the next step.
In your browser’s top-right corner, locate the ZAP extension icon.
Navigate to your application's login page, then click Record to start capturing the login process.
Perform all necessary login actions while recording.
Once complete, click Stop Recording and Download to save the recording file to your local machine.
In the CxOne onboarding wizard, upload your saved recording file on the recorder step to complete the authentication setup.
Warning
Auto-filled saved passwords are currently not recognized by the browser recorder and should be filled in manually.
Managing Saved Configuration Files
Environment Configuration Indicator
An indicator will appear for each environment, showing that an onboarded environment with a saved configuration file is ready for scanning.

Scan Options by Environment Type
Public Environments
Hover and click Scan at the end of the environment row to trigger a scan directly.
Alternatively, click ⋮ and select Copy Scan Command.
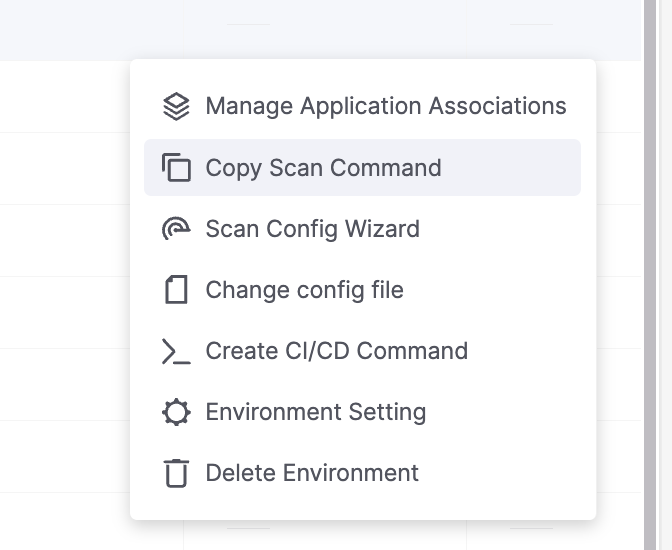
Private Environments
Scanning requires CLI execution. Hover over the environment row to reveal the Copy Scan CMD, which you can use in your local or CI/CD environment.

Update Configuration File
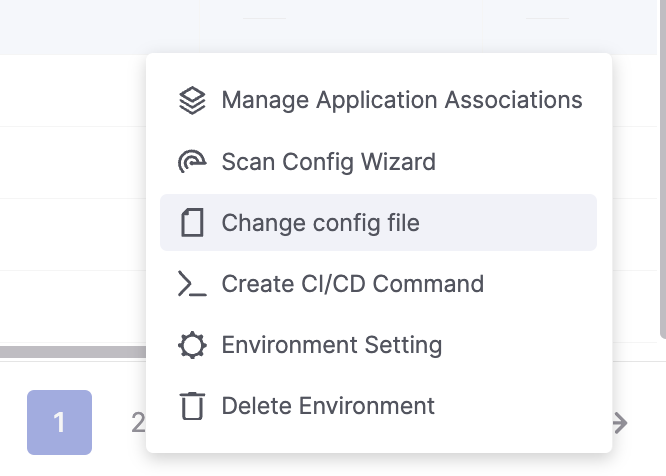
You can replace an existing configuration file by clicking ⋮ on the environment row and selecting Change Config File.
You can modify settings for each environment at any time via the Environment Settings panel. The following options are available:
Tags (Optional)
Assign custom tags to the environment. Tags help filter environments in the UI.
Note: Tagging is independent and intended for organizational purposes. They do not impact other components.
Groups (Optional)
Assign user groups to the environment.
Once a group is assigned, all group members will have permission to perform actions in the environment, such as initiating scans and viewing results.