ActiveMQ TLS Connection Guide
These instructions define the procedure for enabling the TLS protocol connection to the ActiveMQ.
SAST ActiveMQ Clients
The following services operate as ActiveMQ clients:
Access Control (IIS)
Engine Service
Scans Manager Service
Results Service
Configuring ActiveMQ Server Certificates
Notice
In some instances, ActiveMQ servers are also referred to as ActiveMQ brokers.
Server certificates can be configured in several ways. For the purposes of this guide, we provide examples for a self-signed certificate and a CA certificate.
Self-Signed Certificate
Self-signed certificates are used for testing and development.
1. Navigate to the Checkmarx ActiveMQ\conf folder.
2. In the Search field, enter cmd and execute the relevant command according to the respective scenarios listed below.
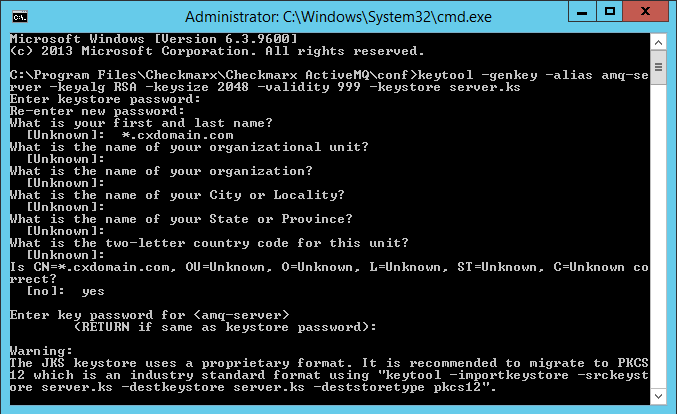
3. Create the server certificate (self-signed) as illustrated:
keytool -genkey -alias amq-server -keyalg RSA -keysize 2048 -validity 999 -keystore server.ks
During the process of self-signed certification creation, you are prompted for the following credentials and information:
Password. Required, the key store password.
Your first and last name, which is going to be your domain name (FQDN). Required by the ActiveMQ URI for the certificate to operate.
Additional organizational information. Optional
Certificate Password. Required, it is recommended to to use the same password as for the key store password.
Notice
You may use the wildcard * for subdomains, for example *.cxdomain.com
 |
4. Export the server certificate.
Notice
The certificate must be available to every client.
keytool -export -alias amq-server -keystore server.ks -file broker_cert.cer
5. Install the desired certificate on every client as explained in the relevant section below.
CA Certificate
CA certificates are used for production.
Notice
CA Certificates must be in .pfx format.
1. Navigate to theCheckmarx ActiveMQ\conffolder.
2. Enter cmd in the Search field and execute the relevant command according to the respective scenarios listed below:
3. Create a key store from an existing CA certificate (cert.pfx).
keytool -importkeystore -srckeystore cert.pfx -srcstoretype pkcs12 -destkeystore server.ks -deststoretype JKS
4. Copy the CA certificate to every client.
5. Install the desired certificate on every client as explained in the relevant section below.
Installing the Certificate
This section explains how to install the respective certificate under Windows:
Copy the certificate to the client and then double-click it or use the Certificate Management tool (certmgr.msc) to install.
Notice
Certificates must be installed in the Trusted Root Certificate Store on every client host.
Enabling TLS Protocol Connection
The TLS protocol connection to the ActiveMQ can be enabled by configuring the ActiveMQ server via a configuration file (activemq.xml) and then updating the ActiveMQ client configuration via the database (CxDB).
Configuring the ActiveMQ Server
Once the CxSAST environment has been installed and fully configured, do the following:,
1. Navigate to the Checkmarx ActiveMQ\conf folder and open activemq.xml.
2. Edit the <sslContext> tag accordingly, using either a KS or a PFX file, as shown in the following examples:
Example with KS file:
<sslContext>
       <sslContext keyStore="file:${activemq.conf}/server.ks"
                   keyStorePassword="${cx.keystore.password}" />
</sslContext>
or
Example with PFX file:
<sslContext>
       <sslContext keyStore="file:${activemq.conf}/cx.company.com.pfx"
                   keyStorePassword="${cx.keystore.password}" />
</sslContext>
2. Edit the <transportConnectors> section, change the openwire line into a comment, and add the following line:
<transportConnector name="ssl" uri="ssl://myhost.mydomain:61617?transport.enableProtocols=TLSv1.2&transport.enableCipherSuites=TLS_AES_128_GCM_SHA256,TLS_AES_256_GCM_SHA384,TLS_CHACHA20_POLY1305_SHA256,ECDHE-ECDSA-AES128-GCM-SHA256,ECDHE-RSA-AES128-GCM-SHA256,ECDHE-ECDSA-AES256-GCM-SHA384,ECDHE-RSA-AES256-GCM-SHA384,ECDHE-ECDSA-CHACHA20-POLY1305,ECDHE-RSA-CHACHA20-POLY1305,DHE-RSA-AES128-GCM-SHA256,DHE-RSA-AES256-GCM-SHA384"/>
Notice
The transportConnector defines theportthat will be used for ActiveMQ communications.
This port will be required for the ActiveMQ URI.
Notice
It is required to use TLS v1.2 and relevant Cipher suites:
ECDHE-ECDSA-AES128-GCM-SHA256, ECDHE-RSA-AES128-GCM-SHA256, ECDHE-ECDSA-AES256-GCM-SHA384, ECDHE-RSA-AES256-GCM-SHA384, ECDHE-ECDSA-CHACHA20-POLY1305, ECDHE-RSA-CHACHA20-POLY1305,DHE-RSA-AES128-GCM-SHA256, DHE-RSA-AES256-GCM-SHA384
3. Navigate to C:\Program Files\Checkmarx\Checkmarx ActiveMQ\bin and open a command line window (cmd instance) for that folder.
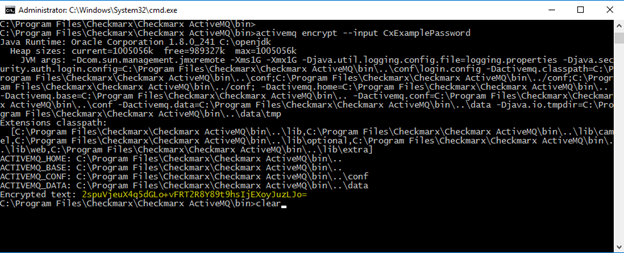
4. Use the ActiveMQ encryption utility to encrypt your password by entering the following in the command line:
Notice
activemq encrypt --password CxManager --input CxExamplePassword
Note: The password argument is related to the “ACTIVEMQ_ENCRYPTION_PASSWORD” environment variable, which is by default “CxManager”.
5. Copy the encrypted text (yellow fonts in the screen image below).

6. Navigate to C:\Program Files\Checkmarx\Checkmarx ActiveMQ\conf and edit credentials-enc.properties.
7. Add a new variable in the same format as the existing value to the text file with the encrypted text between the brackets, for example:
cx.keystore.password=ENC(2spuVjeuX4q5dGLo+vFRT2R8Y89t9hsIjEXoyJuzLJo=)
Notice
Additional information about certificate manipulation in JAVA is available in the Oracle documentation: https://docs.oracle.com/javase/8/docs/technotes/tools/unix/keytool.html. Some examples can be found in the Create Broker Certificate section.
Keystore passwords must be encrypted. For additional information and instructions, refer to https://activemq.apache.org/encrypted-passwords.
High Availability Environment
If High Availability cluster setup is used, copy the following files to every server:
activemq.xml
server.ks
credentials-enc.properties
Restart each relevant ActiveMQ service on the respective server after copying all the files.
ActiveMQ Connection URI
1. For TLS connections, use ssl as the protocol prefix of the URI. The URI format is as follows:
<protocol>://<FQDN>:<port>?optionalparameter=value&optionalparameter2=value
2. Define additional connection parameters as follows:
parameter=value¶meter2=list_valueA, list_valueB
Notice
To ensure that the CxEngine sends the results to the correct ActiveMQ server, ensure that the ValidateEngineMessageQueueConfigurationEnabled feature flag configuration item in the CxComponentConfiguration table is set to true (the default).
If the URL of the ActiveMQ on the server is different from the ActiveMQ URL of the application (as specified in CxComponentConfiguration), the CxEngine will go offline with an OfflineReason error message.
TLS Server Example
ssl://myhost.mydomain:61617
High Availability TLS Example
Refer to the High Availability user guide at Configuring ActiveMQ for High Availability Environments.
failover:ssl://myhost1.mydomain:61617,ssl://myhost2.mydomain:61617
Notice
The parameter value must be ULR encoded
Disabling server name verification is not recommended.
High Availability setup broker certificate must be deployed to all clients in a similar environment.
For advanced URI configuration options please refer to ActiveMQ documentation: https://activemq.apache.org/activemq-connection-uris
Configuring ActiveMQ Clients
To configure ActiveMQ clients, do the following:
1. OpenMS SQL Server Management Studio.
2. Connect to the SQL server.
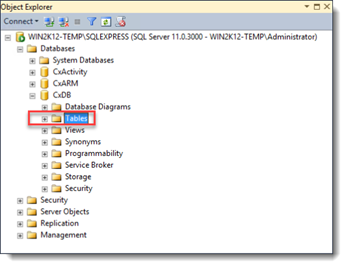
3. Navigate to Databases > CxDB > Tables.

4. Expand the Tables repository to view its content and navigate to dbo.CxComponentConfiguration .
5. Right-click dbo.CxComponentConfiguration and then select Edit Rows.
6. In the ActiveMessageQueueURL key field, enter the ActiveMQ URI.
7. In the Tables repository, right-click Config.CxEngineConfigurationKeysMeta and select Edit Rows.
8. In the ACTIVE_MESSAGE_QUEUE_URL key field, enter the ActiveMQ URI:
Notice
These steps can be performed by using the following DB TSQL script:
Replace <host.domain> with your relevant value:
DECLARE @AmqString varchar(1000)
SET @AmqString = 'ssl://<host.domain>:61617'
Update [CxDB].[dbo].CxComponentConfiguration
set [Value] = @AmqString
where [Key] = 'ActiveMessageQueueURL'
Update [CxDB].[Config].[CxEngineConfigurationKeysMeta]
set [DefaultValue] = @AmqString
where [KeyName] = 'ACTIVE_MESSAGE_QUEUE_URL'
9. Restart the following services for the changes to take effect:
Scans Manager Service
Results Service
Access Control (IIS)
Configuring M&O with ActiveMQ TLS
In the C:\Program Files\Checkmarx\Checkmarx Risk Management\AMQclient folder, create the mnoTrustStore.ts file. The Client trust store file contains the server's certificate. This file is mandatory and must always be available in the AMQclient folder to configure AMQ SSL. The Client keystore file is only needed in case of mutual TLS.
To create the mnoTrustStore.ts file:
1. Open the Windows command line interface (cmd)
2. Enter copy client.ts mnoTrustStore.ts
3. Create a file called ssl_for_amq.properties with the password of the client truststore. The file content looks as follows:
TRUST_STORE_PASSWORD=Cx123456!
AMQ_BROKER_URL= ssl://myhost.mydomain:61617
TRUST_STORE_PASSWORD - Mandatory and must always be set.
AMQ_BROKER_URL - Not mandatory in this file. If supplied, it is used by MnO instead of the URL in the CxComponentConfiguration table. The URL must not contain certificate information like the broker URL in CxComponentConfiguration since this information is supplied by the passwords in ssl_for_amq.properties and mnoTrustStore.ts .
The file ssl_for_amq.properties is relevant for AMQ SSL configuration only.
Notice
When using a self-signed certificate, the URL must contain the name of the domain (FQDN) used to create the server certificate.
The values are encrypted after restarting CXARM.
.