Scanning Projects
Once a project is configured, you can run a scan within that project. Each time a scan is executed, the source code is uploaded as part of the scanning procedure.
There are 2 options to perform a scan:
Upload the source code in a zip or tar file
Scan a repository path - GitHub, GitLab, Bitbucket, Azure DevOps.
When scanning a repository, it is necessary to specify which branch of the project is being scanned.
You can also add tags to the scan. Tags are very useful for project filtering purposes.
Tagging has no dependencies in any other component, and it is possible to configure any required value.
Running a Scan
Notice
Initiating a scan is possible only within an existing project.
There are three options scanning a project:
Scan the source code from a repository URL.
Scan the source code from a ZIP or TAR archive.
Scan an SBOM of your project (supported only for SCA scanner).
Scan Process
When a scan is run using multiple scanners, all scanners run in parallel.
When multiple scans are run in your account, the number of concurrent scans is specified in your account's license. This info is available under Account Settings > License > License Plan Summary. When the limit is exceeded, the scans are added to a queue which runs on a "first in first out" basis.
Running a Scan on a ZIP or TAR Archive
Note
The maximum supported upload size is 6 GB per compressed archive (ZIP or TAR). This limit applies to the archive file itself before extraction.
To run a scan on a ZIP or TAR archive:
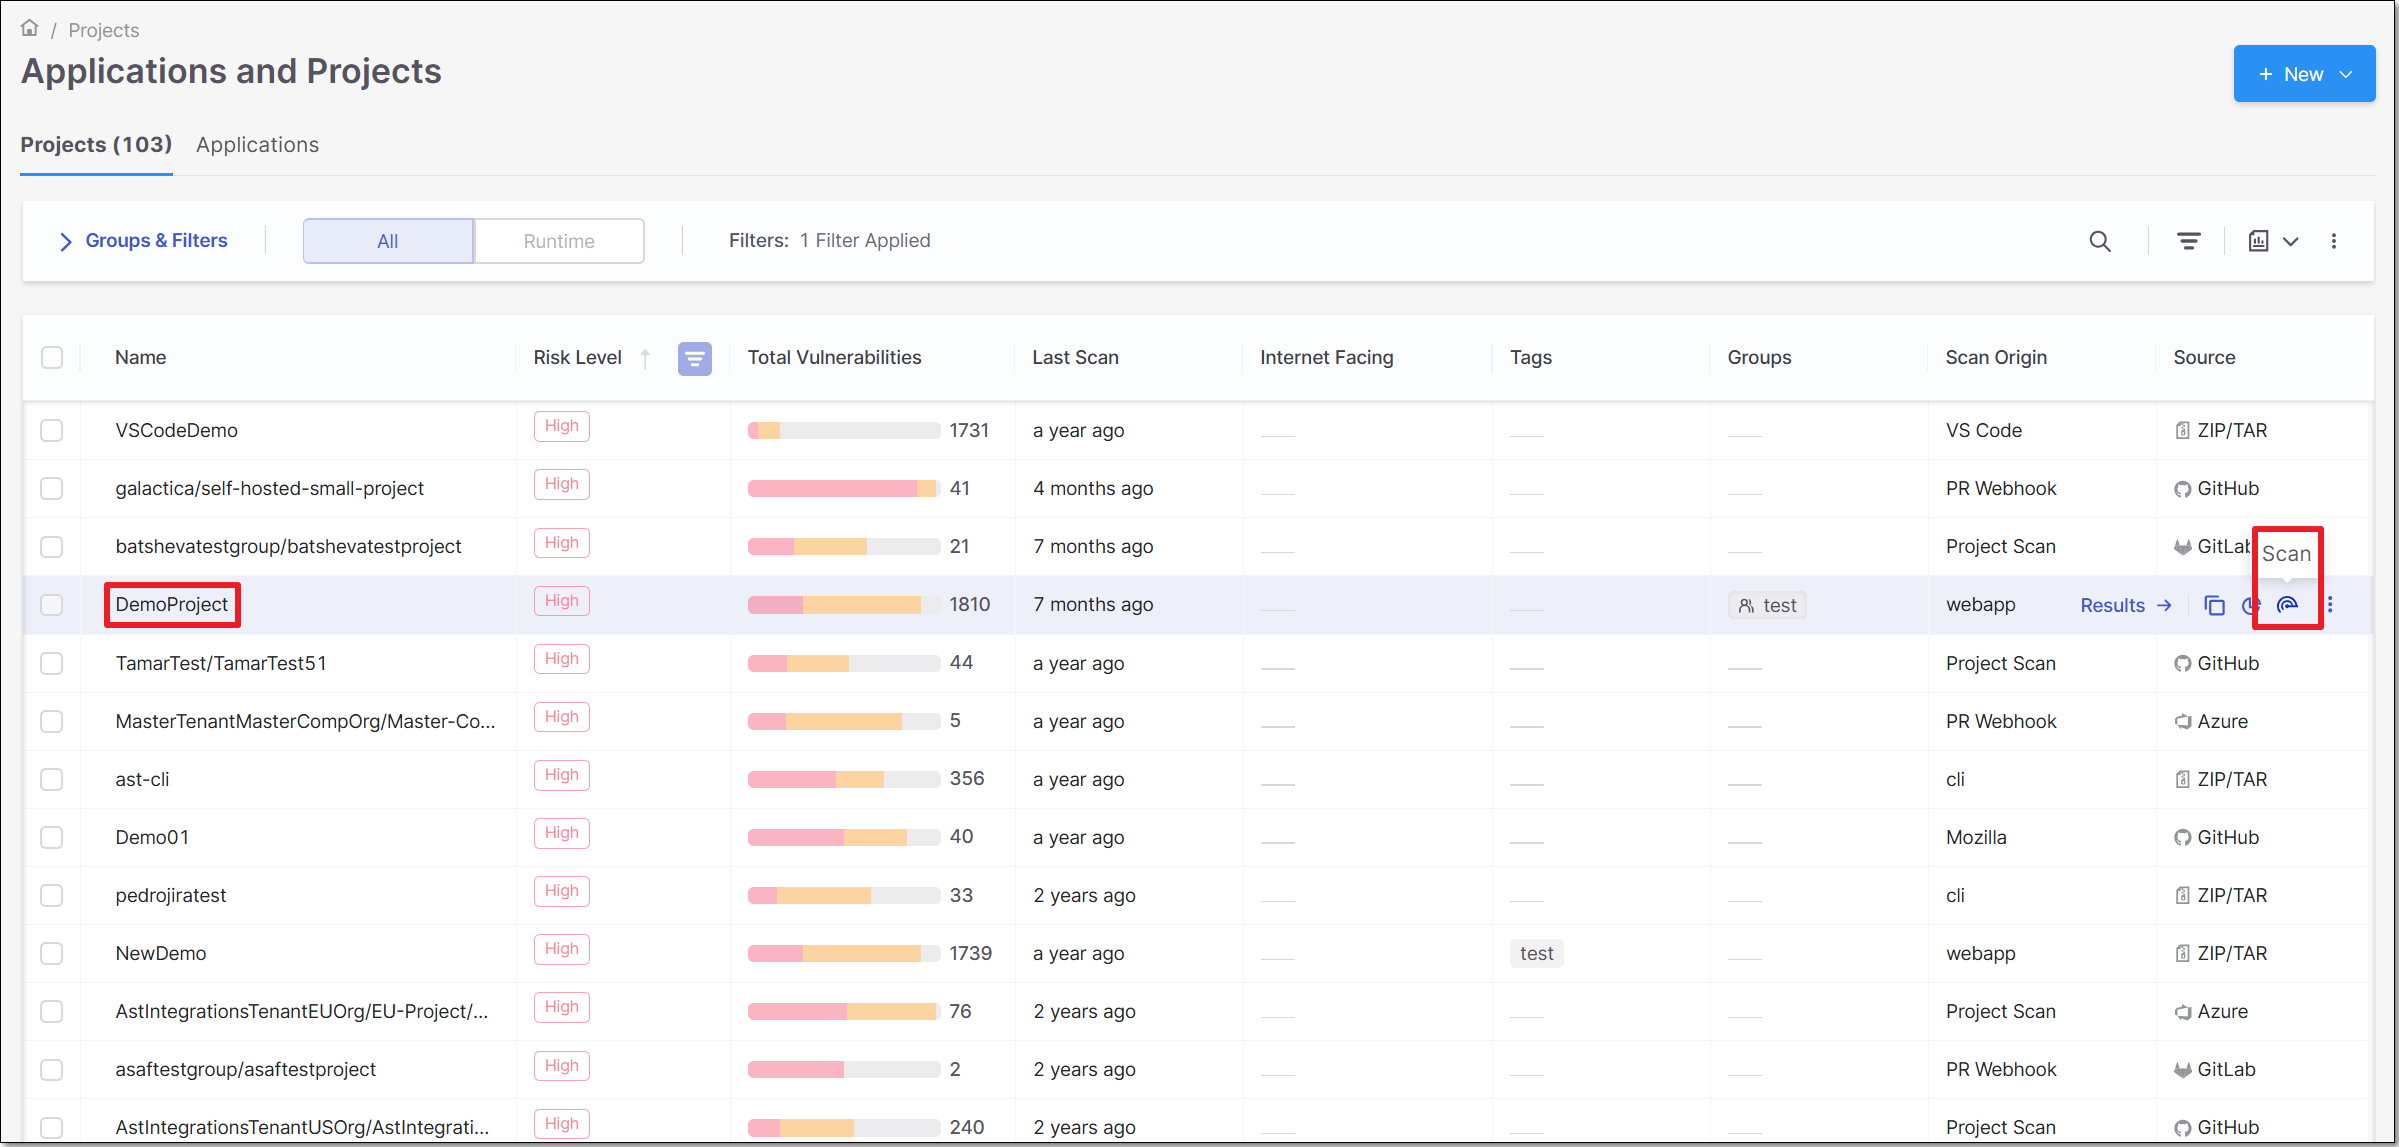
On the Application and Projects home page select the Projects tab.
Hover over the row of the project that you would like to scan, click on the Scan icon
 .
.
The New Scan window opens. By default, under Project Name, the project of the row in which you clicked the Scan icon
is selected.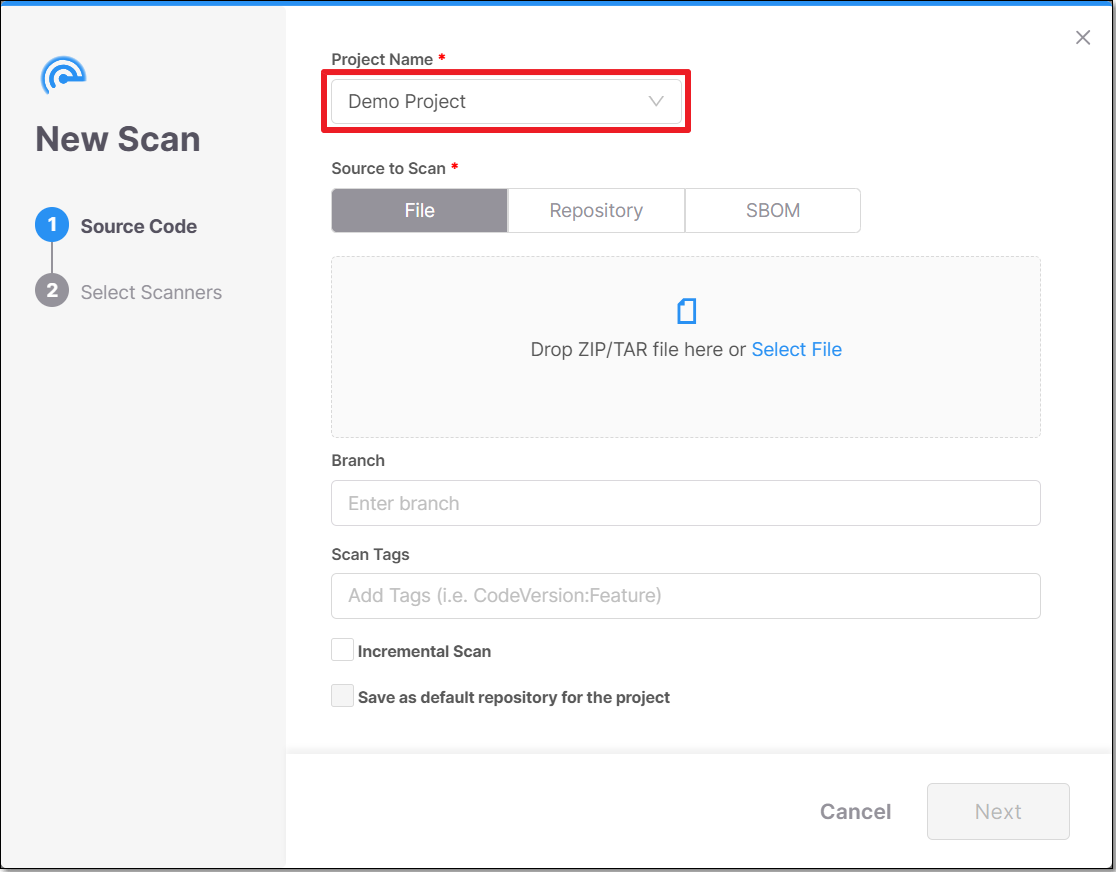
Notice
If you would like to scan a different project, it is possible to select it from the drop-down menu.
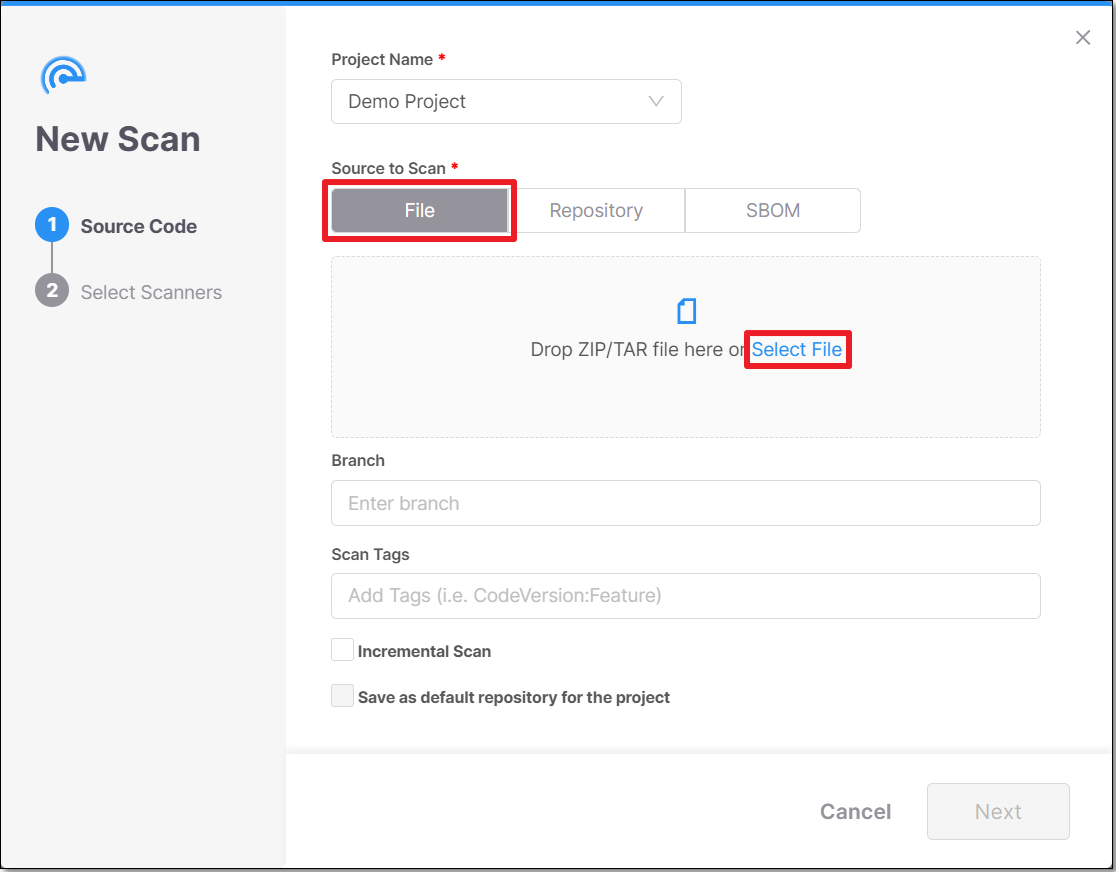
In the Source to Scan section, File is selected by default. In the box below, either drag a file into the box or click on Select File and navigate to the relevant file.
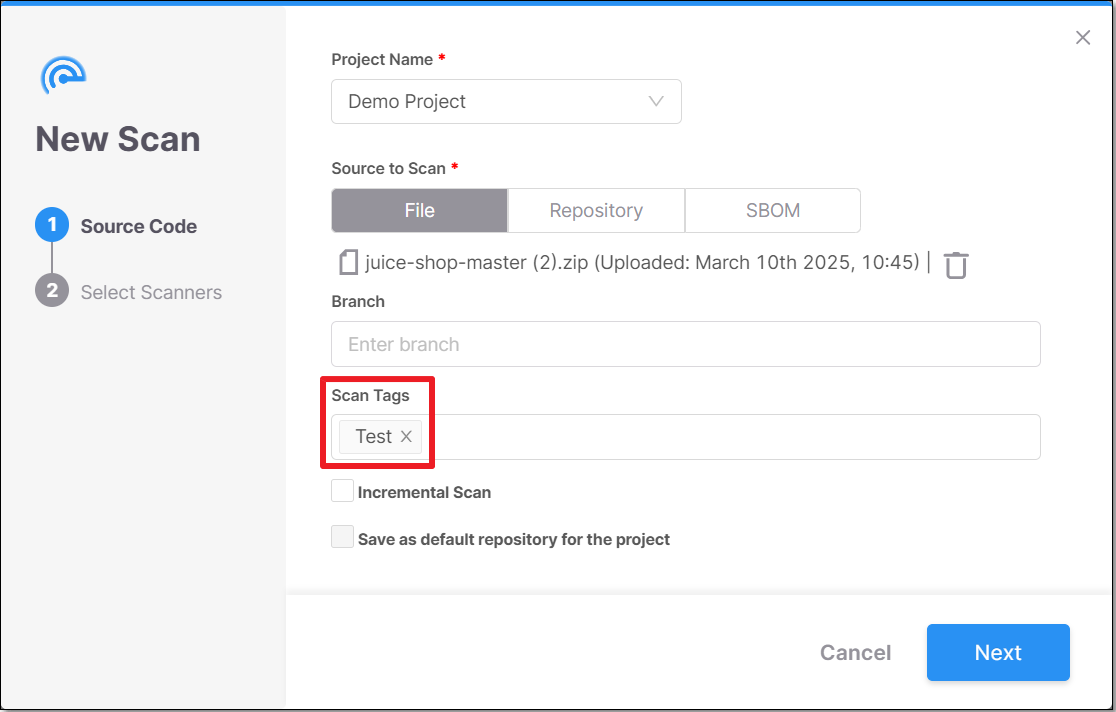
In the Branch field you can specify the name of the branch of the project. (Optional)
In the Scan Tags field you can add tags to the scan. (Optional)
Tags can be added in two different formats:
Notice
Tags can be used also for overriding Jira feedback app fields values. For additional information see Fields Override
Label: <string>
key:value: <key string:value string>
Select the checkbox next to Incremental Scan, if you want to scan only the latest changes and not the entire project. For additional information on Incremental scans, refer to Incremental Scans (SAST Scanner).
Notice
This option is relevant only for SAST and API Security scanners.
Click Next.
Select one or more scanners.

Notice
If you select API Security, SAST must be selected as well because API Security utilizes the SAST code to detect APIs.
Click Scan.
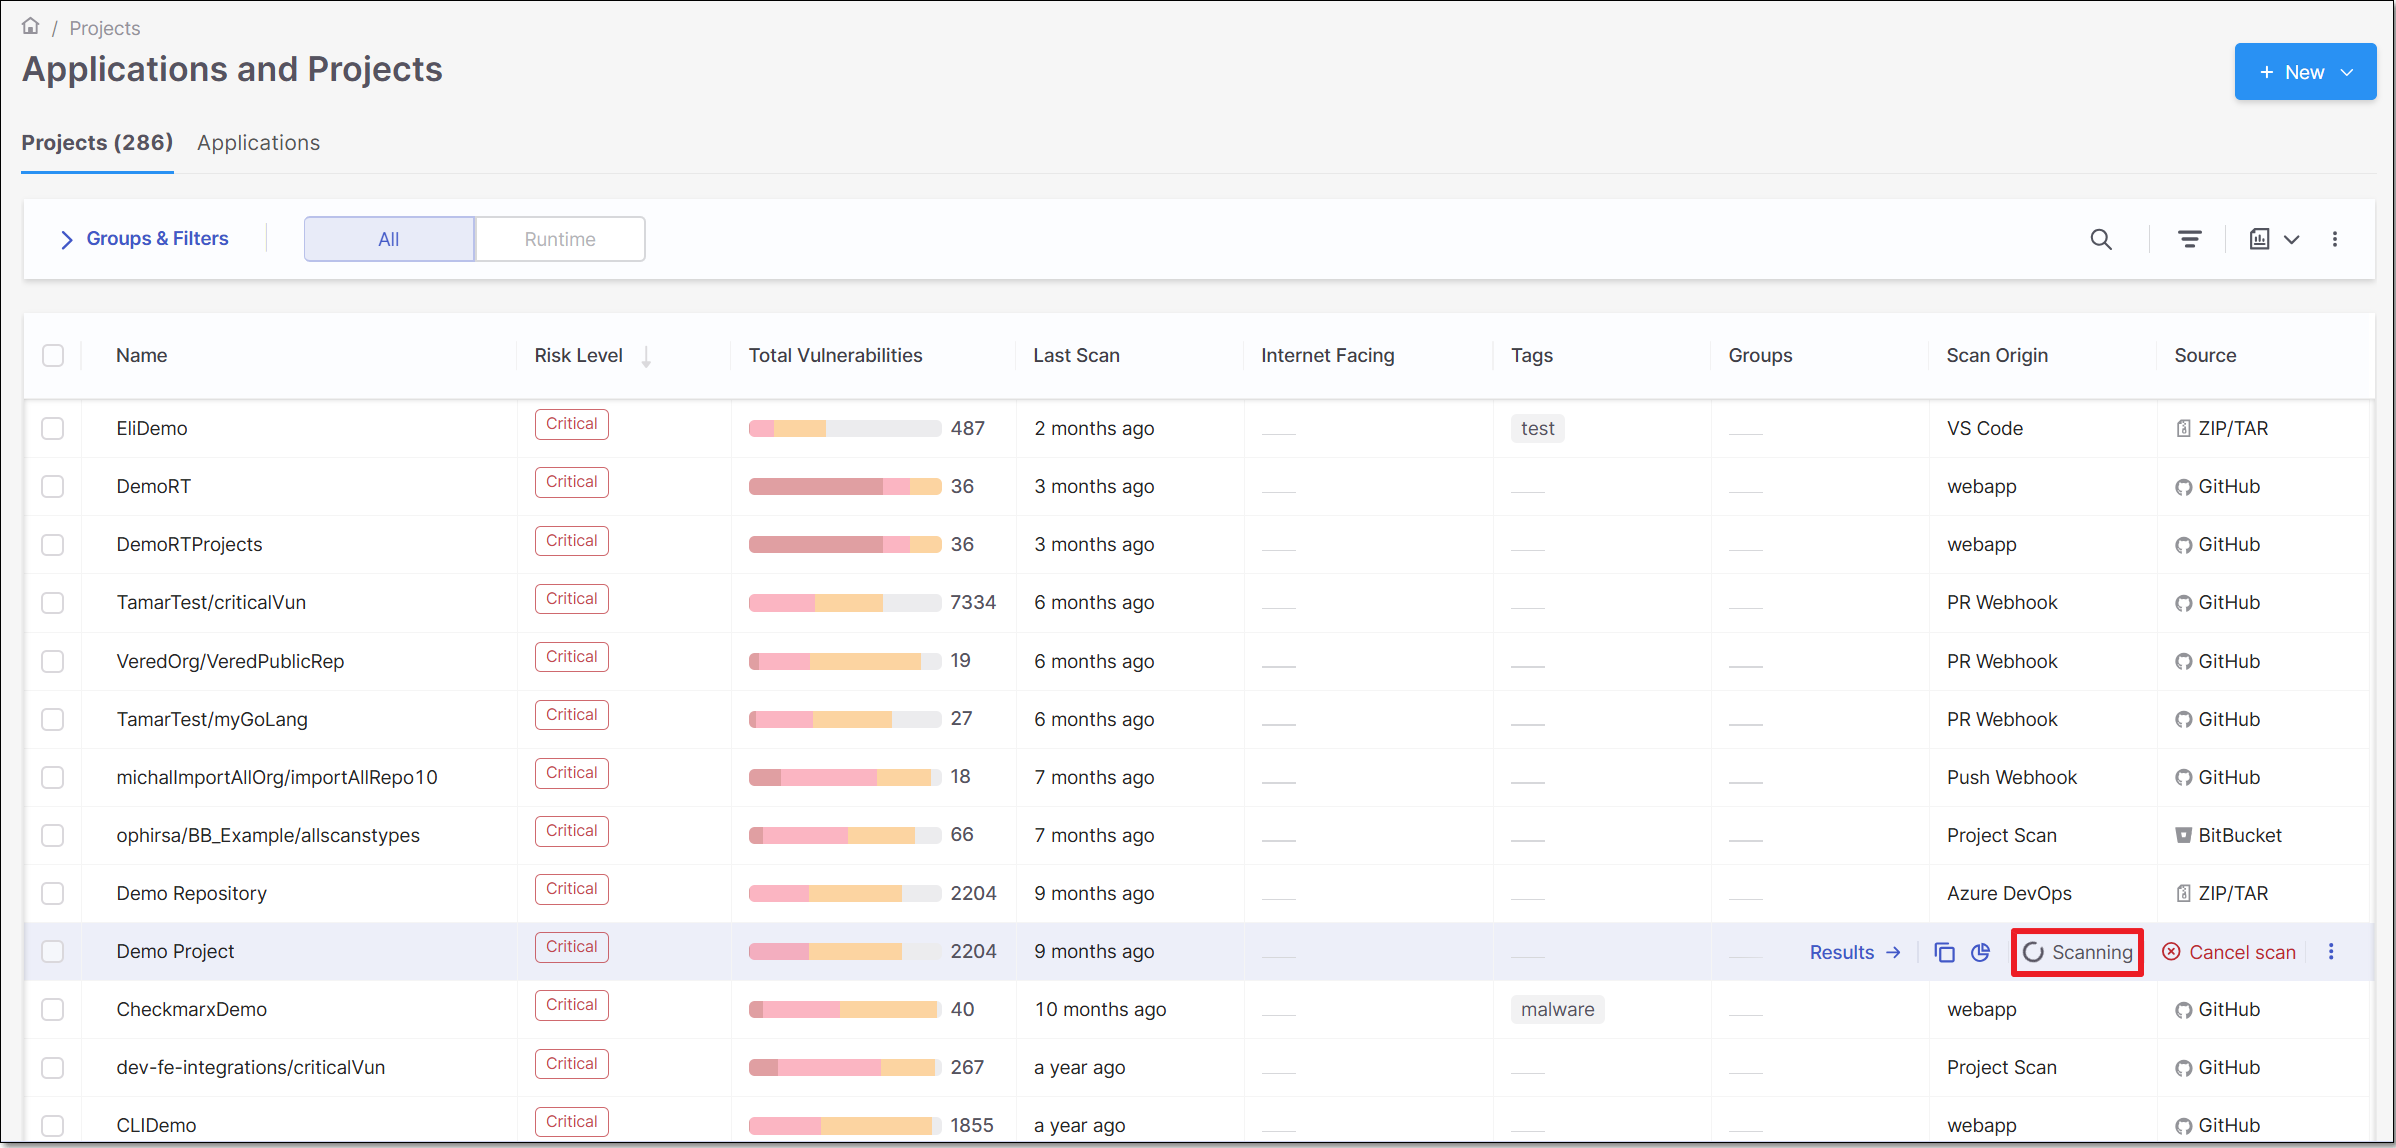
The New Scan dialog closes and the scan starts.
You can monitor the scan's status in the Projects tab when hovering over the project.
Running a Scan on a Repository URL
To run a scan on a Repository URL:
On the Application and Projects home page select the Projects tab.
Hover over the row of the project that you would like to scan, click on the Scan icon
.The New Scan window opens. By default, under Project Name, the project of the row in which you clicked the Scan icon
is selected.Notice
If you would like to scan a different project, it is possible to select it from the drop-down menu.
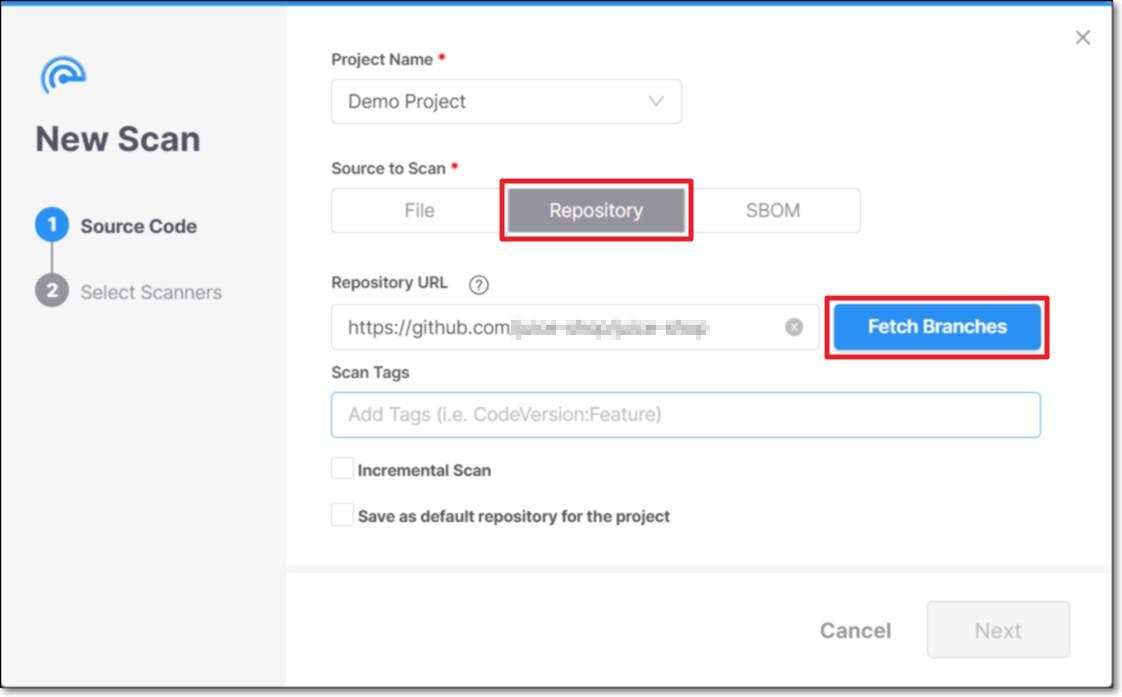
In the Source to Scan section, click on the Repository tab.
In the Repository URL field, enter the URL of the repo that you would like to scan.
Click Fetch Branches.
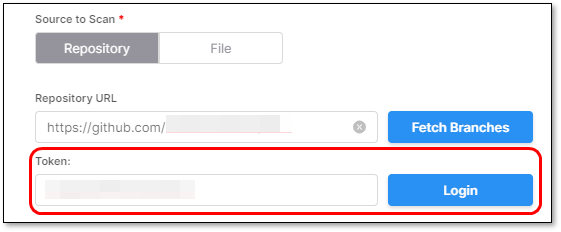
If the repo is public, you will get a confirmation that it has Connected Successfully. If it is a private repo, then the Token field will be shown.
For private repos, in the Token field, enter your Personal Access Token (PAT) for the registry and click Login.
In the Branch field, select from the drop-down list the branch that you would like to scan.
In the Scan Tags field you can add tags to the scan. (Optional)
Tags can be added in two different formats:
Notice
Tags can be used also for overriding Jira feedback app fields values. For additional information see Fields Override
Label: <string>
key:value: <key string:value string>
Select the checkbox next to Incremental Scan, if you want to scan only the latest changes and not the entire project. For additional information on Incremental scans, refer to Incremental Scans (SAST Scanner).
Notice
This option is relevant only for SAST and API Security scanners.
Select the checkbox next to Save as default repository for the project if you would like to save this URL for use in future scans of the project.
Click Next.
Select one or more scanners.
Notice
If you select API Security, SAST must be selected as well because API Security utilizes the SAST code to detect APIs.
Click Scan.
The New Scan dialog closes and the scan starts.
You can monitor the scan's status in the Projects tab when hovering over the project.
Running a Scan on an SBOM
You can run an SCA scan on an SBOM file. The scan is run as a Checkmarx One project, with the source specified as an SBOM file. The SCA scanner returns comprehensive results of all risks associated with your open source packages. This enables customers who don’t want to submit their actual code, to obtain comprehensive SCA results for their project and manage the remediation via Checkmarx One.
SBOM scans can be run from the UI as well as via CLI or REST API.
Note
This capability is distinct from the capability to analyze an SBOM using the POST /analysis/requests API. The new method shows SCA results in the context of an actual Checkmarx One project, as opposed to just returning a report with the enriched SBOM data.
Limitations
Only the SCA scanner can run on an SBOM
Supported upload formats CycloneDX (v1.0-1.6) and SPDX (v2.3)
Can only run on a “manual” project (not a code repository integration)
It is mandatory to include the Package URL (purl) for each package in the SBOM. For more information about purl syntax, see here.
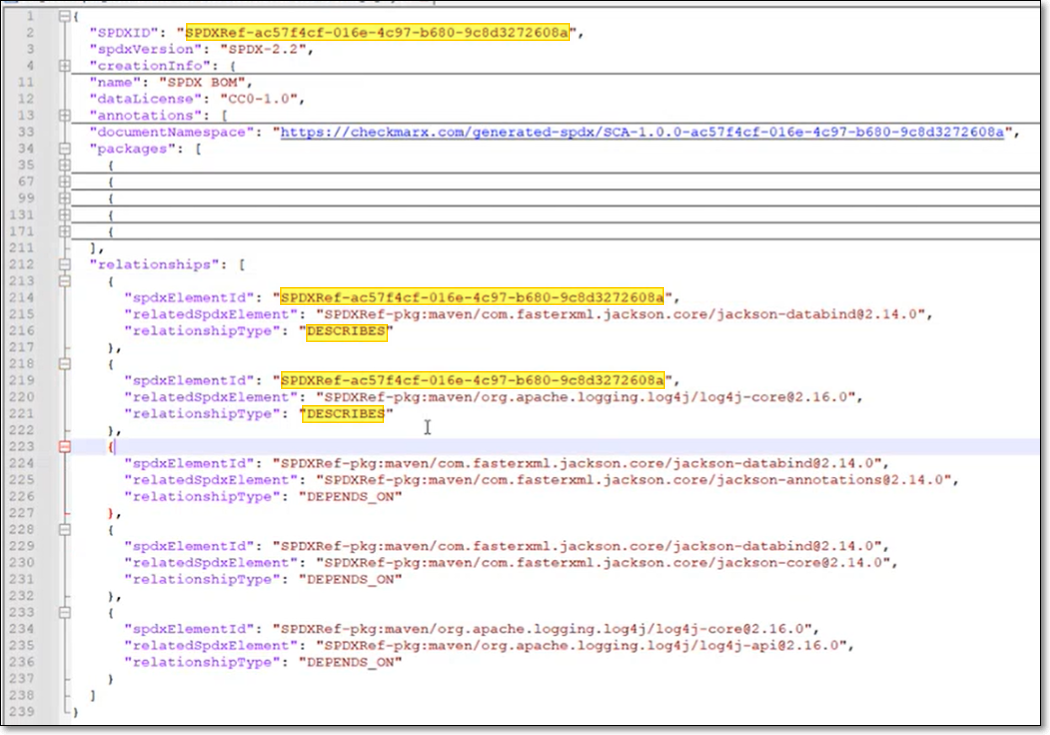
SPDX Requirements
For SPDX, it is important to indicate in the SBOM which packages are "direct". This is done by designating the relationship DESCRIBES or DEPENDS_ON for the SPDXID of the main component of the SBOM. If not specified, all packages will be shown as "direct".
SBOM Scan Procedure
To run a scan on an SBOM:
On the Application and Projects home page select the Projects tab.
Hover over the row of the project that you would like to scan, click on the Scan icon
.The New Scan window opens. By default, under Project Name, the project of the row in which you clicked the Scan icon
is selected.Notice
If you would like to scan a different project, it is possible to select it from the drop-down menu.
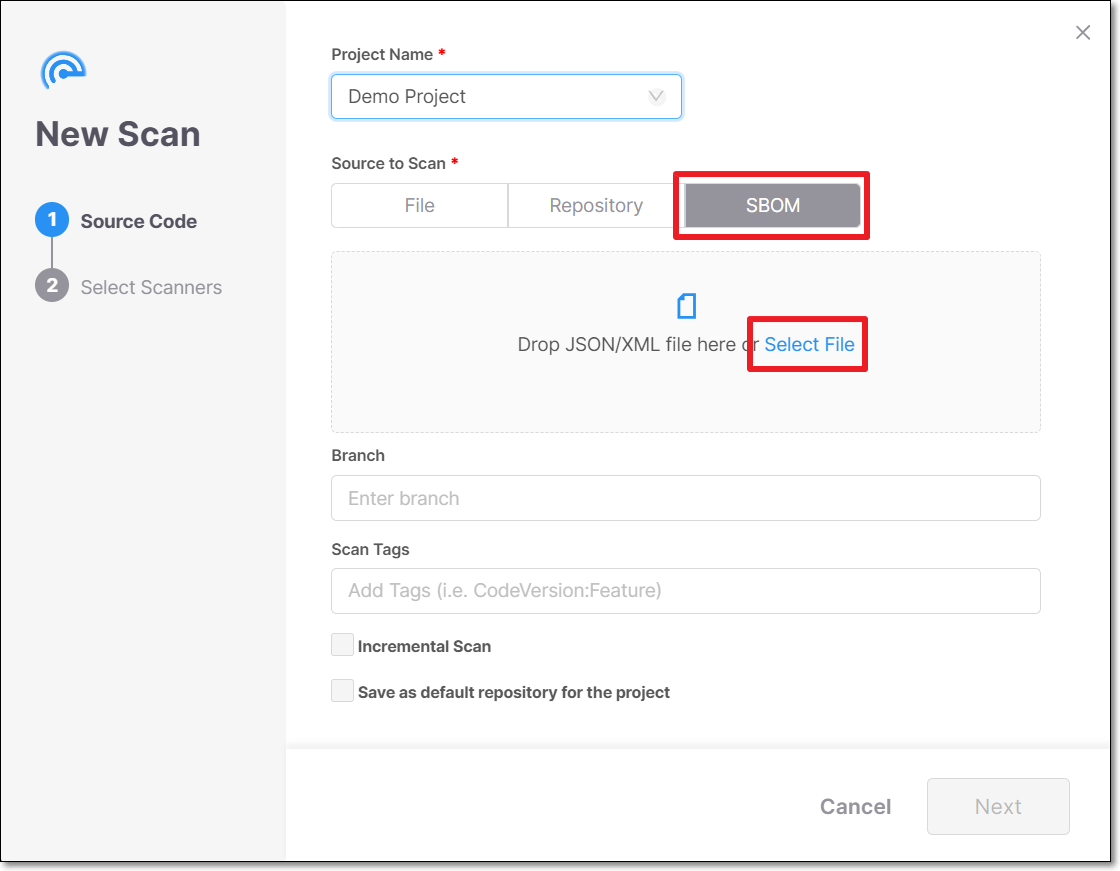
In the Source to Scan section, select SBOM.
In the box below, either drag a file into the box or click on Select File and navigate to the relevant file.
In the Branch field you can specify the name of the branch of the project. (Optional)
In the Scan Tags field you can add tags to the scan. (Optional)
Tags can be added in two different formats:
Notice
Tags can be used also for overriding Jira feedback app fields values. For additional information see Fields Override
Label: <string>
key:value: <key string:value string>
Click Next.
The SCA scanner is the only selected scanner because it is the only one supported when scanning SBOMs.
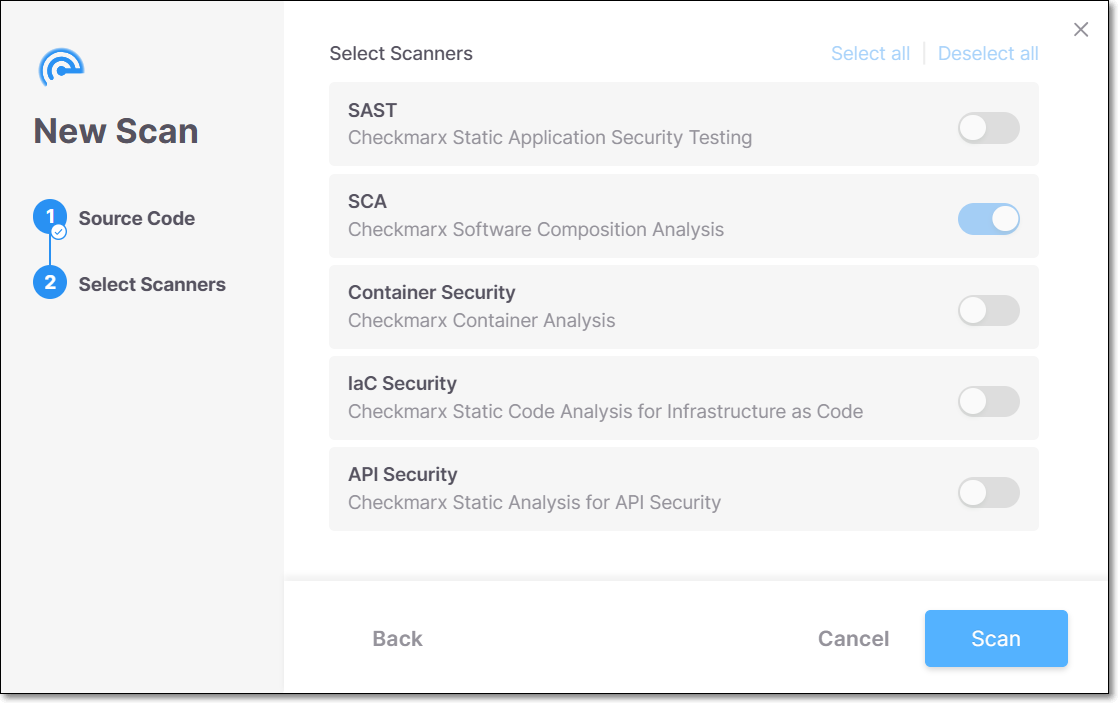
Click Scan.
The New Scan dialog closes and the scan starts.
You can monitor the scan's status in the Projects tab when hovering over the project.
Incremental Scans
Definition
Notice
Incremental scans are relevant only for the SAST scanner.
An incremental scan is a mechanism to scan a small portion of code to deliver fast results. This mechanism scans only the code changed from the last full scan and any code close to it (called "closure").
Notice
With every incremental scan, the changes from the last full scan are accumulated.
How does it work?
The results of every incremental scan are merged with its base full scan to provide a complete result set for the whole code. To understand the merge, we need to understand the different types of results. In the diagram below, only the "Changed files" and the "Closure files" are scanned by the incremental scan.
Each black line represents one result, flowing through several nodes:
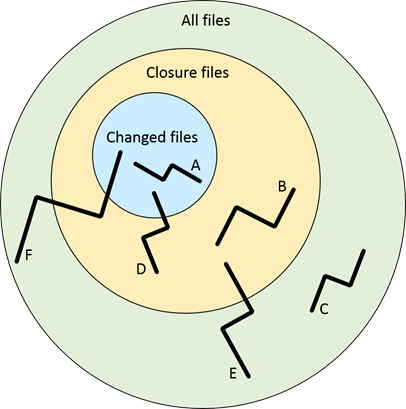 |
A – All of the result nodes are inside the changed files. New results like this returned from an incremental scan are "good results" that the total scan is expected to find.
B – All of the result nodes are inside the closure files. New results like this returned from an incremental scan are "bad results" because these files weren't changed, so there cannot be a new result here. These result types are removed because they are filtered in the incremental scan, and the remaining results are those in at least one of their nodes inside the changed files (A, D).
C – All of the result nodes are outside the closure files. The incremental scan cannot find these because these files are not scanned. The last full scan results are merged with the incremental scan results and shown as "recurrent.”
D – The result nodes are inside both the changed and closure files. New results returned from an incremental scan are "good results" that the incremental scan is expected to find.
E – The result nodes are both inside and outside the closure files. The incremental scan cannot find this kind of result because some result files are not scanned. The last full scan results are merged with the incremental scan results and shown as "recurrent.”
F - The result nodes are inside the changed files, the closure files, and the closure files. The incremental scan cannot find this kind of result because some result files are not scanned. The last full scan results are merged with the incremental scan results and shown as "recurrent.”
Adjusting the Incremental Scan Threshold
You can adjust the incremental scan threshold at the tenant and project levels in the Account Settings and Project Settings pages. The variable range is 0.5% to 10% with increments of 0.5%. The increment threshold at the tenant level applies to all projects in the tenant unless adjusted otherwise and overridden by a specific project's Project Settings.
To adjust the threshold at the Tenant level:
Navigate to
 then Global Settings to open the Account Settings page.
Select SAST to open its list of default parameters.
Select the threshold in the dropdown beneath Incremental threshold.
Click Save when done.
To adjust the threshold at the Project level:
Click the
 at the end of a project's row.
Select Project Settings.
Navigate to Rules.
Click + Add Rule.
Adjust the rule where the scanner is SAST, the parameter is Incremental threshold, and the increment threshold amount.
Click Save when done.
Running Incremental Scans
There are several ways to run an incremental scan. The following are some of the possible methods.
Project Settings - Go to Project Settings > Rules and create a Rule for the SAST scanner to run incremental scans. You can set whether or not this setting can be overridden when running an individual scan.
Running a scan - When manually initiating a scan of a Project, you can mark the Incremental scan checkbox.
CLI - When running the
scan createcommand from the CLI, you can add the flag--sast-incremental=trueto run an incremental scan.API - When running POST /scans, set the config value for sast scans to "incremental":"true".
IDE - When a scan is initiated from the IDE (as described here), it automatically runs as an incremental scan.
Limitations
Incremental scans are only relevant for the SAST scanner. All other scanners always run full scans.
An incremental scan can only run if the project has at least one completed full scan.
By default, the threshold is 7% unless configured otherwise.
Any scan breaching the threshold is converted to a full scan.
Incremental Scans of Branches
When working with branches within Checkmarx GitHub Integration, if you open a pull request to merge into the master branch, you could run a faster incremental scan instead of a longer full scan.
It is recommended to meet the following before running an incremental scan:
Always have the base branch (master) run a full scan (preferably after every commit)
Before every commit made to a pull request, rebase and merge from the base branch (master) to your branch
Note
Incremental scans are most effective when the pull request source branch (master) is up-to-date with the pull request branch, and regular full scans are performed on the base branch (master) for accuracy. The existing logic prioritizes the most recent full scan in the two branches.
You can enable incremental scans for branches (API) by performing the following:
Access Account Settings.
Navigate to SAST.
Select Incremental in branch (API).
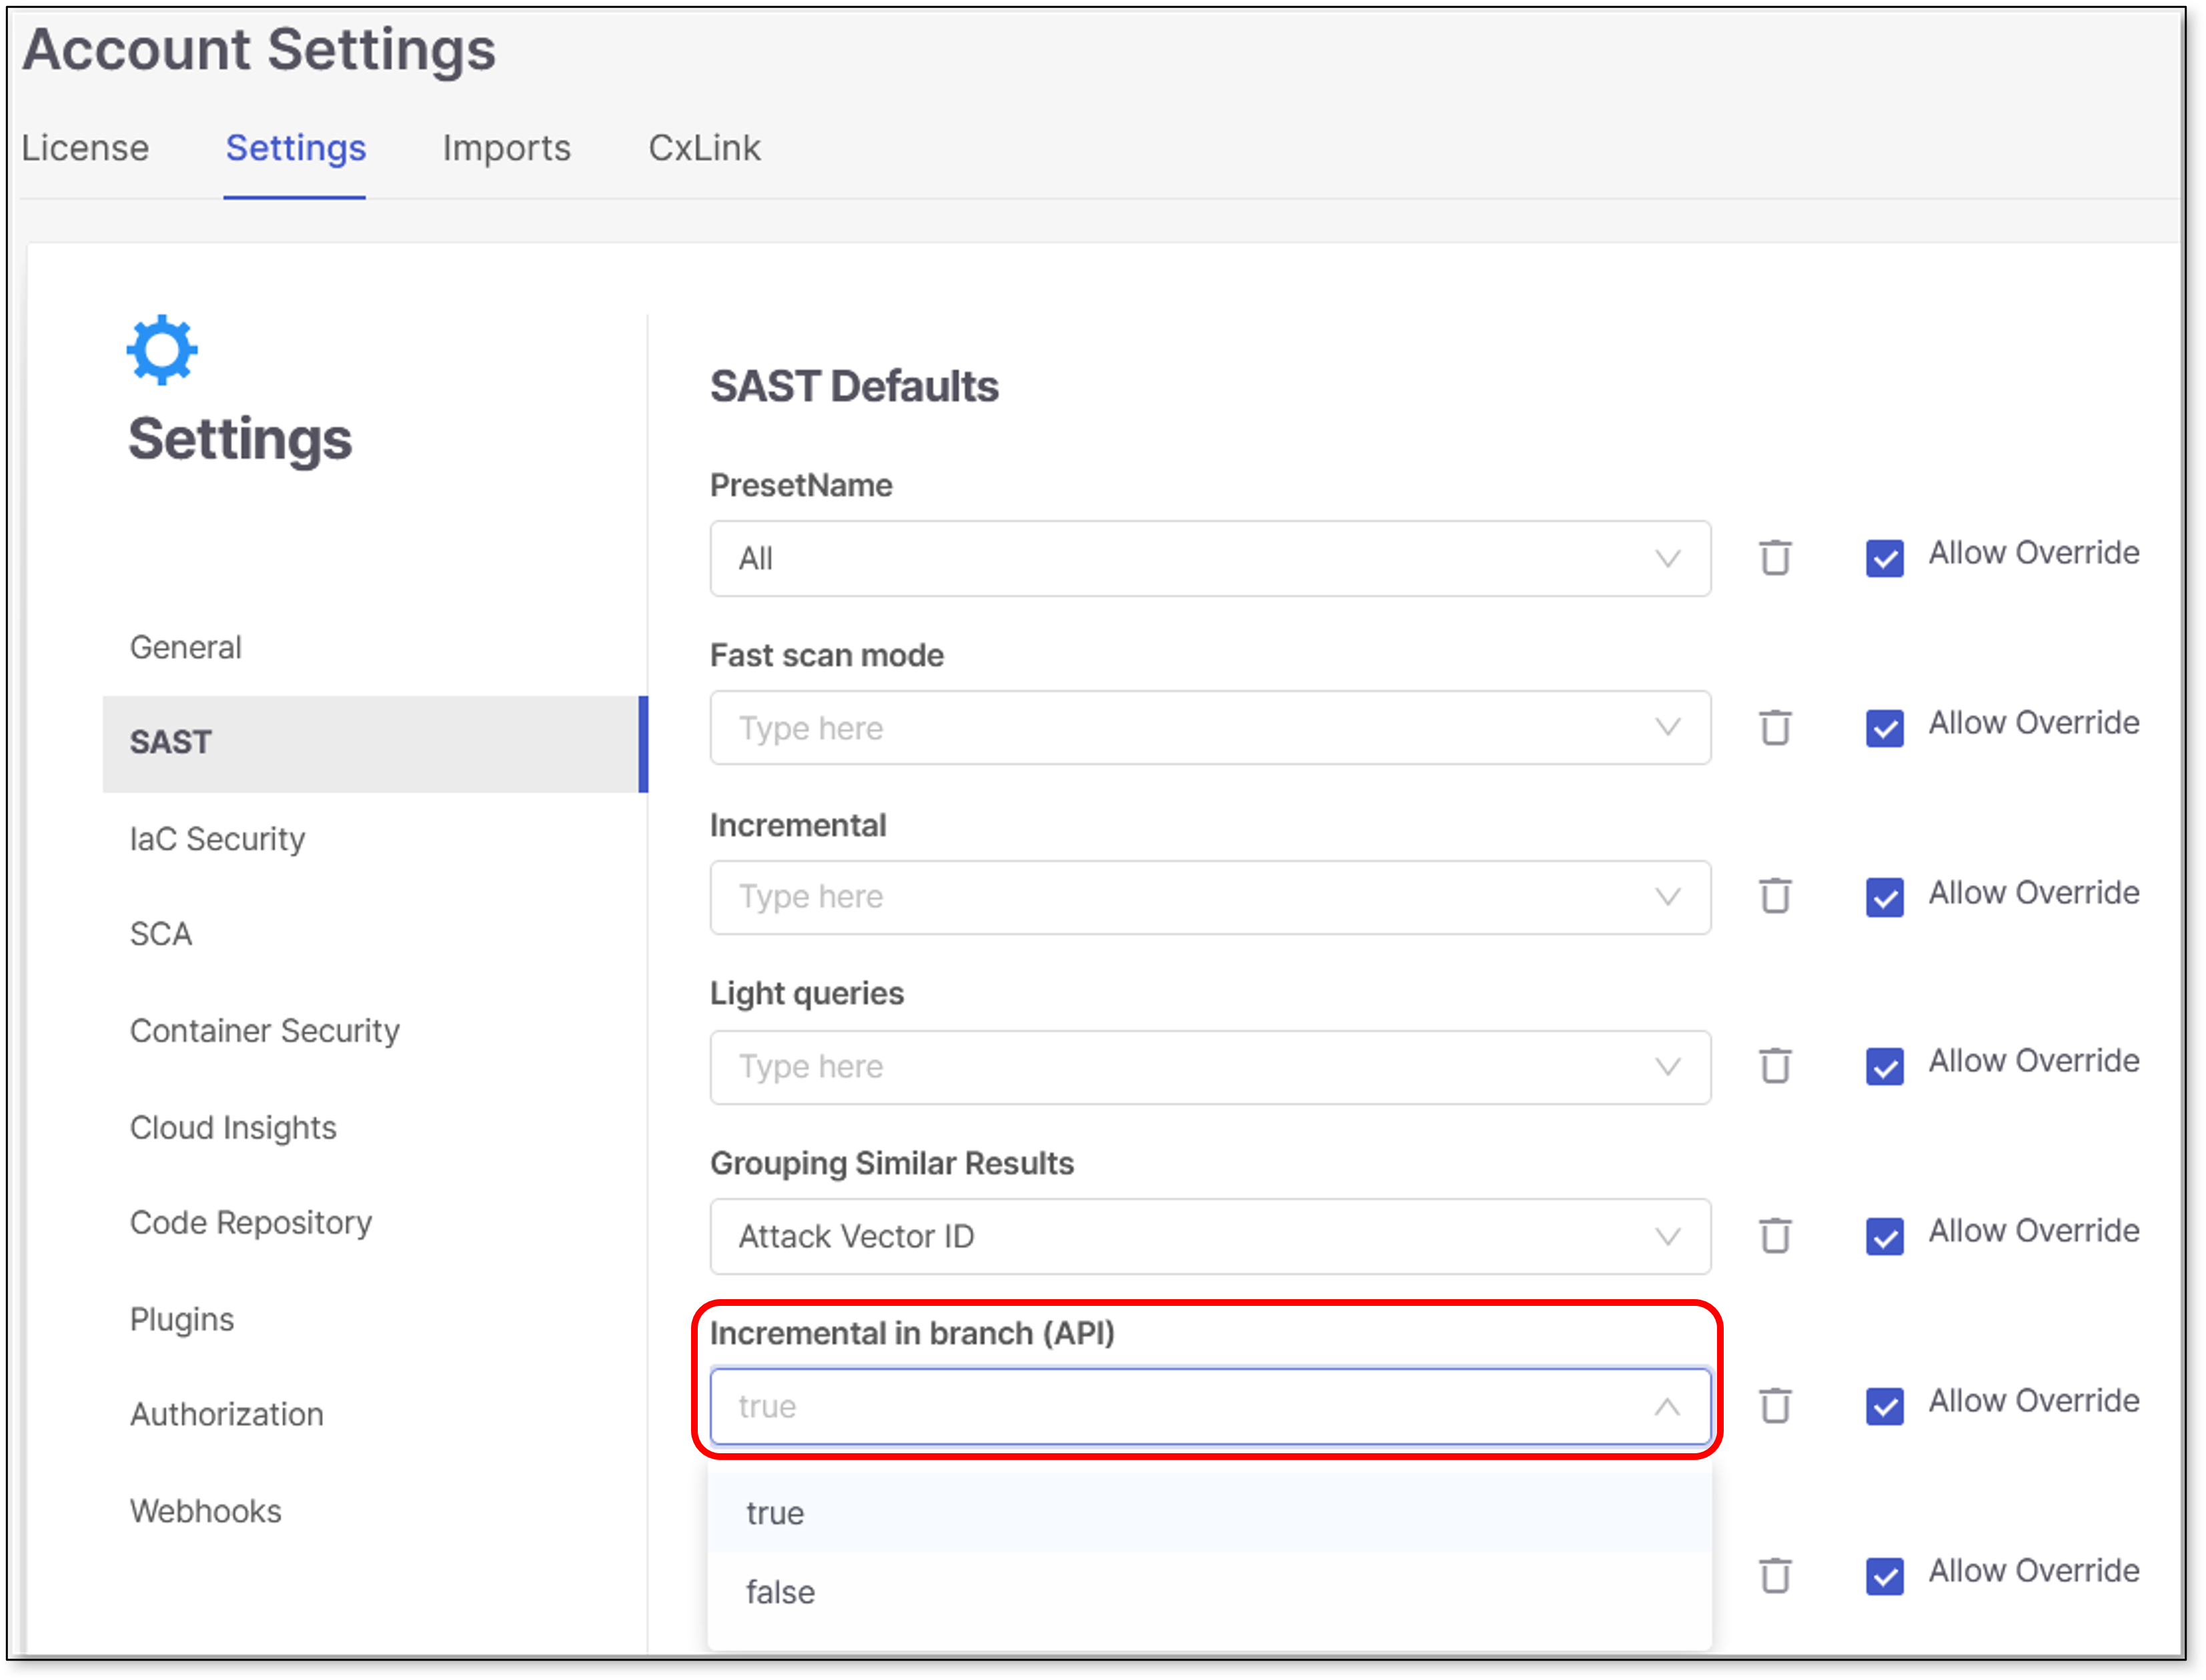
Change the value from false (default) to true.
API
POST api/scans
in sast config payload, send a value for baseBranch (no changes needed)
"config":[{"type":"sast","value":{"incremental":"true","baseBranch":"master"}}]
Empty Scans - SAST Scanner
Checkmarx One has Improved the accuracy and visibility for empty scans.
Checkmarx One has updated the way it handles scan status returned by SAST when no files are found to scan. When SAST identifies a scan with no files to scan, it returns a specific code that clearly indicates that the scan is empty because no files were found.
Checkmarx One treats such scans as successful. As a result, the status of each scan is represented more accurately, providing a reliable overview of the security status across all projects.