- Checkmarx Documentation
- SAST/SCA Integrations
- CI/CD Plugins
- Jenkins Plugin
- Installing and Configuring the Jenkins Plugin
Installing and Configuring the Jenkins Plugin
The latest version of the CxSAST Jenkins plugin is only compatible with the latest CxSAST and CxSCA versions, although older plugin versions for previous CxSAST and CxOSA versions are available as well under Older Versions from the repository. The current version can be installed via the UI or the CLI.
The plugins are available in the Plugins repository .
The current version can be installed via the user interface or the CLI.
Prerequisites
This section covers features and applications that must be installed and active for the respective applications prior to installing the Jenkins plugin.
Notice
CxOSA installs as a plugin with CxSAST, therefore the same requirements for prerequisites apply.
You are unable to start using CxOSA unless the end user license agreement (EULA) has been viewed and accepted.
Required Application | Version | Description |
|---|---|---|
Jenkins Environment | All CxSAST compatible versions |
|
CxSAST | ||
CxOSA | ||
Jenkins Plugin | The latest version is listed in the change log. |
|
Required Application | Description |
|---|---|
Java JRE and SDK | |
NPM |
|
POM |
|
NuGet |
|
Python |
|
Notice
In order to scan dependencies using NPM, NuGet, and Python, the Execute dependency managers 'install packages' command before Scan checkbox must be checked. This checkbox replaces the Enable NPM Install checkbox.
Setting Up the Jenkins Plugin via the User Interface
Before you can set up the Jenkins plugin, you have to first install Jenkins on the host that is going to run the plugin.
Follow the instructions to install the Jenkins Environment.
Open the Jenkins Dashboard by entering its URL http://<IP address or hostname>:<port>/manage, for example, http://localhost:8080/manage where port 8080 is the default port used by Jenkins. The Jenkins Dashboard appears.
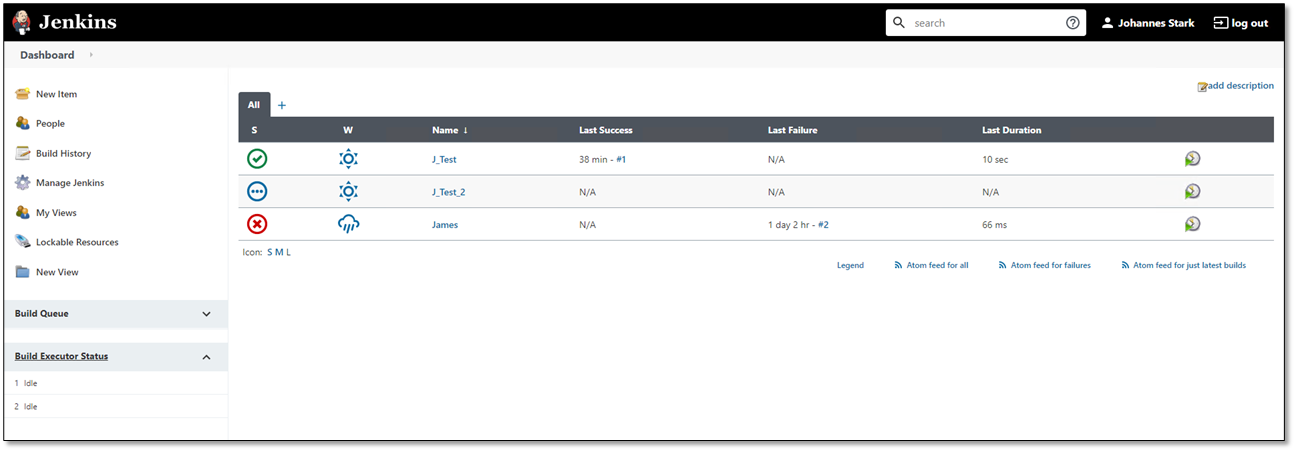
From the menu, select
 Manage Jenkins. The Manage Jenkins dialog appears.
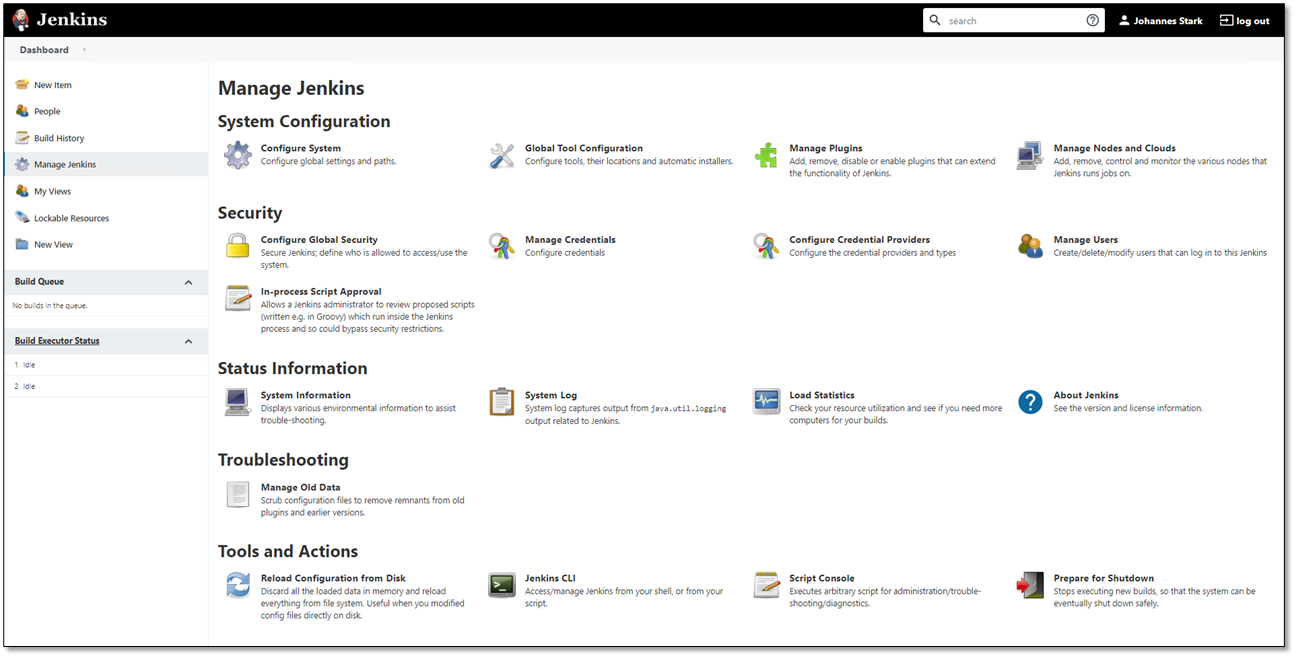
Under System Configuration, click Manage Plugins. The Plugin Manager appears with the Updates tab open.
Click the Available tab to view the list of available plugins.
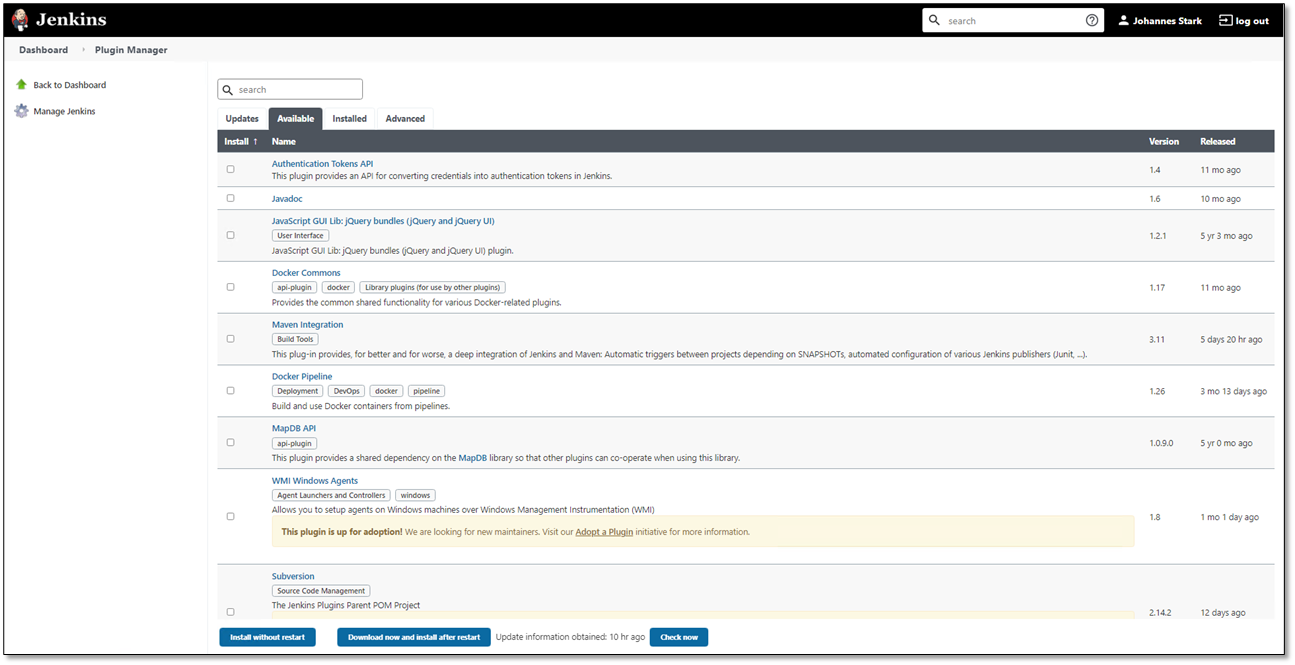
Navigate to the Checkmarx plugin list entry and select the Checkmarx plugin.
Click one of the two installation options, <Install without restart> or <Download and install after restart>. The Checkmarx plugin is installed.
Notice
If the plugin is missing in the plugin repository, click the Advanced tab to add the plugin as explained below.
Notice
These instructions below assume that you already downloaded the plugin zip archive from the Checkmarx Plugins site and extracted its content to a folder of your choice.
Click the Advanced tab. Advanced upload and configuration options appear.
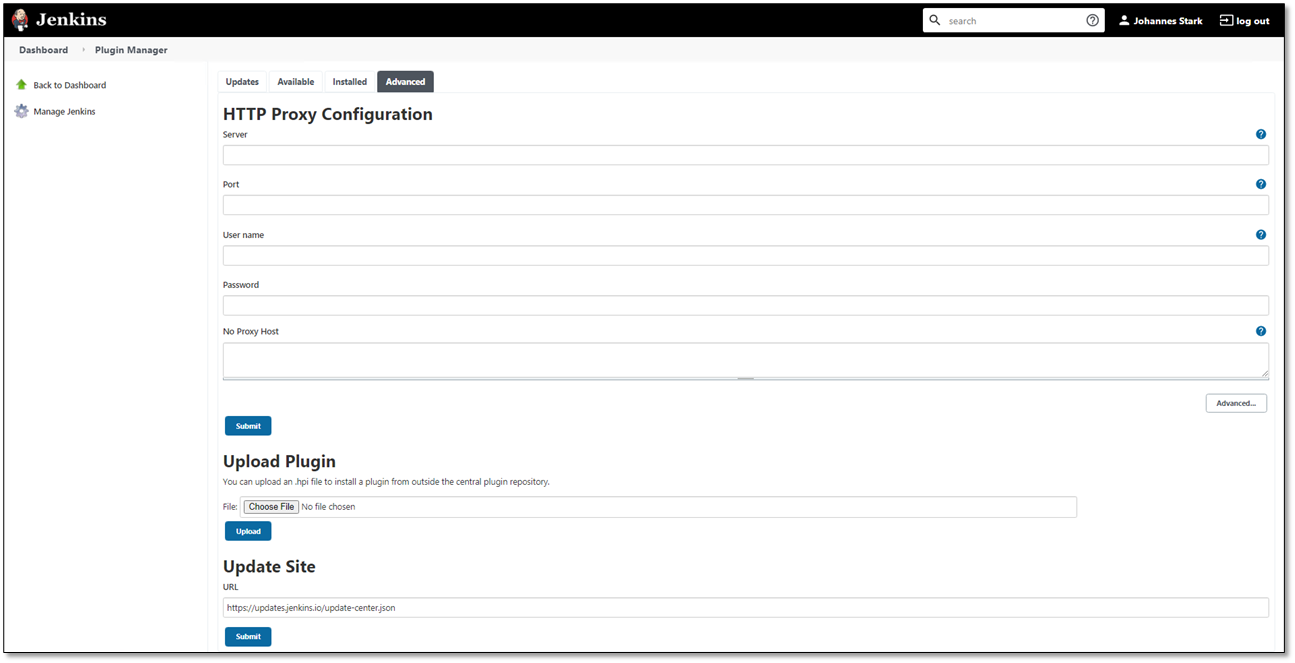
Under Upload Plugin, click <Choose File> and navigate to the checkmarx.hpi file that resides in the extracted folder of the Jenkins plugin zip archive.
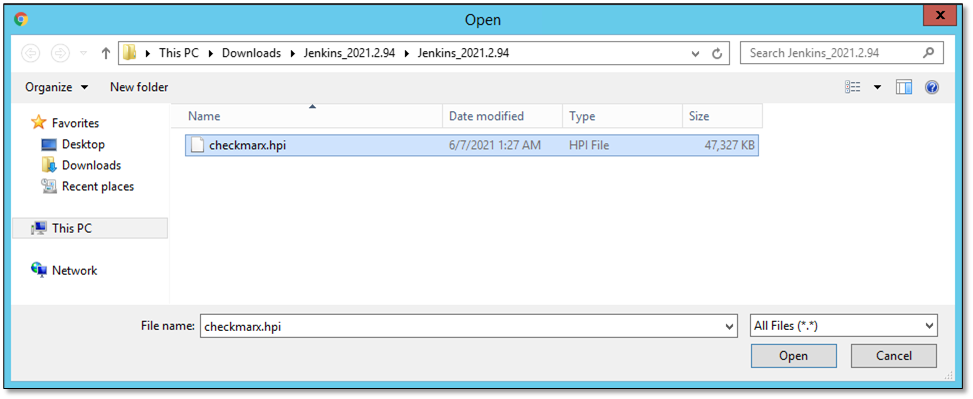
Select checkmarx.hpi and click <Open>. The file is listed under Upload Plugin.
Click <Upload> to upload and install the plugin.
Configuring the Jenkins Plugin for Scanning
Once the Checkmarx plugin is installed, follow the instructions below to configure the Jenkins plugin for scanning.
Once the Checkmarx Plugin is successfully installed, select Manage Jenkins from the menu again. The Manage Jenkins page appears.
Under System Configuration, click Configure System. The plugin configuration interface appears.
Once the Jenkins Configuration is displayed, scroll down to the Checkmarx section and define the relevant configuration parameters.
Select and set the parameters as explained in the table below.
Click <Apply> to apply the changes and then <Save> to save them.
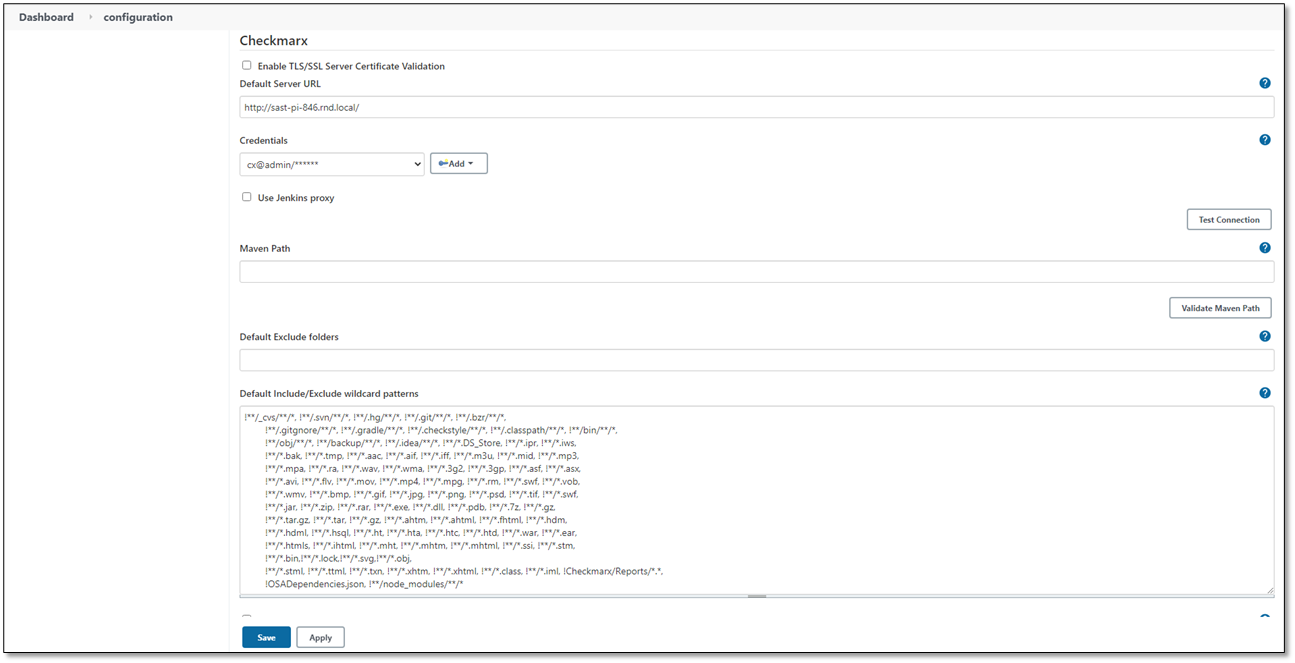
Notice
The screen image below only shows the beginning of the Checkmarx section. For the remaining options and explanations in the Checkmarx section, refer to the table below.
Parameter | Description |
|---|---|
Enable TLS/SSL Server Certificate Validation | Check to enable TLS (Transport Layer Security) and SSL (Secure Sockets Layer) protocol validation. This provides communication security over your network. The checkbox is enabled by default to enforce TLS/SSL server certificate validation. The validation can be disabled by unchecking the checkbox. ImportantWhen working with a server with a Self Signed Certificate, ensure the certificate is imported into the truststore to enable/disable validation. |
Default Server URL | Checkmarx Server URL or IP address with or without port, for example, http://<server-name>or https://<ip-address>:<port>. You are able to override these default settings at a later stage for individual jobs and projects. |
Credentials | This option is for users who may already keep the Checkmarx credentials within the Jenkins credentials manager and would like to use them with the CxSAST Jenkins plugin. To do so, select your credentials from the drop-down list. NoticeIf your credentials don’t exist in the system, add them by clicking < |
Use Jenkins proxy | Check to enable the proxy setting for all the jobs that use the CxSAST server default URL. To disable the proxy for these jobs, clear Once enabled, it affects the CxSAST, CxOSA, and CxSCA scans. |
<Test Connection> | Click <Test Connection> and wait until the credentials are successfully validated. |
Maven Path | Path to the Maven executable, usually located in the Maven bin folder. If left empty, the system-defined path is used. This is required for CxSCA. If using CxSAST with CxOSA, leave this field empty. |
<Validate Maven Path> | Click <Validate Maven Path> and wait until the path has been successfully validated. |
Default Exclude folders | Enter a global comma-separated list of folders to be excluded from the scan. Entries in this list are automatically converted to exclude wildcard patterns and appended to the full pattern list provided in the Default Include/Exclude Wildcard Patterns section. You may override these settings for individual jobs/projects at a later stage. |
Default Include/Exclude Wildcard Patterns | Global default includes/excludes wildcard patterns by entering a comma-separated list for files or file groups to be included or excluded. To exclude files or file groups, start the entry with ! Examples:
You may override these settings for individual jobs/projects at a later stage. |
Deny New Checkmarx Projects Creation | Enabling this option prohibits the creation of new projects in Checkmarx, or assigning an existing project to a different team. Disabling this option allows this action. |
Hide Results | Check to hide scan results from all jobs/projects and builds. |
Remove HTML Results in Async Mode | If checked, reports are removed when scanning in asynchronous mode. The message Job is configured to run Checkmarx scan asynchronously. Report generation is disabled appears. If cleared, the report of the last successful scan appears with the message Job is configured to run Checkmarx scan asynchronously. The displayed results are of the previous successful scan. |
Job status When CxSAST Scan Returns an Error | Define how to act when a triggered CxSAST scan in synchronous mode fails and returns an error message (i.e., no scan results):
You are able to override these settings later for individual jobs/projects. |
Scan Retention Rate (Number of Scans) | By default, sets the number of SAST scans for all projects to be saved (retention rate) as an integer value between 1 and 10,000. These settings may be overwritten for individual projects later. |
Globally define vulnerability thresholds for all jobs | Enable the set vulnerability settings for all jobs/projects option to define the default global settings for all jobs/projects that are not using local settings. You are able to override these settings later for individual jobs/projects unless the Lock global vulnerability settings for all scans/jobs option is enabled. |
Always use the defined global vulnerability thresholds | Check to always use the default global settings and prevent the overriding of these settings later for individual jobs/projects. Available if Globally define vulnerability thresholds for all jobs are enabled. |
Build status when results exceed threshold | Define the build status (Unstable or Failure) when the number of severity vulnerabilities exceeds the specified threshold. Available if the Set vulnerability settings for all jobs option is enabled. |
SAST Critical severity vulnerabilities threshold | Define the CxSAST critical-severity vulnerability threshold. If set, the threshold is crossed, if the number of high-severity vulnerabilities exceeds it. Available in the Set vulnerability settings for all jobs option is enabled. You may override these settings later for individual jobs/projects. NoteThis threshold will be applicable only for the SAST versions which support critical severity. |
CxSAST High severity vulnerabilities threshold | Define the CxSAST high-severity vulnerability threshold. If set, the threshold is crossed, if the number of high-severity vulnerabilities exceeds it. Available if the Set vulnerability settings for all jobs option is enabled. You may override these settings later for individual jobs/projects. |
CxSAST Medium severity vulnerabilities threshold | Define the CxSAST medium severity vulnerability threshold. If set, the threshold is crossed if the number of medium-severity vulnerabilities exceeds it. Available if the Set vulnerability settings for all jobs option is enabled. You may override these settings later for individual jobs/projects. |
CxSAST Low severity vulnerabilities threshold | Define the CxSAST low severity vulnerability threshold. If set, the threshold is crossed if the number of low-severity vulnerabilities exceeds it Available if the Set vulnerability settings for all jobs option is enabled. You may override these settings later for individual jobs/projects. |
Dependency scan critical severity vulnerabilities threshold | Define a threshold for the dependency scan high-severity vulnerabilities. If the sum of the high-severity vulnerabilities is larger than the threshold, the build will be marked (failed or unstable). Available if the Set vulnerability settings for all jobs option is enabled. You may override these settings later for individual jobs/projects. NoteThis threshold applies only if the configured dependency scanner supports critical severity. |
Dependency scan high severity vulnerabilities threshold | Define a threshold for the dependency scan high-severity vulnerabilities. The build will be marked (failed or unstable) if the sum of the high-severity vulnerabilities is larger than the threshold. Available if the Set vulnerability settings for all jobs option is enabled. You may override these settings later for individual jobs/projects. |
Dependency scan medium severity vulnerabilities threshold | Define a threshold for the dependency scan medium severity vulnerabilities. The build will be marked (failed or unstable) if the sum of the medium severity vulnerabilities is larger than the threshold. Available, if the Set vulnerability settings for all jobs option is enabled. You may override these settings later for individual jobs/projects. |
Dependency scan low severity vulnerabilities threshold | Define a threshold for the dependency scan low-severity vulnerabilities. The build will be marked (failed or unstable) if the sum of the low-severity vulnerabilities is larger than the threshold. Available in the Set vulnerability settings for all jobs option is enabled. You may override these settings later for individual jobs/projects. |
Set job scan timeout threshold | Check to enable the Set the job scan timeout threshold option. NoticeEven if a scan has timed out and an error notification was raised, dependency results returned at a later stage may be saved in the database and displayed in the dependency results. |
Scan timeout (minutes) | Define the job scan timeout threshold (only available if the Set job scan timeout threshold is enabled). |
Continue when timed out | If checked, the build continues when the scan timed out. In this case, the latest scan report is displayed. |
Globally define dependency scan settings | Check to enable the globally defined dependency scan and associated settings. |
Include/Exclude wildcard patterns | Define a comma-separated list of include or exclude wildcard patterns. You may override these settings later for individual jobs/projects. |
Exclude folders | Define a comma-separated list of folders to exclude from the dependency scan. You may override these settings later for individual jobs/projects. |
Use CxOSA dependency scanner | Enable the CxOSA dependency scanner and associated settings. Available, if Globally define dependency scan settings are enabled. |
Archive extract patterns | Define a comma-separated list of archive wildcard patterns to include their extracted content for the dependency scan, e.g., *.zip, *.jar, *.ear. Supported archive types are .jar, .war, .ear, .sca, .gem, .whl, .egg, .tar, .gz, .tgz, .zip, and .rar. Leave empty to extract all archives (only available if ‘Use CxOSA dependency scanner’ is enabled). |
Execute dependency managers ‘install packages’ command before scan | Select this option to be able to scan packages from various dependency managers as part of the dependency scan (only available if ‘Use CxOSA dependency scanner’ is enabled). |
Use CxSCA dependency scanner | Check to enable the CxSCA dependency scanner and associated settings. Available, if Globally define dependency scan settings are enabled. NoticeIn addition to the default SCA cloud, the Jenkins plugin supports the CXSCA EU cluster as well. |
CxSCA API URL | URL of the SCA API endpoint is only available if Use CxSCA dependency scanner is enabled. Default: https://api-sca.checkmarx.net Using the CxSCA EU cluster: https://eu.api-sca.checkmarx.net |
Access Control server URL | URL of the Access Control server used to log on to CxSCA is only available if Use CxSCA dependency scanner is enabled. Default: https://platform.checkmarx.net Using the CxSCA EU cluster: https://eu.platform.checkmarx.net |
CxSCA web app URL | URL of the CxSCA web application. It is used to generate a web report URL. If omitted, the CxSCA scan runs as usual and no report URL is generated. This option is only available if Use CxSCA dependency scanner is enabled Default: https://sca.checkmarx.net Using the CxSCA EU cluster: https://eu.sca.checkmarx.net |
CxSCA credentials | Credentials used to log on to CxSCA, username, and password. They are normally different from the CxSAST credentials. This option is available, if Use CxSCA dependency scanner is enabled. NoticeIf your credentials don’t exist in the system, add them by clicking < |
Account | Customer account in CxSCA used during login (only available if Use CxSCA dependency scanner is enabled). |
Package Manager's Config File(s) Path | Use this parameter to provide configuration files of the package managers used in the project, for example:
This option is available, if Perform SCA scan by uploading manifest file(s)/source to SCA Service is enabled. |
Private Registry Environment Variable | Use the CxSCA agent to perform the scan. The CxSCA agent attempts to perform a dependency resolution using the package manager’s configuration files provided. Example: - “c:\user\.m2\settings.xml”, “c:\user\npm\.npmrc” |
This option is relevant to the - Package Manager's Config File(s) Path parameter. In many cases, the package manager's configuration files reference environment variables. This is often performed to provide credentials without storing them in a file. Pass all such variables using the following option: Example: -env param1:value1,param2:value2 This option is available, if Perform SCA scan by uploading manifest file(s)/source to SCA Service is enabled. | |
Include Source | When enabling this option, the entire source code is added to the zip archive that is sent to the cloud for processing. NoticeWhen this option is not selected, only the fingerprints and manifest files are sent to the CxSCA cloud. For additional information on these options, refer to Understanding How CxSCA Scans Run Using Various Methods. |
Enable Synchronous Mode | When enabling this option, the scan results are listed in Jenkins. Otherwise, a link to the scan results in the CxSAST web application is provided. |
Generate CxSAST PDF report | When enabling this option, the scan results are available as PDF files and can be accessed by following a link with the scan results in Jenkins. This option is available only, if Enable Synchronous Mode is enabled. |
Enable Project's Policy Enforcement | When enabling this option, the build breaks, if either the CxOSA, CxSAST, or CxSCA policy is violated. The policy is assigned to a project from within CxSAST or CxSCA. In the case of CxSCA, the name and description of all violated policies and rules within are displayed in the logs. In addition, the build is reported as failed, if any of the violated policies indicates a ‘Break the build’ action. |
Enable Vulnerability Threshold | When enabling this option, you are able to define vulnerability thresholds. This option is available only, if Enable Synchronous Mode is enabled. Once enabled, the Global Settings option is unavailable. |
Enable Data Retention | Check to globally define Data Retention settings for the number of scans. Data retention is a feature of CxSAST that is used to configure the number of scans for each project that retains scan data. This sets the default global value (the number of SAST scans) to save for all Jenkins projects. NoteThe Jenkins plugin applies Data Retention settings only for newly created projects. |
Hide Debug Logs | When enabling this option, no debug-level logs are generated in the job output. |
Allow Global Comment | When enabling this option, Global CxSAST comments are added to the build comment. By default, the global comment field is empty. When both job-level comments and global comments are provided and 'Allow Global Comment' has been checked, both comments are concatenated. Any variables used in the comment text are expanded before sending them to CxSAST. |
Perform SCA scan using dependency resolution by SCA resolver tool | Enable this option for SCA Resolver. To scan in Offline mode of SCA. |
Path to SCA Resolver | Enter the path on the Jenkins node's host where ScaResolver is installed, for example, C:\\Users\\Installations\\ScaResolver-win64 or /opt/ScaResolver-linux64, depending on the operating system in use. Only available, if Perform SCA scan using dependency resolution by SCA resolver tool is enabled. |
Generate CxSca Report | Enable to generate the CxSCA report. This report shows an overview of the security of the project as well as specific vulnerabilities, legal risks, and outdated versions identified by the scan. NoteThis option is only available when Enable Synchronous Mode and Enable Dependency Scan using CxSCA is enabled. |
Report Format | When Generate CxSCA report is enabled, this parameter is mandatory. The scan results are available in PDF, XML, CSV, and JSON format. The Software Bill of Materials (SBOM) details each of your program's open-source packages and their associated risks, using CycloneDX v1.3 standard. SBOM Reports are generated in JSON or XML format. One of the following values must be selected for generating the report in the required format:
NoteThe Report Format options are case-sensitive. |
SCA Resolver Additional Parameters | Provide arguments to ScaResovler in the format that is supported by the ScaResolver tool. ScaResolver is executed in Offline mode. '-s', '-n' , and '-r' are mandatory parameters, for example, -s C:\\Users\\SampleProject -n ProjectName -r c:\\output, where the parameters stand for the following:
If the above mandatory additional parameters are not mentioned then the plugin automatically determines it from Job level parameters. Only available if Perform SCA scan using dependency resolution by SCA resolver tool is enabled. |
Enable Exploitable Path | To enable Exploitable Path Detection using the ScaResolver tool, check the checkbox Enable Exploitable Path. The plugin automatically determines the value of all mandatory arguments to use Exploitable Path detection. There is no need to mention the following parameters in SCA Resolver Additional Parameters:
NoteOnly available if Perform SCA scan using dependency resolution by SCA resolver tool is enabled. |
Perform SCA scan by uploading manifest file(s)/source to SCA Service | This allows performing an SCA scan using the Manifest file. Enables the other options such as Include Sources and Package Managers Config’s File Path. |
SAST Server URL | This parameter is used to obtain scan results from the CxSAST server that are required for Exploitable Path detection by the CxSCA scan. Enter the URL of the CxSAST server, for example https://cxsasthost:port Only available, if Perform SCA scan by uploading manifest file(s)/source to SCA Serviceis enabled. |
Project Full Path | The CxSAST project name with its full path used to scan the project source code, for example CxServer/team1/projectname This project name and its full path are used to retrieve scan results from the CxSAST server that are required for Exploitable Path detection by the CxSCA scan. Notice
|
Project ID | The ID of the CxSAST project that is used to scan the project source code. It is used to retrieve scan results from the CxSAST server that are required for Exploitable Path detection by the CxSCA scan. Notice
Enter the Project ID of the CxSAST project used to scan the project source code. This parameter is used to obtain scan results from the CxSAST server required for the Exploitable Path detection by CxSCA. Only available, if Perform SCA scan by uploading manifest file(s)/source to SCA Serviceis enabled. NoticeExploitable Path must be enabled for the project under Project Settings in CxSCA. |
SCA Teampath | Enter the team for the new CxSCA project. If left empty, the SAST team is assigned to the SCA project. |
SCA Timeout | Set the timeout for the SCA scan. If the SCA scan exceeds that time, the job fails. If left empty, the timeout is set to 60 minutes by default. |
Setting Up a Proxy in the Jenkins Plugin
Setting up a proxy assumes that you checked Use Jenkins Proxy when you configured the Jenkins plugin as explained in the table above.
In the Manage Jenkins dialog, under System Configuration, click Manage Plugins. The Plugin Manager appears with the Updates tab open.
Click the Advanced tab for advanced configuration options.
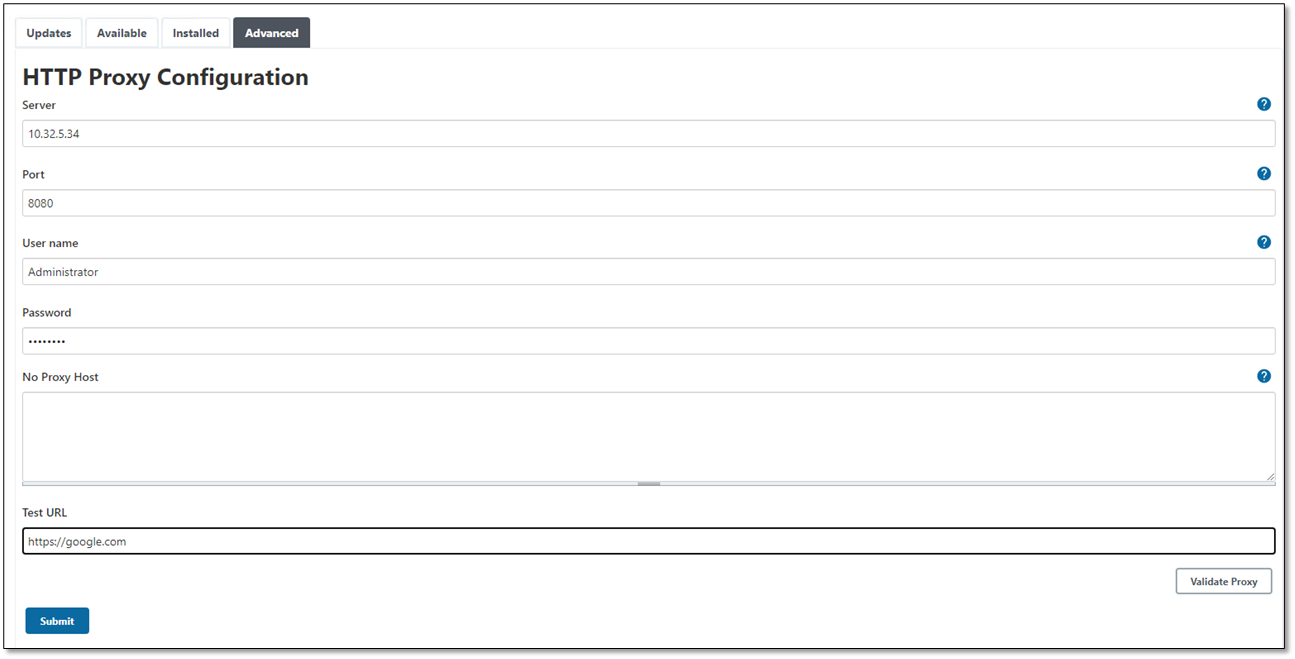
Enter the IP address or hostname of the proxy server.
Enter the port and the user credentials used to access the proxy server.
Define a test URL and then click <Validate Proxy>. The proxy is validated.
Click <Submit> to apply the proxy for the plugin.


