Configuring Git Integration with a Pre-Scan Action
To configure a Git integration with a pre-scan action:
1. Go to the Windows System Environment Variables (Control Panel > System and Security > System > Advanced System Settings > Environment Variables) and edit the Path variable in C:\Program Files\git\bin\git.exe.
2. Create a text file with a name of your choice by using using Notepad or another text editor with the following content:
:: checking if directory exists and delete it
IF EXIST E:\Repo rd /s /q E:\Repo
::making directory with same name
call mkdir E:\Repo\AAG
:: changing path to required directory
cd E:\Repo\AAG
:: clone GIT repository to predefined directory
call "C:\Program Files\git\bin\git.exe" clone https://<username>:<password>@<server>/<repository path> E:\Repo\AAG
3. In the above code example, replace "E:\Repo\AAG" with a similar file folder on the CxSAST Manager Server.
4. In the above code, replace https://<username>:<password>@<server>/<repository path> with the path to the source code in Git, for example: git clone git://github.com/test-unit/test-unit.git E:\Repo\AAG
5. Save and name the file with a .bat extension. This is the pull batch file.
6. Copy the pull batch file to the CxSAST Executables Folder. The script should execute the GIT.EXE from the same path as defined in the CxSAST "Path to GIT client executable" parameter (Management > Application Settings > General > Server Settings > Path to GIT client executable).
7. Go to Management > Scan Settings > Pre & Post Scan Actions > Create New Action. The Create Action window is displayed.
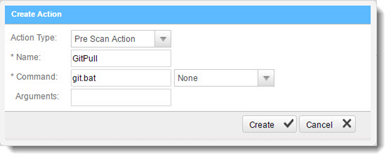
8. Configure the following parameters:
Action Type - select Pre Scan Action
Name - assign a name to the pre-scan action
Command - enter the pull batch file's exact name
Arguments - leave empty
9. Go to Projects and Scans > Create New project. The project's General Settings tab is displayed.
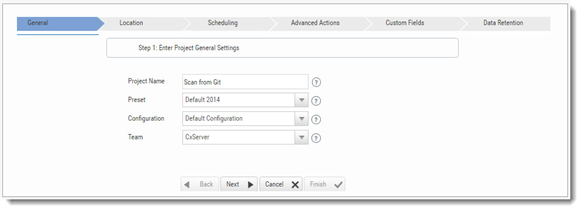
10. Configure the General Settings and click <Next>. The Source Location tab is displayed.
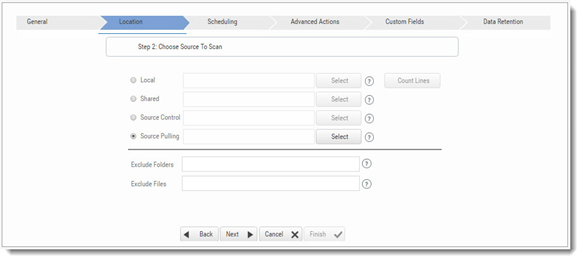
11. Select Source Pulling and click <Select>. The Network Credentials window is displayed (this relates to the local network of the user).
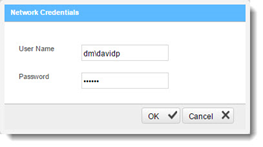
12. Enter your Network Credentials (User Name and Password).
13. Click <OK>. The Select Folder window is displayed.
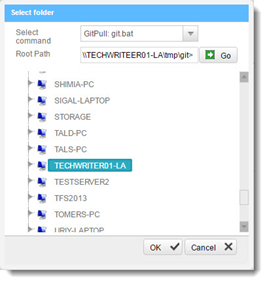 |
14. Navigate to the local folder of the user (root path) of the source code or type the path into the Root Path field and click <Go> to confirm that it exists.
Warning
The defined Root path must be a shared network folder.
15. To complete the process, click <OK> and then <Finish>.