Configuring a GitHub Action with a Checkmarx One Workflow
You can add a Checkmarx One scan to an existing workflow or you can create a new workflow for the scan. There is an option to generate a report which imports the results into the GitHub Security alerts.
The following section describes how to create a new workflow with a Checkmarx One scan.
Navigate to your GitHub repository Actions tab and click New Workflow and then click on set up a workflow yourself.
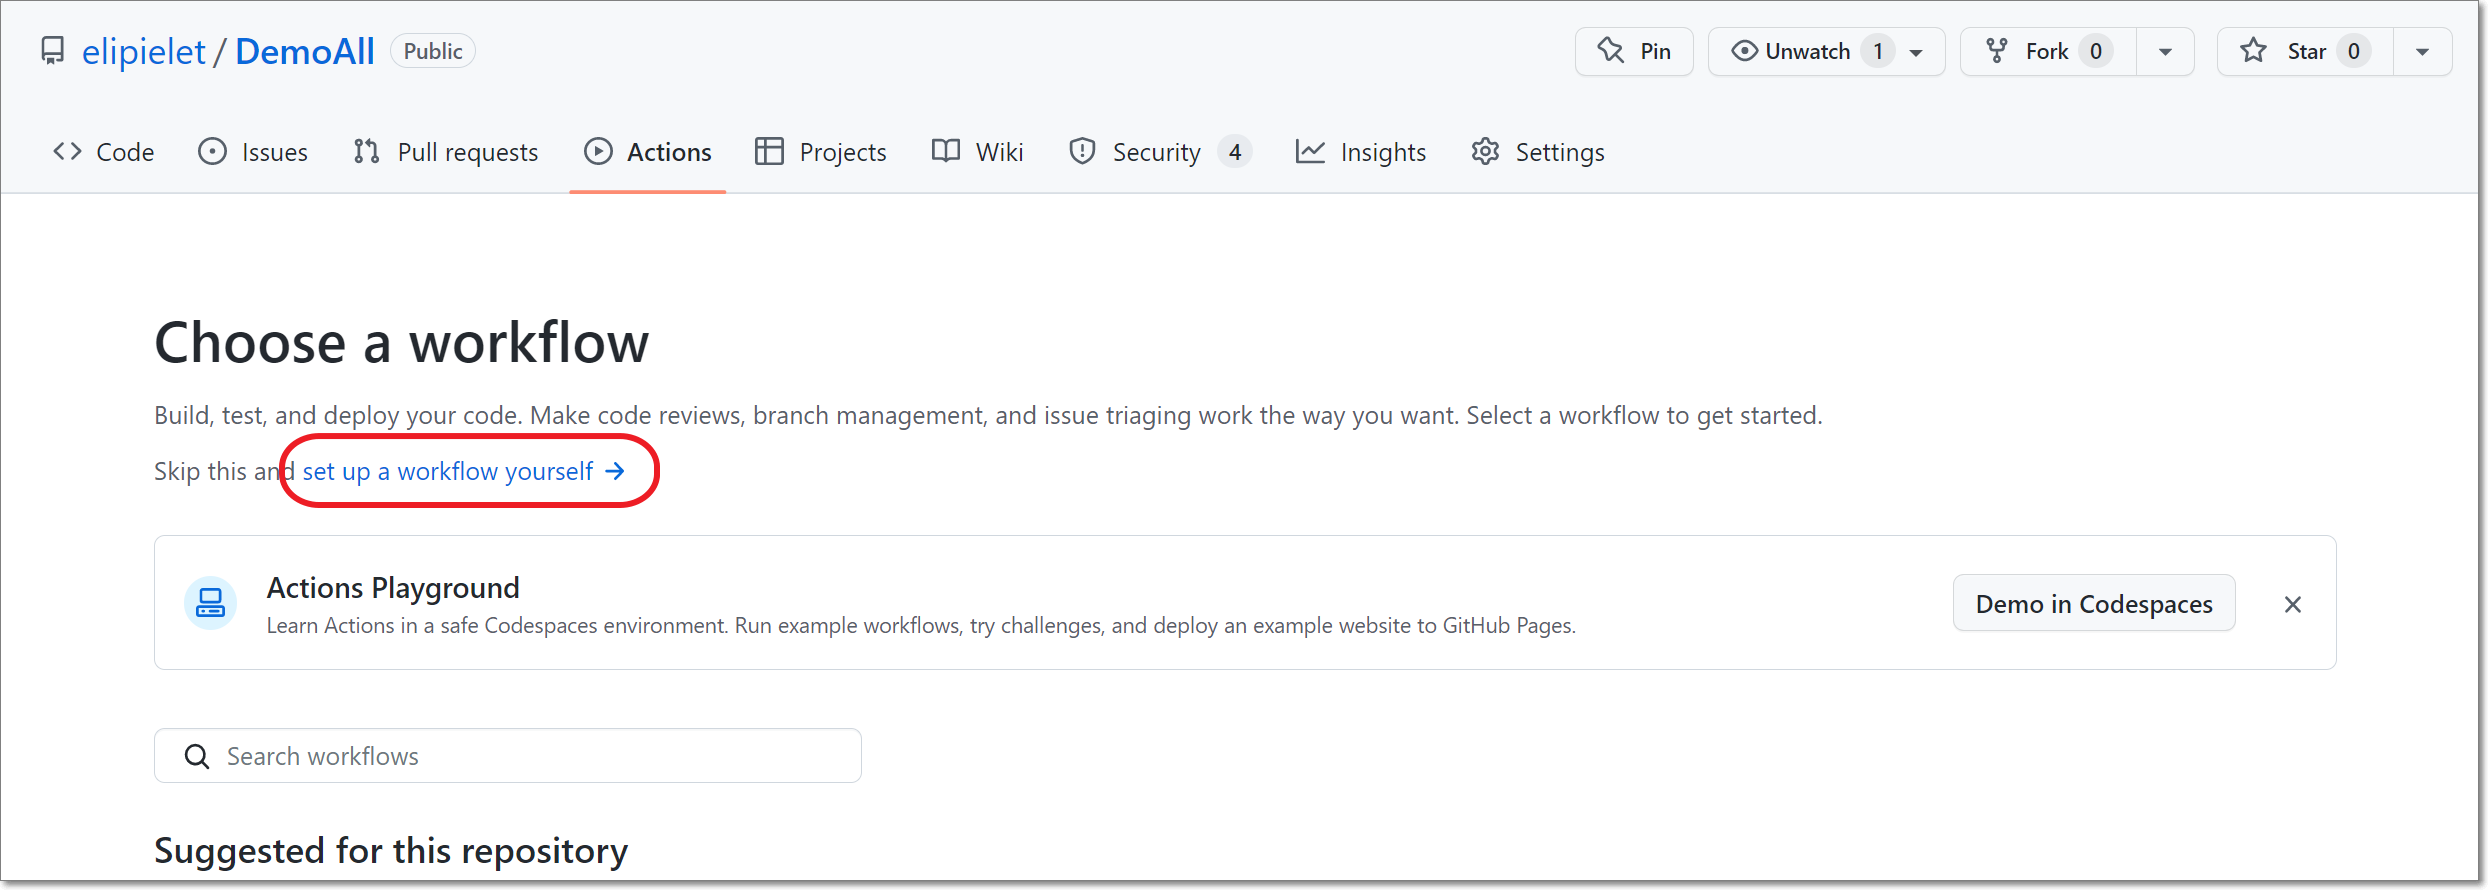
The code editor is shown.
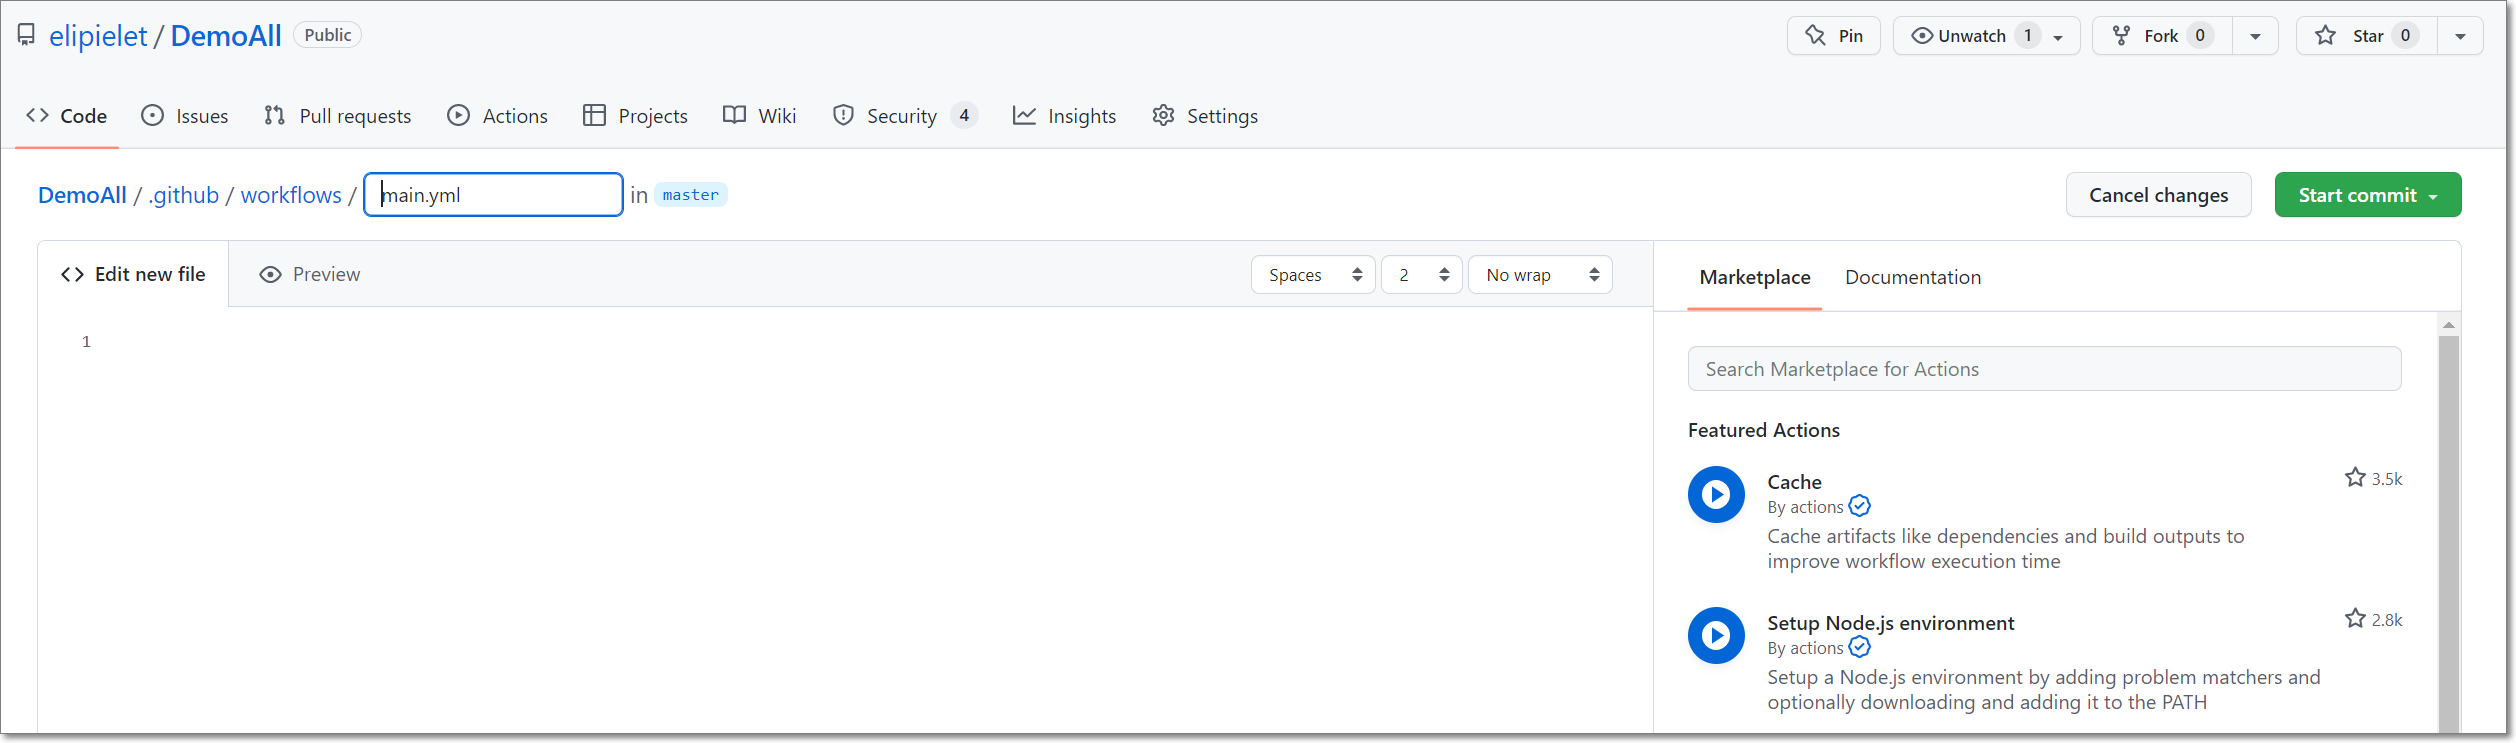
By default, the workflow is named main.yml, you can edit the name to describe the workflow, e.g., CheckmarxScan.
In the Edit new file section, customize the code to meet your needs regarding triggers, branches, etc.
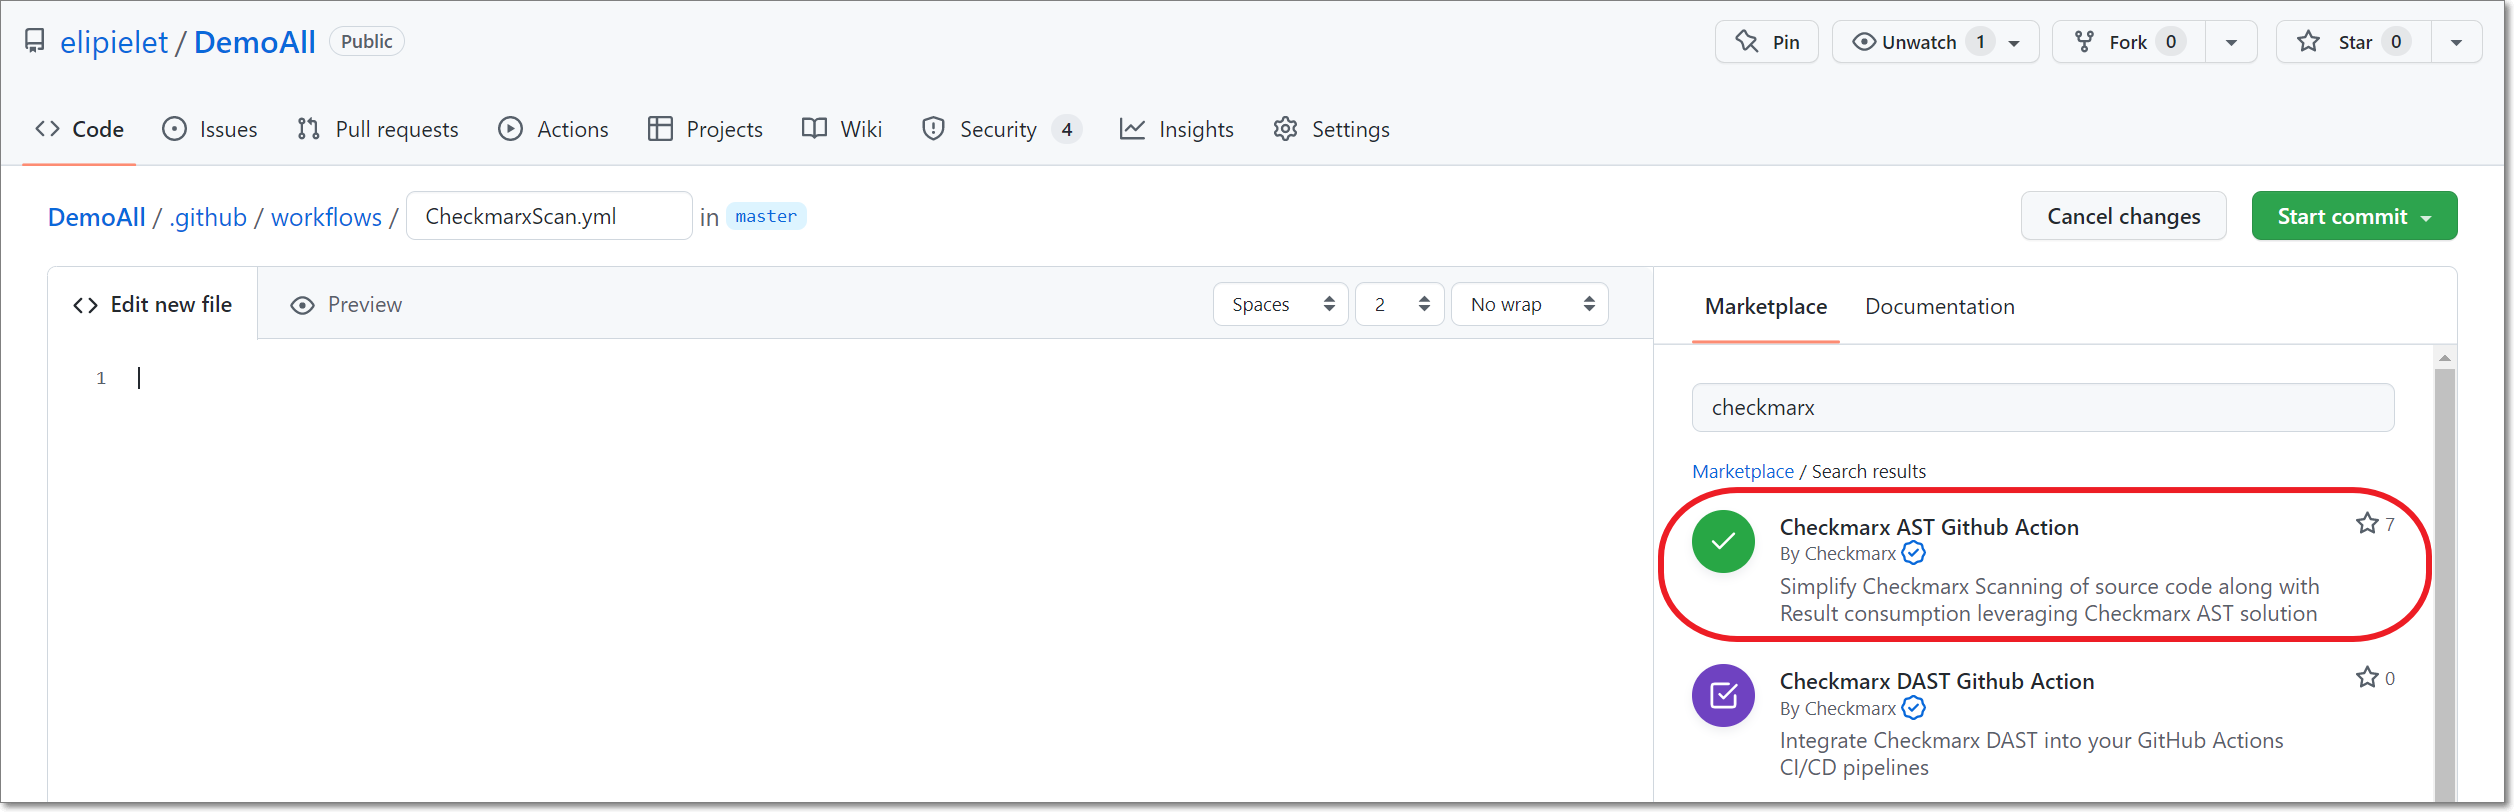
In the Marketplace tab of the right-side panel, search for Checkmarx AST Github Action, and click on that item.
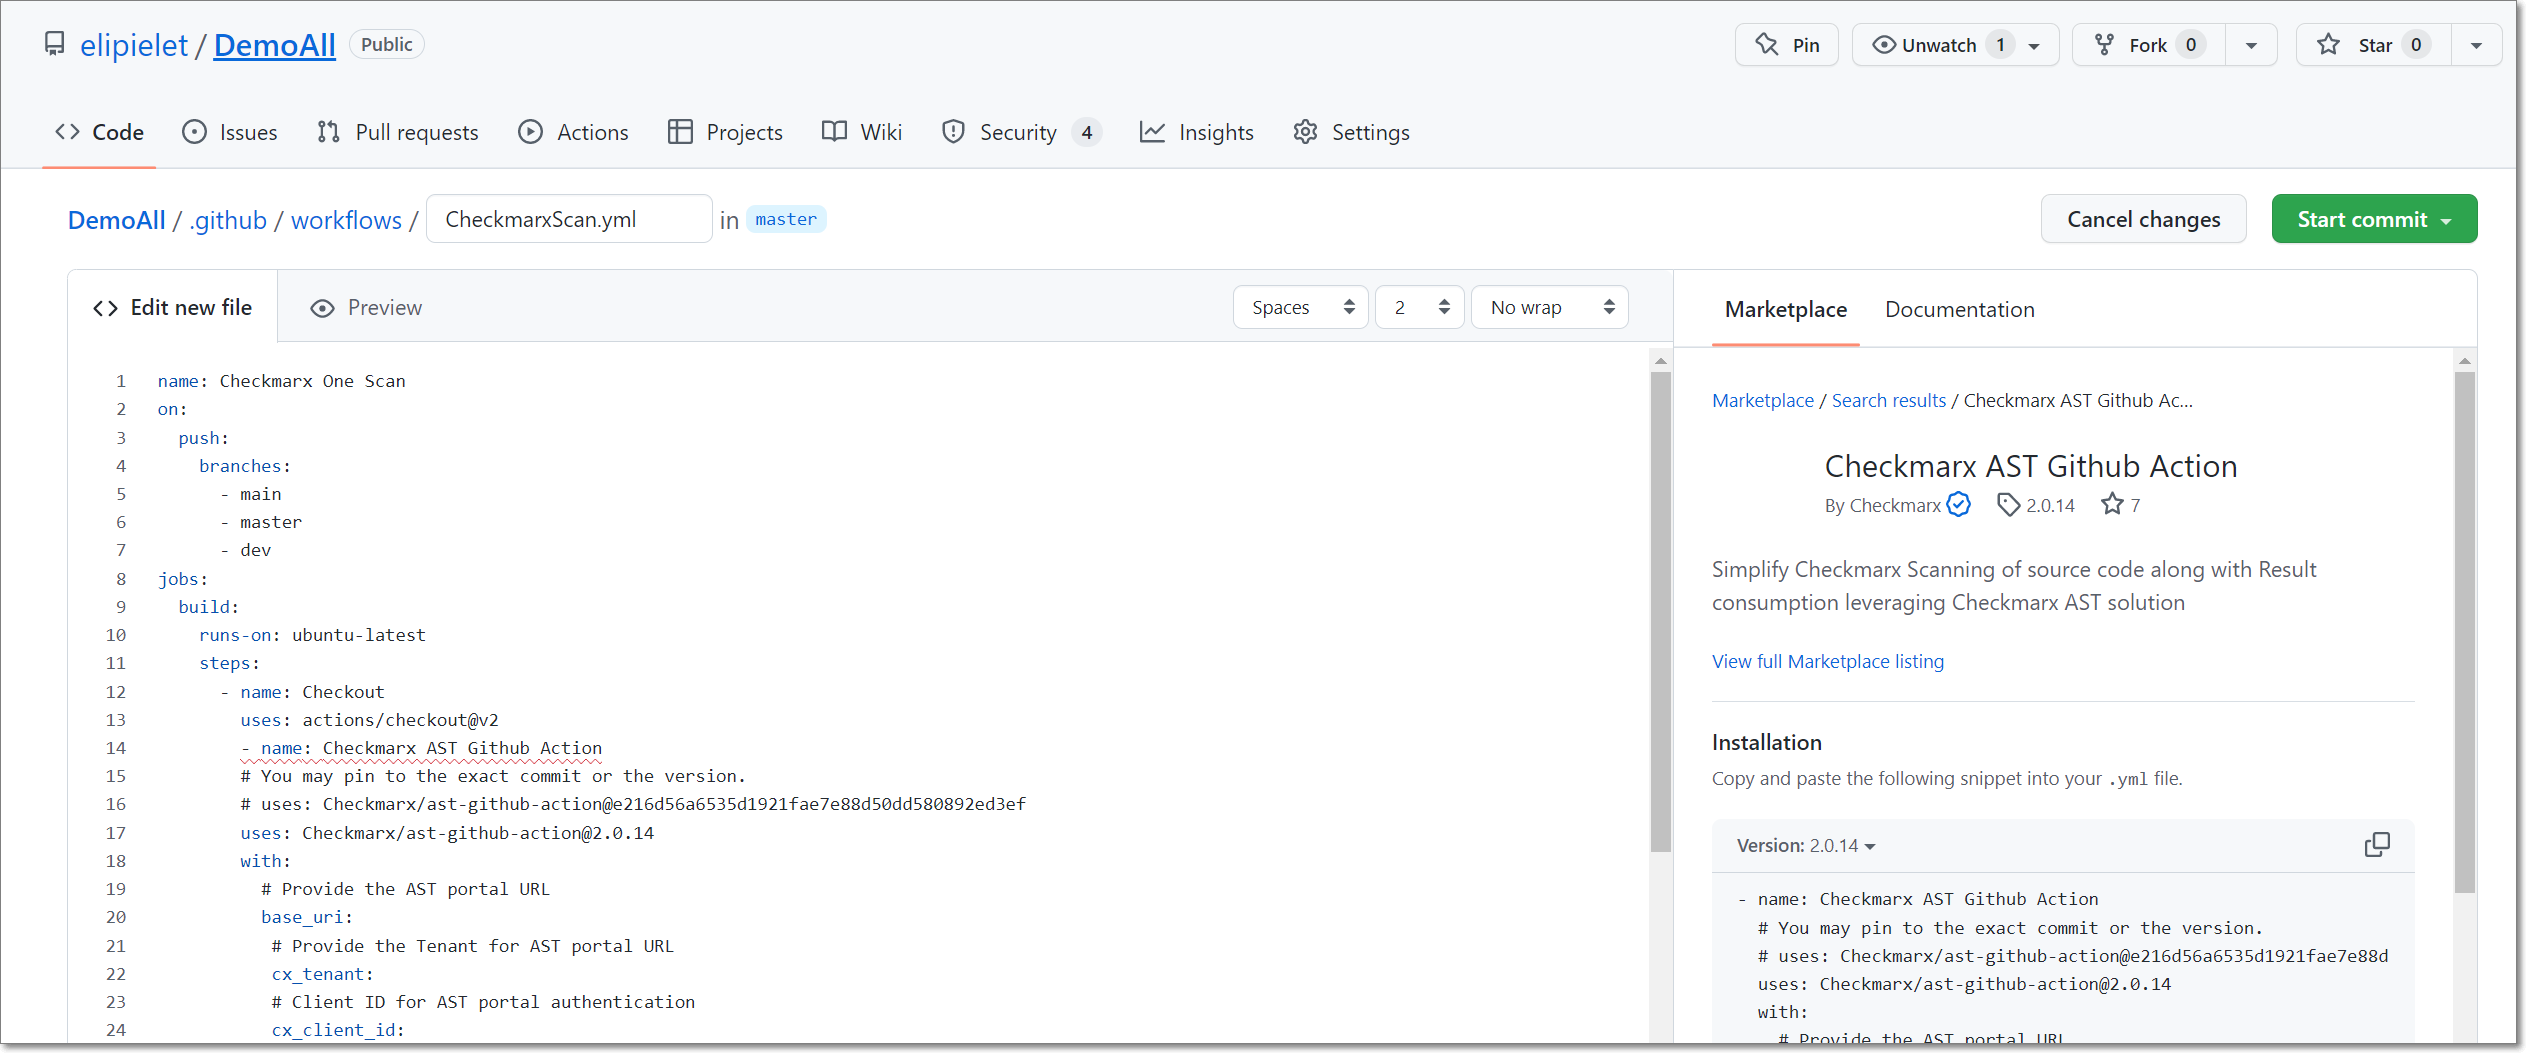
The .yml installation snippet is shown.
In the Marketplace section, copy the snippet, paste it into the “steps” section of the new project workflow below “runs-on”, and adjust the alignment as needed.
Notice
If you are running SCA Resolver as part of the scan then you need to modify the script accordingly. A sample script using Resolver is available here.
Customize the code as follows:
For base_uri, enter the base URL of your Checkmarx One Environment.
For cx_tenant, enter the name of your Checkmarx One tenant account.
For cx_client_id, enter
${{ secrets.CX_CLIENT_ID }}, whereCX_CLIENT_IDis the “Name” you used to store your Checkmarx OAuth Client ID in your GitHub repository.For cx_client_secret, enter
${{ secrets.CX_CLIENT_SECRET }}, whereCX_CLIENT_SECRETis the “Name” you used to store your Checkmarx OAuth Secret in your GitHub repository.For project_name, enter the name of an existing Project in Checkmarx One or enter a new name to create a new Project.
Notice
The project_name parameter must not be left blank. You can omit the project_name parameter completely, in which case it will default to
${{ github.repository }}.For branch, enter the name of an existing branch of your Project or enter a new name to create a new branch.
Notice
The branch parameter must not be left blank. You can omit the branch parameter completely, in which case it will default to
${{ github.ref }}.For additional_params, you can customize the Action by adding additional arguments, see Checkmarx One GitHub Action Configuration Variables.
If you want to import scan results into GitHub, do the following:
In the additional_params line add
--report-format sarif --output-path ..Add the following code to your .yml file:
    - name: Upload SARIF file
      uses: github/codeql-action/upload-sarif@v2
      with:
        # Path to SARIF file relative to the root of the repository
        sarif_file: cx_result.sarif
Click Start Commit.
In the dialog that opens, edit the name, add a description (optional), specify a branch, and then click Commit new file.
The Checkmarx One Action is added to the repo and an initial scan is run on the source code. Subsequent scans will be triggered each time a push commit is done.
Scanning Private Container Registries
GitHub Actions supports running Container Security scans on images that are stored in private container registries.
Notice
If you have set up a Checkmarx One integration with your private registry, as described here, then you can run the standard GitHub Action, which runs the container scan in the cloud.
Procedure for Scanning Private Registries
To run Container Security scans locally and scan images in private registries, use the dedicated workflow provided here.
Note: This workflow includes the following required additional_params configuation:
additional_params: --scan-types container-security --containers-local-resolution
Authentication for Private Registries
Authentication for private registries is done by submitting your username and password/token for each private registry via a dedicated environment variable.
Submit the REGISTRIES environment variable with the name of each of your private registries, separated by a space, e.g., "docker.io ghcr.io mycompany.jfrog.io"
Submit the value of the username for each registry as an environment variable based on the registry name, using the following syntax: USERNAME_<registry name in all caps, with _ replacing .>.
Example:
USERNAME_DOCKER_IO: ${{ secrets.DOCKER_USERNAME }}Submit the value of the password/token for each registry as an environment variable based on the registry name, using the following syntax: PASSWORD_<registry name in all caps, with _ replacing .>.
Example:
PASSWORD_DOCKER_IO: ${{ secrets.DOCKER_PASSWORD }}
Example:
env
  REGISTRIES: "docker.io ghcr.io mycompany.jfrog.io"
  USERNAME_DOCKER_IO: ${{ secrets.DOCKER_USERNAME }}
  PASSWORD_DOCKER_IO: ${{ secrets.DOCKER_PASSWORD }}
  USERNAME_GHCR_IO: ${{ secrets.GHCR_USERNAME }}
  PASSWORD_GHCR_IO: ${{ secrets.GHCR_TOKEN }}
  USERNAME_MYCOMPANY_JFROG_IO: ${{ secrets.JFROG_USERNAME }}
  PASSWORD_MYCOMPANY_JFROG_IO: ${{ secrets.JFROG_ACCESS_TOKEN }}
Checkmarx One GitHub Action Configuration Variables
When you set up a Checkmarx One GitHub Action in a GitHub workflow you need to configure the following variables.
Variable | Required | Description | Possible Values | |
|---|---|---|---|---|
base_uri |
| The base URL of your Checkmarx One environment. | ||
cx_tenant |
| The name of your Checkmarx One Tenant Account. | e.g., MyOrganization | |
cx_client_id |
| The Checkmarx One client ID. Recommended to create a GitHub Secret. | e.g., | |
cx_client_secret |
| The Checkmarx One Client Secret. Recommended to create a GitHub Secret. | e.g., | |
project_name |
| The name that will be assigned to this Project in Checkmarx One. | e.g DemoProject Default: If no project name is specified, then the name of the GitHub repo is assigned to the project in Checkmarx One. | |
branch |
| The branch name that will be designated for this Project in Checkmarx One. | e.g., main Default: | |
global_params |
| Submit CLI | ||
scan_params |
| Submit | ||
utils_params |
| Submit | ||
results_params |
| Submit | ||
additional_params |
| You can specify any CLI arguments that you would like to apply to scans of this project. See documentation here. TipThis variable has been replaced by the dedicated parameter groups It remains supported for backward compatibility, but must not be used in combination with any of these newer parameters. | e.g., |

