Deploying Policy Management in Windows
This page describes how to deploy Policy Management in Windows.
Before deploying, ensure you meet the following requirements and complete the preliminary steps.
Requirements Before Deployment
Enable the Internet Informational Service (IIS) web server; see here for further instructions.
Install the URL Rewrite module here. This module is necessary to operate with React routes and requires an IIS restart after installation.
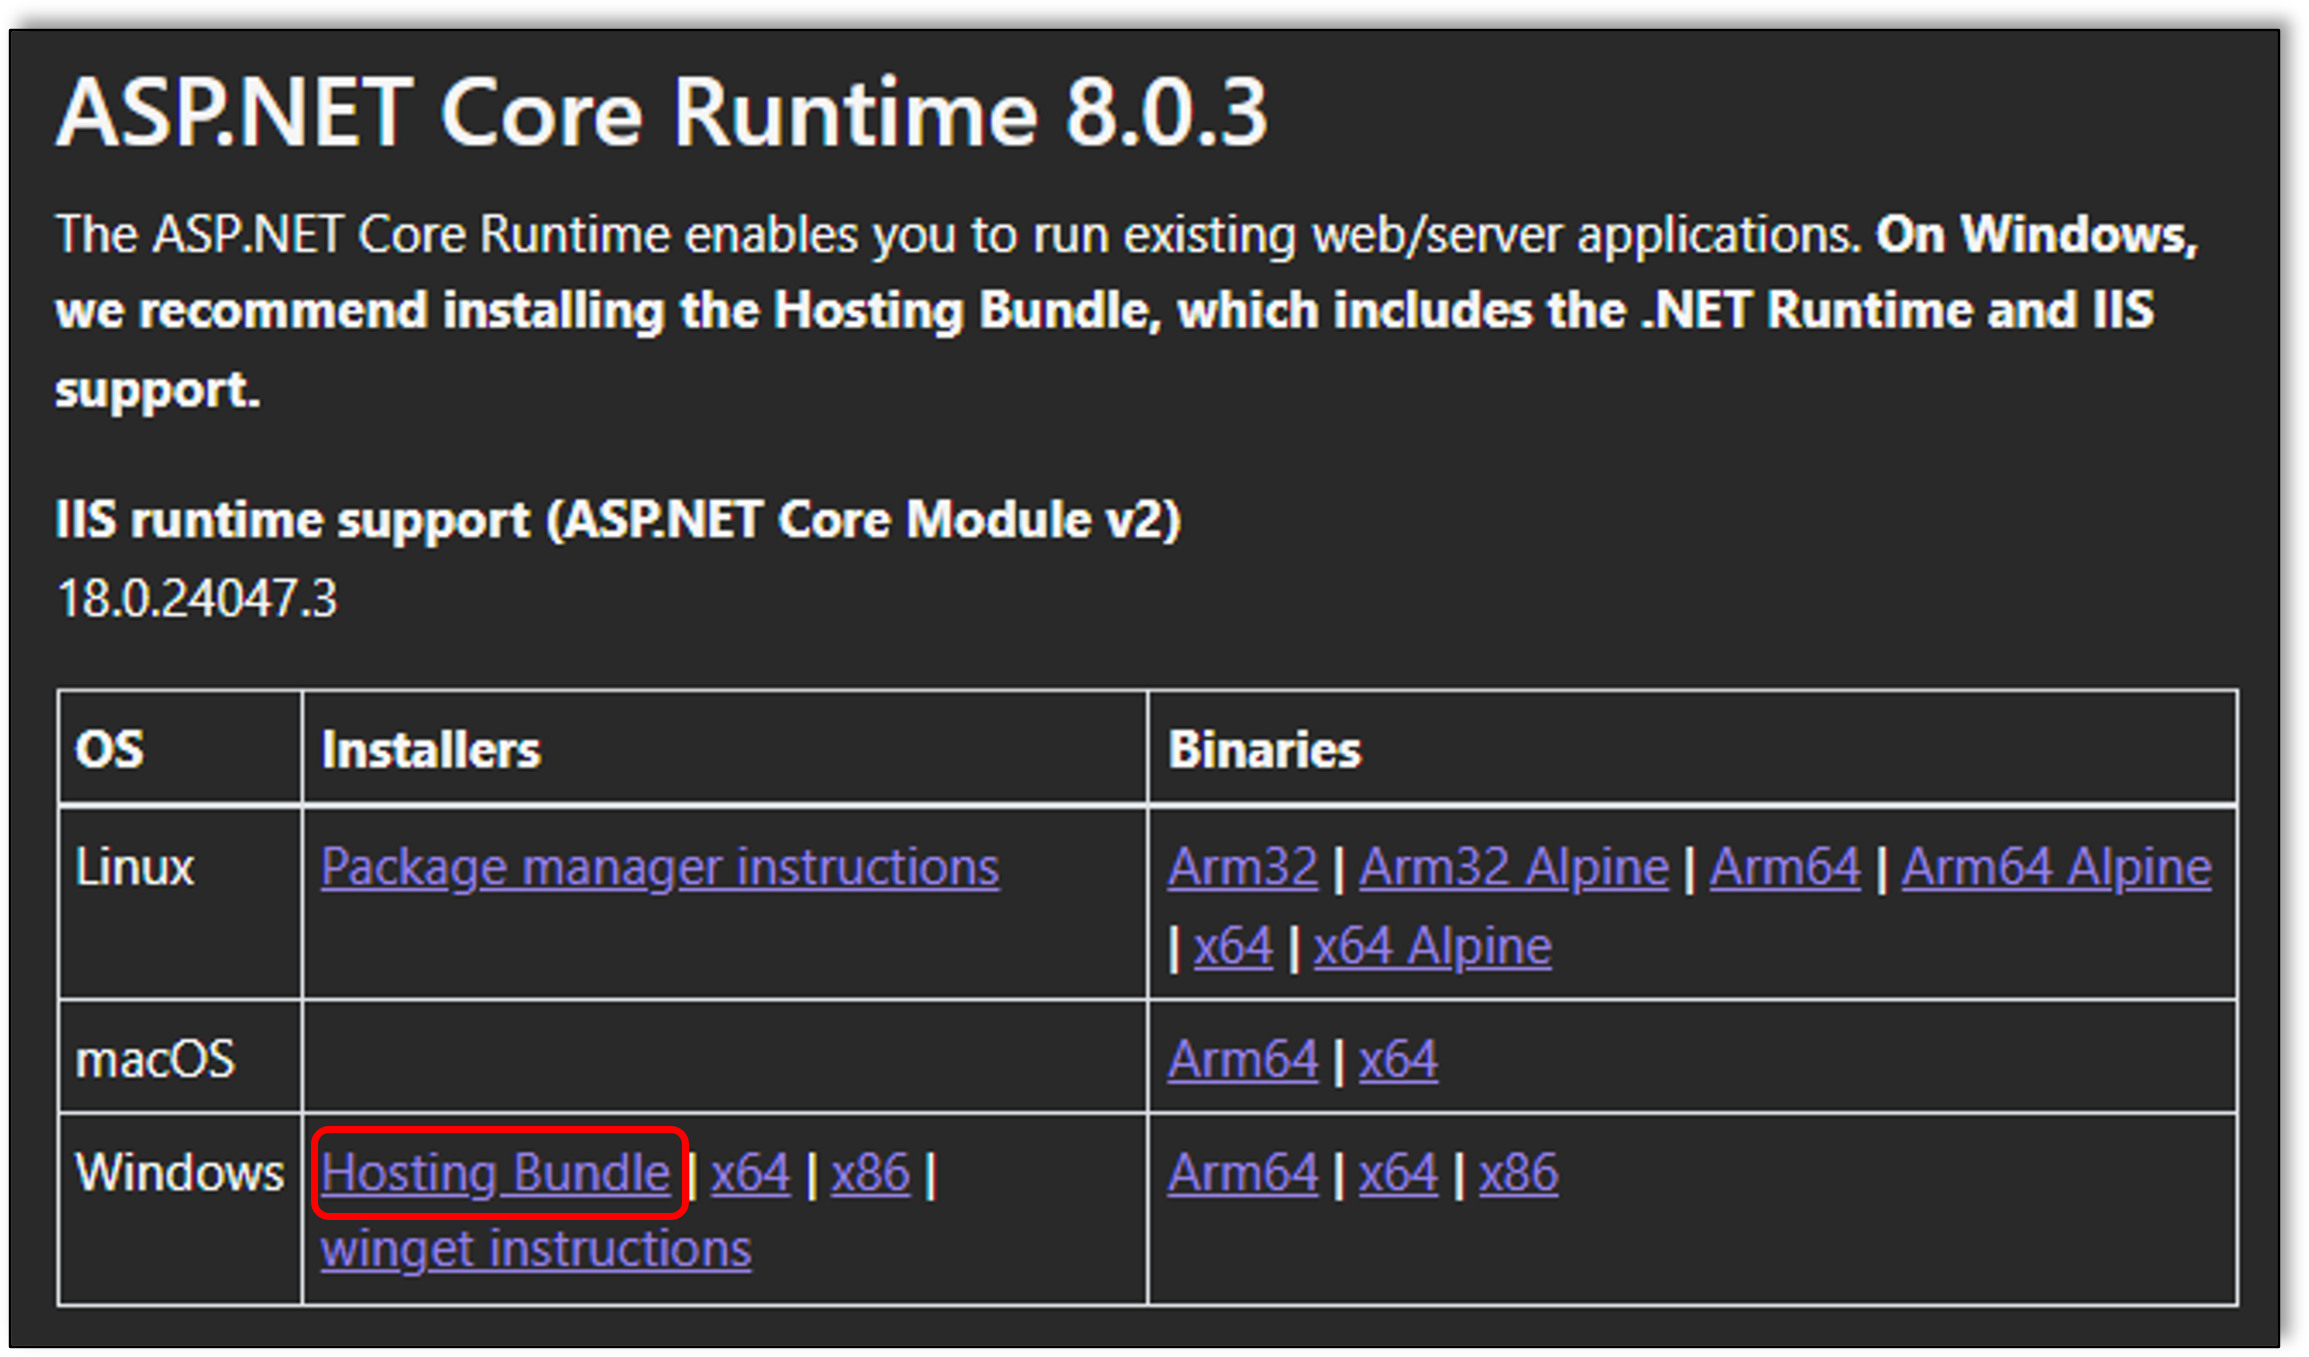
Download only the ASP.NET Core Runtime 8 (Windows - Hosting Bundle) here. This hosting bundle enables you to run existing web/server applications.
Preliminary Steps for Both Installation Processes
Obtain the latest Policy Management Portal and Service .zip files from your Checkmarx representative. Place those files inside the following folders.
[Optional] Create a new admin user to access the database- here
Applications folders:
Create a new folder to store the Policy Management applications. We recommend using the default Checkmarx folder - example:
C:\Program Files\Checkmarx\CxPolicyManagement.Create two new folders inside this folder: one for the Portal and another for the Backend application, then move the contents in the policy-management-ui-x.x.x.zip and policy-management-service-x.x.x.zip from the Windows release folder to the created folders, respectively. As an example:
C:\Program Files\Checkmarx\CxPolicyManagement\PortalC:\Program Files\Checkmarx\CxPolicyManagement\Backend
Grant full control permission to the user IIS_IUSRS in these folders (Properties → Security → Edit → Add).
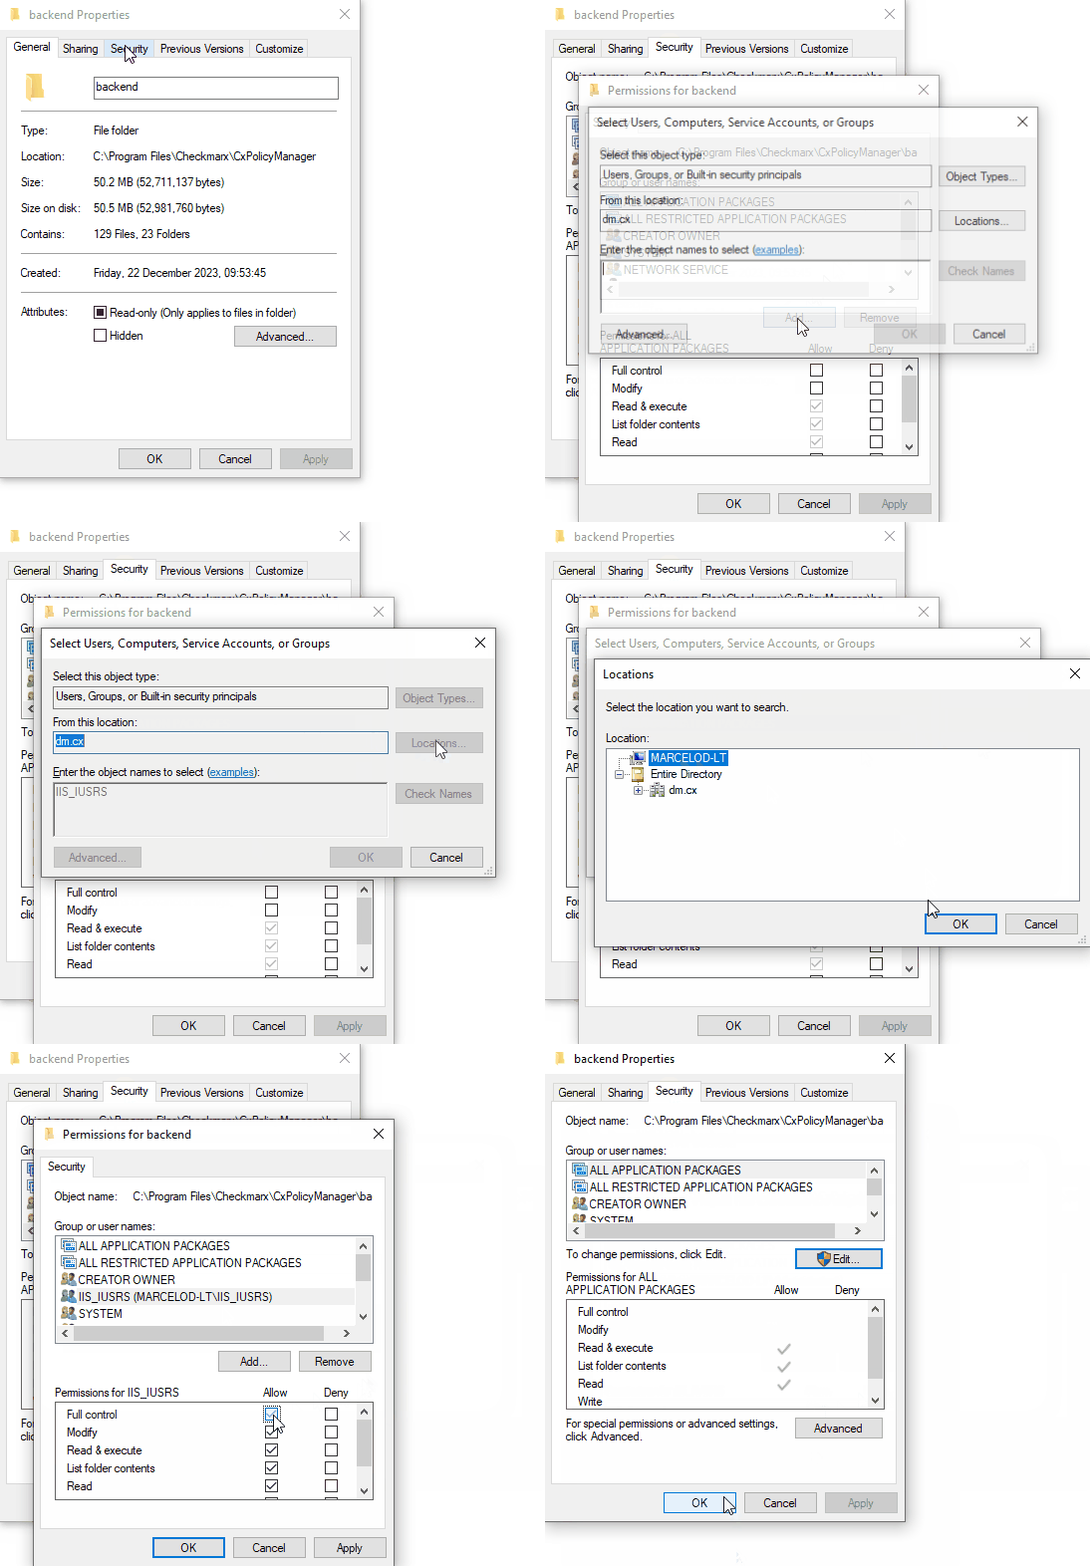
If the folder is created outside the Program Files folder, you need to ensure the permissions to the folder and, if necessary, add two new usernames (IUSR, IIS_IUSRS) with default permissions (Read & execute, List folder contents, and Read).
Configure the
appsettings.jsonfile to make the database accessible to the API.Go to the backend folder created for IIS and open the file
appsettings.json."ConnectionStrings": { "ConnectionString": "Data Source=.\\SQLEXPRESS;Initial Catalog=CxDB;Integrated Security=False;User ID=<username>;Password=<password>;Encrypt=True;TrustServerCertificate=True", "EncryptionKey": "", "EncryptionVector": "" },Replace username and password with your credentials.
Main Deployment Processes
There are two processes to deploying Policy Management: one where you have CxSAST installed on your environment and one where you do not. Follow the deployment process relevant to you by choosing the one that best fits your needs:
Deployment in Environment with CxSAST
To deploy Policy Management in an environment with CxSAST, create a new application and add its path to the Portal and Backend folders you created above. To complete deployment, run the Authentication and Authorization scripts as an administrator.
Adding a Path to the Portal Folder
Open IIS and expand on the left panel until you see the content of Sites
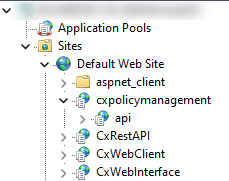
Then, under Default Web Site, right-click and click
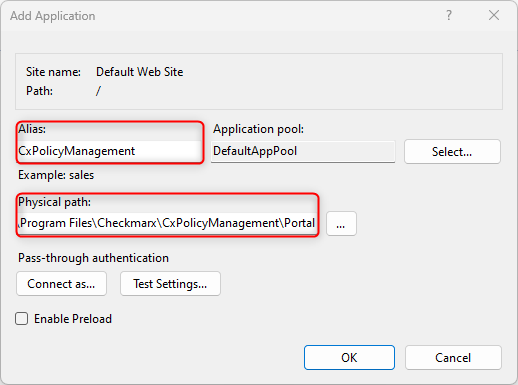
Add Application...On the Add Application window, you must fill in the following fields:
Alias: choose the name of the Policy Management portal alias to see in the IIS WebSites treeview (example: CxPolicyManagement).
Note
This name will be necessary for the next steps.
Physical path: add the path to the Portal folder previously created (e.g.,
C:\Program Files\Checkmarx\CxPolicyManagement\Portal)Application pool: by default, it is the same as the parent. Optionally, you can create a new one to turn the API into an isolated process.
Adding a Path to the Backend Folder
Since the backend services (including the API) are also a part of the policy management portal, they should be deployed as an application of the website created previously. Deploying it as a separate application or website is also possible.
Right-click under the Policy Management Portal Application previously created and click
Add Application....On the Add Application window, fill in the following fields:
Alias: choose the alias of the Backend. This name will appear in the URL (example: API).
Application pool: use the same as the parent (example: CxPolicyManagementPortal). Optionally, you can create a new one to turn the API into an isolated process.
Physical path: add the path to the Portal folder previously created (example:
C:\Program Files\Checkmarx\CxPolicyManagement\Backend).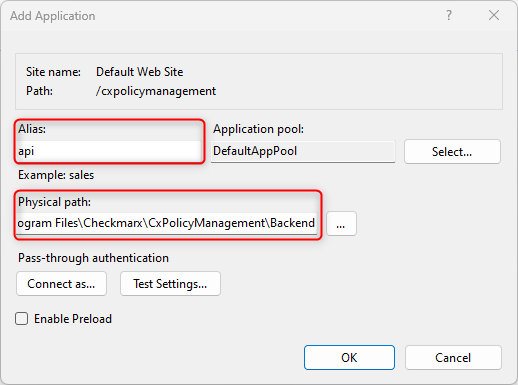
Running the Authentication and Authorization Script
Run PowerShell as an Administrator, and cd to the Portal folder
C:\Program Files\Checkmarx\CxPolicyManagement\Portaland prepare to run the cx-pm-auth-setup.ps1 script file.Run the script with these parameters:
-BaseAddressService, BaseAddressPortal, APIAlias, PortalAlias, BaseAddressAccessControl and Username.Use the example command shown here, but remember to replace the domain names of the addresses and <database_User>:
In this example, the addresses are the domain names of the same machine, the Portal (with the alias CxPolicyManagement) is an application of the Default Web Site, the backend (with the alias API) is an application of the Portal, and they are both on port 80: .
\cx-pm-setup.ps1 -BaseAddressService http://xptomachine.dm.cx -BaseAddressPortal http://xptomachine.dm.cx -APIAlias api -PortalAlias CxPolicyManagement -BaseAddressAccessControl http://xptomachine.dm.cx -Username <database_User>.
Important
<database_User> should be replaced with the username to connect to the database.
The DatabaseHost parameter should also be passed if the host differs from the local host.
Other parameters available: ServicePort, PortalPort, InstallationPath, DatabaseHost.
Press Enter to request the password for the database user inputted.
For more information on the script and its parameters, see Deployment - Additional Information
Deployment in an Environment without CxSAST
To deploy Policy Management in an environment without CxSAST, you must create a new website and add its path to the Portal and Backend folders you created above. To complete deployment, run the Authentication and Authorization scripts as an administrator.
Adding a Path to the Portal Folder
Open IIS and expand the left panel until you see Sites.
Then, under the Sites folder, right-click and click
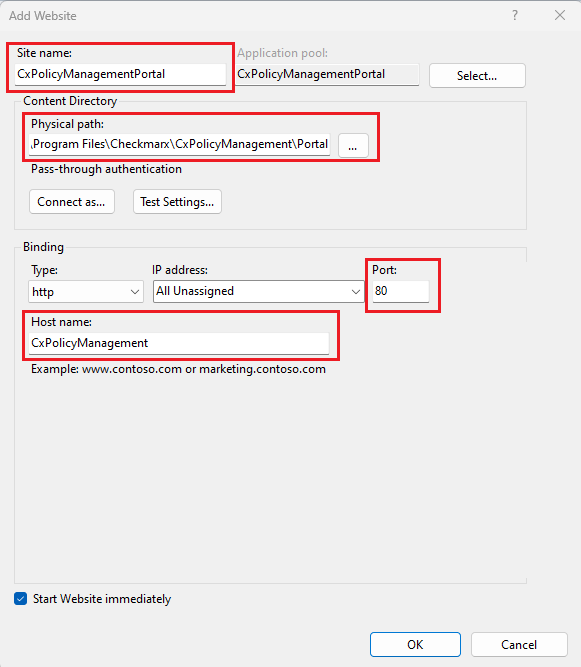
Add Website...on the dropdown.On the Add Website window, fill in the following fields:
Site name: choose the name of the Policy Management portal to see in the IIS WebSites treeview (example: CxPolicyManagementPortal).
Physical path: add the path to the Portal folder previously created (example:
C:\Program Files\Checkmarx\CxPolicyManagement\Portal).Port: write the port to access the Policy Management portal.
Hostname: set the Hostname to access the Policy Management portal (example: CxPolicyManagement).
Important
This name will be necessary for the next steps!
Adding a Path to the Backend Folder
Since the backend services (including the API) are also a part of the Policy Management website, they should be deployed as an application of the website we created previously. You may also deploy it as a separate website.
Right-click under the Policy Management Portal website previously created and click on
Add Application...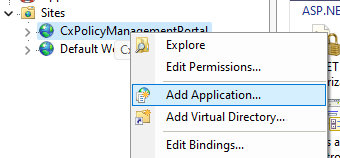
On the Add Application window, we need to fill in the following fields:
Alias: choose the alias of the Backend. This name will appear in the URL (example: API);
Application pool: use the same as the parent (example: CxPolicyManagementPortal). Optionally, you can create a new one to turn the API into an isolated process.
Physical path: add the path to the Portal folder previously created (example:
C:\Program Files\Checkmarx\CxPolicyManagement\Backend)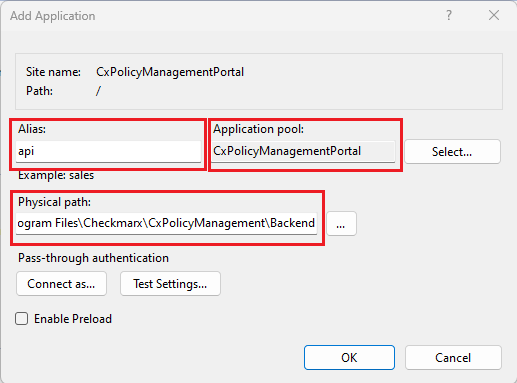
Notice
After configuring, Swagger will be available in http://<baseaddress>/<alias>/swagger/index.html or http://CxPolicyManagement/api/swagger/index.html using this guide's example names.
Warning
If you are using Port 80 , you must also set up a hosts file.
Authentication and Authorization Script
Run PowerShell as an Administrator, and cd to the Portal folder
C:\Program Files\Checkmarx\CxPolicyManagement\Portaland prepare to run cx-pm-auth-setup.ps1 script file.Run the script with these parameters:
-BaseAddressService, BaseAddressPortal, APIAlias, BaseAddressAccessControl, and Username.Use the example command shown here, but remember to replace the domain name in
BaseAddressAccessControlwith the correct value and your <database_User>:In this example, the Portal is the main website, the backend (with the alias API) is an application of the Portal, they are both on port 80, and the hostname is CxPolicyManagement: .
\cx-pm-setup.ps1 -BaseAddressService http://CxPolicyManagement -BaseAddressPortal http://CxPolicyManagement -APIAlias api -BaseAddressAccessControl http://xptomachine.dm.cx -Username <database_User>.
Important
<database_User> should be replaced with the username to connect to the database.
The DatabaseHost parameter should also be passed if the host differs from the local host.
Other parameters available: ServicePort, PortalPort, PortalAlias, InstallationPath, DatabaseHost.
To use a port other than 80, set the parameters ServicePort and PortalPort.
Press Enter to request the password for the database user inputted.
For more information on the script and its parameters, see Deployment - Additional Information.