Triaging SCA Results
There are two ways by which you can triage SCA results:
Management of Risks - change the state and/or severity of a specific risk.
Manageent of Packages - change the state of a package to Muted or temporarily Snoozed.
Management of Risks
Checkmarx SCA tracks specific risk instances throughout your software development lifecycle (SDLC). After reviewing the results of a scan, you can triage the results and modify these predicates accordingly. If the identical risk instance is identified in subsequent scans of the same project, the predicate will automatically be applied to that instance.
A risk instance is defined as a specific risk affecting a specific package in a specific project. Therefore, changes that you make to the predicate of a risk aren’t applied to the identical risk when it is found in a different project. Also, if the risk affects other packages in your project, the changes won’t be applied to those risks.
For Vulnerabilities and Suspected Malware risks each risk instance has a predicate associated with it, which is comprised of the State, Severity and Comments.
For Vulnerabilities, in addition to standard triage predicates, you can enrich your workflow by incorporating Vulnerability Exploitability eXchange (VEX) information to assess whether a vulnerability is actually exploitable in your product. SeeVulnerability Exploitability eXchange (VEX) for more details.
For Legal Risks, you can adjust the state of the related license, marking it as Effective or Not Effective. Learn about triaging legal risks below.
Important
The following permissions enable users to triage risks:
update-result-state-not-exploitable (can change to this state only)
update-result-state-propose-not-exploitable (can change to this state only)
update-result-states (can change all states except not-exploitable; can’t change the severity)
update-result-severity (can change only severities)
For additional details about triage permissions, see here.
Triaging Risk State and Severity
A risk state is assigned to each risk instance in your Project. Initially, the state of each new risk is set as To Verify, indicating that it is a new finding that hasn’t yet been assessed by your AppSec team. The severity is determined primarily based on the CVSS score of the vulnerability. Your AppSec team can adjust the risk state to one of the following options:
Notice
The states mentioned above are pre-configured for all Checkmarx One accounts. In addition, you can create custom states in your account. Once they are created, you can assign those custom states to results.
Custom states is currently supported for SAST, SCA, IaC Security and Container Security results. It is not yet available for all tenant accounts. For more info, see Custom States.
Not Exploitable - Select this state if your team has determined that this risk doesn’t pose a threat to your application (and isn’t expected to cause a risk at any time in the future).
Note
When a Risk is marked as Not Exploitable, in the All Risks page the CVE is marked with a strikethrough line, and the Risk Details page is grayed out. Also, Not Exploitable risks aren't counted in the risk summary counters.
Proposed Not Exploitable - Select this state if your team has suggested tentatively that this risk doesn’t pose a threat to your application.
Confirmed - Select this state if your team has confirmed that this risk does pose a threat and requires mitigation.
Urgent - Select this state if your team has determined that this risk poses an imminent threat and requires urgent mitigation.
Based on your AppSec team's determination, the score can be adjusted to a score between 0.0 and 10.0 with the following severity breakdown:
Critical - 9.0 to 10.0
High - 7.0 to 8.9
Medium - 4.0 to 6.9
Low - 0.1 to 3.9
Info - 0.0
Note
Only users with the permissions Update-result-severity or Update-result-severity-if-in-group can change the risk severity or score.
Guidelines for Triaging Risks
Before defining a new state for a Risk or package, it is important to ensure not only the security threat that the Risk currently poses but the threat that it may cause at any stage in your project’s development and deployment. On the other hand, it is sufficient to ensure that the presence of the Risk in this particular package and in this Project does not pose a threat, even if the Risk would pose a threat if it is identified in a different package and/or a different Project.
The following are some common reasons for changing the state of Risk or package:
There is no exploitable path from your source code to the package that contains the Risk.
The Risk doesn't affect the OS that you're running.
You don't consider the threat to be severe enough to require remediation.
Snoozing or muting a package will reduce noise in the system if there is no available fixed package version.
Vulnerability Exploitability eXchange (VEX)
Vulnerability Exploitability eXchange (VEX) enables you to triage vulnerabilities in open-source dependencies using a standardized, machine-readable format that communicates whether a known vulnerability, such as a CVE, actually affects your software. In many cases, a product may include a component that is technically vulnerable while the vulnerability itself is not exploitable within the specific product context. VEX allows vendors and stakeholders to clarify real exploitability status, reducing alert noise and improving risk prioritization.
After completing VEX triage, the associated information can be exported within SBOMs and other reports. Reports generated in XML, JSON, or CSV formats automatically include VEX data. In contrast, when exporting an SBOM, VEX information is not included unless explicitly selected during export. VEX is supported for CycloneDX SBOMs only; not supported for SPDX format. For more information on exporting VEX-compliant SBOMs, see Generating SBOM Report for a Project.
Notice
This capability complements existing triage workflows. All current triaging methods remain fully supported.
Below are tables describing the various VEX fields that define the exploitability assessment:
Field | Required | Description |
|---|---|---|
State | Yes | Defines exploitability status |
Justification | Required when | Explains why vulnerability does not affect product |
Response | Optional | Action to be taken (Cannot fix, Update, etc.) |
Detail | Optional | Free-text notes |
State Options
State | Description |
|---|---|
Resolved | Vulnerability has been remediated. |
Resolved with pedigree | Vulnerability has been remediated and evidence of the changes are provided in the affected components pedigree, containing verifiable commit history and/or diff(s). |
Exploitable | Vulnerability may be directly or indirectly exploitable. |
In triage | Vulnerability is being investigated. |
False positive | Vulnerability is not specific to the component or service and was falsely identified or associated. |
Not affected | Vulnerability does not affect the component or service. |
Justification Options
Justification | Description |
|---|---|
Code not present | Code has been removed. |
Code not reachable | Vulnerable code is not invoked at runtime. |
Requires configuration | Exploitability requires a configurable option to be set/unset. |
Requires dependency | Exploitability requires a dependency that is not present. |
Requires environment | Exploitability requires a certain environment that is not present. |
Protected by compiler | Exploitability requires a compiler flag to be set/unset. |
Protected at runtime | Exploits are prevented at runtime. |
Protected at perimeter | Attacks are blocked at physical, logical, or network perimeter. |
Protected by mitigating control | Preventative measures have been implemented that reduce the likelihood and/or impact of the vulnerability. |
How to Change the Risk State and Severity
Triaging a Single Risk
To change the risk state and severity:
On the Projects page, hover over the Results button for the desired project and select SCA.
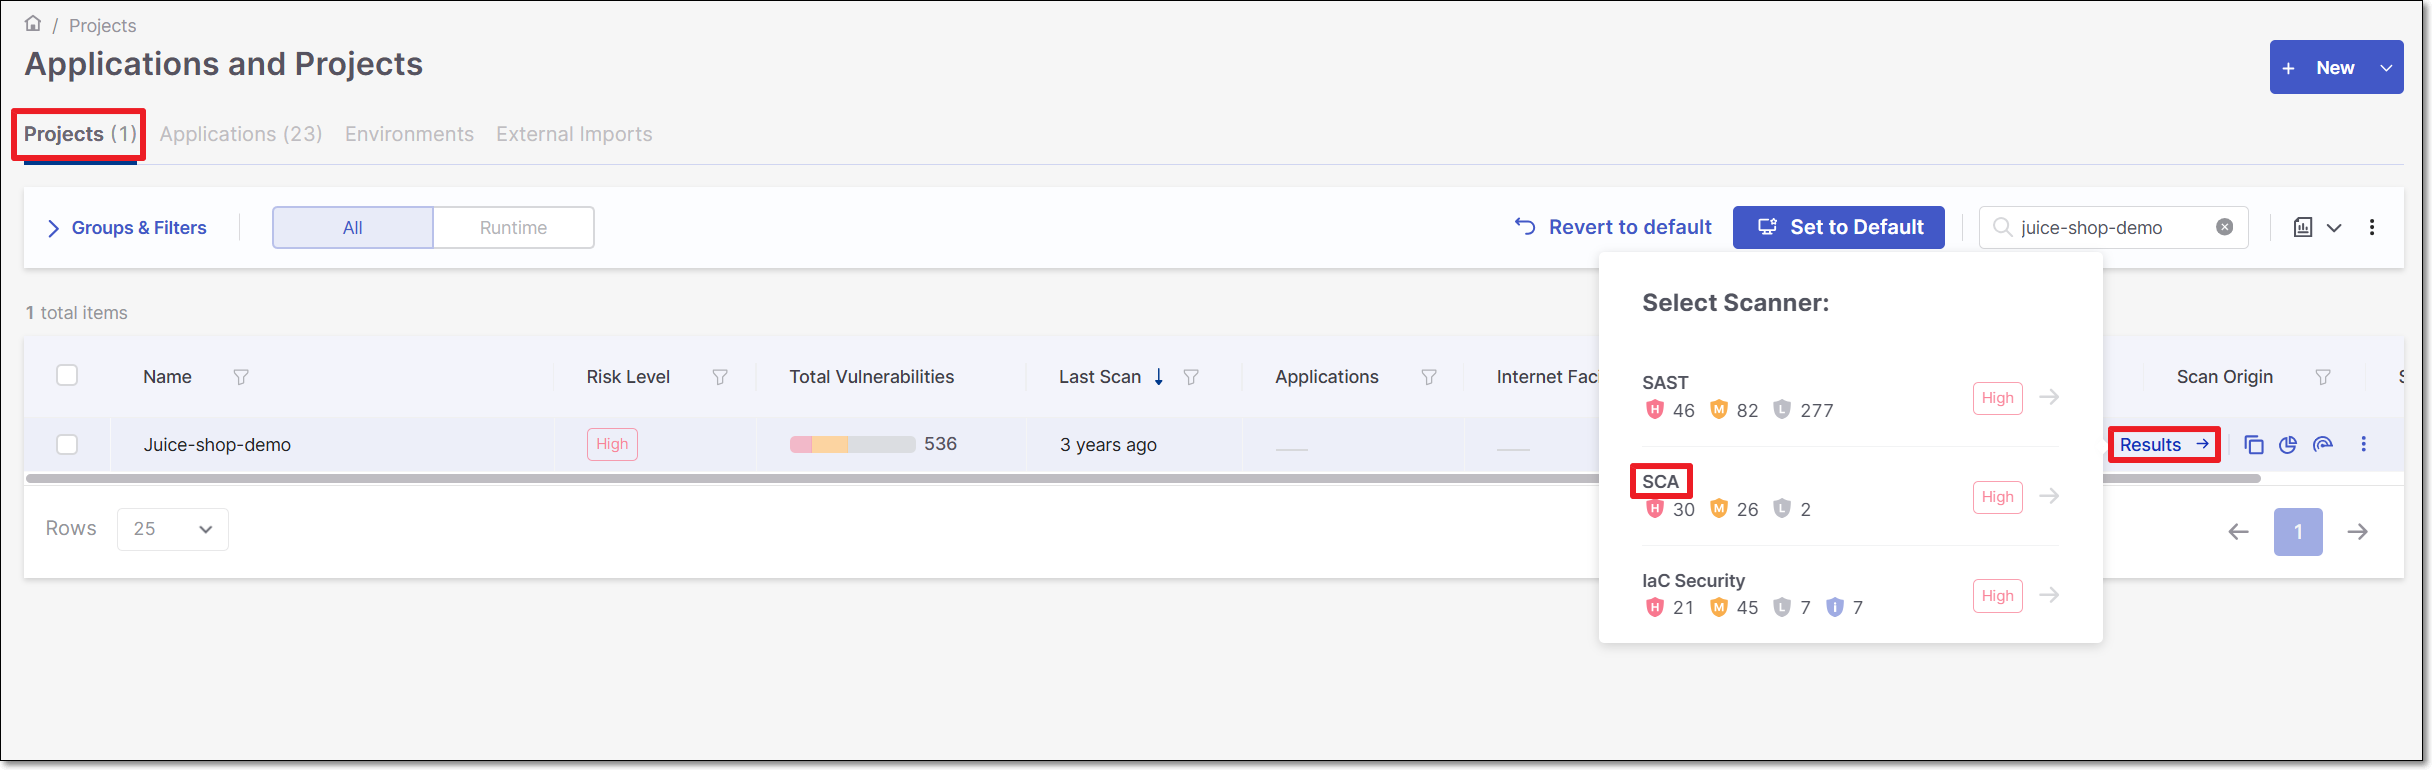
On the Scan Results page, click on the Risks tab. The All Risks sub-tab is displayed.
Click on a risk to open the Risk Details page for that risk.
Click on the Edit button.

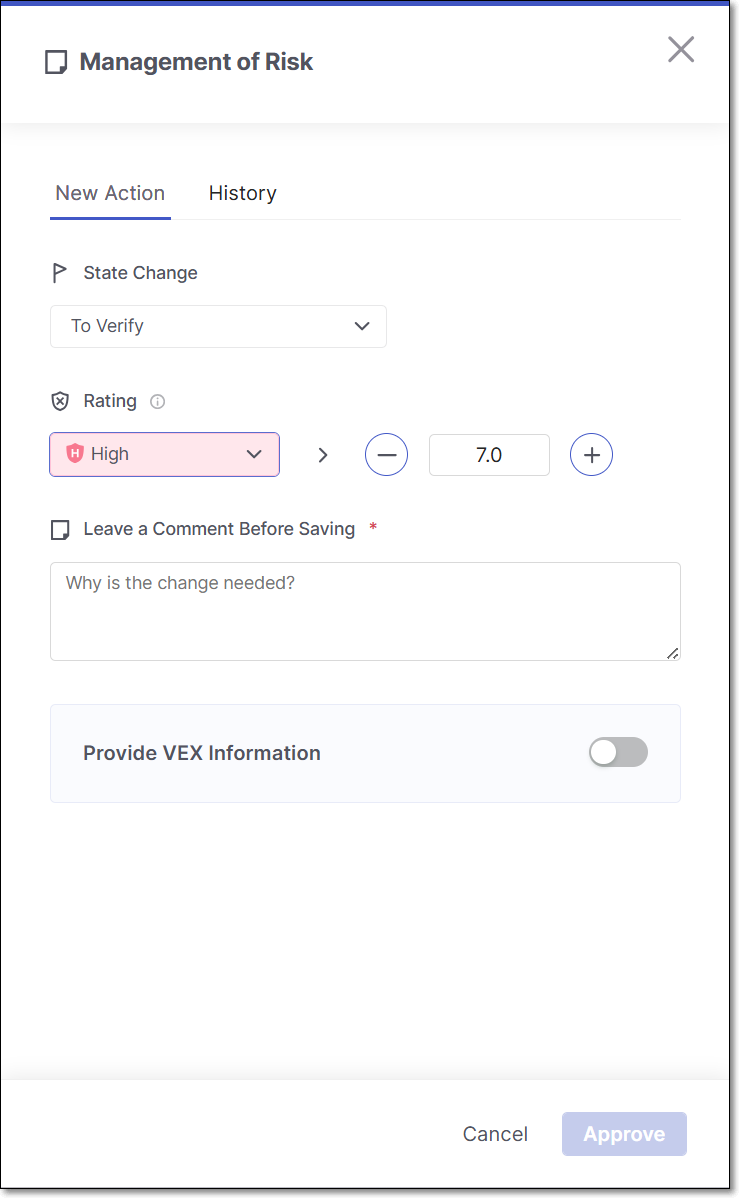
The Management of Risk panel opens.
Notice
Alternatively, you can open the Management of Risk panel by clicking on the Comments button in the Customization section at the bottom of the Risk Details page.
To change the state, click on the State field, and select from the drop-down list the desired state.
To change the severity, either click on the Rating field and select from the drop-down list the desired severity or customize the severity score using the + / - buttons.
Note
Changing the severity score from the drop-down list will assign the lowest severity from that level (e.g., selecting Medium, the risk will be assigned a score of 4.0).
In the Leave a Comment Before Saving section, enter your comment. For example, you can add resources related to the vulnerability, assessment of exploitability in the context of your code, remediation steps, assignment of responsibility for remediation etc.
Warning
After changing the state, you are required to add a comment explaining the rationale behind the change before the option to Approve the change becomes available.
Click Approve.
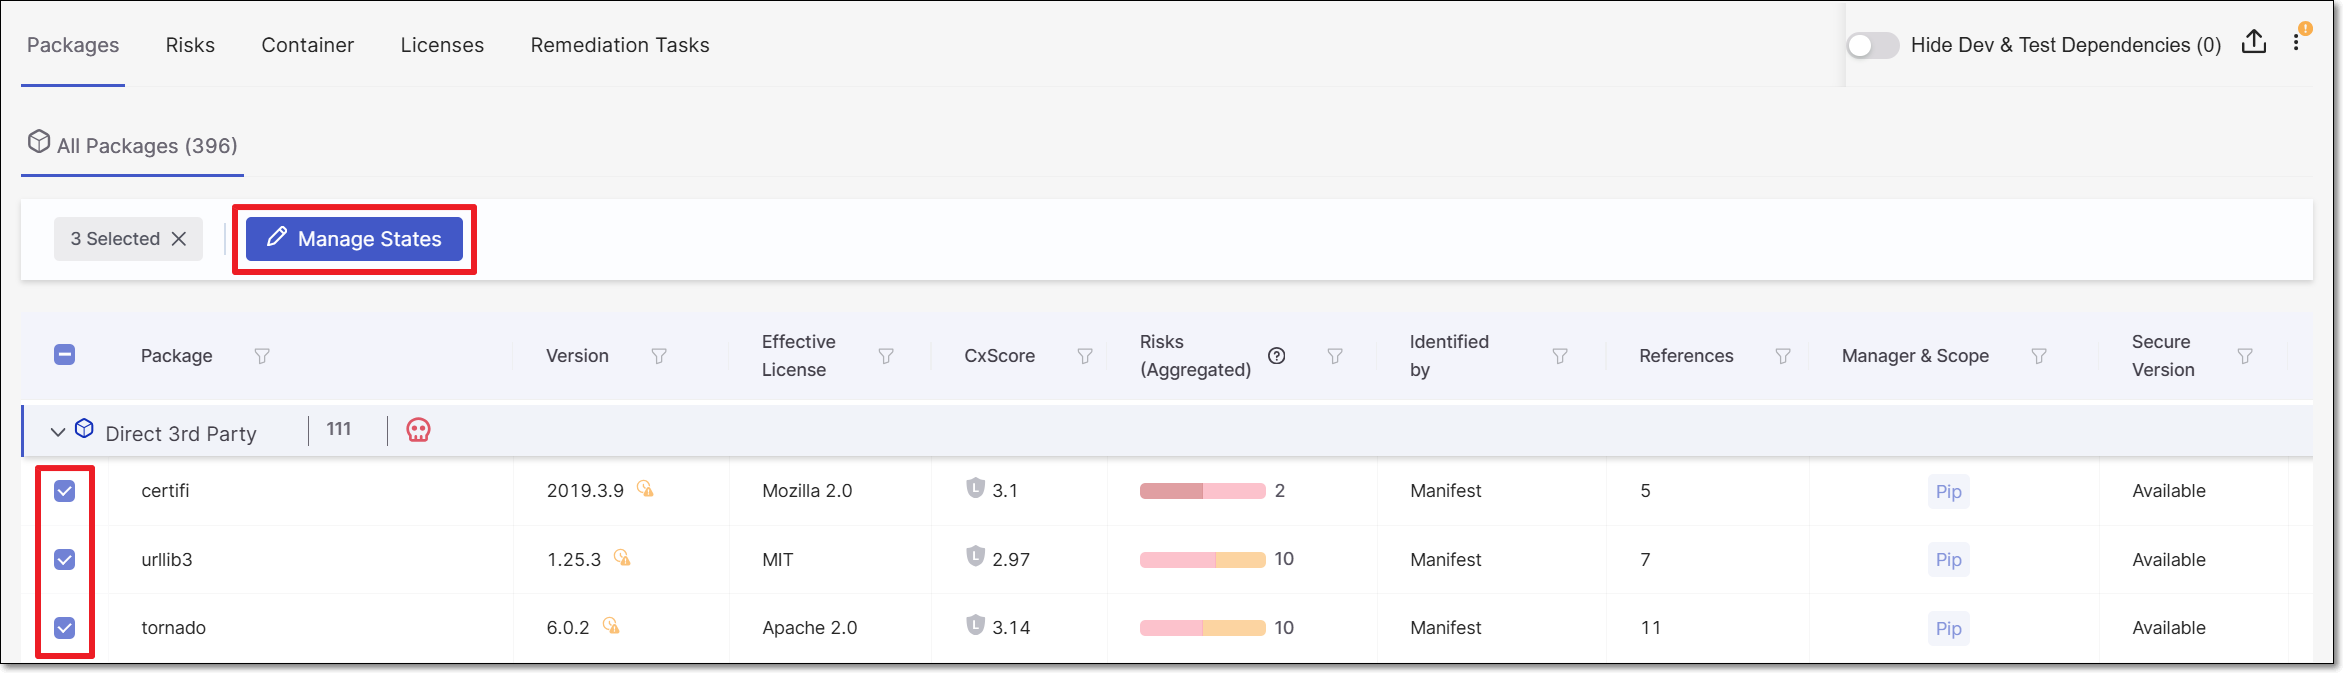
Triaging Risks - Bulk Action
To bulk action triage risks:
Go to SCA results viewer > Risks tab > All Risks sub-tab.
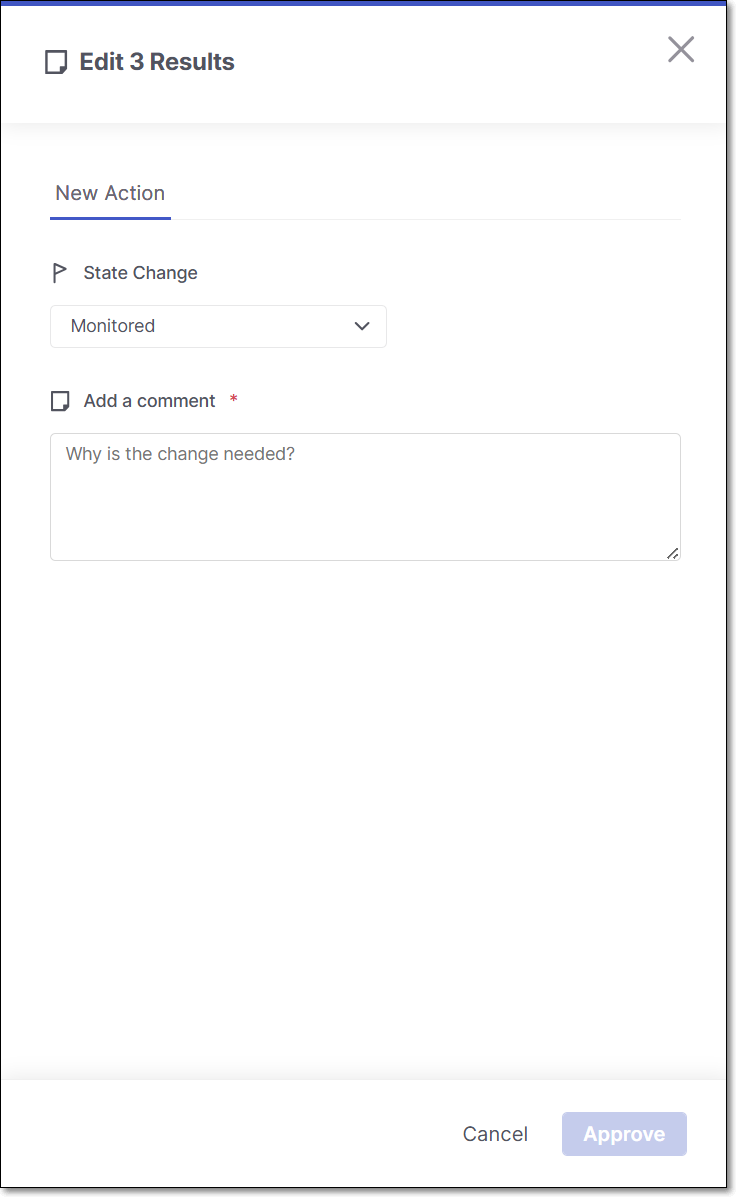
Select the checkbox next to each risk you would like to include in the bulk action triage, and click Manage States.
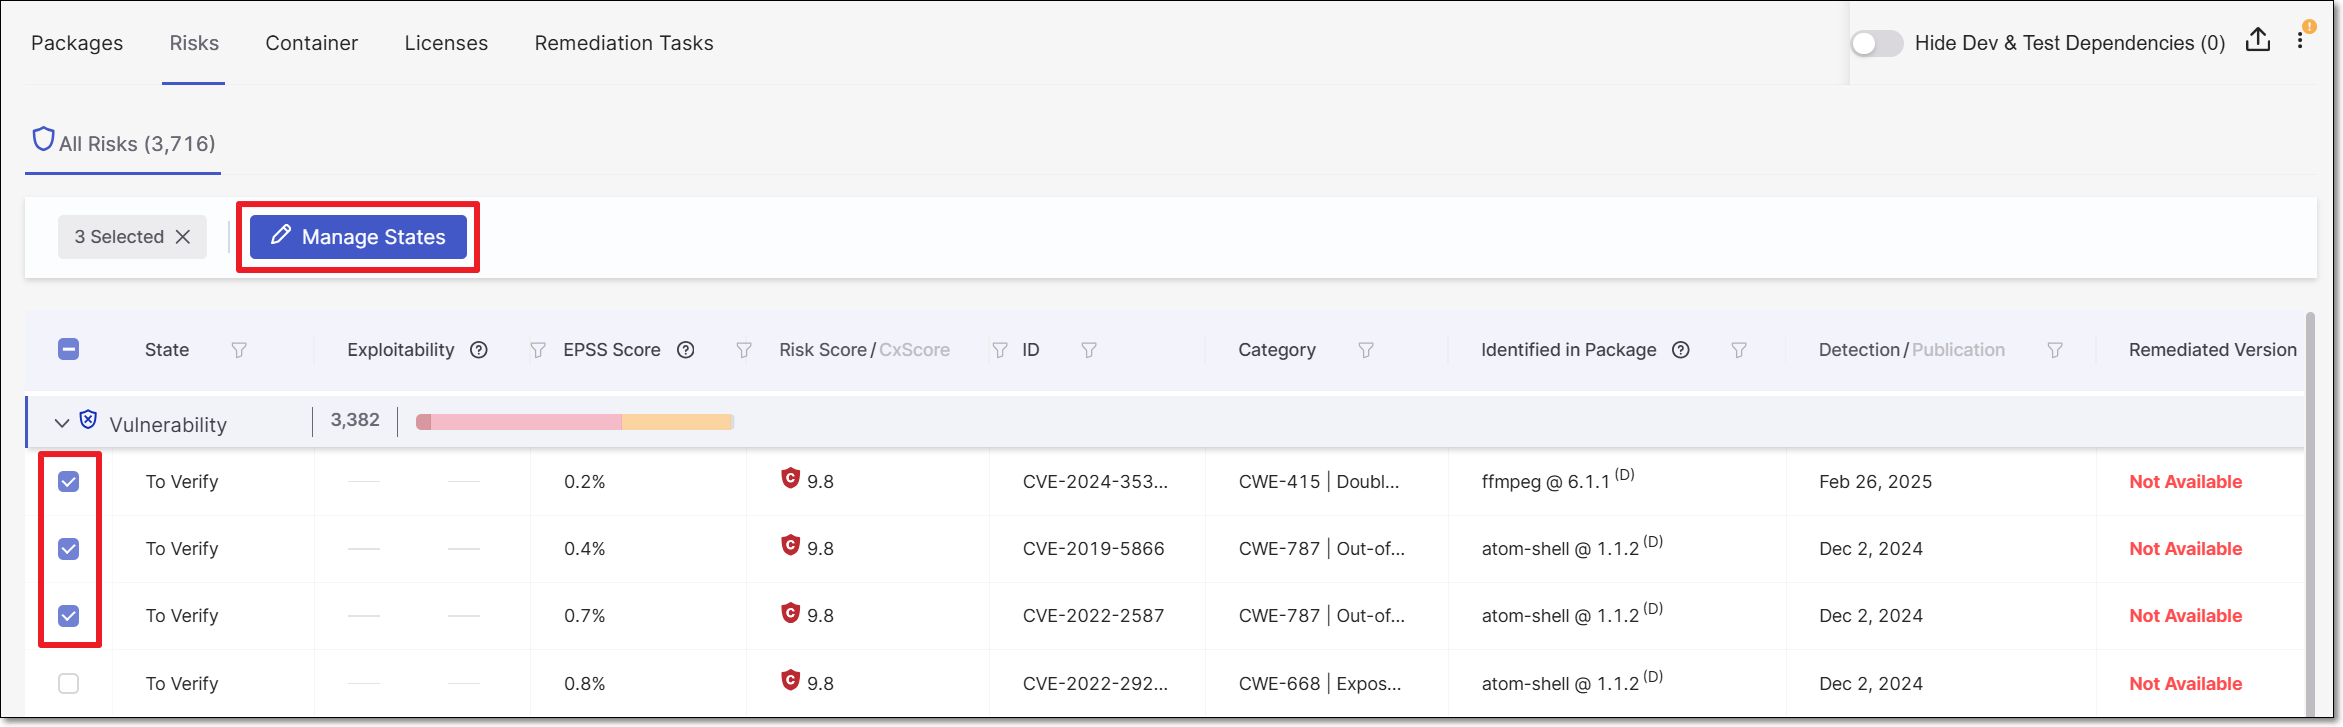
The Management of Risks panel opens.
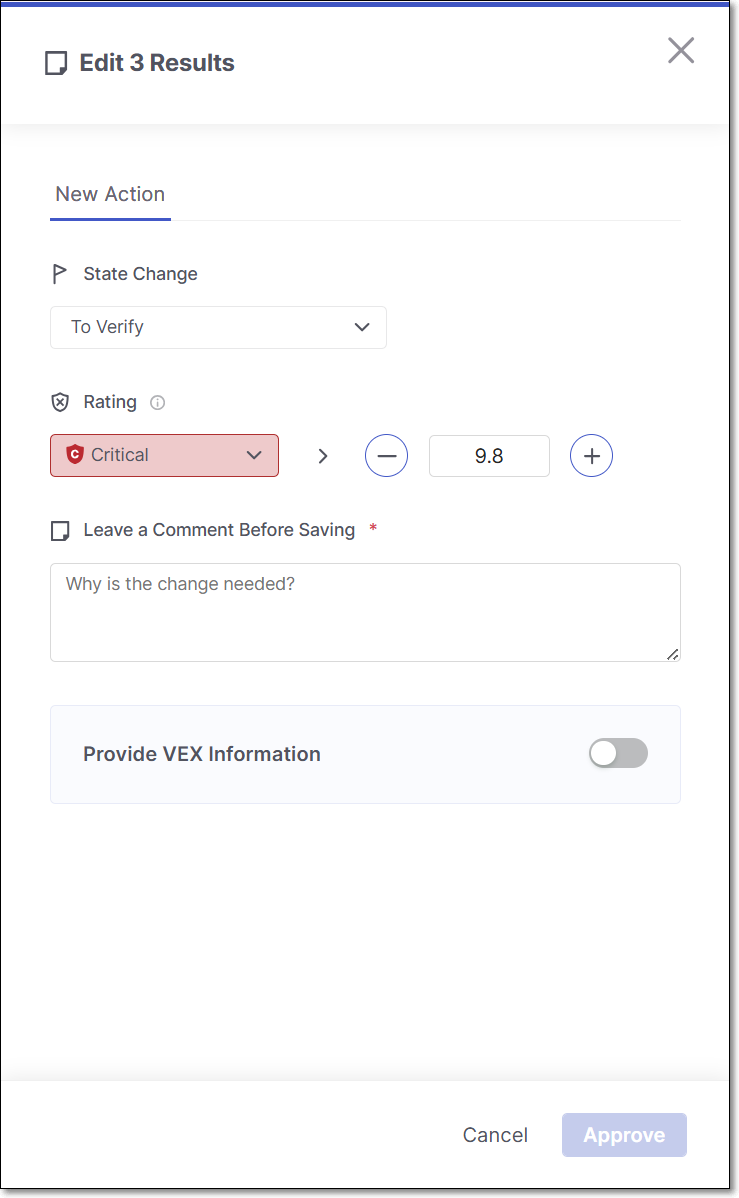
Make changes to the State, Rating, and Make a Comment Before Saving.
Click Approve.
The changes are applied to all of the selected risks.
How to perform VEX triage
Follow the below procedure for Triaging a Single Risk, until and including step 7.
On the Projects page, hover over the Results button for the desired project and select SCA.
On the Scan Results page, click on the Risks tab. The All Risks sub-tab is displayed.
Click on a risk to open the Risk Details page for that risk.
Click on the Edit button.
The Management of Risk panel opens.
Notice
Alternatively, you can open the Management of Risk panel by clicking on the Comments button in the Customization section at the bottom of the Risk Details page.
To change the state, click on the State field, and select from the drop-down list the desired state.
To change the severity, either click on the Rating field and select from the drop-down list the desired severity or customize the severity score using the + / - buttons.
Note
Changing the severity score from the drop-down list will assign the lowest severity from that level (e.g., selecting Medium, the risk will be assigned a score of 4.0).
In the Leave a Comment Before Saving section, enter your comment. For example, you can add resources related to the vulnerability, assessment of exploitability in the context of your code, remediation steps, assignment of responsibility for remediation etc.
Warning
After changing the state, you are required to add a comment explaining the rationale behind the change before the option to Approve the change becomes available.
In the Management of Risk panel, use the toggle to enable VEX options.
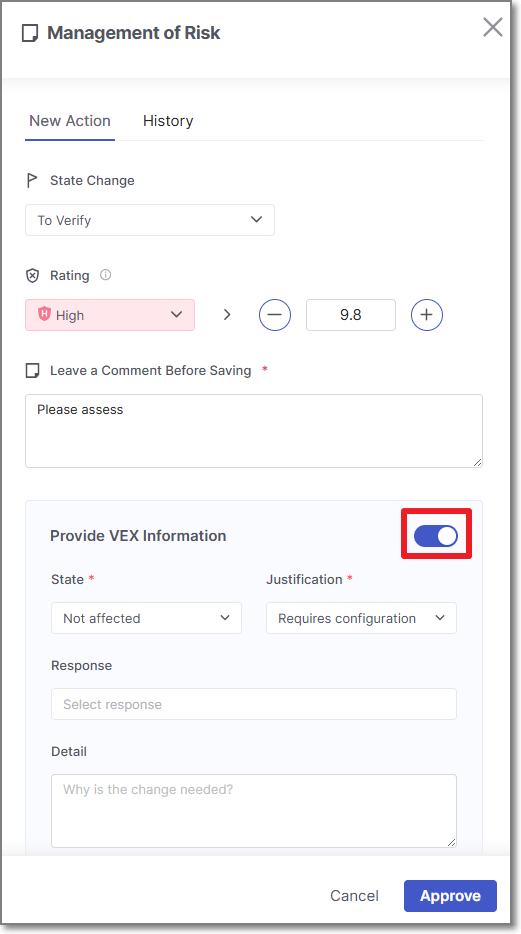
By default, VEX state is mapped from the risk state set in the regular triage workflow as follows:
If the risk state =
To Verify, the VEX state will default toIn triage.If the risk state =
Not Exploitable, the VEX state will default toNot affected.If the risk state =
Confirmed, the VEX state will default toExploitable.
Configure the various VEX fields. When state is set to
Not affected, the Justification field will appear to its right.Click Approve.
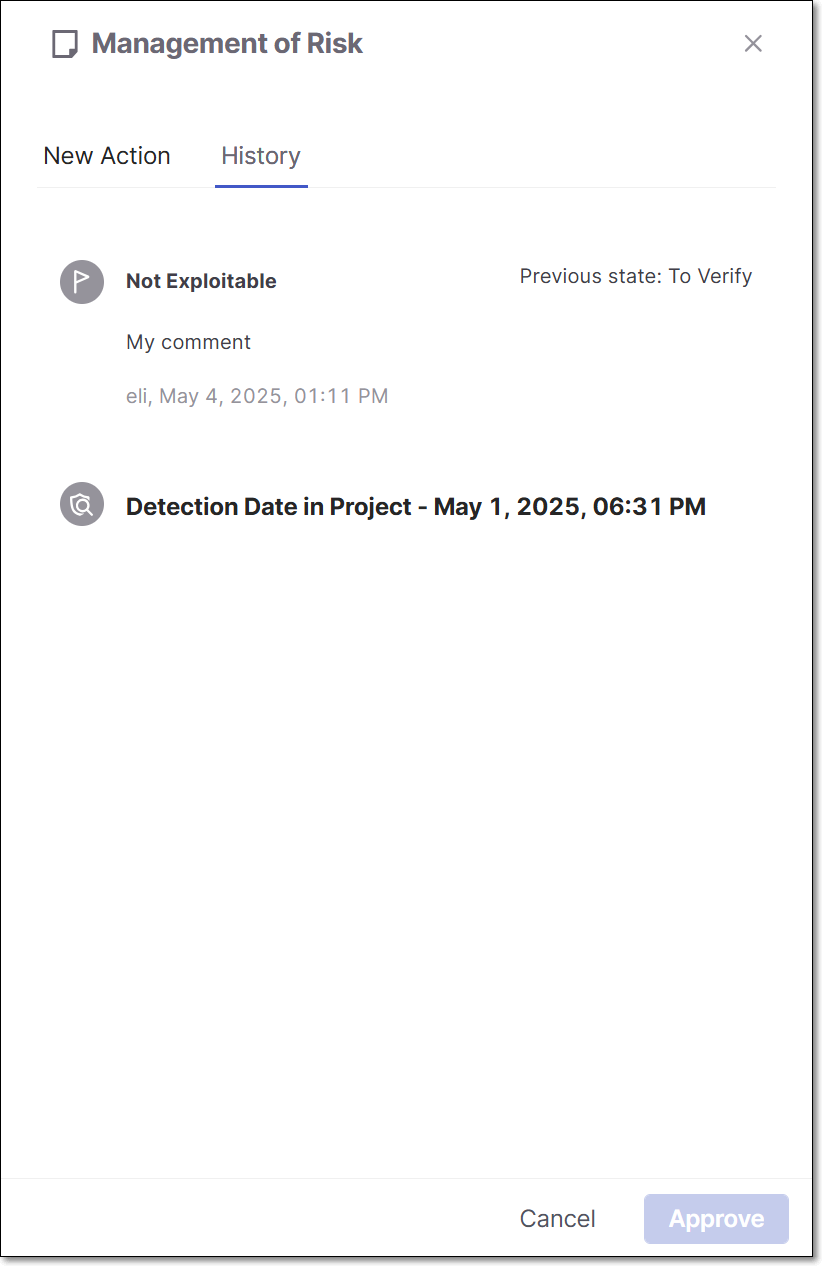
Viewing Risk Change History
Once a change has been made, the new State and Severity are immediately shown in the web application. However, the risk summary counters aren't recalculated until a new scan or scan recalculation is run on the project. Until the recalculation, a red dot will be displayed for the risk indicating that recalculation is required.
State changes are shown in the All Risks table. Not Exploitable risks are marked with a strikethrough line.
 |
In addition, a detailed history of all changes is shown in the History tab in the Management of Risk and Management of packagespanels. For each change that was made, the name of the user who made the change and the time of the change are shown. In addition, the new state and/or severity is shown alongside the previous state/severity.
 |
Management of Packages
You can reduce noise in you system when you feel that a certain package (in the SCA results viewer) does not pose a threat or where there is no available fixed version of the package. This is done by changing the State of the package as needed. By default all packages are assigned the state Monitored. You can change the state to Muted so that the vulnerabilities associated with that package won’t be shown as risks to your project. You can also Snooze a package so that it is muted for a fixed period of time after which it will automatically revert back to being a regular monitored package. When you mute or snooze a package in SCA, you trigger a scan recalculation that resets all CVE‑level triage states (e.g Confirmed) to To_Verify. Your package‑level action overrides any individual CVE decisions, so previous CVE states are cleared during the update.
Notice
When the designated snooze period ends, an auto-scan (i.e., automatic scan recalculation) is triggered in order to update the project data and risk counters to include data for the package that has been returned to Monitored state.
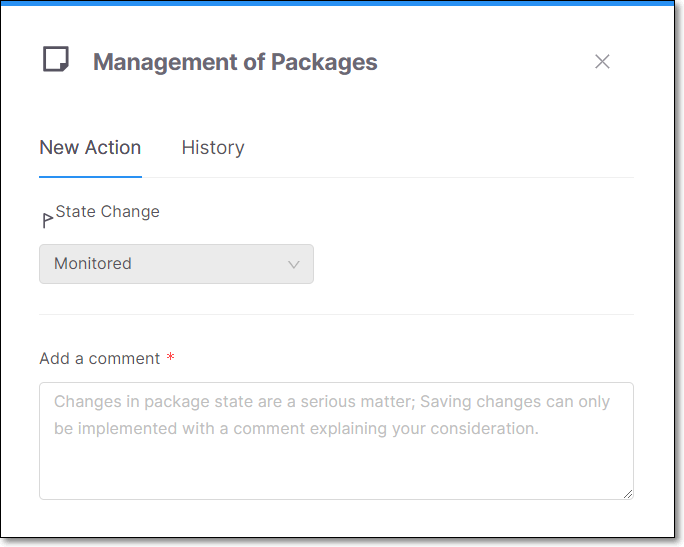
While viewing the Package Details page for a specific package, you can open a side panel by clicking on the State button on the header bar, with tabs for New Action (i.e., making changes to the state) and for viewing History of changes made.
 |
Limitations
Changing the state of a package affects only the data displayed in the Project Overview and Scan Results. It does not impact the Analytics Dashboards or the Project and Scan Reports.
Changing the Package State
The package state can be modified based on your AppSec team's decision whether to have the package affect the project score or have it muted permanently or temporarily (snoozed).
Monitored (default) - vulnerabilities are displayed based on the risk score.
Muted - vulnerabilities associated with the package will permanently not be shown as risks to your project.
Snoozed - vulnerabilities associated with the package will be muted temporarily. It is required to choose a date for the snooze to expire.
Important
Only users with the roles update-package-state-mute and update-package-state-mute-if-in-group can mute packages.
Important
Only users with the roles update-package-state-snooze and update-package-state-snooze-if-in-group can snooze packages.
Changing Package State for a Single Package
To change the package state for a single package:
On the Projects page, hover over the Results button for the desired project and from the scanner drop-down click on SCA.
On the Scan Results page, click on the Packages tab. The All Packages sub-tab is displayed.
Click on a package to open the Package Details page for that package.
In the tab's header bar, click on the State button (showing the current state).

The Management of Packages panel opens.
Note
Alternatively, you can open the Management of Packages panel by clicking on the Comments button in the Customization section at the bottom of the Package Details page.
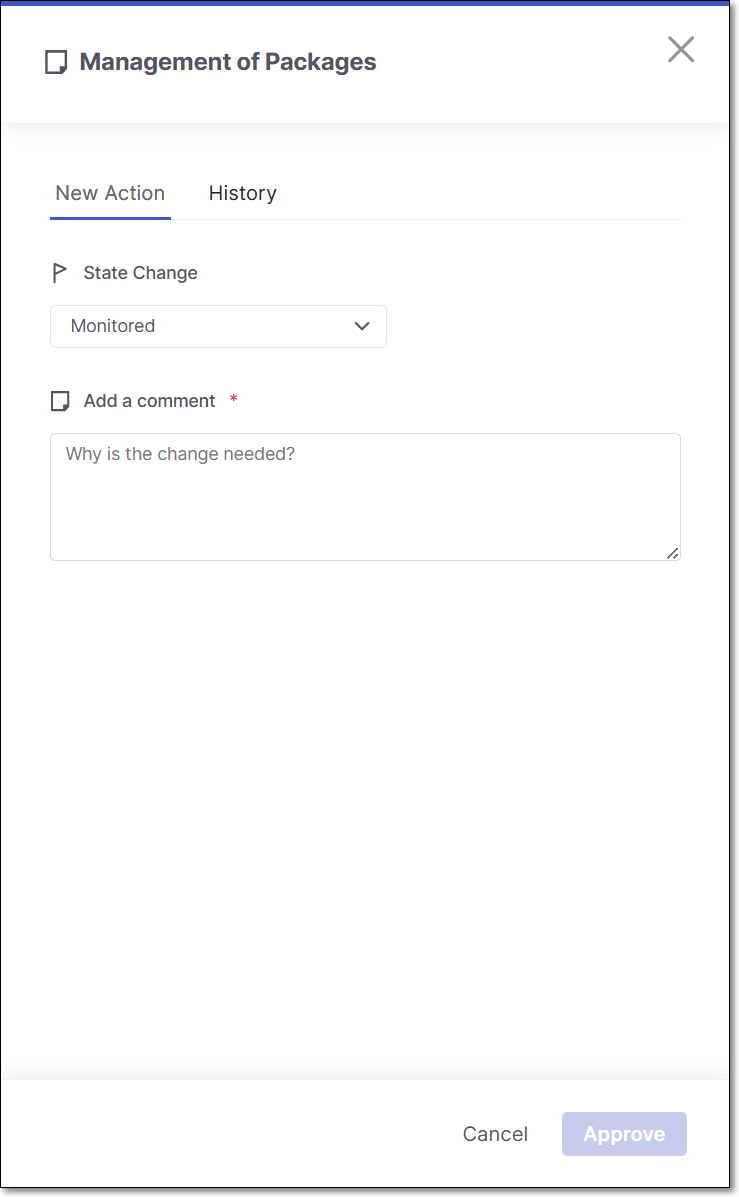
To change the state, click on the State Change field, and select from the drop-down list the desired state.
Note
After changing the state, you are required to add a comment before the option to Approve the change becomes available.
In the Add a Comment section, enter your comment.
Click Approve.
The new State is immediately shown in the web application. However, the package summary counters aren't recalculated until a new scan or scan recalculation is run on the project. Until the recalculation, a red dot will be displayed for the package indicating that recalculation is required.
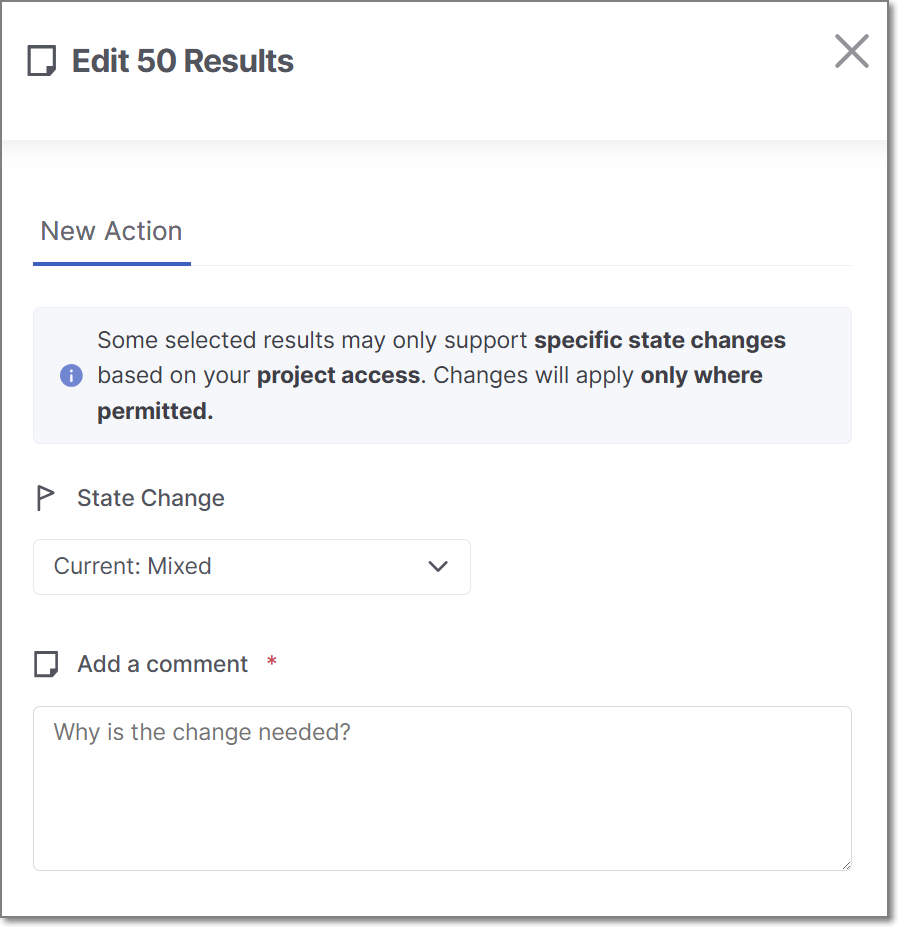
Triaging Packages - Bulk Action
To bulk action triage packages:
Go to SCA results viewer > Packages tab > All Packages sub-tab.
Select the checkbox next to each risk you would like to include in the bulk action triage, and click Manage States.
The Management of Risks panel opens.
Change the State, and add a Comment (required).
Click Approve.
The changes are applied to all of the selected packages.
Viewing Package Change History
Once a State change has been made, a red dot is shown next to the relevant Package. This indicates that you need to run a scan recalculation in order to update all of the result counters to reflect the change.
State changes are shown in the Package Details page. Muted packages will have a pink background for the header bar with a muted icon and Snoozed packages will have a yellow background for the header bar with a snoozed icon.
 |
In addition, a detailed history of all changes is shown in the Management of Risk panel > History tab. For each change that was made, the name of the user who made the change and the time of the change are shown. In addition, for state changes, the new state is shown alongside the previous state.
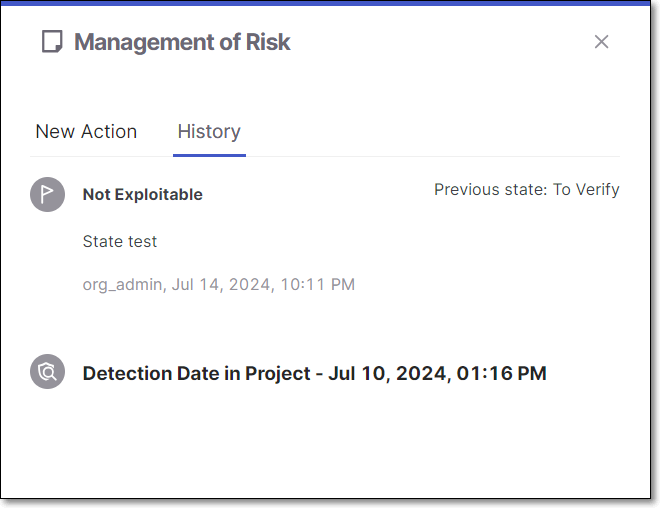 |
Managing Legal Risks
Packages often have several different licenses associated with them. This gives users the option to choose which license to consider "effective" for that package, i.e., which set of license restrictions they would like to follow. As long as you are abiding by the terms of the effective license, the other licenses don't constitute a legal risk. Therefore, Checkmarx only considers a risky license as constituting a Legal Risk if it is marked as the Effective license for that package.
Initially, the state of most licenses is set as To Verify. However, when there is a sole license for a package and it was identified in a reliable source, that license is automatically marked as Effective. You can then review the licenses and mark each license as Effective or Not Effective based on your assessment of the package usage. Changing the state of a license is done via the Checkmarx One web application, on the Risk Details page.
Learn more about Legal Risks here.
Triage Using the Global Inventory
Many SCA triage decisions need to be applied consistently across multiple projects. When the same package, vulnerability, malware risk, or license appears in more than one project, triaging each instance individually can be time-consuming and lead to inconsistent results. The Global Inventory provides cross-project triage, allowing you to locate an item once and apply a single triage action to all of its occurrences across the tenant. This applies to packages, associated vulnerabilities and malware risks, as well as licenses, enabling scalable and consistent SCA triage across all projects.
For example, if you decide that a particular package is not a concern, you can search for all instances of that package in the Packages tab and mark them all as Muted.
Use the procedure below to triage items across projects in the Global Inventory.:
Note
This procedure demonstrates how to triage a package across multiple projects. The steps for triaging vulnerabilities, malware risks, or licenses are the same—navigate to the Vulnerabilities and Malware or Licenses tab and follow the procedure described below.
Access the Global Inventory and Risks page by clicking on the Resources
 > SCA Inventory and Risks in the main navigation.
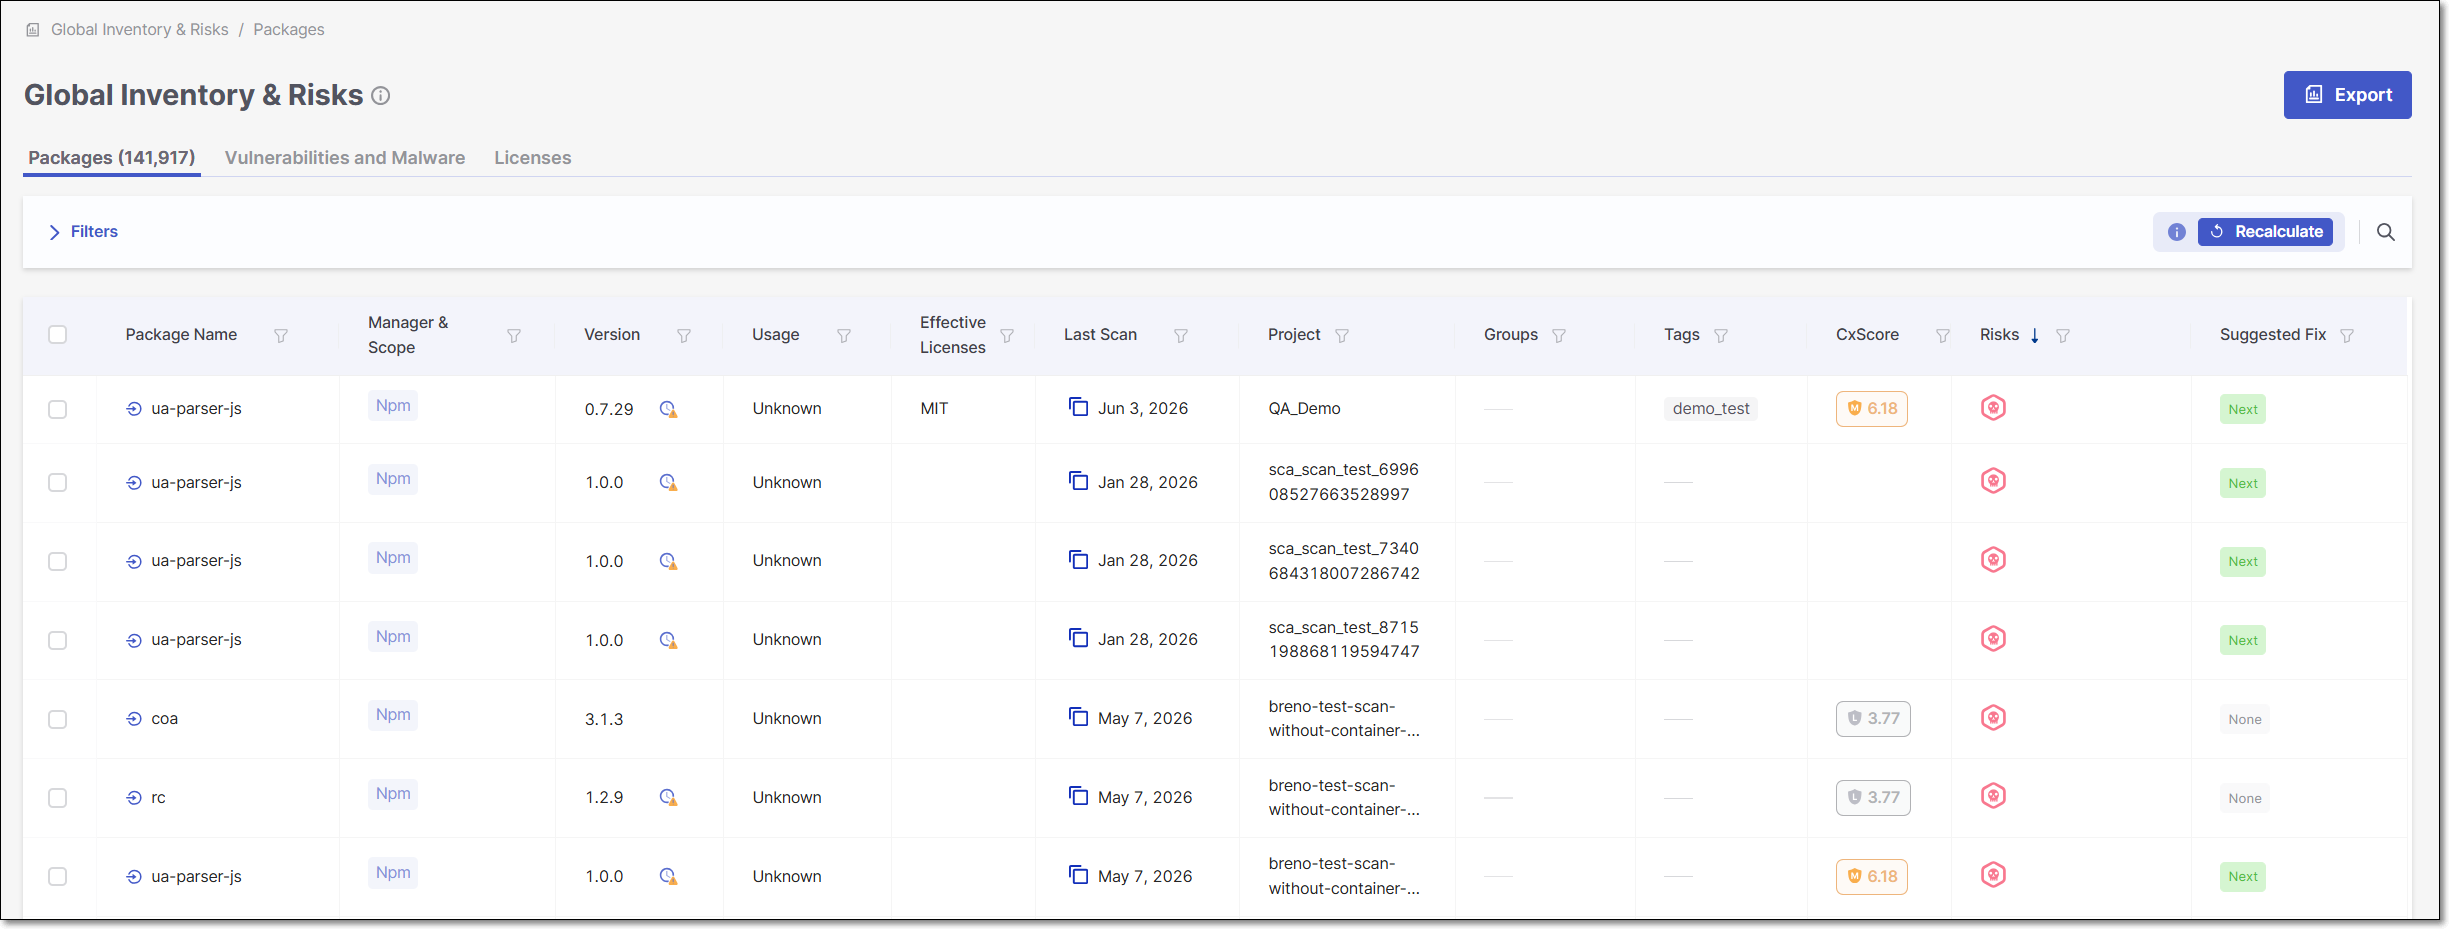
Use the search bar to find the particular package you want to triage.
Check the selection boxes of the instances of the package you want to triage.
The Manage States button appears in the header bar.
Click on the Manage States button.
The Management of Packages side panel is opened.
To change the state, click on the State Change field, and select from the drop-down list the desired state.
Note
After changing the state, you are required to add a comment before the option to Approve the change becomes available.
In the Add a Comment section, enter your comment.
Click Approve.
The new State is immediately shown in the web application. However, the package summary counters aren't recalculated until a new scan or scan recalculation is run on the project. Until the recalculation, a red dot will be displayed for the package indicating that recalculation is required.