Managing Users
Creating a User
Only an Administrator can create new user accounts in the system.
Note
Mandatory fields are marked with 
To create a new user:
Note
The Tenant Owner is the designated Admin who represents your organization in all license-related matters with Checkmarx One (such as accepting EULAs and managing license packages). By default, the first Admin user created in the account is assigned this role, and each account always has exactly one Tenant Owner.
Navigate to Settings
 > Identity and Access Management.
In Identity and Access Management , open the Users tab.

Click Create User.
The Create User dialog is displayed.
Configure the Username.
Enter the user's Email, First Name , and Last Name.
In the Other field, you may enter additional information regarding the user.
Set User Enabled to ON to activate the user on the system.
The OFF setting allows the administrator to control when a user is activated on the system. The account remains inactive until it is toggled to ON.
Enforce SSO-Only Access: This option prevents the user from logging in with a username and password, and ensures that the user can log in only through Single Sign-On (SSO).
Enforce SSO-Only Access is linked to the global Enable SSO-Only Access Login setting in Login & Session Management:
If the global setting is disabled, the Enforce SSO-Only Access field is not available in the Create User dialog.
If the global setting is enabled, Enforce SSO-Only Access is applied automatically to all users except those covered by the configured exception (e.g., tenant owner or tenant owner + iam-admin).
Set Email Verified to ON.
The system emails a link to the user’s email address. When the user clicks on the link, they must update the password, verify the email, and configure a one-time password.
Set the Required User Action to Update Password when the password needs to be reset on the next login.
Click Save.
Note
After a user is created, a new entry is added to the list in the Users tab. In the user settings (accessible from the three-dot menu), two additional fields appear that are not part of the creation dialog: ID and Created At. These fields are automatically generated when the user is created and cannot be edited.
Assigning Roles to Users
Tip
Click here for more information on Roles.
Perform the following to assign roles to users:
Navigate to Settings and select Identity and Access Management.
Click on the Users tab. This displays all users in your environment.
At the end of the user's row, click
 , then Edit.
Click on the Roles Mapping tab. This displays all roles that are available to map to the user.
Select the roles you wish to assign to the user by clicking Add.
Click Save when done.
Caution
Navigating away from the tab before clicking Save will not assign the roles successfully.
Assigning Users to Groups
Perform the following to assign users to groups:
Navigate to Settings and select Identity and Access Management.
Click on the Users tab. This displays all users in your environment.
At the end of the user's row, click
, then Edit.Click on the Groups tab. This displays all groups the user is in and ones available to join.
Select the groups you want the user to join by clicking Join. Select the groups to leave by clicking Leave.
Managing User Credentials
Set Password
To set a user's password, at the end of the user's row, click , Edit, and navigate to the Credentials tab to fill out the relevant fields.
Password Restrictions
When setting a password, certain special characters or character combinations (for example, parentheses () or sequences involving @#) may result in a 403 Forbidden error.
This occurs because the AWS Web Application Firewall (WAF) may interpret these patterns as potential cross-site scripting (XSS) or SQL injection attempts and block the request before it reaches the application.
Note
This behavior is enforced by the built-in security rules of AWS WAF, not by Checkmarx One.
Checkmarx One itself supports these characters; however, the request may be blocked at the WAF level during processing.
To avoid this issue, use a password that does not include these specific special character combinations, for example: 1stPASSWORD-123.
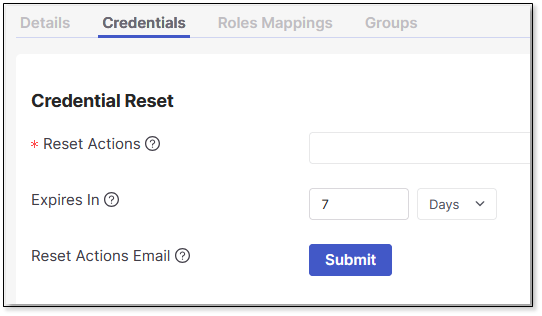
Credentials Reset
To ensure that a user resets their password:
Select Update Password from the Reset Actions option.
Enter the maximum time before the credential reset expires. Type in the number and select Minutes, Hours , or Days from the dropdown list. Once it has expired, the administrator will need to reset it.
Click Submit.
An email with an embedded link is sent to the user.
The reset action can be executed by following the link without logging into the system.