- Checkmarx Documentation
- SAST/SCA Integrations
- CI/CD Plugins
- Jenkins Plugin
- Setting up Scans in Jenkins
Setting up Scans in Jenkins
Once the Jenkins plugin is set up and configured, you can configure any Jenkins job (project) to perform scans.
Notice
The Checkmarx Jenkins plugin supports Freestyle projects and Pipeline jobs.
At the Jenkins Dashboard, do one of the following:
Select an existing Job, for example, freestyle, and click Configure.
Create a new job by clicking New Item and then selecting Freestyle Project.
Click <OK>. The Job Configuration interface appears.
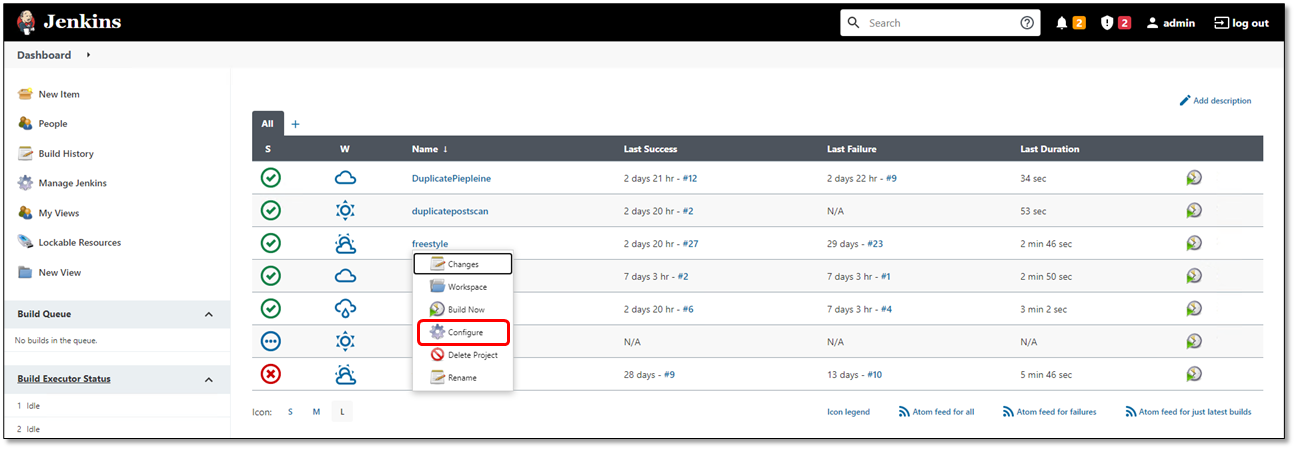
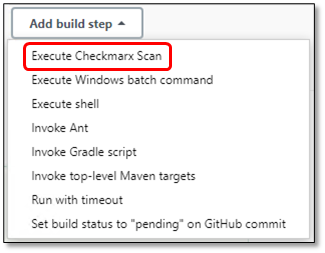
In the Job Configuration interface, scroll down to Build, click <Add build step>, and select Execute Checkmarx Scan. The Build dialog appears with settings and scan parameters.
Notice
The user running the Jenkins plugin scan must have both 'Scanner' and 'Reviewer' role permissions.
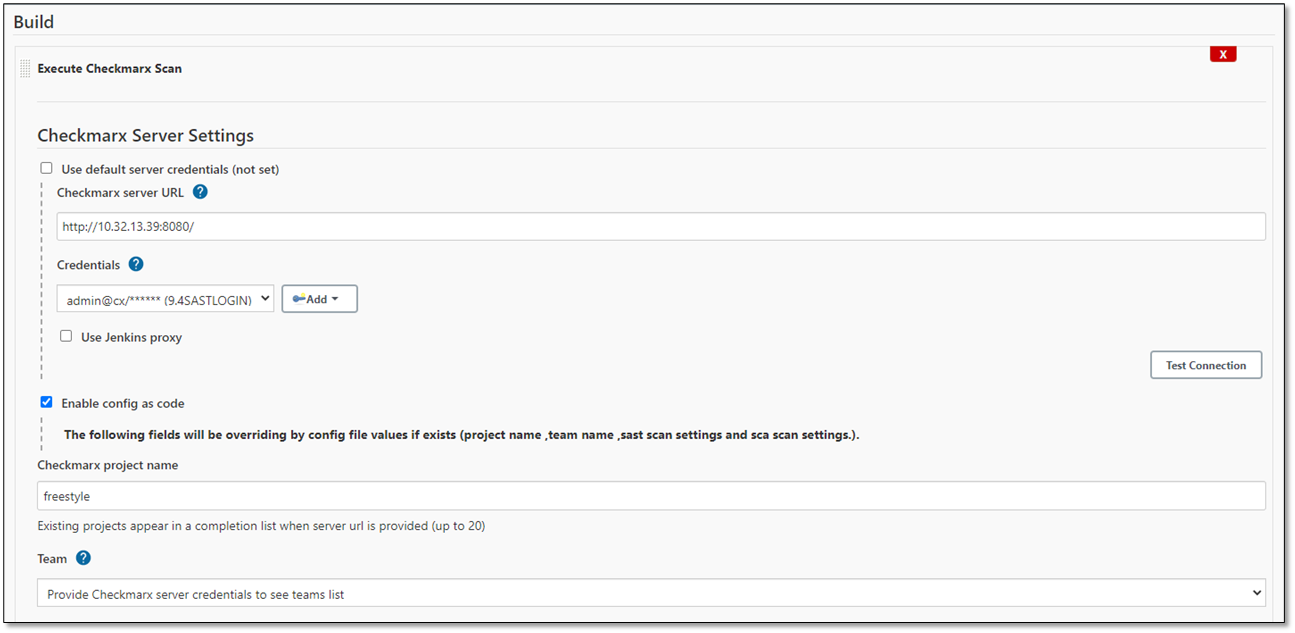
In the Build dialog, scroll down to the Execute Checkmarx Scan section and define the server settings and scan parameters as illustrated and explained below. The screen image at the bottom illustrates the beginning of the Execute Checkmarx Scan section.
Parameter | Description |
|---|---|
Use Default Server Credentials | Check to apply the default (global) credentials configured as explained under Installing and Configuring the Jenkins Plugin. If checked, the Checkmarx Server URL, Credentials, and Use Jenkins Proxy settings are hidden. |
Checkmarx server URL | Enter the Checkmarx server URL in the following format: http://<server IP address>:<port>, for example, http://10.32.13.39:8080 . |
Credentials | Click <Add> and follow the onscreen instructions to define new credentials. Click <Add> when done. To use the credentials you already defined, click the arrow and select the desired user name/password pair. |
Use Jenkins Proxy | Check to enable the proxy setting for all the jobs that use the CxSAST server default URL. To disable the proxy for these jobs, clear this option. Once enabled, it affects the CxSAST, CxOSA, and CxSCA scans. |
Enable Config as Code | Check to use a config file for the following parameters:
Any settings defined in the Build dialog are overridden by the ones defined in the config file if Enable Config as Code is enabled. |
Checkmarx Project Name | Select the project name from the list. The list is available once the Checkmarx Server URL has been defined. |
Team | Select the team name from the list. The list is available once you provide the server credentials. |
CxSAST Scan | |
Enable CxSAST Scan | Check to enable performing a CxSAST scan. When enabled, the CxSAST scan settings become available. |
Preset | Select a previously configured preset. The list is available once you provide the server credentials. |
Use Global Include/Exclude Settings | Select to apply the global settings defined as explained under Installing and Configuring the Jenkins Plugin. The Exclude Folders and Include/Exclude Wildcard Patterns fields are not editable. |
Specific Include/Exclude Settings | Select to apply the global settings below to the project/job that you are currently configuring. |
Exclude Folders | Define a comma-separated list of folders to exclude for a specific project/job from the scan. Entries in this list are automatically converted to exclude wildcard patterns and appended to the full pattern list provided in the Default Include/Exclude wildcard patterns section. |
Include/Exclude Wildcard Patterns | Enter a comma-separated list for files or file groups to be included or excluded for a specific job/project. To exclude files or file groups, start the entry with "!" Examples:
|
Incremental | Enable incremental scans. Force Scan cannot be selected at the same time. |
Override Global Scan Retention Settings | Check to change a project set's data retention rate in global settings. If Enable Data Retention is checked in the global section, a default data retention rate will be set for the project. This box must be checked to change the retention rate for a specific project. |
Scan Retention Rate (Number of Scans) | Sets the number of scans retained for a project as an integer between 1 and 10,000. Set the rate to 0 to not include a retention rate. |
Schedule Periodic Full Scans | Define between 1 and 99 incremental scans before the next periodic full scan is run. The default is 10. |
Force Scan | Check to enable forced scans. Forced scans are run even if there has been no code change since the last scan. Incremental cannot be selected at the same time. |
Project Level - Custom Fields | Add project-level custom fields and their values. For example: field1:value1, field2:value2. This feature is available in SAST versions 9.4 and higher. |
Scan Level - Custom Fields | Add scan-level custom fields and their values, for example, field1:value1,field2:value2 |
Post Scan Action | Select what to do after the scan is complete. The list is available once you provide the server credentials. Available post-scan actions depend on post-scan actions that you pre-configured in CxSAST. This option is available for work with CxSAST 9.4 and higher. |
Source Character Encoding | Select the source code character encoding format. The list is available once you provide the server credentials. The following options are available:
|
addGlobalCommenToBuildCommet | Global CxSAST comments are added to the build comment when enabling this option. By default, the global comment field is empty. When both job-level and global comments are provided and Allow Global Comment has been checked, both comments are concatenated. Any variables used in the comment text are expanded before sending them to CxSAST. |
Comment | Enter free text. If the comment contains variables like ${GIT_COMMIT}, ${GIT_BRANCH}, ${GIT_URL}, ${GIT_AUTHOR_NAME} or any Jenkins variable. It is expanded as long as it is a valid variable in Jenkins. It is considered plain text if it is not a valid variable. |
Avoid Duplicate Project Scans in the Queue | If checked, no new scan requests are accepted; if this project is already scanned in the queue in status Working or Queued. |
Skip Scan if triggered by SCM Changes | If checked, no scan is run, if SCM changes triggered it. |
Dependency Scan | |
Enable Dependency Scan | Check to enable including/excluding certain folders or file formats with/from the scan. By default, the global dependency scan settings are configured as explained under Installing and Configuring the Jenkins apply. |
Override Global Dependency Scan Settings | Check to include/exclude certain files or folders with/from the scan. |
Include/Exclude Wildcard Patterns | Enter a comma-separated list for files or file groups to be included or excluded. To exclude files or file groups, start the entry with "!" Examples:
|
Exclude Folders | Define a comma-separated list of folders to exclude for a specific project/job from the scan. Entries in this list are automatically converted to exclude wildcard patterns and appended to the full pattern list provided in the Default Include/Exclude wildcard patterns section. |
Use CxOSA Dependency Scanner | Select to define criteria for what to scan in CxOSA. |
FSA Variables | Enter a comma-separated list of keys/values, for example, KEY1=VALUE, KEY2=VALUE Available if Use CxOSA Dependency Scanner has been selected. |
Archive Extract Patterns | Enter a comma-separated list to define the archives to be extracted and scanned as wildcard patterns. Example: *.zip, *.jar, *.ear Supported archive types are: jar, war, ear, sca, gem, whl, egg, tar, tar.gz, tgz, zip, rar To extract all archives, leave this field empty. Available if Use CxOSA Dependency Scanner has been selected. |
Execute Dependency Managers 'Install Packages' Command before the Scan | Check to enable scanning packages from various dependency managers (NPM, Nugget, Python, and more.) as part of the CxOSA scan. Available if Use CxOSA Dependency Scanner has been selected. |
Use CxSCA Dependency Scanner | Select to define criteria for what to scan in CxSCA. |
CxSCA API URL | Enter the server name that interacts with CxSCA using API calls, for example, https://api-sca.company.com/. |
Access Control Server URL | Enter the server that hosts the Access Control portal used to access CxSCA, for example, https://platform.company.com. |
CxSCA Web App URL | Enter the URL of the web-based application that serves as the CxSCA user interface, for example, https://sca.company.com. Entering this URL generates a link to a page with CxSCA scan results. If this option is not entered, no such link is generated. |
CxSCA Credentials | Enter the credentials in the following format: <user name>/<password>, for example, admin@cx/********* . |
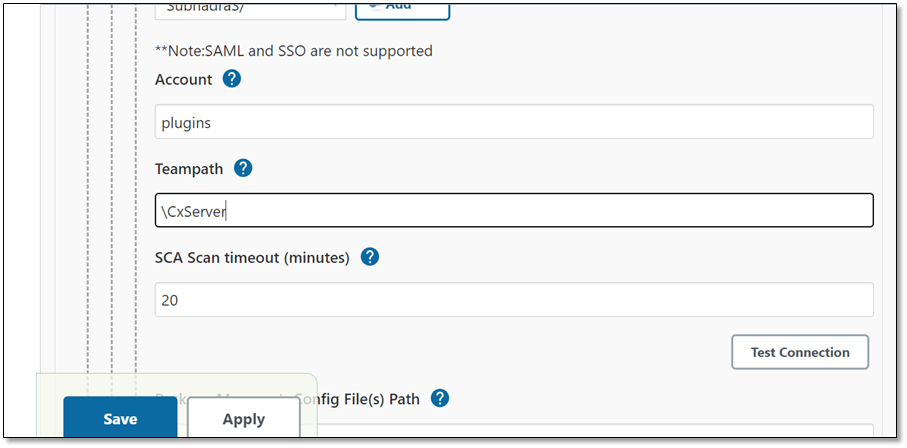
Account | Enter the CxSCA customer account. |
Teampath | Enter the team to assign it to the new SCA project. If left blank, the team will be assigned to the currently existing SCA project. |
Project Custom Tag | The project tag is a key: value pair, and multiple tags can be separated using a comma. For example tag1:value1,tag2:value2 |
Scan Custom Tag | The scan tag is a key: value pair, and multiple tags can be separated using a comma. For example tag1:value1,tag2:value2 |
SCA Scan Timeout (Minutes) | define the timeout. The job is considered as failed when the timeout has been reached. If left blank, the timeout is 60 minutes. |
Perform SCA Scan using Dependency Resolution by SCA Resolver Tool | Enable this option for SCA Resolver to scan in the Offline mode of CxSCA. |
Path To SCA Resolver | Enter the path to the host of the Jenkins node where ScaResolver is installed, for example, C:\\Users\\Installations\\ScaResolver-win64 or /opt/ScaResolver-linux64, depending on the operating system in use. This option is available if Perform SCA Scan using Dependency Resolution by SCA Resolver Tool has been selected. |
SCA Resolver Additional Parameters | Provide arguments to ScaResovler in the format supported by the ScaResolver tool. ScaResolver is executed in Offline mode. '-s', '-n,' and '-r' are mandatory parameters, for example, -s C:\\Users\\SampleProject -n ProjectName -r C:\\output, where the parameters stand for the following:
This option is only available if Perform SCA Scan using Dependency Resolution by SCA Resolver Tool has been selected. |
Perform SCA Scan by Uploading Manifests File(s)/Source to SCA Service | This allows performing an SCA scan using the Manifest file. Enables other functionalities such as Include Sources, Private Registry Environment Variable , and Package Managers Config’s File Path. This option is only available if Perform SCA Scan using Dependency Resolution by SCA Resolver Tool has been selected. |
Package Manager's Config File(s) Path | Use this parameter to provide configuration files of the package managers used in the project, for example, Settings.xml for maven, Nuget.config for Nuget, .npmrc for npm , etc. This option is relevant for projects that use private artifactory. Use the CxSCA agent to run the scan. The CxSCA agent attempts to perform dependency resolution using the package manager’s configuration files provided. Example: - “c:\user\.m2\settings.xml”, “c:\user\npm\.npmrc” This option is only available if Perform SCA Scan by Uploading Manifests File(s)/Source to SCA Service has been selected. |
scaEnvVariables | This option is relevant to Package Manager's Config File(s) Path . In many cases, the package manager's configuration files reference environment variables. This is often performed to provide credentials without storing them in a file. Pass all such variables using the following option: Example: -env param1:value1,param2:value2 |
isIncludeSource | When enabling this option, the entire source code is added to the zip file for scanning. |
Enable Exploitable Path | CxSCA leverages the CxSAST ability to scan the project code in parallel with the manifest file to validate whether the vulnerable open-source packages are called from your proprietary code and whether your code uses the vulnerable methods. For additional information on this functionality, refer to Exploitable Path in the CxSCA documentation space. If checked, the functionality is active. This option is only available if Perform SCA Scan by Uploading Manifests File(s)/Source to SCA Service has been selected. |
Build Control | |
Job Status when Scan returns an Error | Define how to act when a triggered CxSAST scan in synchronous mode fails and returns an error message (i.e., no scan results):
|
Enable Synchronous Mode | When enabling this option, the scan results are listed in Jenkins. Otherwise, a link to the scan results in the CxSAST web application is provided. |
Generate CxSAST PDF Report | When enabling this option, the scan results are available as PDF files and can be accessed by following a link with the scan results in Jenkins. This option is available only if Enable Synchronous Mode is enabled. |
Enable Project Policy Enforcement for SAST | When enabling this option, the build breaks if the CxOSA or CxSAST policy is violated. The policy is assigned to a project within CxSAST. The name and description of all violated policies and rules are displayed in the logs. In addition, the build is noted as failed if any of the violated policies indicates a Break the build action. |
Enable Project Policy Enforcement for SCA | When enabling this option, the build breaks if the CxSCA policy is violated. The policy is assigned to a project within CxSCA. The name and description of all violated policies and rules are displayed in the logs. In addition, the build is noted as failed if any of the violated policies indicates a Break the build action. |
enableProjectPolicyEnforcement | When enabling this option, the build breaks if either CxOSA or CxSAST policy is violated. The policy is assigned to a project from within CxSAST. The name and description of all violated policies and rules within are displayed in the logs. In addition, the build is reported as failed if any of the violated policies indicates a Break the build action. |
enableProjectPolicyEnforcementSCA | When enabling this option, the build breaks if the CxSCA policy is violated. The policy is assigned to a project from within CxSCA. The name and description of all violated policies and rules within are displayed in the logs. In addition, the build is reported as failed if any of the violated policies indicates a Break the build action. |
Enable Vulnerability Threshold | When enabling this option, you can define vulnerability thresholds and how the system responds when exceeding the threshold. This option is available only if Enable Synchronous Mode is enabled. Once enabled, the Use Global Settings option is unavailable. |
Build Status when Results Exceed the Threshold | Define how the system responds when the number of vulnerabilities detected during a triggered CxSAST scan in synchronous mode exceeds a threshold specified in the settings below.
|
Propagate Error when Results Exceed the Threshold | When this checkbox is enabled, in cases where the results exceed the vulnerability threshold, the build fails, and the scan returns a Job error: Failure, Unstable and Aborted |
SAST Critical severity vulnerabilities threshold | Sets the threshold for critical severity thresholds. Available if Enable Vulnerability Thresholds is checked. NoteThis threshold will only apply to the SAST versions that support critical severity. |
SAST High Severity Vulnerabilities Threshold | Set the threshold for high severity thresholds. Available if Enable Vulnerability Thresholds is checked. |
SAST Medium Severity Vulnerabilities Threshold | Set the threshold for medium severity thresholds. Available if Enable Vulnerability Thresholds is checked. |
SAST Low Severity Vulnerabilities Threshold | Set the threshold for low severity thresholds. Available if Enable Vulnerability Thresholds is checked. |
Fail the Build for New SAST Vulnerabilities | Check to select the severity to which the system triggers a failure for the build. |
Fail For the following Severity or Greater |
Available if Fail the Build for New SAST Vulnerabilities is checked. NoteThe Critical option will only apply to the SAST versions that support critical severity. |
Dependency scan critical severity vulnerabilities threshold | Sets the threshold for critical severity thresholds for dependency scans. Available if Enable Vulnerability Thresholds is checked. NoteThis threshold applies only if the configured dependency scanner supports critical severity. |
Dependency Scan High Severity Vulnerabilities Threshold | Set the threshold for high severity thresholds for dependency scans. Available if Enable Vulnerability Thresholdsis checked. |
Dependency Scan Medium Severity Vulnerabilities Threshold | Set the threshold for middle severity thresholds for dependency scans. Available, if Enable Vulnerability Thresholdsis checked. |
Dependency Scan Low Severity Vulnerabilities Threshold | Set the threshold for low severity thresholds for dependency scans. Available, if Enable Vulnerability Thresholdsis checked. |
hideDebugLogs | When enabling this option, no debug-level logs are generated in the job output. |
<Add Build Step | Add a build step to a specific project. |
Post-Build Actions | |
<Add Post Build Action  > | Define what to do once the build is complete. |
To complete adding the project freestyle:
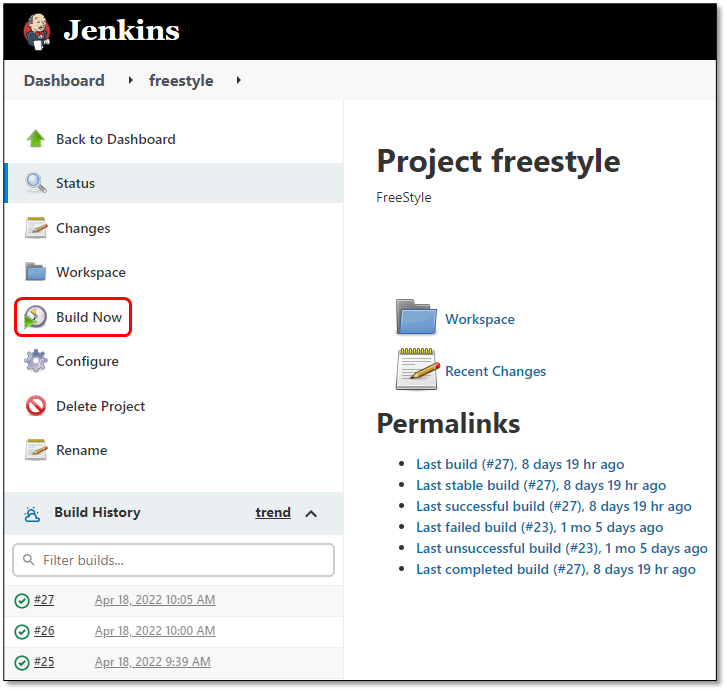
Once all the parameters are set, click <Apply> to apply the new configuration and then click <Save> to save it. You are returned to the project's dashboard.
Click Build Now to run the job/project scan.
Notice
Checkmarx scans using the Jenkins Pipeline require Jenkins Plugin 8.42.0 and up.
Checkmarx scans that include CxSCA require Jenkins Plugin 2019.4.2 and up.
Before starting the configuration, ensure you already have the Pipeline plugin installed with your Jenkins environment. For further information and instructions, refer to https://jenkins.io/doc/pipeline/tour/hello-world/
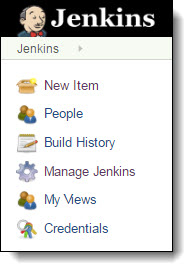
From the Jenkins Dashboard, select New Item. You are asked to enter an item name.
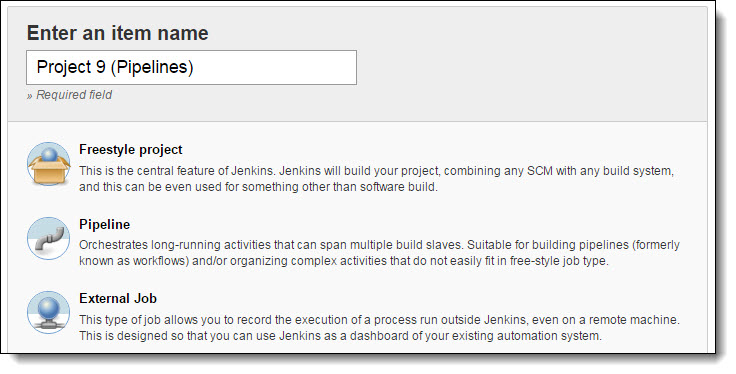
Assign a name to the new item in the Item name field.
Select Pipeline and click <OK>. The Job Configuration dialog appears.
Scroll down to Pipeline and click Pipeline Syntax. The Snippet Generator appears.
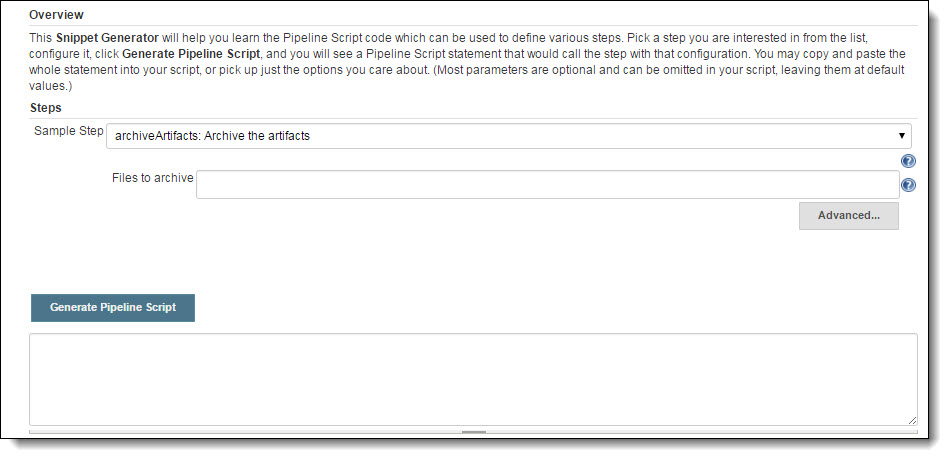
From the Sample Step dropdown list, select step: General Build Step. the related build step parameters appear.
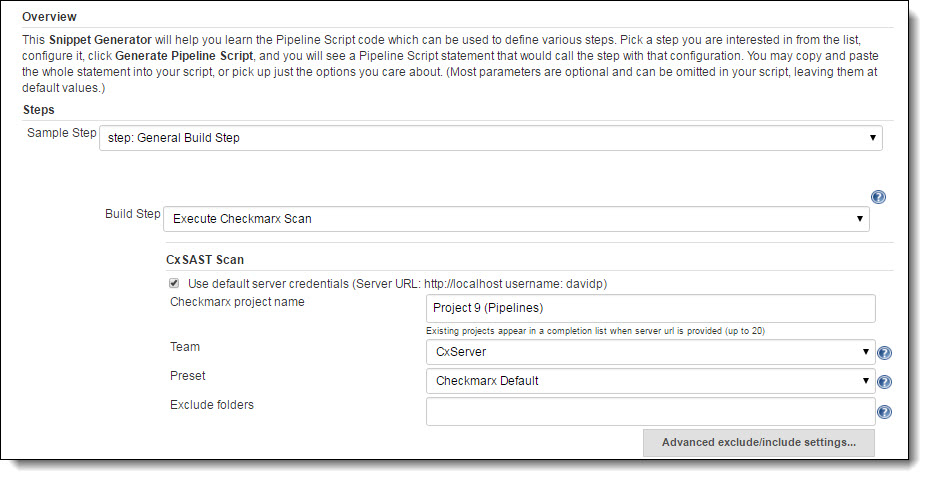
From the Build Step dropdown list, select Execute Checkmarx Scan. Once the CxSAST Scan Configuration is displayed, define the relevant job/project scan parameters for creating a scan job in Freestyle.
Generate a pipeline script as explained below.
To generate a Pipeline script:
Scroll down and click <Generate Pipeline Script>.

Notice
For additional information on the pipeline script parameters, refer to Editing the Pipeline Script Parameters below.
In the generated pipeline script, the encrypted password is displayed as illustrated above and cannot be hidden.
Copy the generated script to the clipboard and follow the instructions for one of the following scenarios:
Paste the generated script into an existing or new Jenkins file between the node {node('master'){stage('Preaparation')} markers and then commit it to the SCM.
In the Choose the Pipeline script from SCM definition in the Jenkins pipeline configuration, select the relevant SCM (Git or Subversion) and then define the relevant parameters and the Script Path.
Click <Apply> to apply the new configuration, then click <Save>. You are returned to the dashboard.
Click Build Now to run the job/project scan using the Jenkins pipeline.
To edit pipeline script parameters:
Once the pipeline script has been generated, you may edit the parameters outlined in the table below.
Parameters | Description |
|---|---|
avoidDuplicateProjectScans: | Enables the option that if there is a scan for this project in the queue in status working or queued do not send a new scan request. True=Enabled. |
comment: | Includes optional remark for the scan action (e.g., scan originating from Jenkins). |
credentialsId: | Defines your credentials Id as it is in the Jenkins credentials manager. |
excludeFolders: | Comma-separated list of folders to be excluded from the CxSAST scan, for example, folder 1, folder 2, folder 3. |
excludeOpenSourceFolders: | Comma-separated list of folders to be excluded from the CxOSA scan, for example, folder1 folder2 folder3. |
exclusionsSetting: | Defines to use global include/exclude settings. This displays the values from the predefined global include/exclude settings. The available options are the following:
If left empty, the exclusions defined in the pipeline script are used. |
failBuildOnNewResults: | Enables the option to fail the build according to the defined severity or higher. This option works in addition to the regular thresholds. This means that the build fails if "x" total high vulnerabilities were found OR at least one NEW vulnerability is introduced. True = enabled. This option is only available if the ‘vulnerabilityThresholdEnabled’ parameter is enabled. |
failBuildOnNewSeverity: | Defines the fail build severity (high, medium, low). This option is only available if the ‘failBuildOnNewResults’ parameter is enabled. |
filterPattern: | Defines the include/exclude wildcard patterns, for example '''!**/_cvs/**/*, !**/.svn/**/*, !**/.hg/**/*, !**/.git/**/*, !**/.bzr/**/*, !**/bin/**/*,**/obj/**/*, !**/backup/**/*, !**/.idea/**/*, !**/*.DS_Store, !Checkmarx/Reports/*.*''' |
fullScanCycle: | Defines the number of incremental scans to be performed before performing a periodic full scan, for example, 10. |
PostScanID | Postscan actions define what to do once the scan is complete. PostScan actions are defined in CxSAST and can be selected from the list through the associated PostScanID. Notice
|
Source Character Encoding | Select the source code character encoding format. The following options are available:
|
projectLevelCustomFields | Add project-level custom fields and their values. For example: field1:value1,field2:value2. The feature works with 9.4 version SAST and higher. |
customfields | Adds scan level custom fields and their values, for example field1:value1,field2:value2. |
generatePdfReport: | Enables the creation of a scan result report in PDF. True = enabled. NoticeThe report is available via a link in the scan results in Jenkins. |
groupId: | Represents a number in both access control versions for SAST and SCA. Optionally, users can pass teamPath (which is a team name) instead of groupId. NoticeIf both groupid and teamPath are provided, groupid overrides teamPath. |
teamPath: | Represents a group name, for example, CxServer\\SP\\Company\\Users. This value can be passed instead of groupID. NoticeThe teamID can only be determined by using the Get All Teams CxREST API (GET /auth/teams) or by using the Pipeline syntax generator to create a new Checkmarx pipeline step. |
highThreshold: | Defines the CxSAST high severity vulnerability threshold. If set, the threshold is crossed, if the number of high-severity vulnerabilities exceeds it, for example, 5. This option is only available if the ‘vulnerabilityThresholdEnabled’ threshold option is enabled. |
includeOpenSourceFolders: | Defines a comma-separated list of include or exclude wildcard patterns. Exclude patterns that start with an exclamation mark "!". Example: *.jar */folder/* */folder1/folder2/* */folder*/* */file.* */file*.jar */test/*file*.* may reference build parameters like ${PARAM}. Examples: "**/*.jar" matches all .jar jars in a directory tree. "*/test/a??.jar" matches all files or directories that start with an 'a', then two more characters, and then ".jar", in a directory called test. "**" matches everything in a directory tree. "**/test/**/XYZ*" matches all files and directories that start with "XYZ" and where there is a parent directory called test, for example, "abc/test/def/ghi/XYZ123". An empty value includes all files for the CxOSA scan. This option is only available if the ‘osaEnabled’ parameter is enabled. |
incremental: | Enables an incremental scan, which means a scan that only scans new and modified files relative to the project's previous scan. True = Enabled. |
ForceScan: | Forces a scan on the source code, which has not been modified since the last scan of the same project. NoticeForceScan is not compatible with Incremental. |
lowThreshold: | Defines the CxSAST low severity vulnerability threshold. If set, the threshold is crossed if the number of low-severity vulnerabilities exceeds it, for example, 12. This option is only available if the ’vulnerabilityThresholdEnabled’ option is enabled. |
mediumThreshold: | Defines the CxSAST medium severity vulnerability threshold. If set, the threshold is crossed if the number of medium severity vulnerabilities exceeds it, for example, 7. This option is only available if the ’vulnerabilityThresholdEnabled’ option is enabled. |
osaArchiveIncludePatterns: | Defines a comma-separated list of archive wildcard patterns to include their extracted content for the scan, for example, *.zip, *.jar, *.ear. |
osaEnabled: | Enables an option to initiate a CxOSA scan for this project/job. True = Enabled. |
osaHighThreshold: | Defines a threshold for the CxOSA high-severity vulnerabilities. The build is marked as failed or unstable if the high-severity vulnerabilities are higher than the threshold, for example, 1. |
osaInstallBeforeScan: | Defines this option to scan packages from various dependency managers (NPM, Nugget, Python, and more) as part of the CxOSA scan. True = Enabled. |
osaLowThreshold: | Defines a threshold for the CxOSA low-severity vulnerabilities. The build is marked as failed or unstable if the low-severity vulnerabilities are higher than the threshold, for example, 2. |
osaMediumThreshold: | Defines a threshold for the CxOSA medium severity vulnerabilities. is marked as failed or unstable if the medium severity vulnerabilities are higher than the threshold, for example, 3. |
password: | The password is not in use anymore, although the encrypted version of it appears in the automatically generated pipeline script. |
preset: | Defines a scan preset for the project. If the preset is not specified, the default preset for a new project will be used, for example, 36. |
projectName: | Defines the relevant project name. |
sastEnabled: | Enables the option to initiate a CxSAST scan for this project/job. True = Enabled. |
serverUrl: | Checkmarx Server URL or IP address with or without port, for example, http://server-name or https://ip-address:port. This option is only available if the ‘useOwnServerCredentials’ parameter is disabled. |
sourceEncoding: | Define the source code character encoding format by entering the associated language encoding ID, for example, sourceEncoding: “1” to select the Default Configuration. The following source character encoding formats are available and associated with the respective language encoding IDs:
NoticeLanguage encoding ID 4 is not used. |
useOwnServerCredentials: | Enables the use of the default server credentials or disables and provides server and credentials that override the defaults. True=Enabled. When the job is configured to override the CxSAST server URL, this option can be enabled to use proxy settings. When enabled, proxy settings are used for this job irrespective of the state of the same setting in the plugin’s global configuration. When enabled, actual scan operation and TestConnection will utilize a proxy. This setting affects the CxSAST, CxOSA, and CxSCA scans. |
username: | Deprecated, should not be used. |
vulnerabilityThresholdEnabled: | Enables the vulnerability threshold option. This option is only available if the ‘waitForResultsEnabled’ parameter is enabled. True = Enabled. |
vulnerabilityThresholdResult: | Defines the build status as failed or unstable when the results of scanned vulnerabilities exceed the threshold. |
waitForResultsEnabled: | Enables the ‘waitForResultsEnabled’ (synchronous mode) option. The Synchronous mode allows viewing scan results in Jenkins. Enable = True. If disabled (asynchronous mode), a link to the scan results in the Checkmarx web application is displayed in the Jenkins build results. |
Once the pipeline script has been generated, you may edit the parameters outlined in the table below.
Parameters | Description |
|---|---|
overrideGlobalConfig | Defines if the pipeline is overriding the globally defined dependency scan settings. Valid values: true/false |
dependencyScannerType | Defines the used dependency scan. Valid values: SCA, OSA |
dependencyScanExcludeFolders | Defines a comma-separated list of folders to exclude from the scan. Example: bin, backup |
dependencyScanPatterns | Defines a comma-separated list of include or exclude wildcard patterns. Exclude patterns that start with an exclamation mark "!". Exclude example: !**/_cvs/**/*, !**/.svn/**/*, !**/.hg/**/*, !**/.git/**/* |
osaArchiveIncludePatterns | Defines a comma-separated list of archive wildcard patterns to include their extracted content for the scan (OSA dependency only). Supported archive types are jar, war, ear, sca, gem, whl, egg, tar, tar.gz, tgz, zip, rar. Example: *.zip, *.war, *.ear, *.tgz |
scaAccessControlUrl | URL of the Access Control server used to log in to CxSCA. |
scaCredentialsId | The credential ID is defined for CxSCA credentials in Jenkins. |
scaServerUrl | URL of the CxSCA API endpoint. |
scaTenant | The CxSCA Account. |
scaWebAppUrl | URL of the CxSCA web application, used to generate a web report URL. |
scaTimeout | Set the timeout for the SCA scan. If the SCA scan exceeds that time, the job fails. If left empty, the timeout is set to 60 minutes by default. |
scaProjectCustomTags | The project tag is a key: value pair and multiple tags can be separated using a comma(,). For example: tag1:value1,tag2:value2 Note: Project Custom Tag supports special characters. |
scaScanCustomTags | Scan tag is a key: value pair and multiple tags can be separated using a comma(,). For example: tag1:value1,tag2:value2 Note: Scan Custom Tag supports special characters. |
scaProxy | URL of the CxSCA proxy server. |
scaEnvVariables | This option is relevant to the - Package Manager's Config File(s) Path parameter. In many cases, the package manager's configuration files reference environment variables. This is often performed to provide credentials without storing them in a file. Pass all such variables using the following option: Example: -env param1:value1,param2:value2 |
isIncludeSources | When enabling this option, the entire source code is added to the zip file for scanning. |
hideDebugLogs | When enabling this option, no debug-level logs are generated in the job output. |
addGlobalCommenToBuildCommet | Global CxSAST comments are added to the build comment when enabling this option. By default, the global comment field is empty. When both job-level and global comments are provided and Allow Global Comment has been checked, both comments are concatenated. Any variables used in the comment text are expanded before sending them to CxSAST. |
isExploitablePathByScaResolver | CxSCA leverages the CxSAST ability to scan the project code in parallel with the manifest file to validate whether the vulnerable open-source packages are called from your proprietary code and whether your code uses the vulnerable methods. For additional information on this functionality, refer to Exploitable Path in the CxSCA documentation space. If checked, the .functionality is active. This option is only available if SCA has been set to perform SCA scans by uploading a Manifest File(s) source to the SCA service. |
SAST Server URL | This parameter is used to obtain scan results from the CxSAST server that are required for Exploitable Path detection by the CxSCA scan. Enter the URL of the CxSAST server, for example, https://cxsasthost:port. |
Project Full Path | Enter the full path to be scanned, for example, CxServer/team1/projectname. NoticeExploitable Path must be enabled for the project under Project Settings in CxSCA. |
Project ID | Enter the Project ID of the CxSAST project used to scan the project source code. This parameter is used to obtain scan results from the CxSAST server required for the Exploitable Path detection by CxSCA. NoticeExploitable Path must be enabled for the project under Project Settings in CxSCA. |
SCA Dependency Scan Override Example
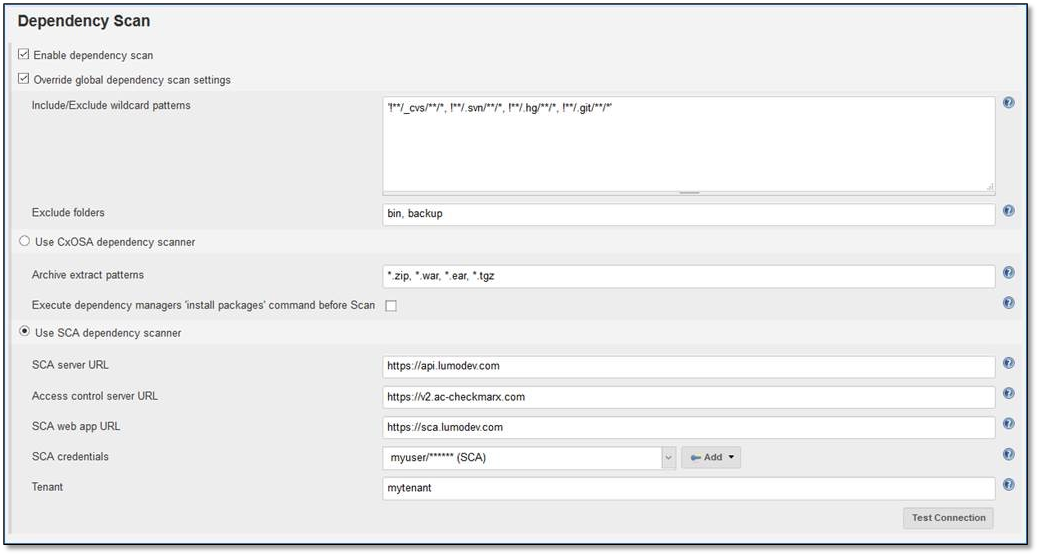
Pipeline step example for the SCA dependency scan override as illustrated above:
Below is an example of a pipeline step that executes a SCA-only scan. The Snippet Generator can create this step code as usual.
The dependencyScanConfig section in the following code block corresponds to the Dependency Scan user interface.
Pipeline step example for the SCA dependency scan override
step([$class: 'CxScanBuilder', comment: '', credentialsId: '',
dependencyScanConfig: [
     overrideGlobalConfig: true,
     dependencyScannerType: 'SCA',
     dependencyScanExcludeFolders: 'bin, backup',
     dependencyScanPatterns: '!**/_cvs/**/*, !**/.svn/**/*, !**/.hg/**/*, !**/.git/**/*',
     osaArchiveIncludePatterns: '*.zip, *.war, *.ear, *.tgz',
     scaAccessControlUrl: 'https://v2.ac-checkmarx.com',
     scaCredentialsId: 'SCA',
     scaServerUrl: 'https://api.lumodev.com',
     scaTenant: 'mytenant',
     scaWebAppUrl: 'https://sca.lumodev.com'
], excludeFolders: '', exclusionsSetting: 'job',
failBuildOnNewResults: false, failBuildOnNewSeverity: 'HIGH',
filterPattern: '!**/_cvs/**/*, !**/.svn/**/*, !**/.hg/**/*, !**/.git/**/*',
fullScanCycle: 10, password: '{AQAAABAAAAAQY+fUZlxMPaLDPMRDXCkczCyEbddKcGYE1x5kmwqB1Tc=}',
projectName: 'test2 - pipeline', sastEnabled: false, serverUrl: '',
sourceEncoding: 'Provide Checkmarx server credentials to see source encodings list',
username: '', vulnerabilityThresholdResult: 'FAILURE', waitForResultsEnabled: true])Open the Jenkins Dashboard by entering its URL http://<IP address or hostname>:<port>/manage, for example, http://localhost:8080/manage where port 8080 is the default port used by Jenkins. The Jenkins Dashboard appears.
Log on to the Jenkins Server. The dashboard appears.
Open or create a new freestyle or pipeline that clones or can access the code project you want to scan with CxSCA. To do so, do one of the following.
To create a scan job as a Freestyle project, click Freestyle Project.
To create a scan job as Jenkins pipeline, click Pipeline.
Click <OK> and follow the respective instructions for configuring the scan job parameters as explained for freestyle projects and Jenkins pipelines used to create CxSAST scan jobs.
If you do not want to run a CxSAST scan, under CxSAST Scan, clear Enable CxSAST scan in the scan job parameter interface.
Under Dependency Scan, select Enable dependency scan. The Override Global Dependency Scan Settings option appears.
Select Override global dependency scan settings.
Select Use CxSCA dependency scanner.
Use the defaults (listed in the “Default Configuration for Scanning with CxSCA Cloud” section below) or specify values for:
CxSCA API URL
Access Control Server URL
CxSCA Web App URL
For CxSCA credentials, click <Add> and follow the onscreen instructions to define your credentials. Click <Add> when done.
Enter your account for CxSCA. You can optionally test your connection to the CxSCA server.
Click <Save>. The CxSCA Scan is now one of the steps in the Jenkins pipeline.
Notice
For a table with all the parameters and settings, refer to the instructions on creating a scan job as a Freestyle project.