- Checkmarx Documentation
- SAST/SCA Integrations
- CI/CD Plugins
- TeamCity Plugin
- Configuring a Scan Task in TeamCity
Configuring a Scan Task in TeamCity
The TeamCity workflow is organized accordingly and uses the concept of a project with builds and build steps to configure and order activities in the workflow. The workflow consists of the components listed below. Once you log into your TeamCity account, the Build Dashboard screen is displayed, and you can start configuring.
Workflow Component | Description |
|---|---|
Project | In Checkmarx terms, a project refers to a scan task. |
Build | In Checkmarx terms, a build refers to the protocol of the code that will be scanned. |
Build step | In Checkmarx terms, a build step refers to a Checkmarx scan, configured from within TeamCity as explained below. In general, a build step is a small aspect of the task such as a source code checkout, running a script, or parsing test results. |
Notice
The user running the TeamCity plugin scan must have both 'Scanner' and 'Reviewer' role permissions.
The Root_Project is added and configured automatically and cannot be modified.

Refer to Creating and editing projects for further information and instructions on creating a project.
Create at least one build, as explained under Creating a build configuration.
Add a Checkmarx scan-build step. To do so, select the build, for example Build_Test_1 , and then go to Edit Configuration Settings. The Build Settings screen is displayed.
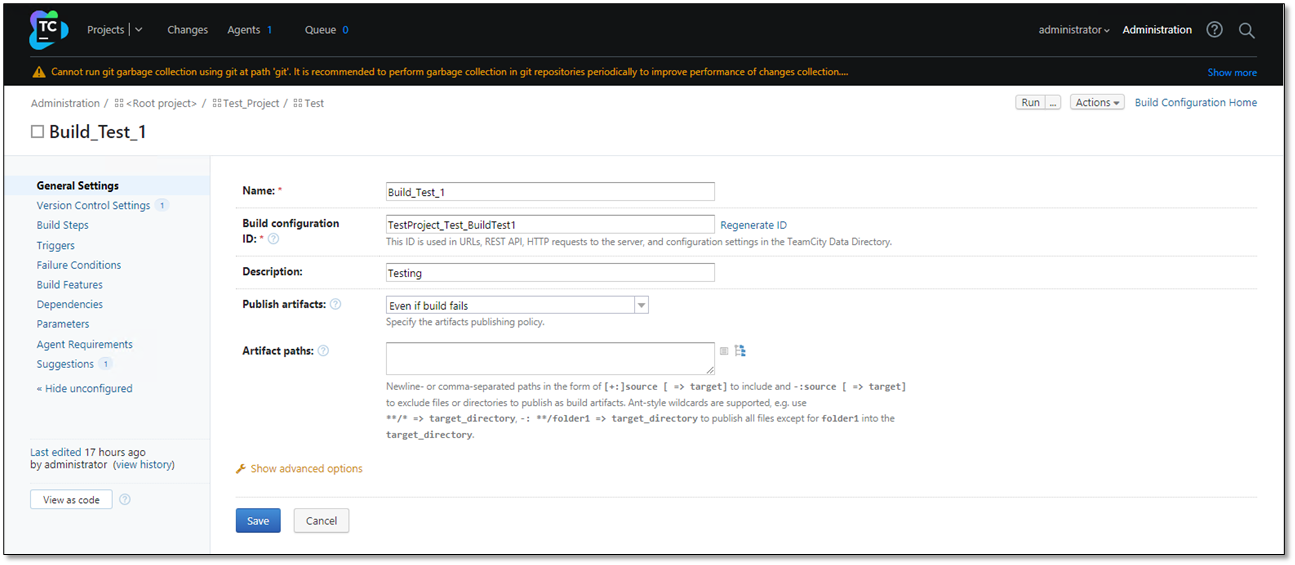
From the menu, choose Build Steps. The Add Build Step screen is displayed.
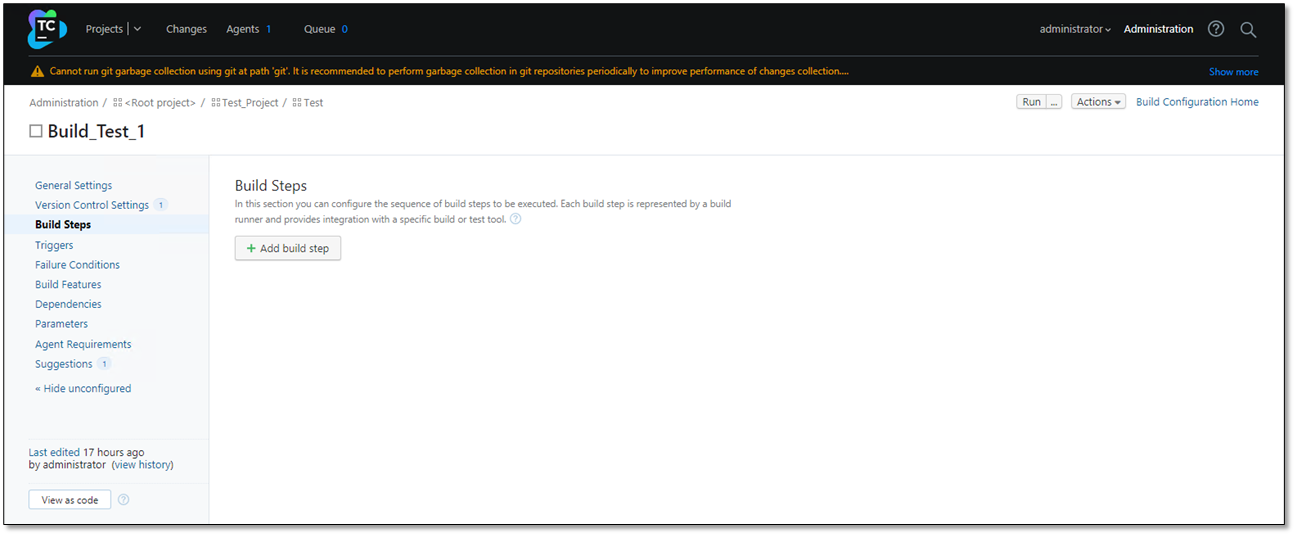
Click <+ Add Build Step> to open the parameter page.
from the Runner Type menu, select Checkmarx. The New Build Step screen is displayed.
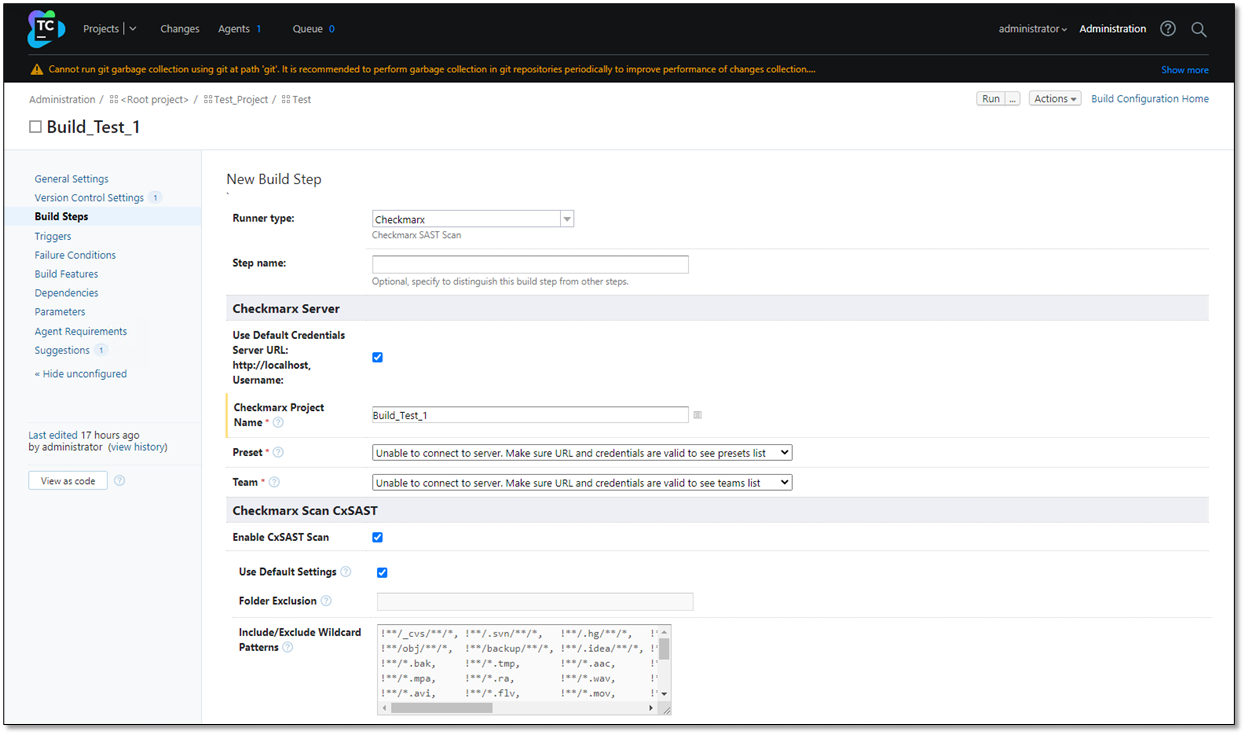
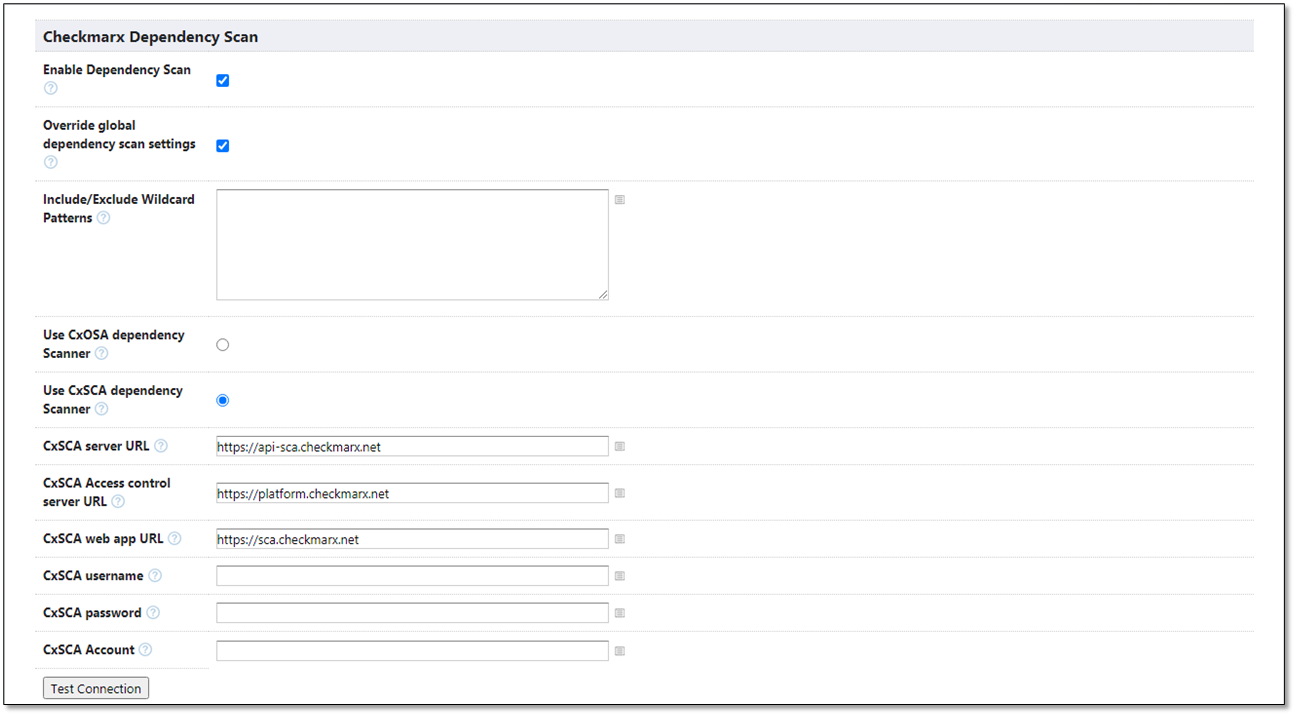
Define the Checkmarx Scan step configuration parameters as listed and explained in the table below.
Click <Save> when done to save the changes. The Checkmarx Scan Step is displayed in the Build Steps screen.
Parameter | Description |
|---|---|
Runner Type | Build step type. In our case, Checkmarx SAST Scan. |
Step Name | Enter a name / description for the step. |
Checkmarx Server | |
Execute Step | Specify the step execution policy, if required. This option is available if Show Advanced Options is enabled. |
Use Default Credentials Server URL:http://localhost, Username: | Check to use the default server credentials. For information and instructions, refer to Setting up the TeamCity Plugin. Clear to use individual server credentials that override the default settings. |
Server URL | Enter the Checkmarx Server URL or IP address with or without a port, for example, http://server-name, https://<IP address>:<port number> This option is available only if the Use Default Credentials Server URL is cleared. |
Username | Username to access the Checkmarx server. This option is available only if the Use Default Credentials Server URL is cleared. |
Password | Password to access the Checkmarx server. This option is available only, if theUse Default Credentials Server URL is cleared. |
<Connect to Server> | Click <Connect to Server> and wait until a successful connection is indicated and the credentials are validated. This option is available only if the Use Default Credentials Server URL is cleared. |
Checkmarx Project Name | Enter the relevant project name. The project name is used in the CxSAST Server. To use an existing project, make sure that the name is identical to the one in CxSAST and that the project resides under the same team. |
Preset | Select a scan preset for the project. If the preset is not specified, the default preset will be used. NoticeIf the Preset list is not displayed (or empty), click Connect to Server to refresh the list. |
Team | Enter the relevant team associated to the project. NoticeIf the Team list is not displayed (or empty), click Connect to Server to refresh the list. |
Checkmarx Scan CxSAST | |
Enable CxSAST Scan | It is clear to run a CxOSA scan without first performing a CxSAST scan. This option is checked by default, and a SAST scan runs first. |
Use Default Settings | Check to use the default settings displayed. For further information, refer to Setting up the TeamCity Plugin. To provide your own definitions, clear the checkbox. These settings override the default settings. |
Folder Exclusion | Define a comma-separated list of folders to be excluded from the scan. Entries in this list are automatically converted to exclude wildcard patterns and appended to the full pattern list provided in the Include/Exclude Wildcard Patterns section This option is available only, if Use Default Settings is cleared. |
Include / Exclude Wildcard Patterns | Define the include/exclude wildcard patterns This option is available only, if Use Default Settings is cleared. |
Scan Timeout In Minutes | Define the scan timeout threshold. This option is available only, if Use Default Settings is cleared. |
Comment | Enter a comment on a CxSAST scan (optional). You may use TeamCity variables, for example ${teamcity.buildNumber} or ${teamcity.buildPlanName} as part of the comment. |
Enable Incremental Scan | Check to scan only new and modified files relative to the project's previous scan. |
Schedule Periodic Full Scans | Check to schedule a full scan after a certain number of incremental scans. You are asked to specify the number of incremental scans after which a full scan is scheduled to run. Enter the number of incremental scans between periodic full scans, for example 10. In this case, 10 incremental scans are performed before the next full scan runs. The supported range is 1-99. This option is available only, if Enable Incremental Scan is checked. |
Scan Level Custom Fields | Tag individual scans with custom values to extrapolate and generate reports based on certain chunks of data. Example: field1:value1,field2:value2 NoticeThis functionality is available for CxSAST 9.4 and higher. |
Generate CxSAST PDF Report | Enable the creation of a CxSAST scan result report in PDF. The report will be available via a link in the scan results. |
Source Character Encoding | Enables users to select the required Engine Configuration ID with specific options to revert to whatever is defined in the project settings for CxSAST |
Checkmarx Dependency Scan | |
Enable Dependency Scan | Check to initiate a dependency scan for this project/job. This option is disabled by default. |
Override global dependency scan settings | Check to override globally defined dependency scan settings. This option is available only, if Enable Dependency Scan is checked. |
Include/Exclude Wildcard Patterns | Comma separated list of wildcard patterns to be included or excluded. Exclude patterns start with an exclamation mark "!". Example: **/*.jar, **/*.dll, !**/test/**/XYZ* NoticeThe Includes/Exclude wildcard patterns parameter does not affect dependencies resolved from manifest files. |
Use CxOSA dependency scanner | Check to enable the CxOSA dependency scanner and associated settings. This option is only available, if Enable Dependancy Scan is checked. |
Archive Extract Wildcard Patterns | Comma separated list of archive wildcard patterns to include their extracted content with the scan, for example *.zip, *.jar, *.ear. Supported archive types are: jar, war, ear, sca, gem, whl, egg, tar, tar.gz, tgz, zip, rar Available, if 'Enable Use CxOSA dependency scanner‘ is enabled. |
Execute dependency managers 'install packages' command before Scan | Select this option in order to be able to scan packages from various dependency managers as part of the dependency scan NoticeThe relevant dependency managers must be installed on every Jenkins worker and/or orchestrator instance running the job in order to use this option. |
Use CxSCA Dependency Scanner | Check to enable the CxSCA dependency scanner and associated settings. This option is only available, if Override Global Dependency Scan Settings is checked. |
CxSCA Server URL | URL of the SCA API endpoint. This option is only available, if Use CxSCA dependency scanner is checked. |
CxSCA Access Control Server URL | URL of the Access Control server used to log in to CxSCA. This option is only available, if Use CxSCA dependency scanner is checked. |
CxSCA Web App URL | URL of the SCA web application, used to generate a web report URL. If omitted, the SCA scan runs as usual, but no report URL is generated. This option is only available, if Use CxSCA dependency scanner is checked. |
CxSCA Username | Username to log in to CxSCA. This option is only available, if Use CxSCA dependency scanner is checked. |
CxSCA Password | Password to log in to CxSCA. This option is only available, if Use CxSCA dependency scanner is checked. |
CxSCA Account | Customer account of CxSCA used to log in to CxSCA This option is only available, if Use CxSCA dependency scanner is checked. |
SCA Team Path | Assign the SCA team to the new CxSCA project. If left empty, the CxSAST team is assigned to it by default. |
<Test Connection> | Click <Test Connection> to validate the credentials. |
Enable Dependency Scan Vulnerability Thresholds | Check to enable the Dependency Scan Vulnerability Threshold settings for all jobs and project options. This enables you to set the default global settings for all jobs and projects that are not using local settings. You may override these settings later for individual jobs and projects. |
Perform SCA Scan using Dependency Resolution by SCA Resolver Tool | Check to enable this option for SCA Resolver to scan in Offline mode of CxSCA. |
Path to SCA Resolver | Enter the path to the host of the Jenkins node where ScaResolver is installed, for example C:\\Users\\Installations\\ScaResolver-win64 or /opt/ScaResolver-linux64, depending on the operating system in use. This option is only available, if Perform SCA Scan using Dependency Resolution by SCA Resolver Tool is checked. |
SCA Resolver Additional Parameters | Provide arguments to ScaResovler in the format supported by the ScaResolver tool. ScaResolver is executed in Offline mode. '-s', '-n' and '-r' are mandatory parameters, for example -s C:\\Users\\SampleProject -n ProjectName -r C:\\output, where the parameters stand for the following:
This option is only available, if Perform SCA Scan using Dependency Resolution by SCA Resolver Tool is checked. |
Perform SCA Scan by Uploading Manifests File(s)/Source to SCA Service | This allows performing a SCA scan using the Manifest file. Enables other functionalities such as Include Sources, Private Registry Environment Variable and Package Managers Config’s File Path. This option is only available, if Perform SCA Scan using Dependency Resolution by SCA Resolver Tool is checked. |
Package Manager's Config File(s) Path | Use this parameter to provide configuration files of the package managers used in the project, for example Settings.xml for maven, Nuget.config for Nuget, .npmrc for npm etc. This option is relevant for projects that use private artifactory. Use the CxSCA agent to run the scan. The CxSCA agent attempts to perform dependency resolution using the package manager’s configuration files provided. Example: - “c:\user\.m2\settings.xml”, “c:\user\npm\.npmrc” This option is only available, if Perform SCA Scan by Uploading Manifests File(s)/Source to SCA Service is enabled. |
Private Registry Environment Variable | This option is relevant with Package Manager's Config File(s) Path . In many cases, package manager configuration files reference environment variables, often to provide credentials without storing them in a file. Pass all such variables using this option. Example: -env param1:value1,param2:value2 This option is only available, if Perform SCA Scan by Uploading Manifests File(s)/Source to SCA Serviceis enabled. |
Include Source | If checked, the entire source code is included in the zip archive for scanning. This option is only available, if Perform SCA Scan by Uploading Manifests File(s)/Source to SCA Service is enabled. |
Enable Exploitable Path | CxSCA leverages the CxSAST ability to scan the project code in parallel with the manifest file to test whether the vulnerable open source packages are called by your code and whether the vulnerable methods are used by your code. This means, it tests whether there is an 'exploitable path' from your project code to the vulnerable package code. For additional information on this functionality, refer to Exploitable Path in the CxSCA documentation space. If checked, the functionality is active. This option is only available, if Perform SCA Scan by Uploading Manifests File(s)/Source to SCA Service is enabled. |
Use Global Credentials Server URL:, Username: | Check to use the global server credentials. This option is only available, if Perform SCA Scan by Uploading Manifests File(s)/Source to SCA Service and Enable Exploitable Path are enabled. |
Server URL | The URL of the Checkmarx SAST Endpoint. This is the Checkmarx server endpoint used to retrieve scan results from the CxSAST server, which are required for the Exploitable Path detection by the CxSCA scan. This option is only available, if Perform SCA Scan by Uploading Manifests File(s)/Source to SCA Service and Enable Exploitable Path are enabled. |
Username | Username to access the CxSAST server This option is only available, if Perform SCA Scan by Uploading Manifests File(s)/Source to SCA Service and Enable Exploitable Path are enabled. |
Password | Password to access the CxSAST server This option is only available if Perform SCA Scan by Uploading Manifests File(s)/Source to SCA Service and Enable Exploitable Path are enabled. |
<Connect to Server> | Click to verify the connectivity to the server and verify the credentials. This option is only available if Perform SCA Scan by Uploading Manifests File(s)/Source to SCA Service and Enable Exploitable Path are enabled. |
Project Full Path | The CxSAST project name used to scan the project source code, for example CxServer/team1/projectname This parameter retrieves scan results from the CxSAST server required for Exploitable Path detection by the CxSCA scan. Notice
|
Project ID | The ID of the CxSAST project is used to scan the project source code. This parameter retrieves scan results from the CxSAST server required for Exploitable Path detection by the CxSCA scan. Notice
|
Control Checkmarx Scan | |
Use Default Settings | Check to use the default settings. Refer to Setting up the TeamCity Plugin for further information. Clear the checkbox to provide your own definitions that override the default settings. |
Enable synchronous Mode | Enable the synchronous mode option to allow the viewing of the scan results in TeamCity. If cleared (asynchronous mode), only a link to the scan results in the CxSAST web application is provided with the build results in TeamCity. This option is enabled by default. |
Enable project's policy enforcement | Mark the build as failed or unstable if the project's policy is violated. NoticeA policy is assigned to a project from within SAST. |
Enable Project's SCA policy enforcement | Mark the build as failed or unstable if the project's SCA policy is violated. NoteA policy is assigned to a project from within SCA. |
Enable CxSAST Vulnerability Thresholds | Enable option to initiate vulnerabilities threshold setting options for the CxSAST scan (only available, if Enable synchronous Mode is enabled). |
High / Medium / Low | Configure a threshold for the high, medium and low severity vulnerabilities. The build is marked as failed, if the number of high, medium or low severity vulnerabilities exceeds the threshold. Available only, if Enable CxSAST Vulnerability Thresholds is checked. If left blank, the respective threshold is ignored. |
Enable Dependency Vulnerability Thresholds | Enable this option to initiate vulnerability threshold setting options for the Dependency scan (only available, if Enable synchronous Mode is enabled). |
High / Medium / Low | Configure a threshold for the high, medium and low severity vulnerabilities. The build is marked as failed, if the number of high, medium or low severity vulnerabilities exceeds the threshold. Available only, if Enable CxSAST Vulnerability Thresholds is checked. If left blank, the respective threshold is ignored. |
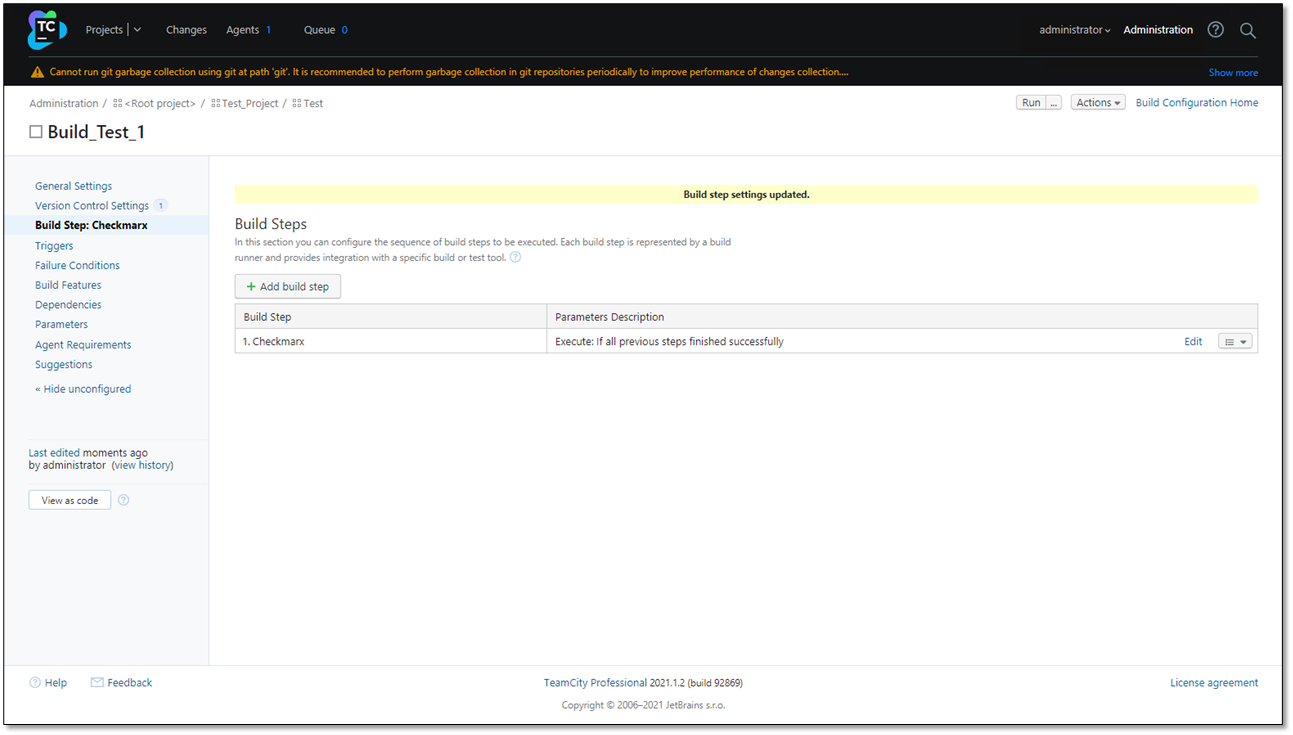
Notice
To edit the scan step configuration parameters, click your Checkmarx Build Step and make the changes as explained in the table above.
You can now configure and run your build according to your current development procedure. refer to Creating a build configuration for further information and instructions.