- Checkmarx Documentation
- Checkmarx One
- Checkmarx One User Guide
- User Management and Access Control
- Managing Identity Providers
- Configuring SAML Integration
Configuring SAML Integration
To add a new external SAML v2.0 provider, perform the following:
Hover over and click
 , select Identity and Access Management.
In the Identity and Access Management screen, select Identity Providers.
Click Create Identity Provider.
The Create Identity Provider panel is displayed.
Select SAML V2.0 from the drop-down menu and click Create.
The Create Identity Provider page is displayed.
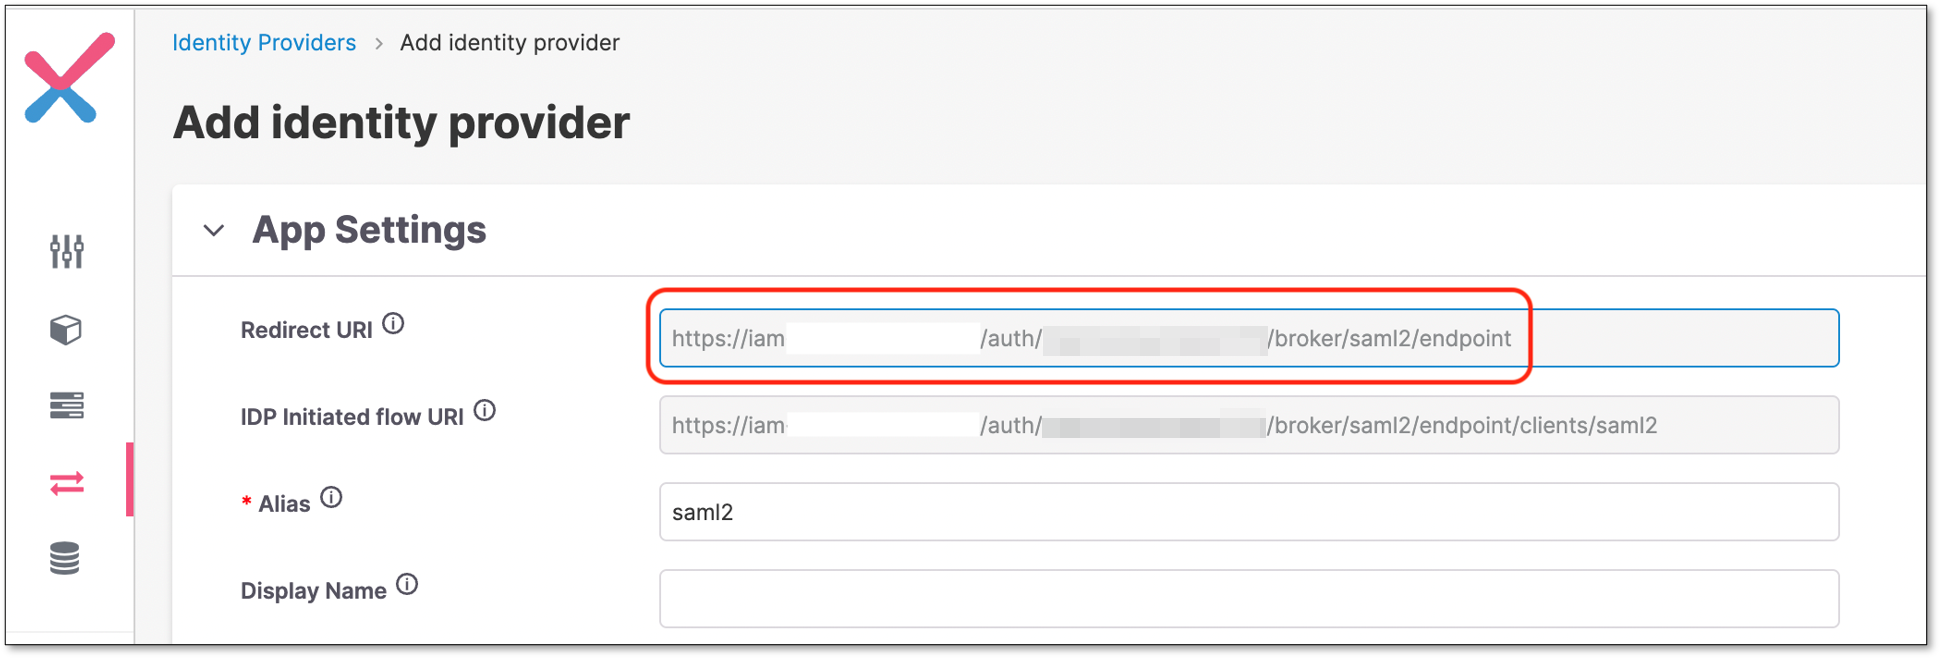
In the Create Identity Provider page, copy the value of the Redirect URI field.

Configuring a new SAML Server
Note
Mandatory fields are marked with 
App Settings
This configuration section refers to the IAM (Broker) side.
Below are all the configuration options that exist in this section.
Parameter | Description | Default | Notes |
|---|---|---|---|
Redirect URI | Client redirect URI | ||
IDP Initiated flow URI | Used when login process is expected to start from the IDP side | ||
Alias | The alias that uniquely identifies the identity provider. It is also used to build the redirect URI | ||
Display Name | The name that will be presented in the identity provider’s table | ||
Enabled | On | ||
Store Tokens | Determine if to save the token in Checkmarx One DB in an encoded format, after the users' authentication | Off | |
Stored Tokens Readable | Determine if to save the token in Checkmarx One DB in a Decoded format, after the users' authentication | Off | |
Trust Email | Off |
| |
Account Linking Only | Off |
| |
Hide on Login Page | Determine if to hide the external provider icon in the Checkmarx One log in page | Off | |
GUI order | Set the external providers icons order in the Checkmarx One log in page |
| |
First Login Flow | Alias of the authentication flow, which is triggered after the first login with this IDP. | First broker login | |
Post Login Flow | Alias of the authentication flow, which is triggered after each login with this IDP | Useful for additional verification of each user authenticated with this IDP | |
Sync Mode | Default sync mode for all mappers. Determines when user data will be synced using the mappers. |
|
SAML Settings
This configuration section refers to the external provider side (not the client).
Below are all the configuration options that exist in this section.
Parameter | Description | Default | Notes |
|---|---|---|---|
Single Sign-On Service URL | The URL that is used for SAML SSO log in authentication requests | ||
Single Logout Service URL | The URL that is used for external provider log out authentication requests | For a user to log out from the external provider (When performing log out from Checkmarx One), you need to perform the following:
| |
Backchannel Logout | In case this option is enabled, it supports logging out from the identity provider when logging out from Checkmarx One | Off | |
NameID Policy Format | Specifies the URI reference corresponding to a name identifier format, or in other words, how to send the details in the SAML XML assertion format | Persistent | Optional Values: Persistent, Email, Kerberos, X.509 Subject Name, Windows Domain Qualified Name, Unspecified |
Principal Type | Specifies which part of the SAML assertion XML will be used to identify and track external user identities | Subject NameID |
|
HTTP-POST Binding Response | Indicates how the external provider returns the information to the client | Off |
|
HTTP-POST Binding for AuthnRequest | Indicates which SAML binding should be used when the client requests authentication from the external provider | Off |
|
HTTP-POST Binding Logout | Indicates which SAML binding should be used for logging out from the external provider | Off |
|
Want AuthnRequests Signed | Indicates whether the identity provider expects a signed AuthnRequest | Off | In case this value is On, 2 additional fields will be added:
|
Want Assertions Signed | Indicates whether this service provider expects a signed Assertion | Off | |
Want Assertions Encrypted | Indicates whether this service provider expects an encrypted Assertion | Off | |
Force Authentication | Indicates if to force the user’s authentication, even if the user is already logged in to the external provider | Off | |
Validate Signature | Enable/disable signature validation of SAML responses | Off | If this value is On, an additional Validating X509 Certificates field will be added. This is an indication of the certificate in PEM format that must be used for checking signatures. Multiple certificates can be entered, separated by a comma. |
Allowed clock skew | Clock skew in seconds that is tolerated when validating identity provider tokens | zero | |
Import from URL | Import metadata from a remote identity provider SAML entity descriptor | ||
Import from file | Import metadata from a file | If the import is being performed using a file, there is a need to click the Select file button, and to select the requested file. |
SAML Mappers
The following are the SAML mappers and their descriptions available in Checkmarx One:
Username Template Importer: Allows formatting the username to import via template.
Advanced Attribute to Role: If the set of attributes exists and can be matched, grant the user the specified realm or client role.
XPath Attribute Importer: Extract the text of a SAML attribute via XPath expression and import it into the specified user property or attribute.
SAML groups Mapper: Allows you to map values from the SAML attribute directly to Checkmarx groups. Missing groups are created automatically.
Hardcoded User Session Attribute: When a user is imported from a provider, a value is hardcoded to a specific user session attribute.
Attribute Importer: Import the declared SAML attribute into the specified user property or attribute.
Hardcoded Role: When a user is imported from the provider, it hardcodes a role mapping.
SAML Attribute to Groups: Allows mapping of SAML attribute to one or more groups
Hardcoded Group: Assigns the user to the specified group.
Advanced Attribute to Group: If all attributes exist, the user is assigned to the specified group.
Hardcoded Attribute: When a user is imported from a provider, a value is hardcoded to a specific user attribute.
SAML Attribute to Role: If an attribute exists, this grants the user the specified realm or client role.
Configuring a SAML Provider with Azure Active Directory (AD)
This page provides details about SSO configuration on Checkmarx One when using Azure Active Directory.
Instructions
Log in to Checkmarx One using your Tenant, Username and Password.
Click on the
 icon
iconIn the Identity and Access Management screen click on
 icon
iconSelect SAML v2.0
Copy the redirect URI
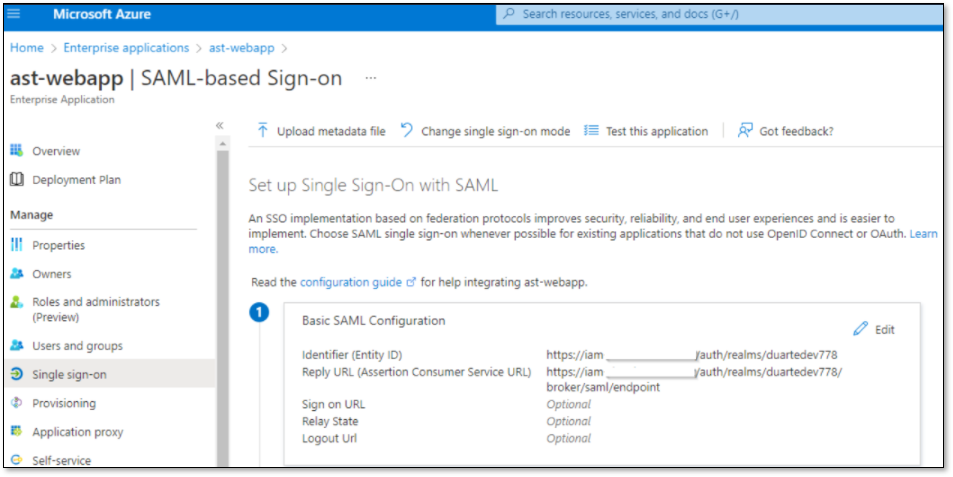
On the Azure webapp, set Identifier and Reply URL fields according to the copied Redirect URI.
Identifier = A portion of the Redirect URI (until the tenant name).
Reply URL = Redirect URI.
Note
To create a new Azure webapp go to Enterprise Applications → Create your own application → Integrate any other application you don't find in the gallery (Non-gallery).
On Azure, copy the App Federation Metadata Url

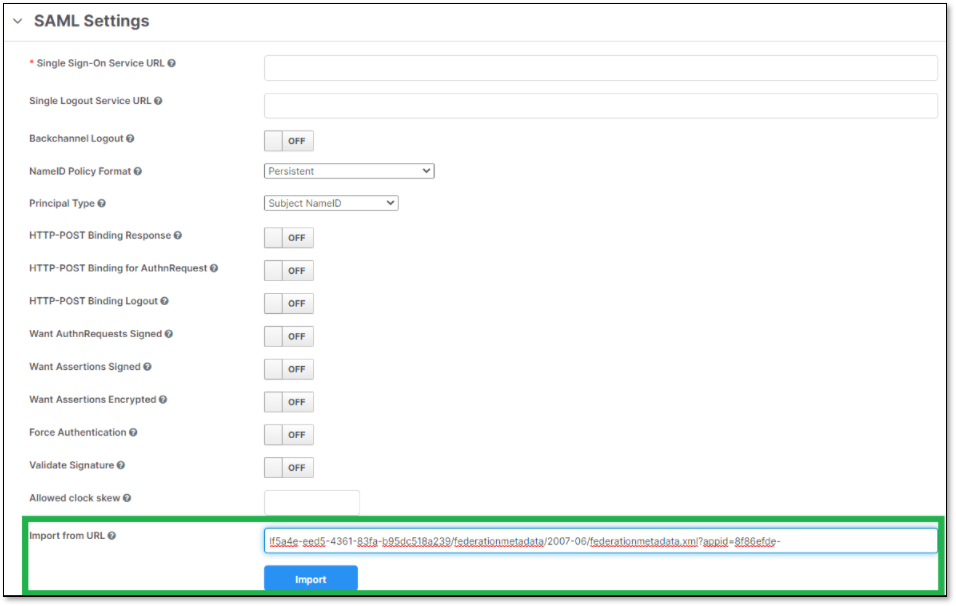
On Checkmarx One, use the copied link to import the metadata.
Perform the following:
Copy the URL to Import from URL field.
Click Import
Click Save
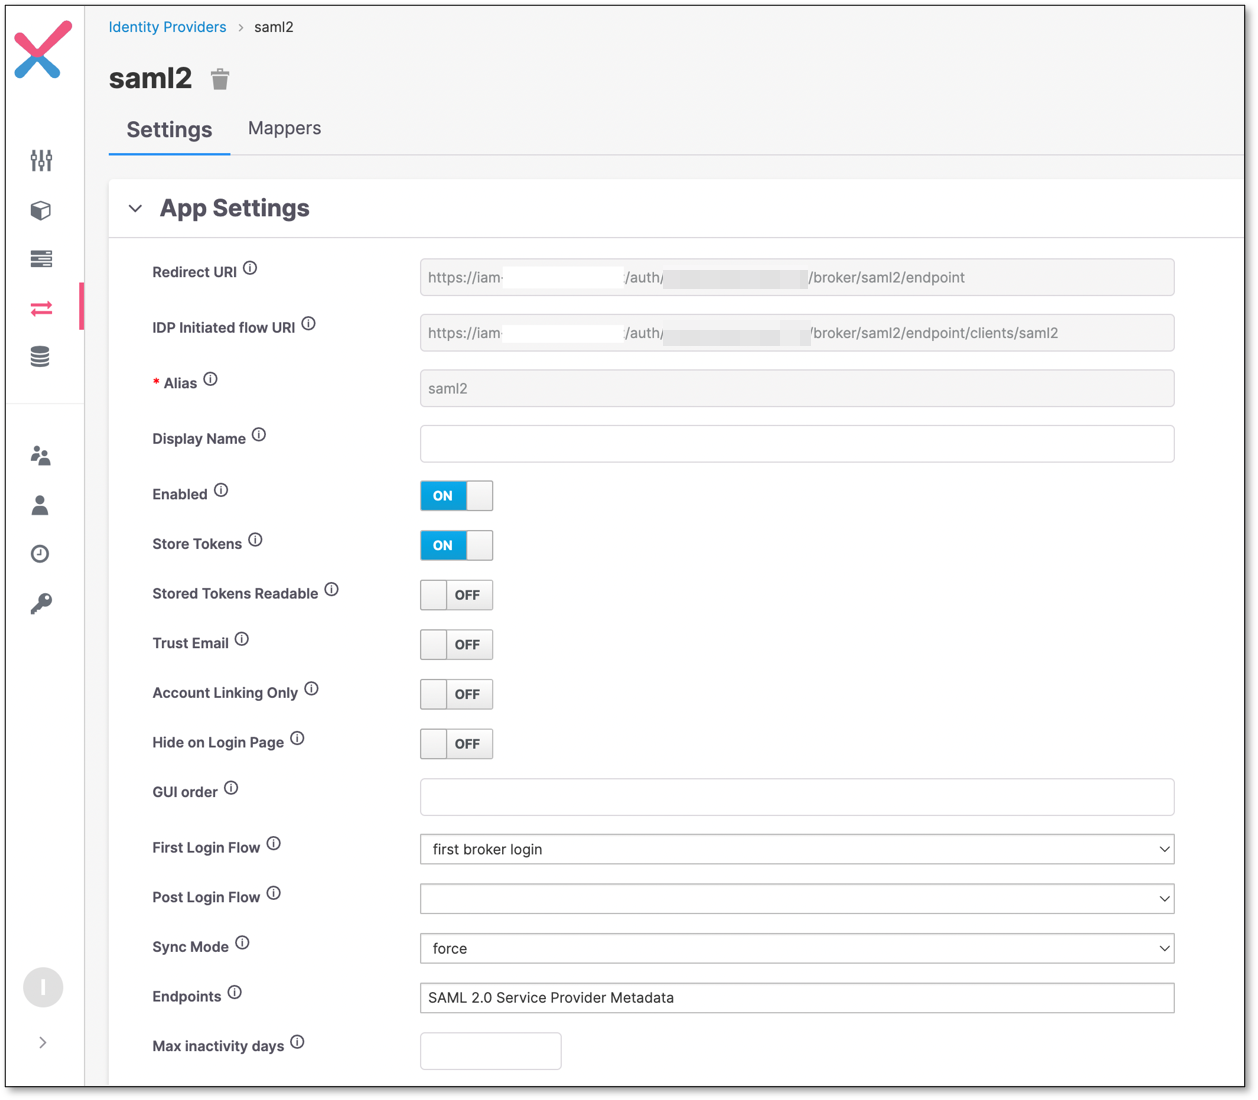
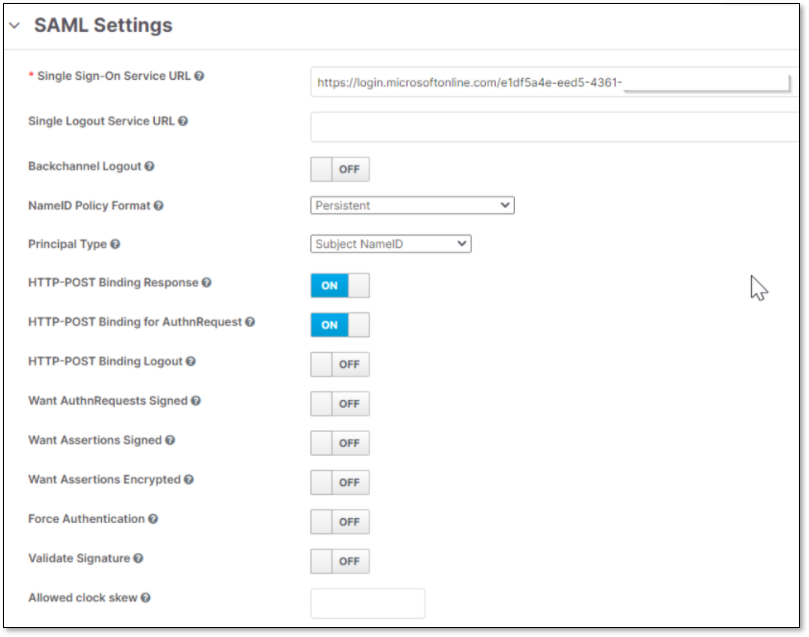
Check Checkmarx One SAML configuration.
This is how SAML settings should look like:
On Azure, check that the claims are correctly configured.

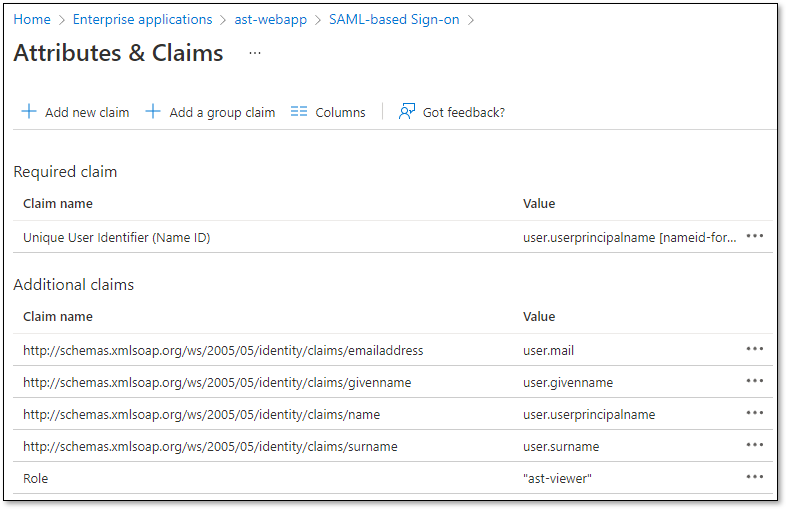
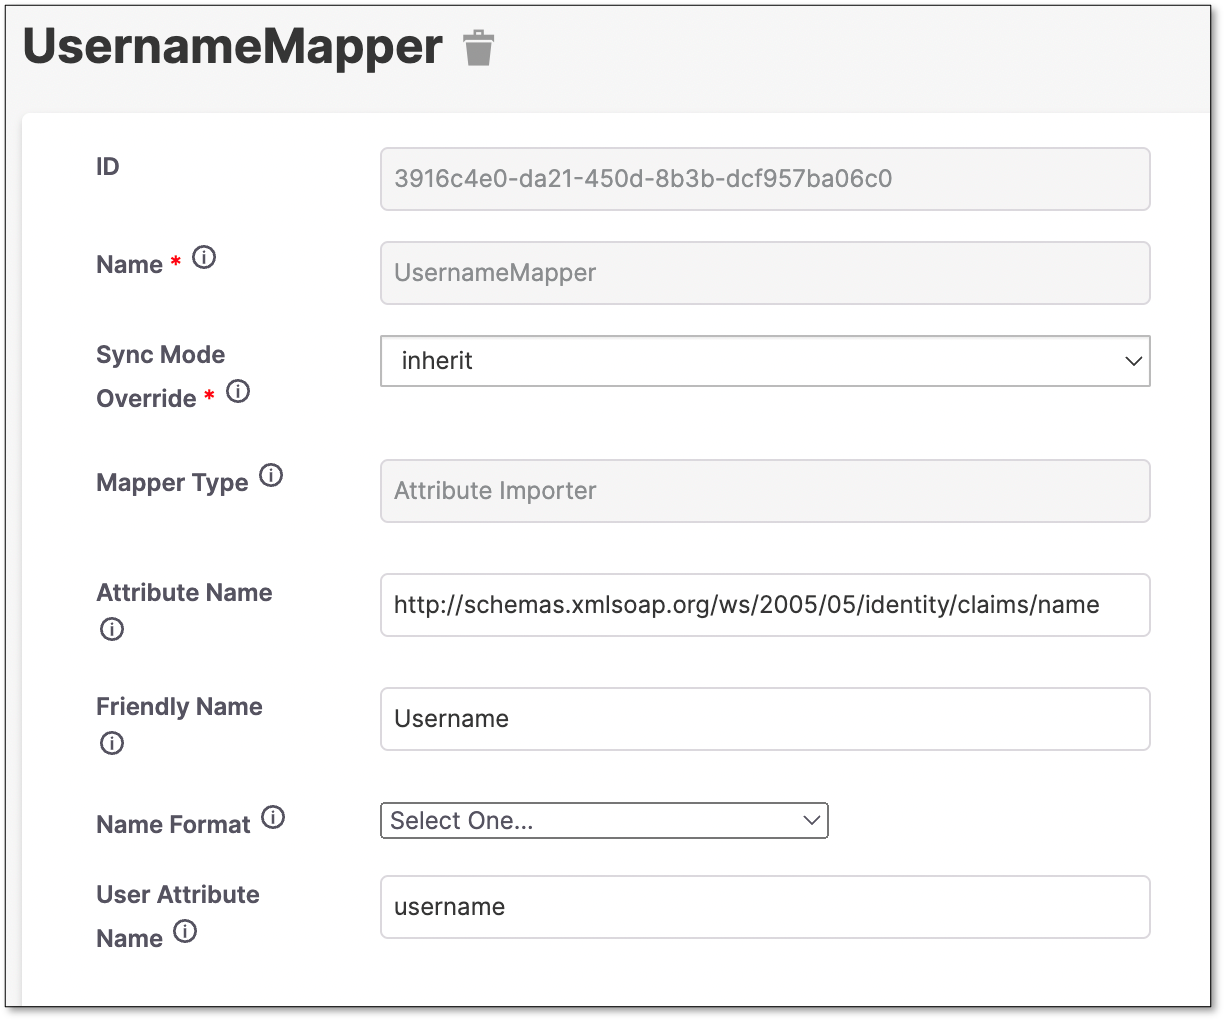
In Checkmarx One, create a mapper for the Username
Click on Mappers tab.
Click Create

Fill the information and click Save
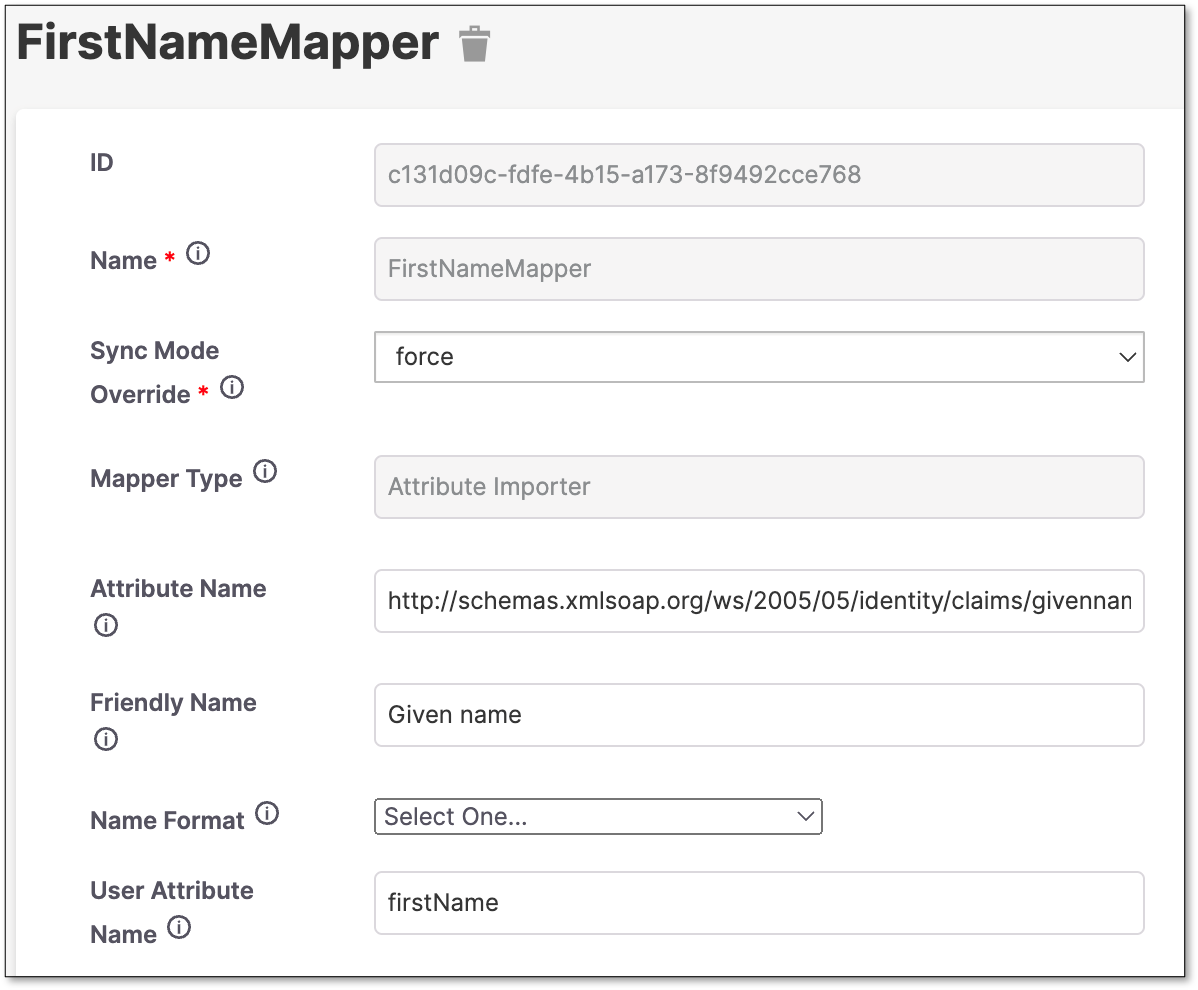
Create a FirstName Mapper.
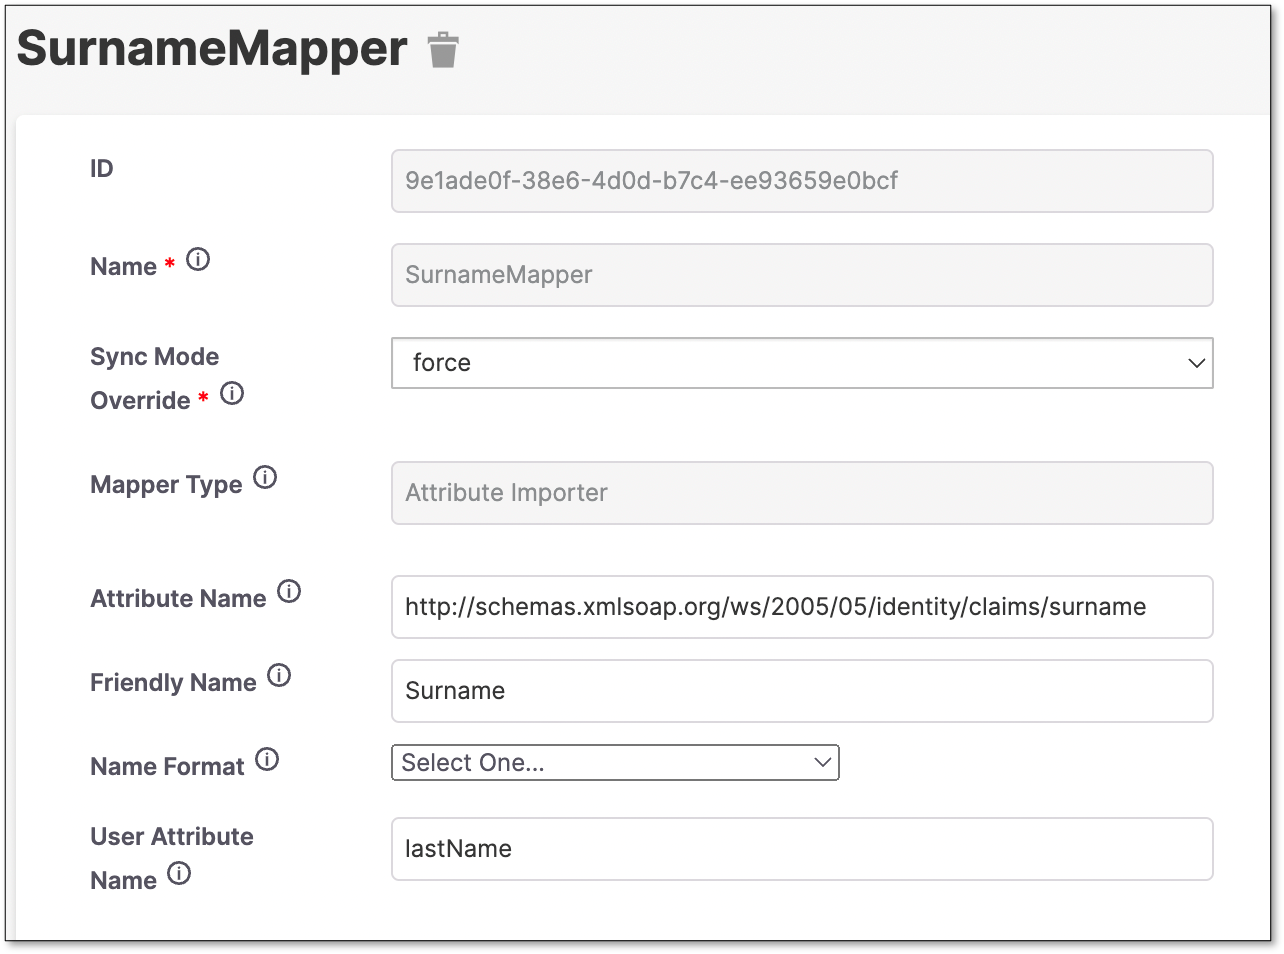
Create a Surname Mapper.
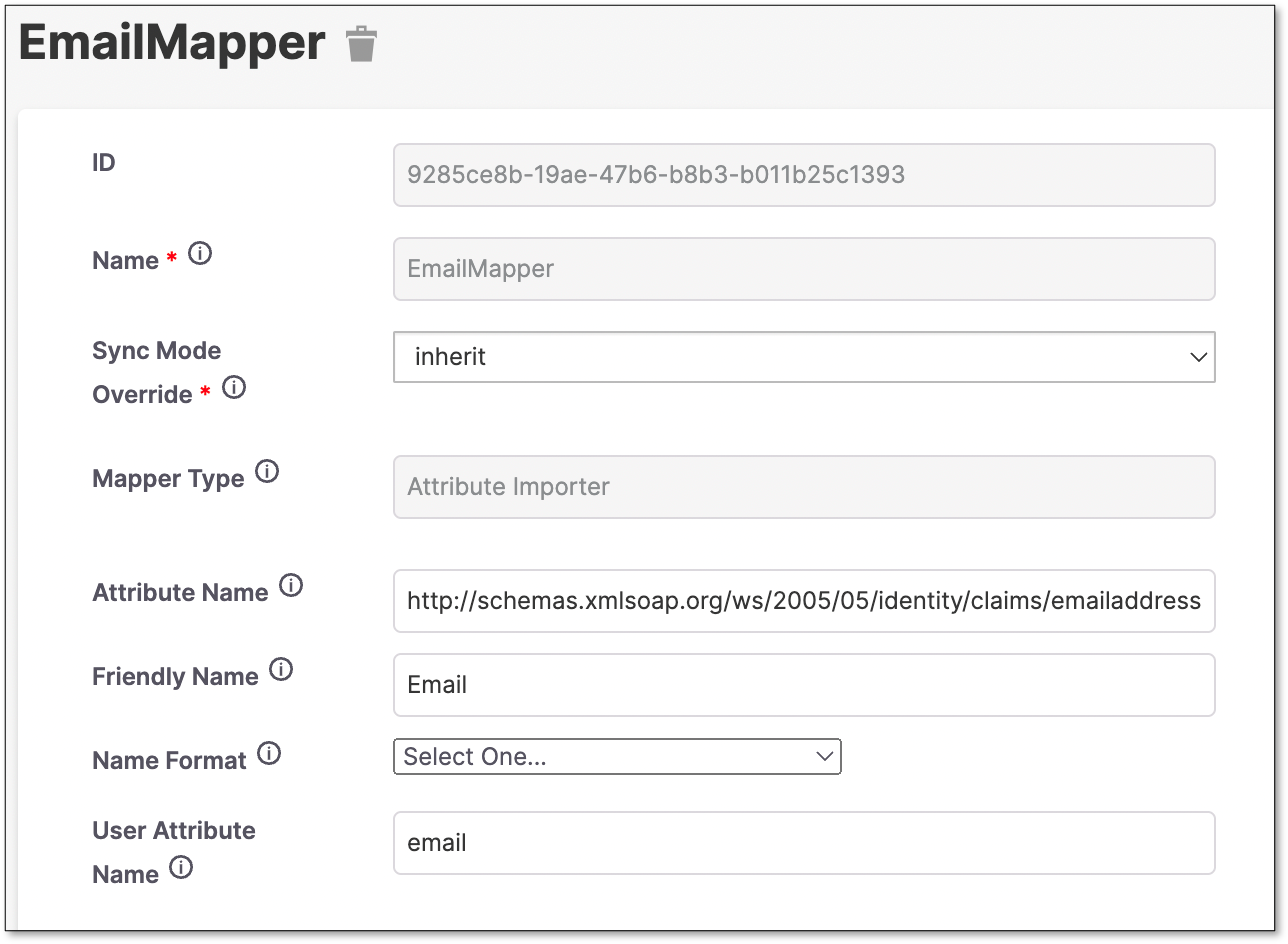
Create an Email Mapper.
Create a Role Mapper.
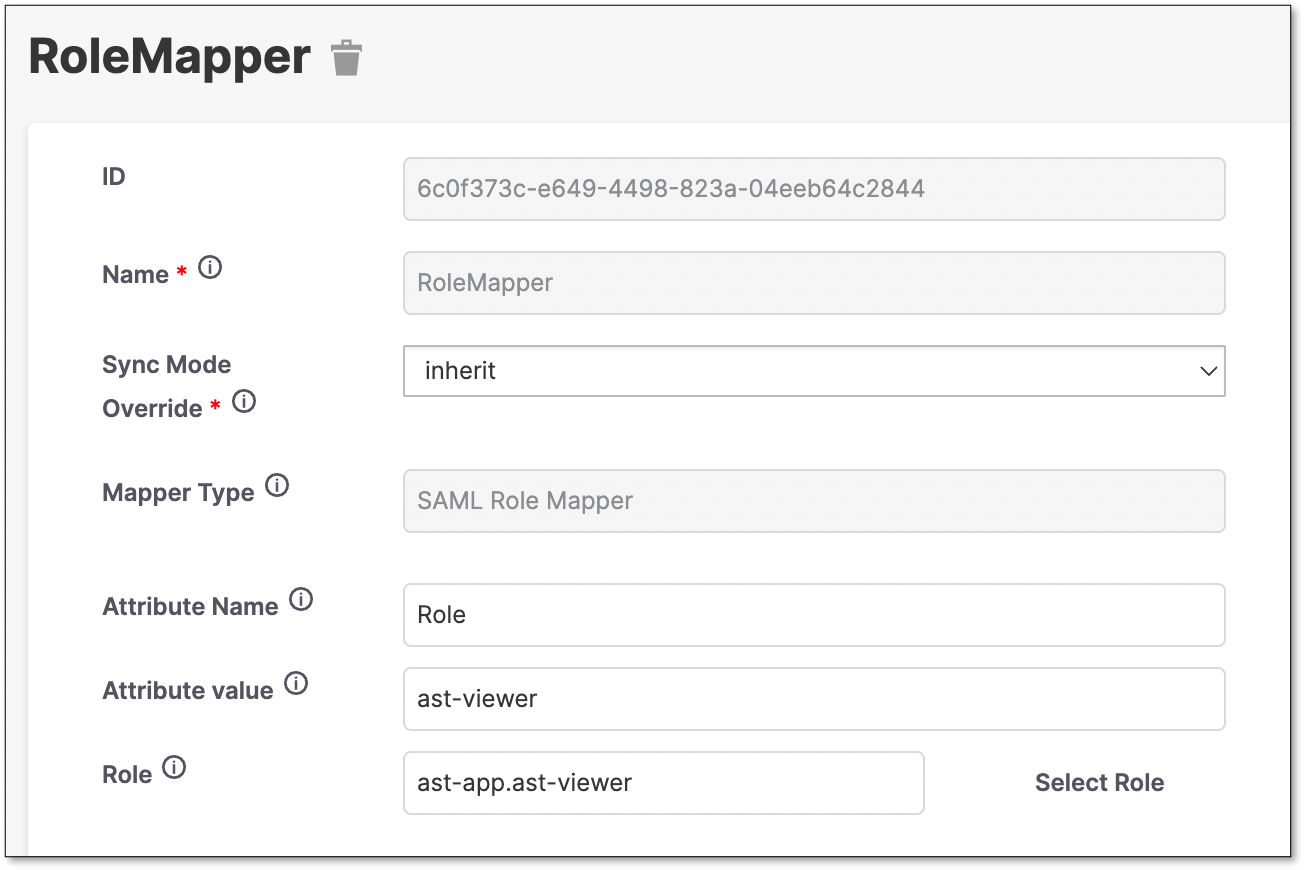
Warning
For this example, the Role claim configured on Azure is a constant “ast-viewer”.
This will map all users to assume the ast-viewer role.
Azure can send other values on this claim.
You will need to add a mapper for each value, to convert the azure claim value into a Checkmarx One role.
Explore other Mapper Types for other ways to map roles.
Importing Groups
Checkmarx One can also import groups from Azure AD.
Create the GroupMapper:
 |
On Azure, add a group claim.
 |
Warning
This azure configuration example will return the group ID's. Check Azure AD documentation on how to provide a friendly name.
Related article: How To Work Around The Azure SAML Group Claim Limitations
If the integration is being done for groups that are not created within Checkmarx One, using the Entra ID group name, users can use the sAMAccountName as the source attribute instead of the Group ID and configure the Entra ID group name.
Troubleshooting
A good way to troubleshoot issues with the configuration is to only configure one mapper, for example a Given Name.
When the information is incomplete, the user will be prompted to enter the user’s missing data.
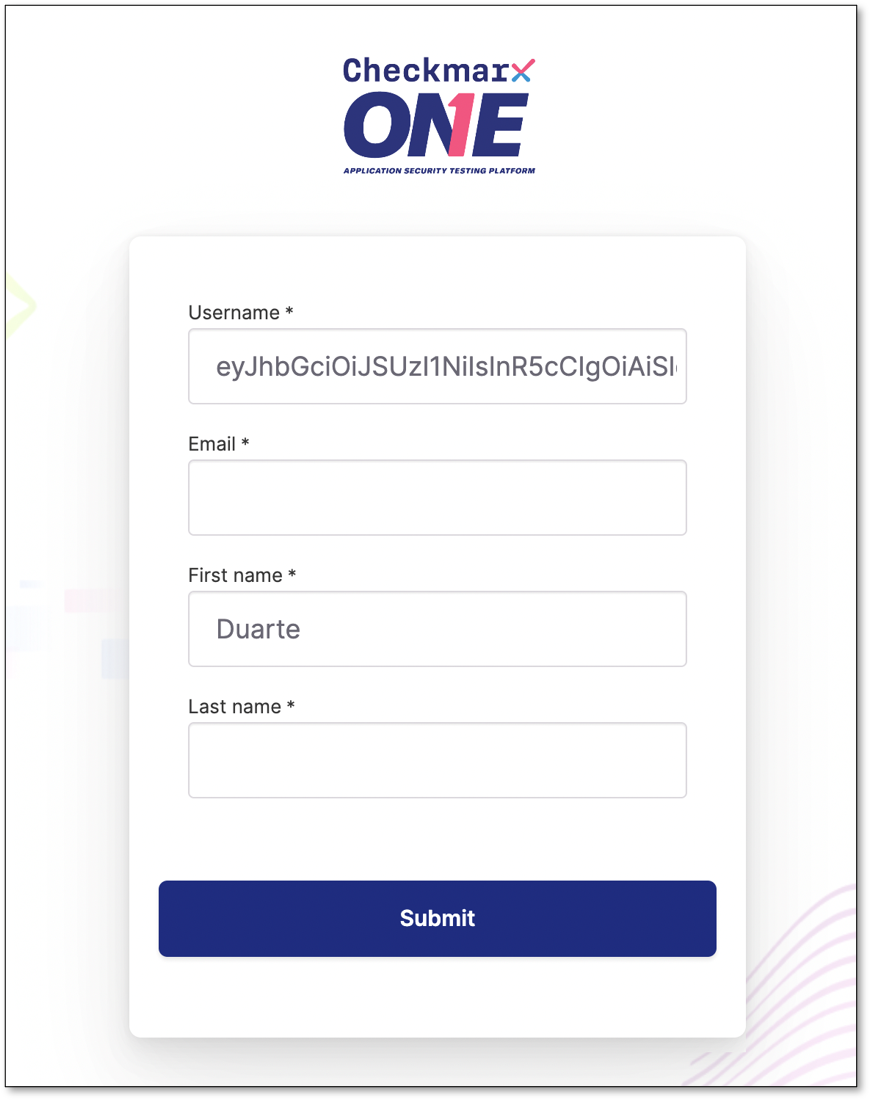 |
In the image above, we can check that Checkmarx One is being able to retrieve the First Name correctly.
This form is only shown when the user logs in for the first time.
Configuring a SAML Provider with OKTA
This page provides details about SSO configuration with SAML on Checkmarx One using OKTA.
Instructions
Start Creating a new Identity Provider via Checkmarx One
Log in to Checkmarx One using your Tenant, Username and Password.
Hover over the
 icon and select Identity and Access Management.
In the Identity and Access Management screen click on

Select SAML v2.0
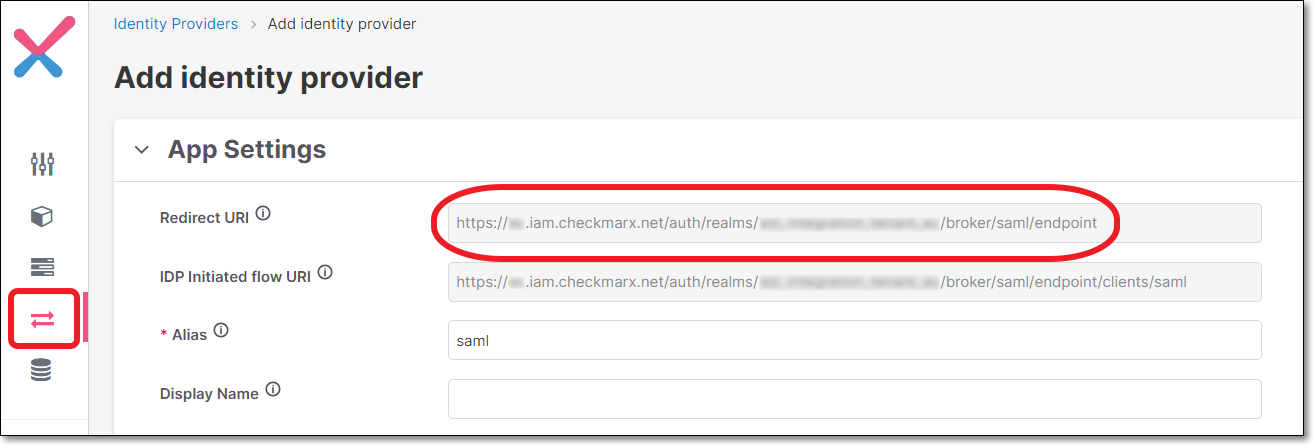
In the Add identity provider page, copy the Redirect URI
Create an Application in OKTA
Log in to the OKTA console using an admin account.
In the OKTA home page, click on Applications
In the Applications page, click Create App Integration
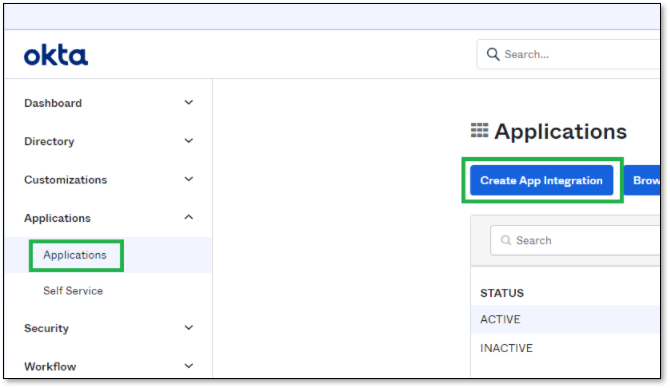
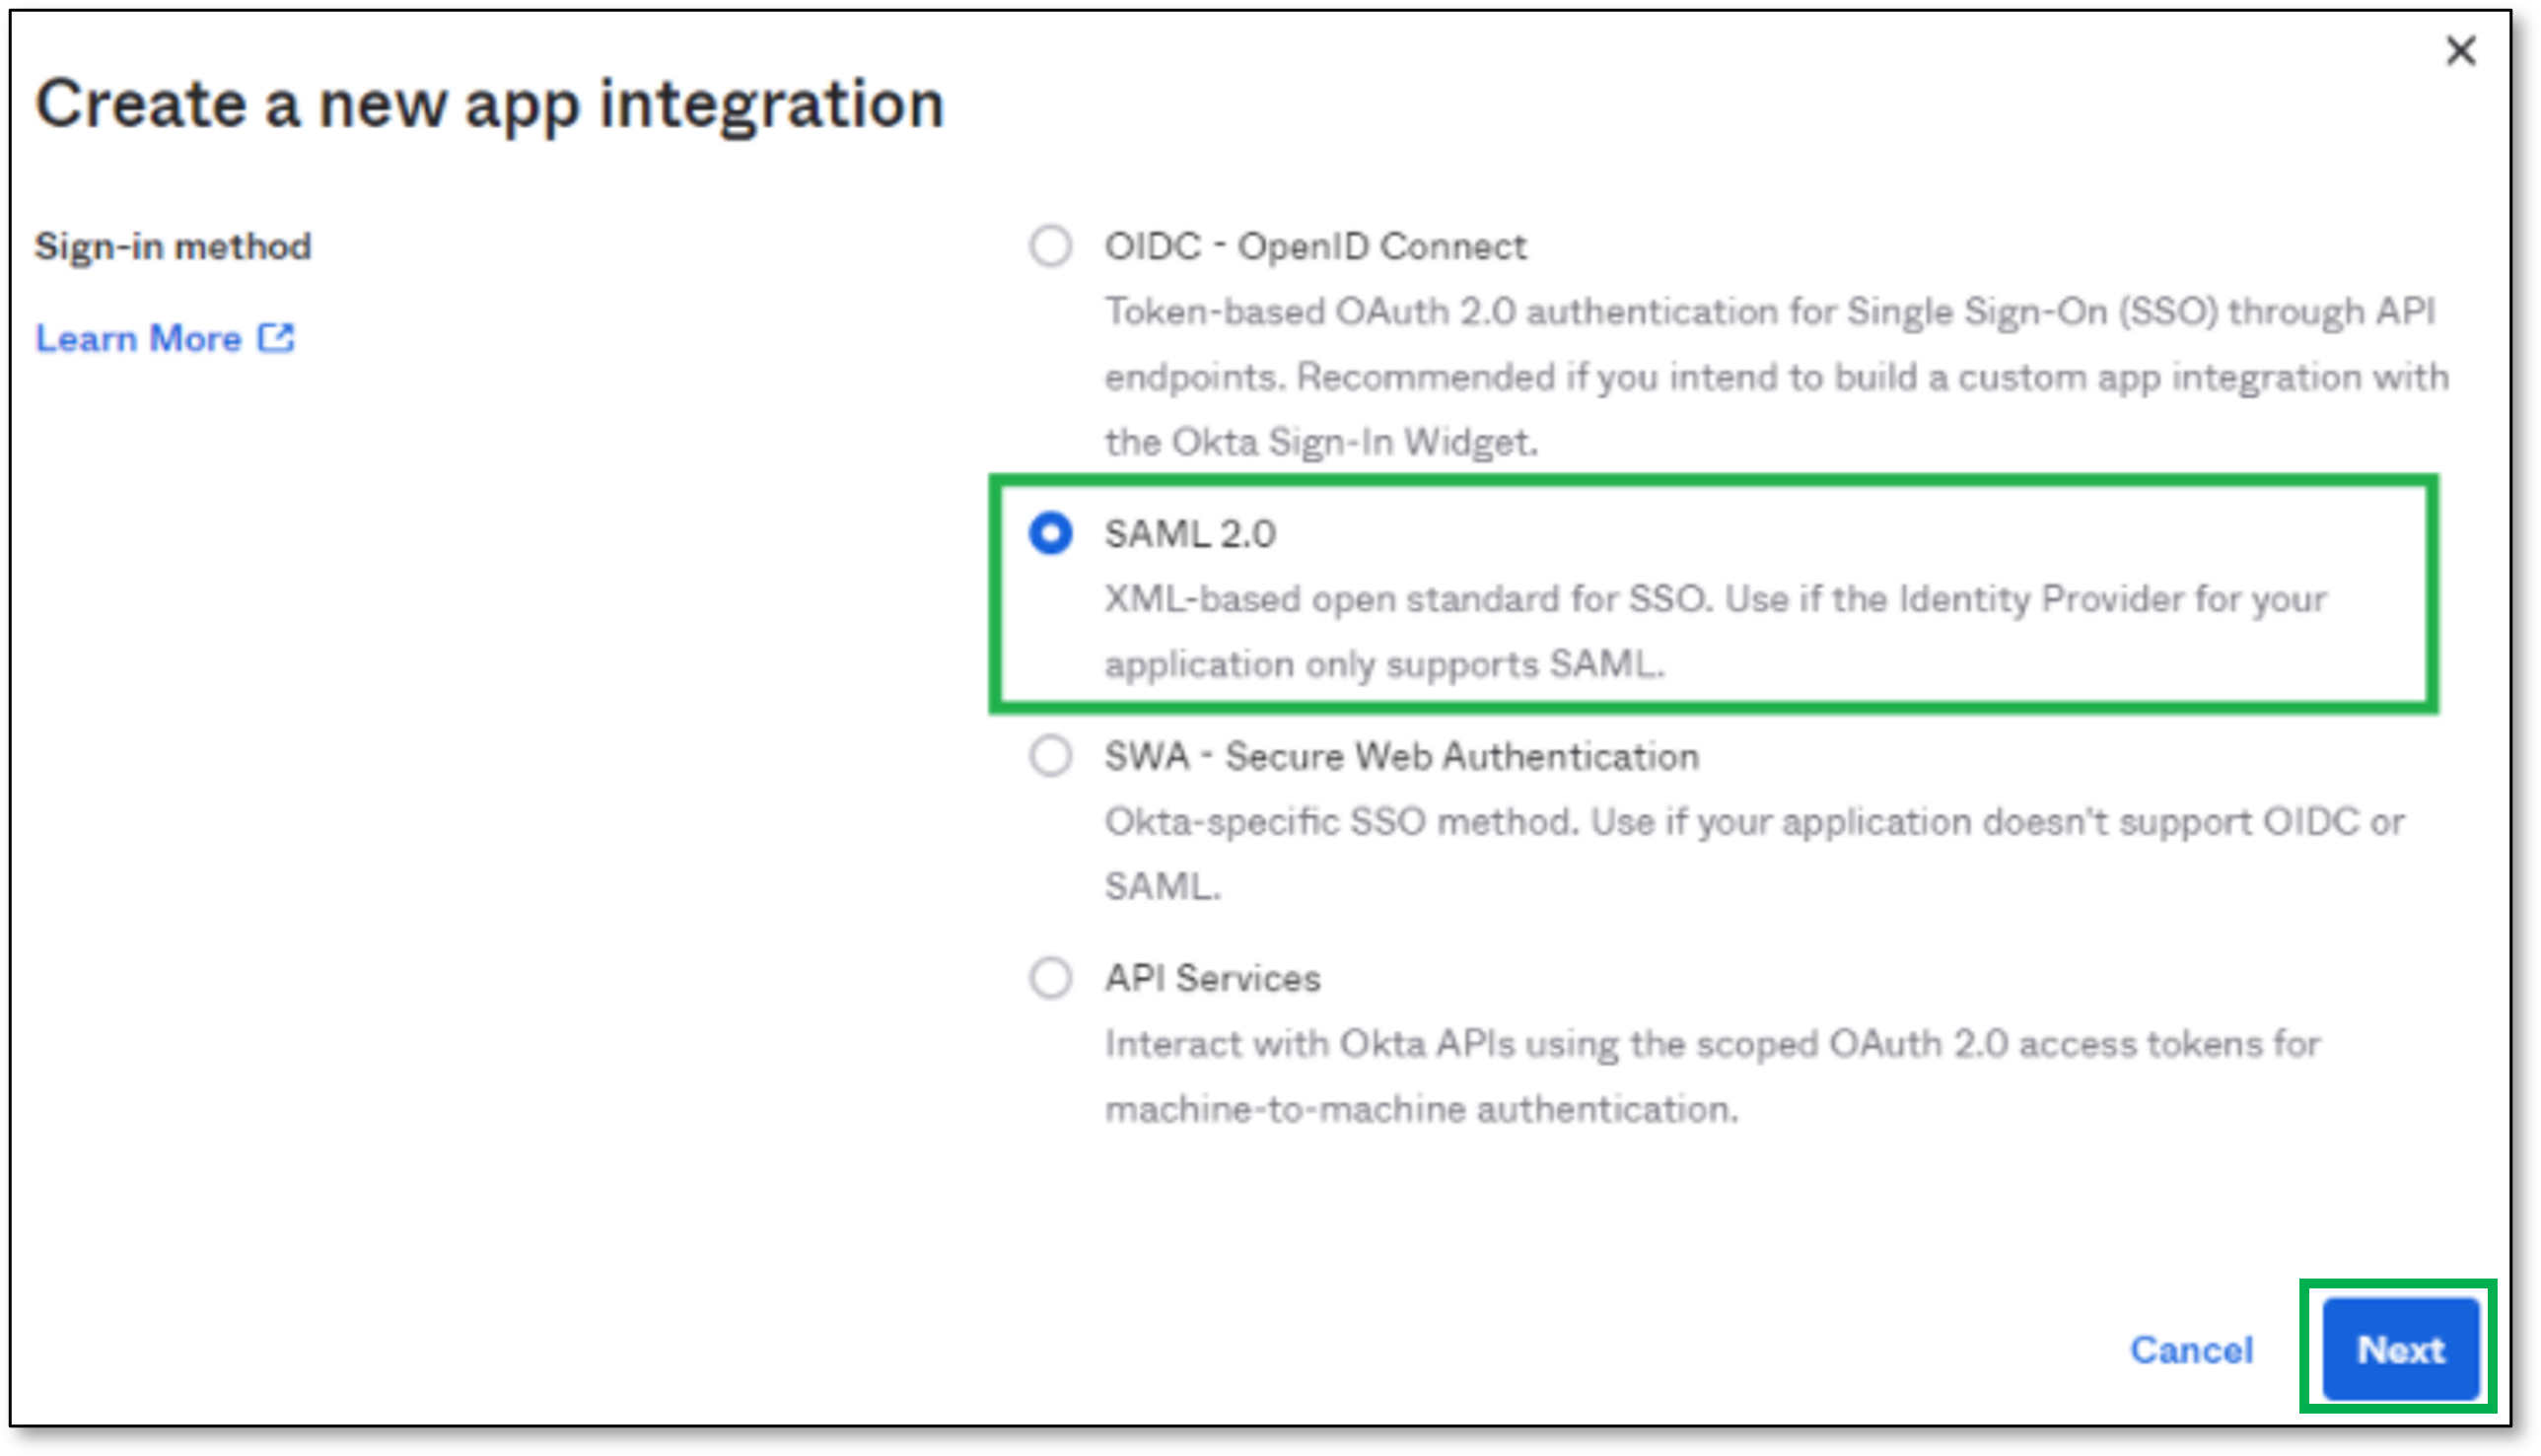
The Create a New Application Integration popup opens.
In the Create a New Application Integration, perform the following:
Select SAML 2.0
Click Next
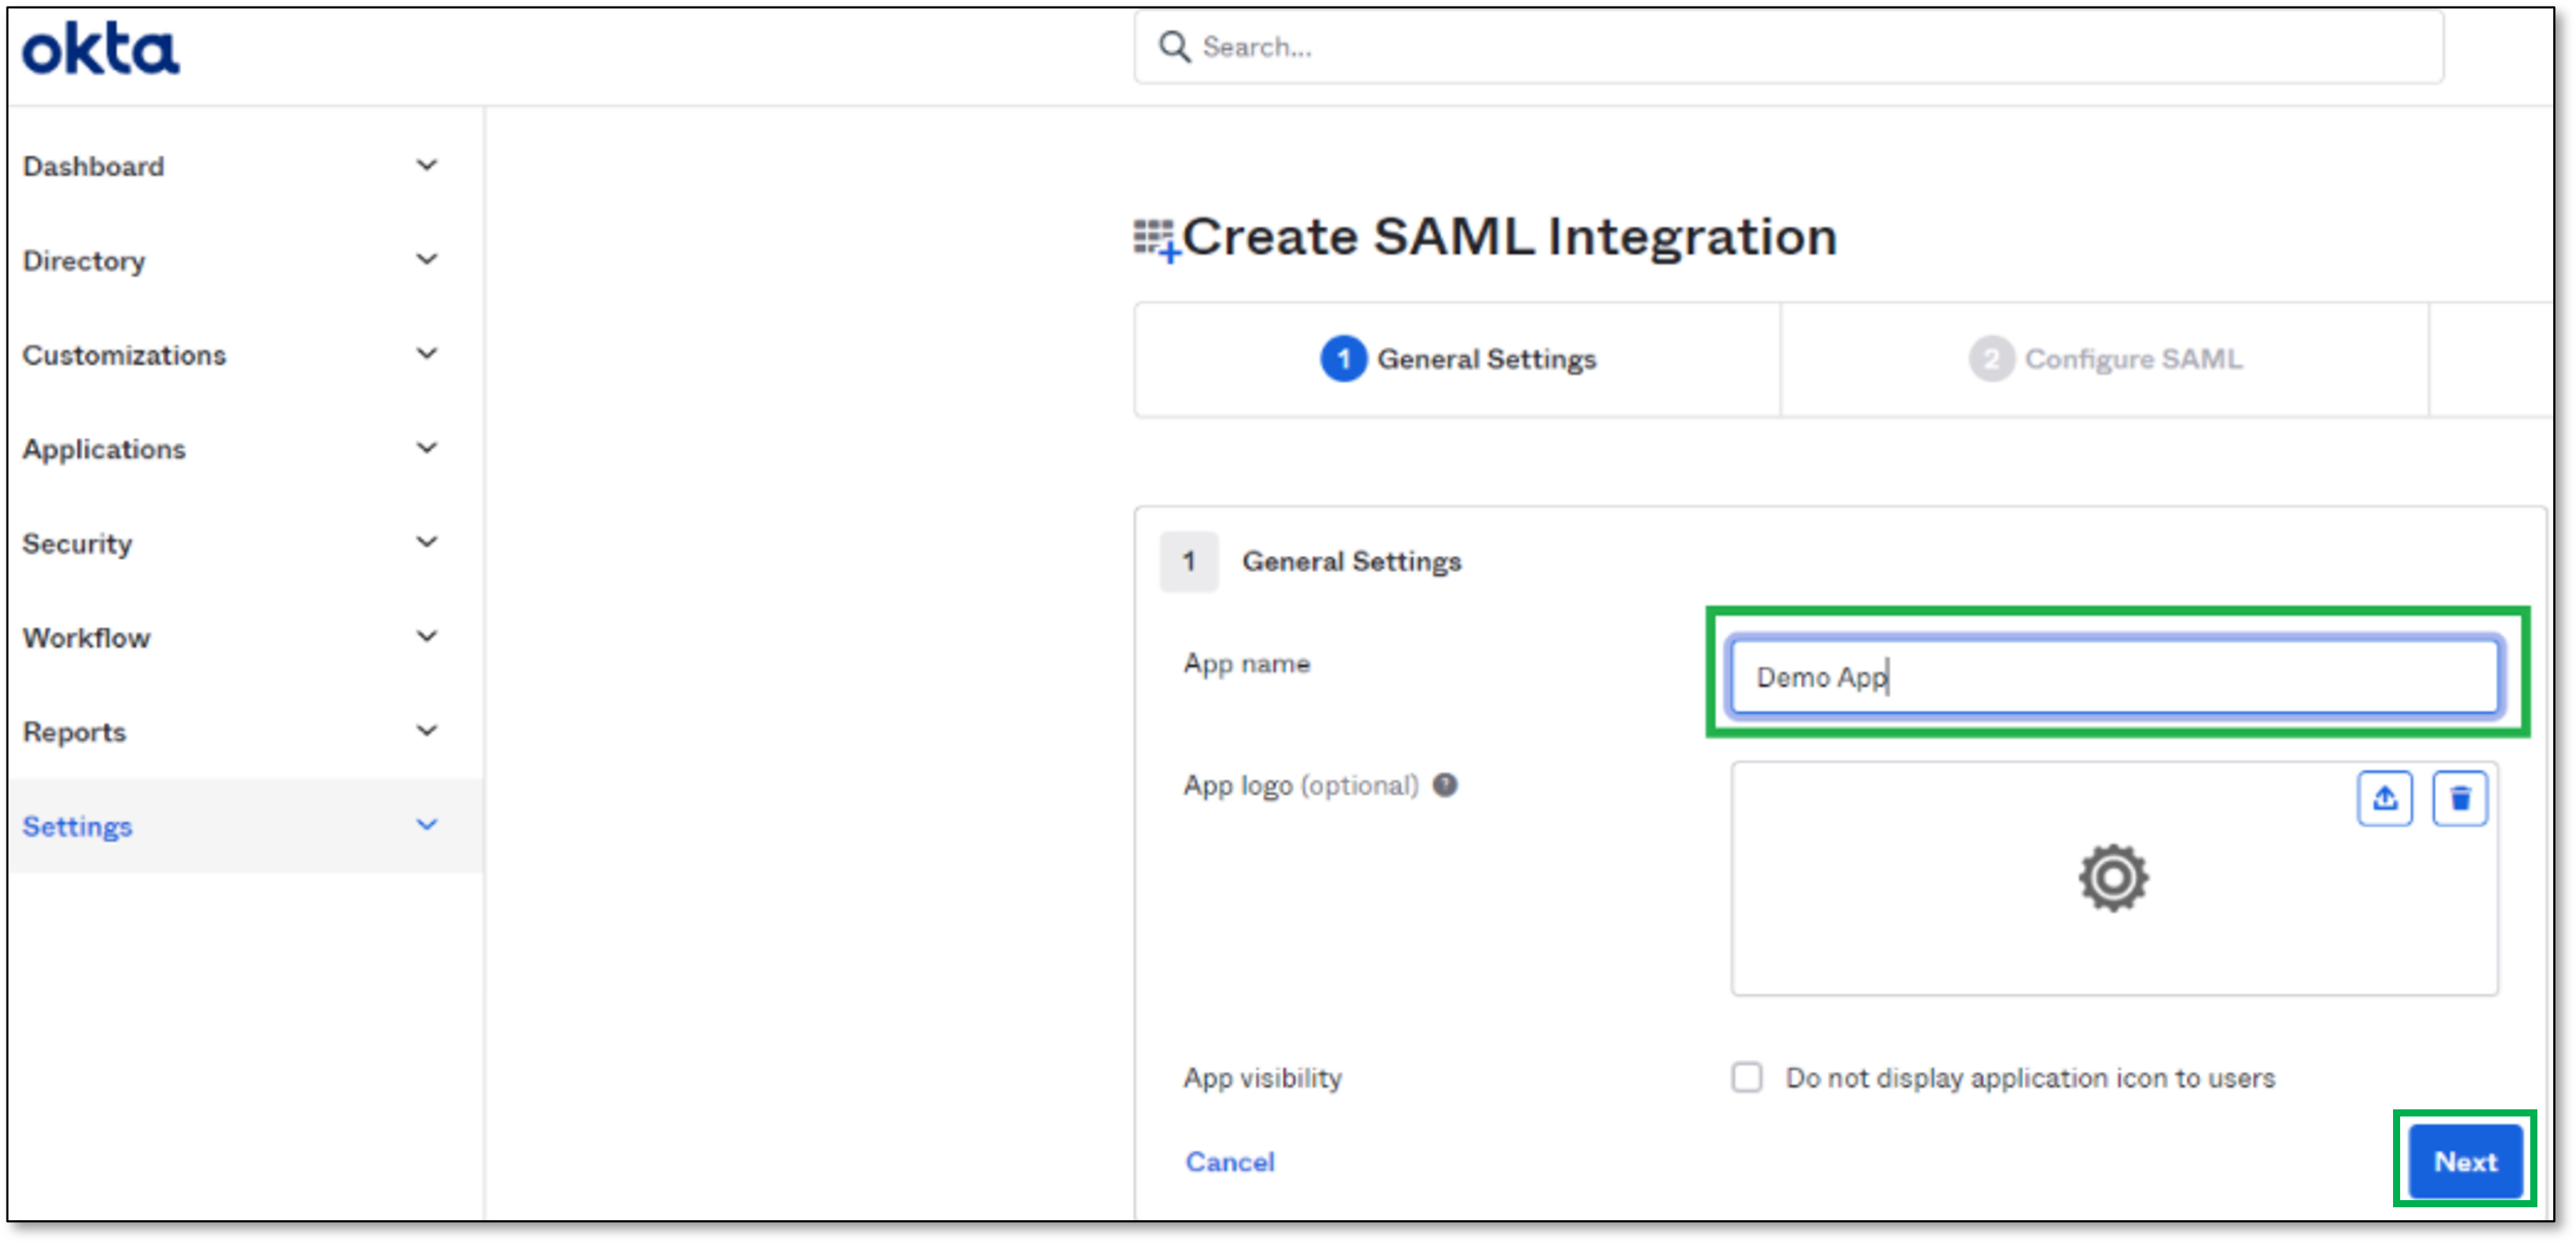
In the Create SAML Integration page, perform the following:
Configure the App name
Click next
In the Single sign on URL field, paste the Redirect URI (copied in first step).
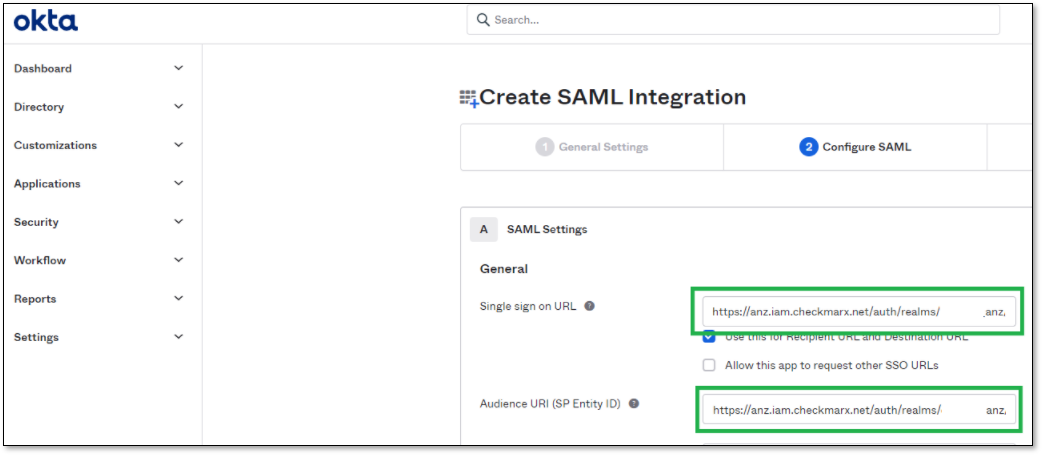
In the Audience URI (SP Entity ID) field, paste the Entity ID using the following procedure:
In Checkmarx One, in the Add identity provider page in the Endpoints field, click on the Metadata link.
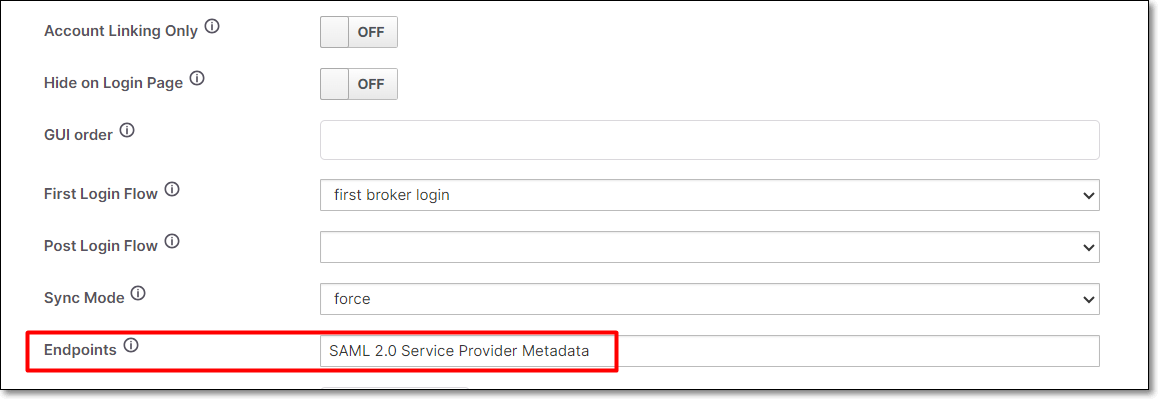
The Service Provider Metadata will be opened in an XML file in a new tab.
From the XML file copy the Entity ID.
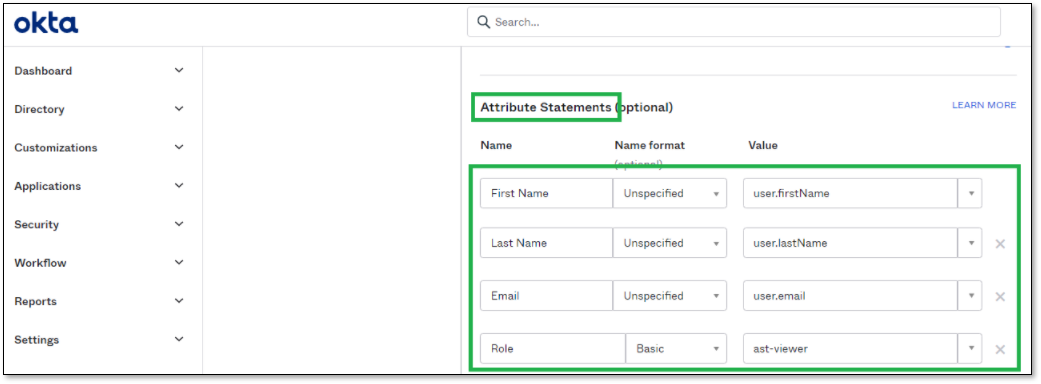
Go to Attribute Statements section configure the base mapper fields:
First Name
Last Name
Email
Role
Note
Make sure to set value with “user.” prefix for First Name, Last Name and Email.
For Role, set the ast-viewer value.
Add Groups Attribute Statement (Optional):
Under the Group Attribute Statements, create a new statement named “Groups”.
Select the filter option that best describes your use-case.
Note
Configuring “.*” will import all the groups.

After setting Attribute and Group Statements, scroll down to the bottom and click Next
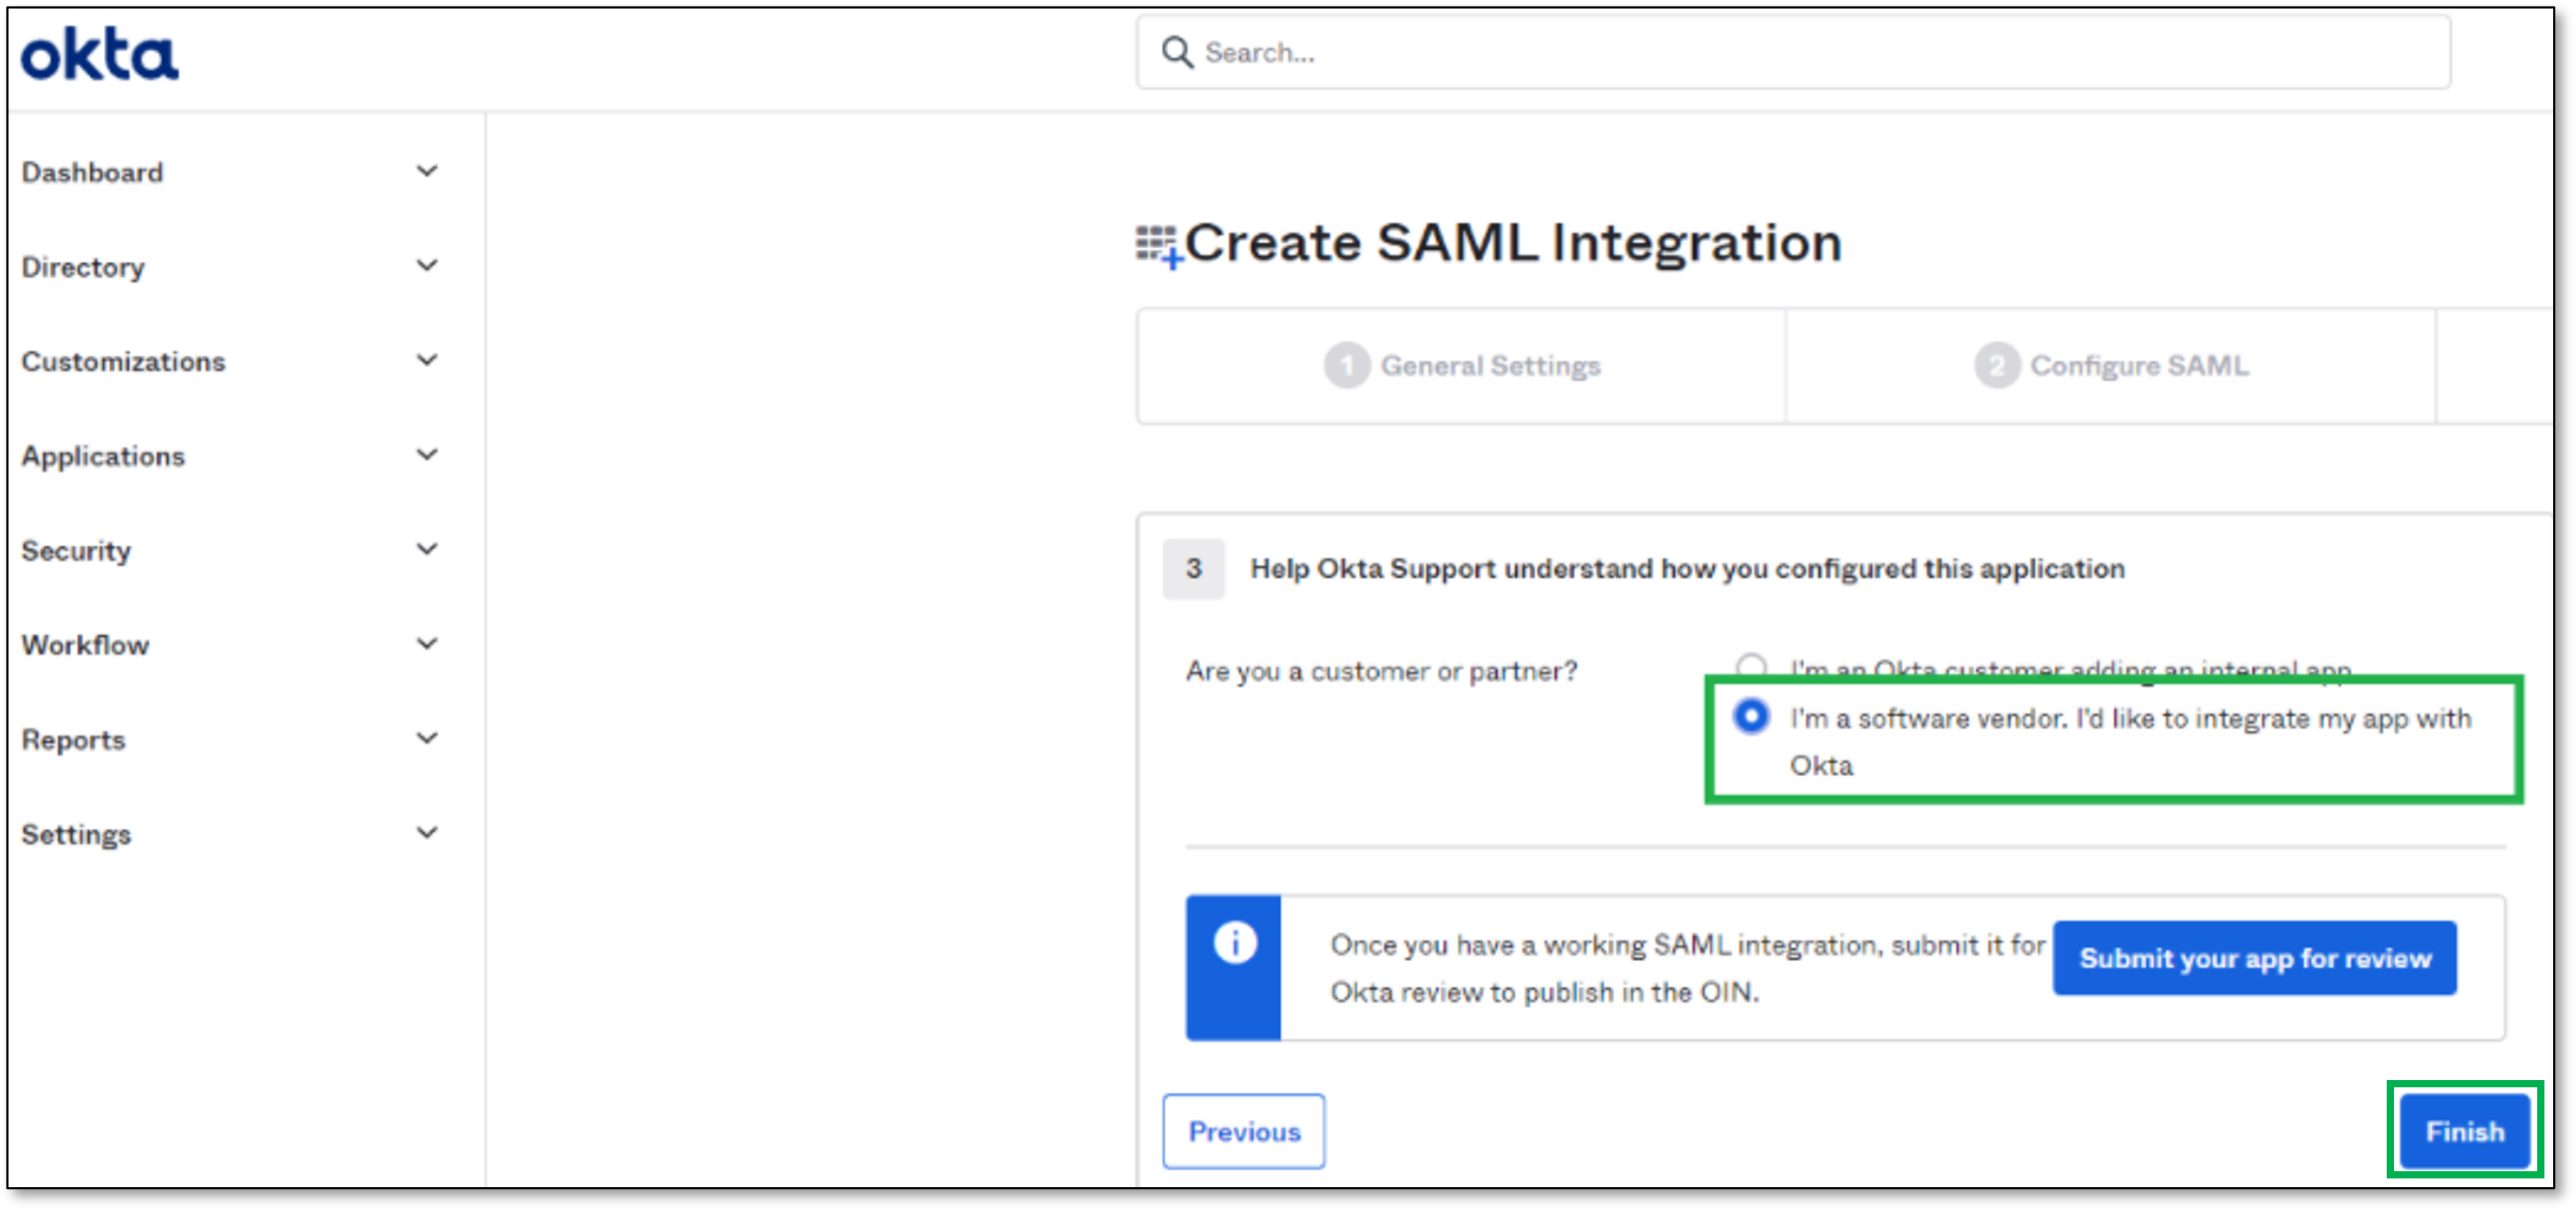
Select if you are a customer or partner and click Finish
In the Sign On tab, click on Identity Provider metadata link.
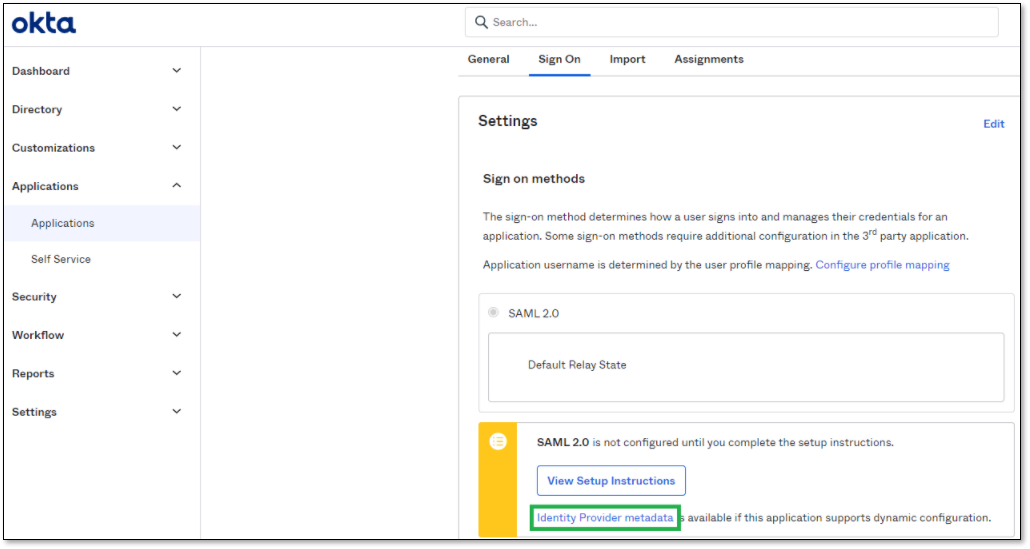
This will open a new tab with the App Federation Metadata URL, copy the URL

Finish Creating Identity Providers via Checkmarx One
In Checkmarx One, use the copied link to import the metadata, by performing the following:
Copy the URL to Import from URL field.
Click Import
Click Save
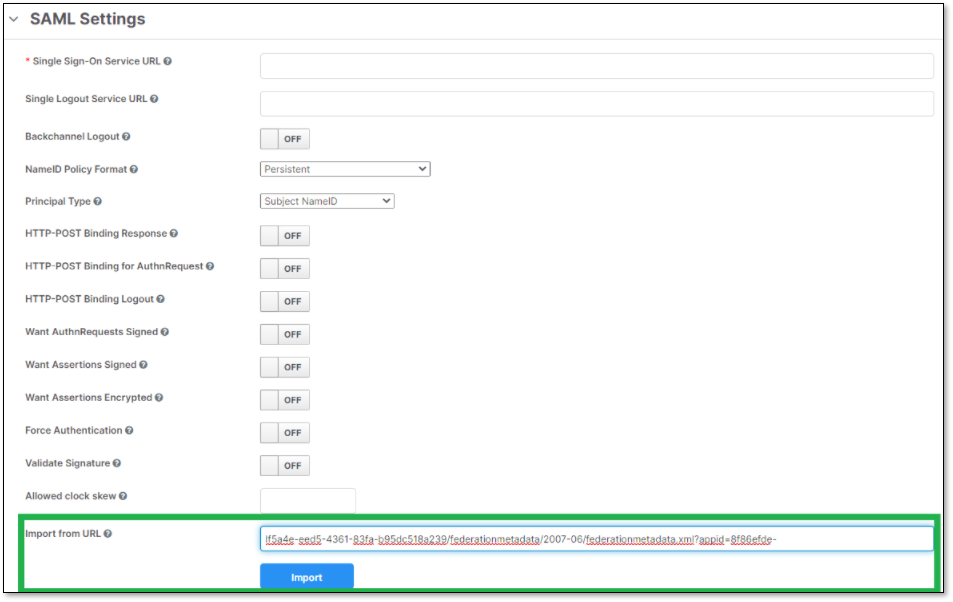
Check the Checkmarx One SAML configuration.
This is how SAML settings should look:
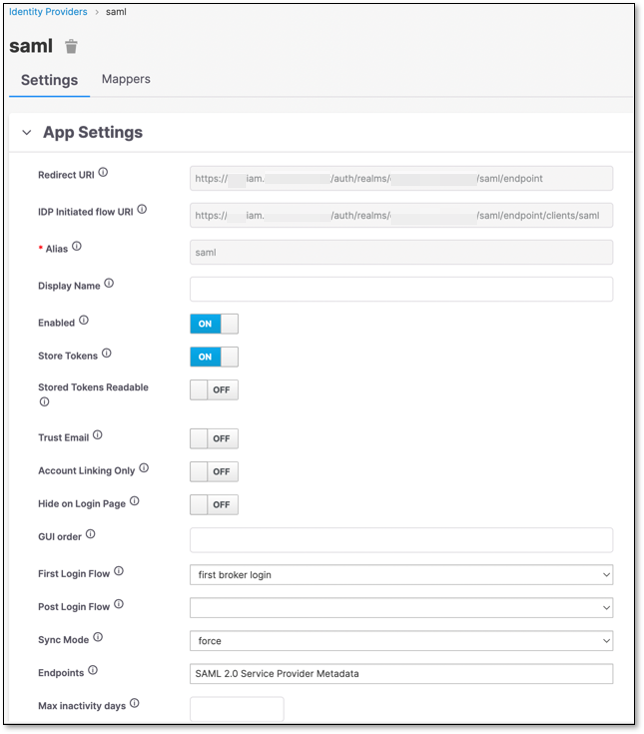
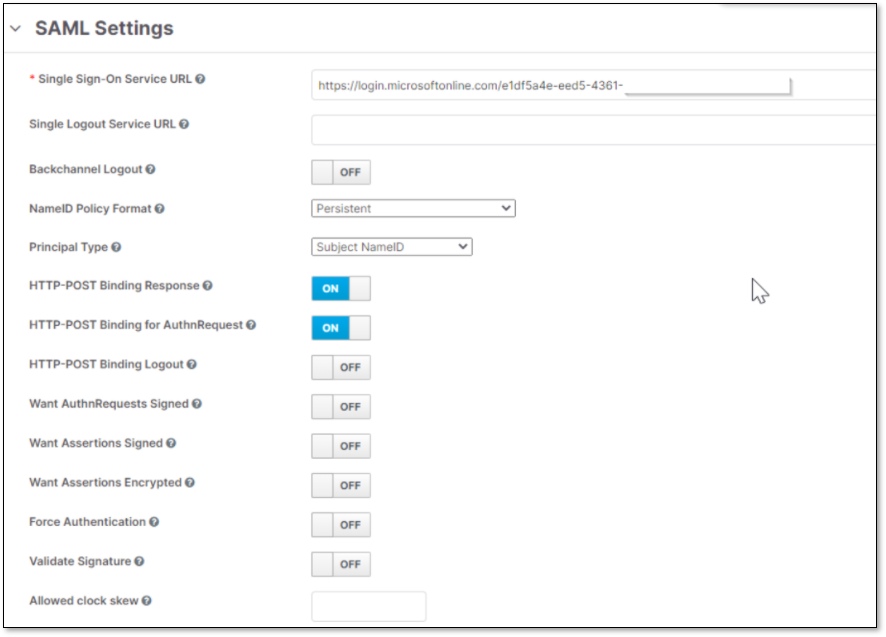
Click on Mappers tab and click Create
Create a First Name Mapper.
Create a Last Name Mapper.
Create an Email Mapper.
Create a Role Mapper.
Create the GroupsMapper (Optional) - If you added the attribute statement in the OKTA configuration.
Warning
For this example, the Role claim configured on OKTA is a constant “ast-viewer”.
This will map all users to assume the ast-viewer role.
OKTA can send other values on this claim.
You will need to add a mapper for each value, to convert the OKTA claim value into a Checkmarx One role.
Explore other Mapper Types for other ways to map roles.
Identity Provider Initiated Flow
Azure Identity Provider Initiated Flow
Preconditions
Login into Keycloak and into Azure, set up providers according to Configuring a SAML Provider with Azure Active Directory (AD)
Set up Identity Provider in Keycloak and Azure
Fill out Identifier (Entity ID) field in Azure.
In Keycloak side, in Service provider settings copy the part of field Redirect URI
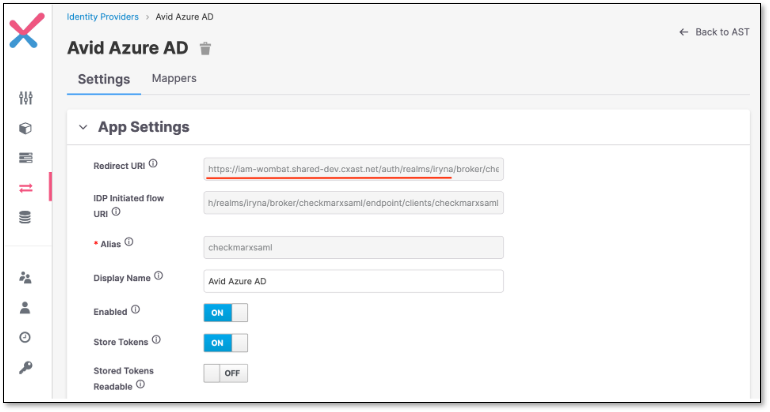
In Azure, in Identifier (Entity ID) field, pass the part of copied URL (without the ending part “/broker/checkmarxsaml/endpoint“)
https://{KEYCLOAK_URL}/auth/realms/{REALM}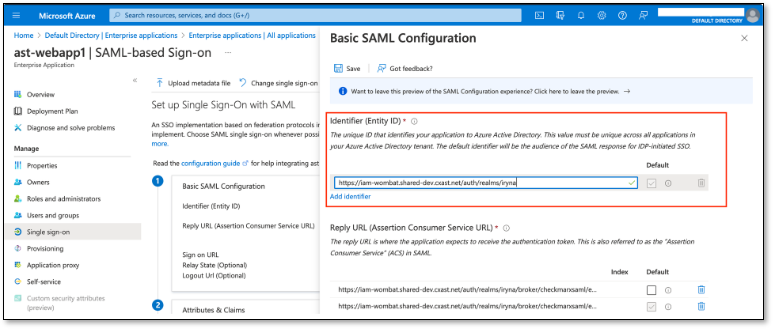
Fill in the Reply URL field in azure
In Keycloak side, in Service provider settings copy the content of Redirect URI and IDP Initiated flow URI fields
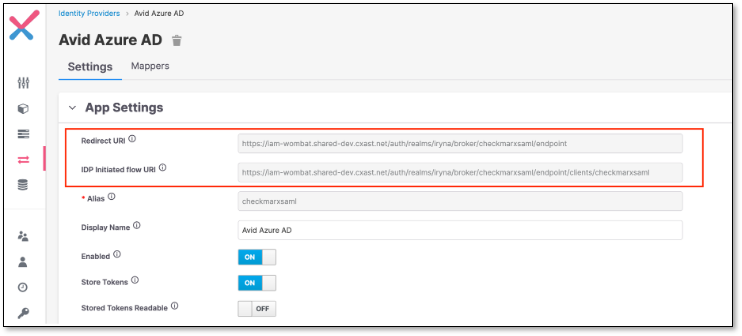
In Azure, in Reply URL (Assertion Consumer Service URL) field, add both fields from the previous step
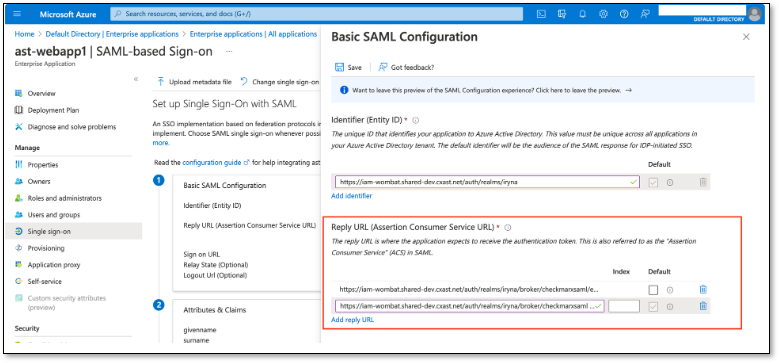
Click Save
Set up Fields Mapping
In Azure
SAML-based Sign-on → Attributes & Claims → Edit
In the table select Required claim → Claim name → Unique User Identifier (Name ID) and click Unique User Identifier (Name ID)
In the opened Manage claim screen find and click Choose name identifier format → Name identifier format
In the dropdown select Email or Persist and Save
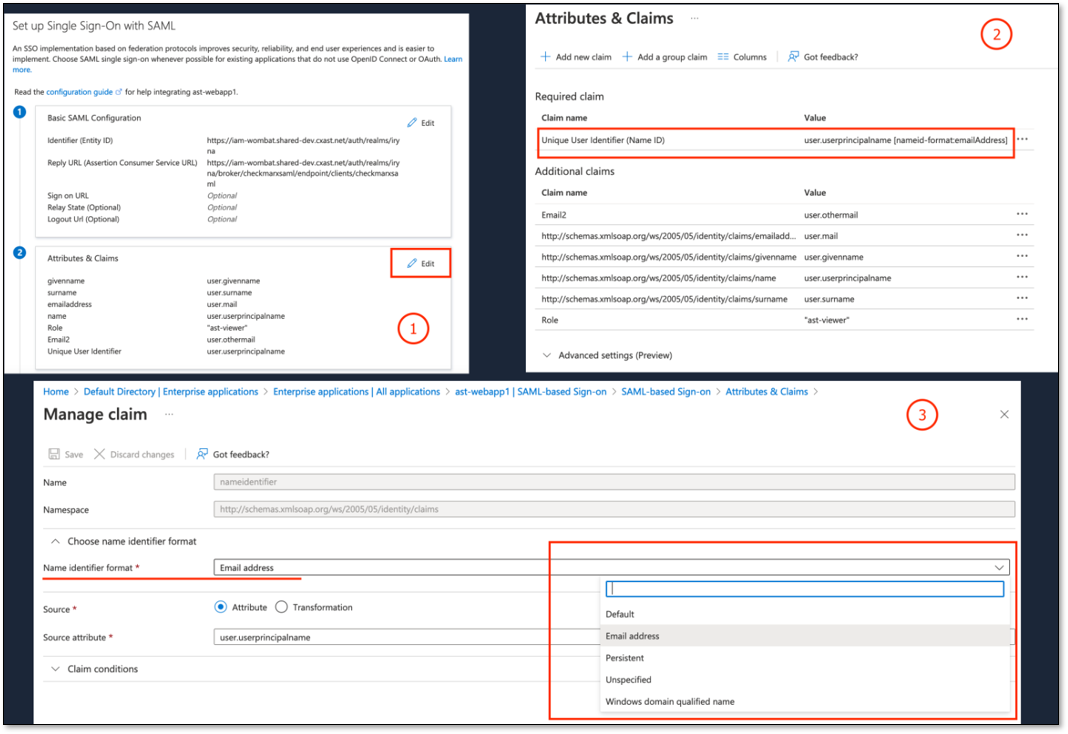
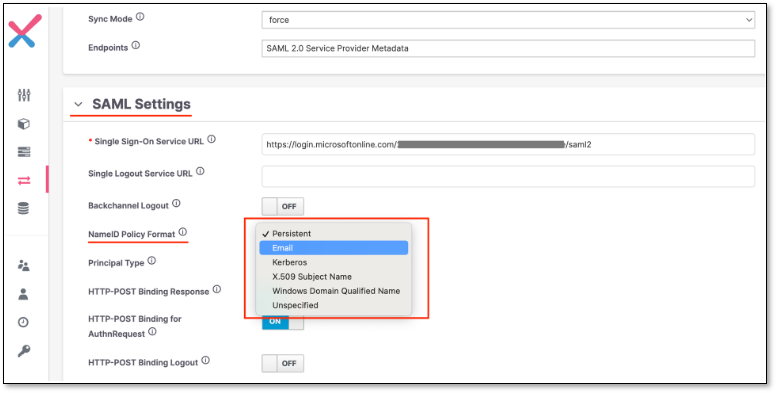
In Keycloak provider settings, find SAML Settings-> NameID Policy Format section
In the dropdown, select the same value as it was selected in azure in previous step (Email or Persist)
Login using Azure Identity Provider Initiated Flow
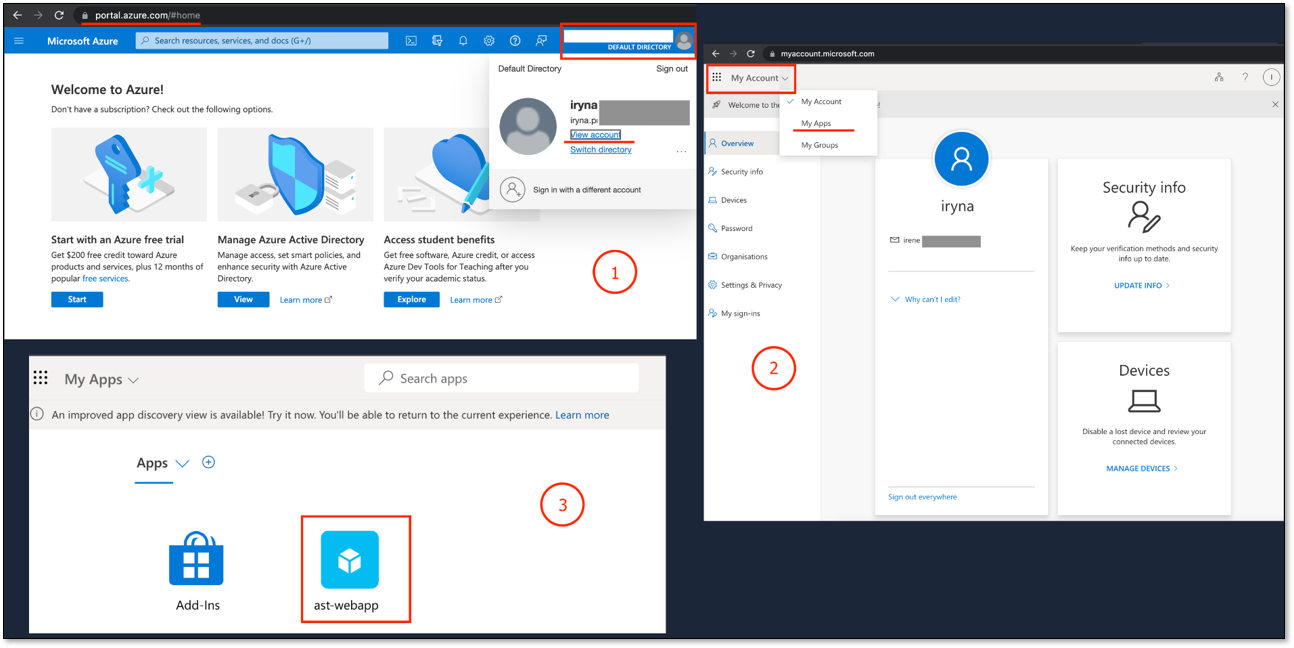
In azure, create a new user
Login into Microsoft Azure as the created user
View Account → My Apps → select the app
OKTA Identity Provider Initiated Flow
Preconditions
Login into Keycloak and into OKTA, set up providers according to Configuring a SAML Provider with OKTA
Set up Identity Provider in Keycloak and OKTA
Fill out Audience URI (SP Entity ID) field in OKTA
In Keycloak side, in Service provider settings copy the part of the IDP Initiated Flow URI field
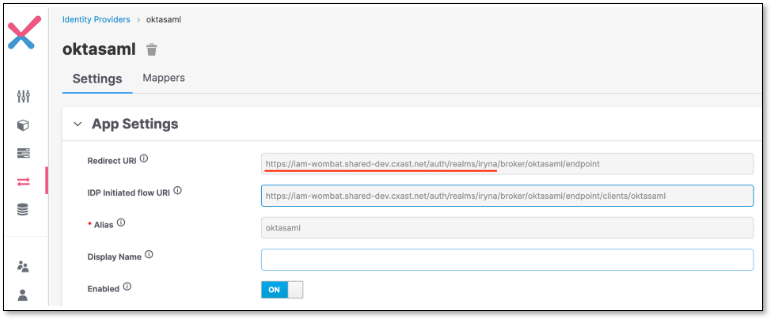
In OKTA > Audience URI (SP Entity ID) field, pass the part of copied URL (without the ending part “/broker/oktasaml/endpoint“)
https://{KEYCLOAK_URL}/auth/realms/{REALM}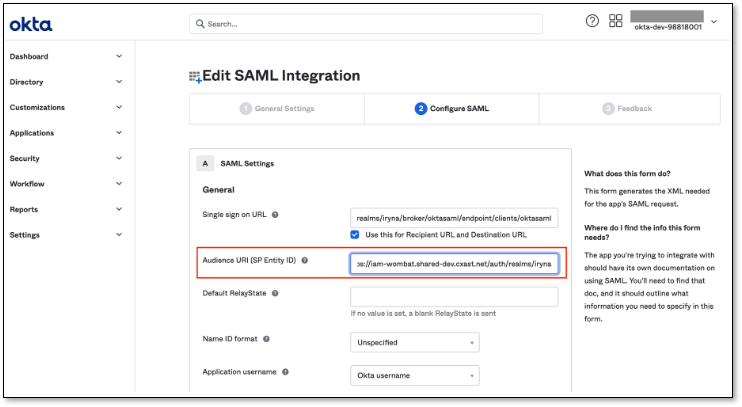
Fill in Single sign on URL field in OKTA
In Keycloak side, in Service provider settings copy the content of IDP Initiated flow URI field
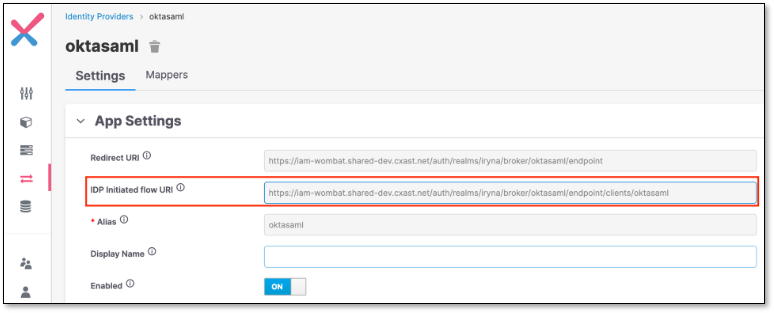
In OKTA > Single sign on URL field, pass the copied URL from the previous step
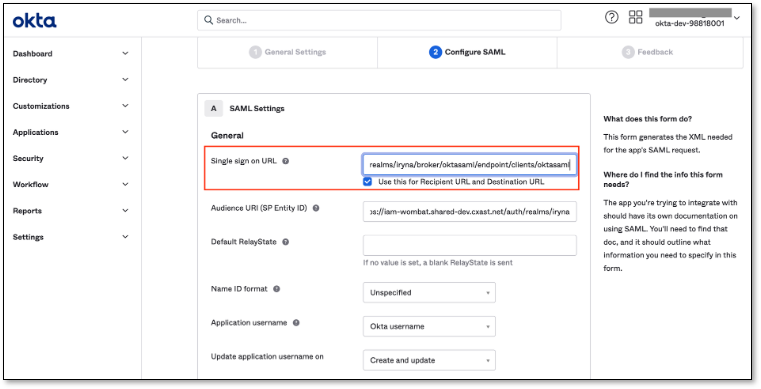
Click Save
Login using OKTA Identity Provider Initiated Flow
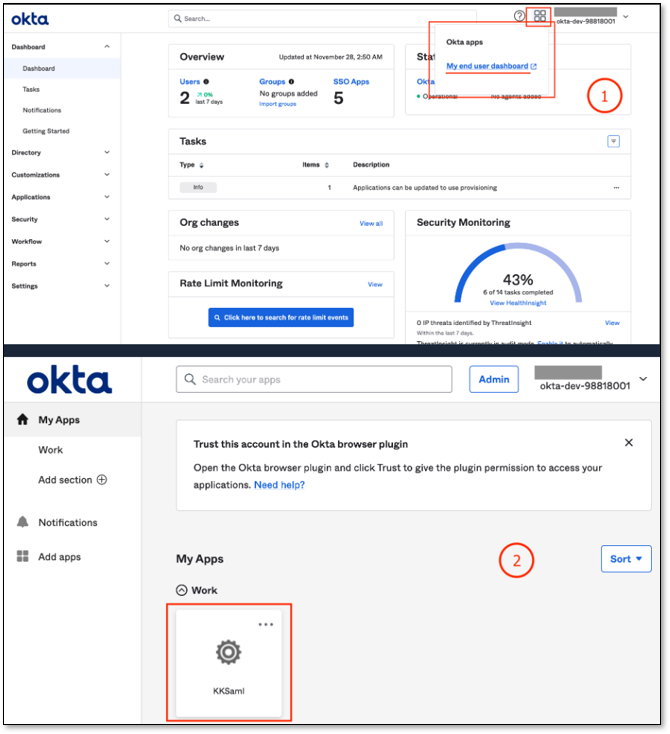
Login into OKTA
OKTA apps → My end user dashboards
Select app
