Configuring CxSAST Settings
Notice
Configuring CxSAST settings for JIRA integration requires CxManager permissions. Please contact Checkmarx support for further assistance.
Before you start configuring the settings on the SAST side and link to the desired Jira server make sure that you configure the Description and Priority fields since Checkmarx requires these fields from the Jira API.
To Configuring CxSAST settings for JIRA integration:
On the CxSAST server, open the following file for editing.
C:\Program Files\Checkmarx\CheckmarxWebPortal\Web\web.config
Notice
In a distributed deployment, this file resides on the CxManager host
Under the 'appSettings' element, add the following parameter key:
<add key="EnableIssueTracking" value="true"></add>
Log in to the CxSAST Web Portal. Log out first, if currently logged in.
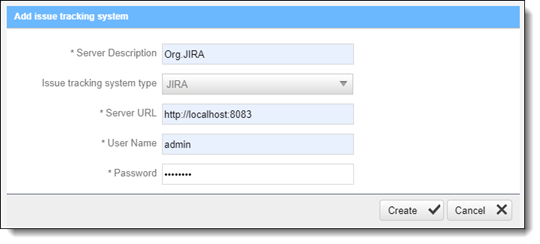
Go to Settings > Application Settings > Issue Tracking Settings, and click Add Issue Tracking System.
Enter the following:
The top-level URL of your JIRA Server including the protocol (http or https)
The port number
A JIRA user account with permissions for creating issues and for reading issue metadata
Click <Create> to complete.

Go to Project & Scans and click Create New Project.
In the Advanced Actions stage, under Issue Tracking Settings, select the JIRA Server.
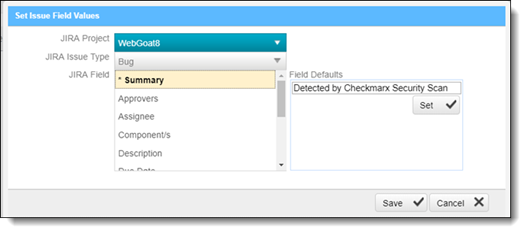
Click Select, and configure JIRA issue submissions.

Set the JIRA Project (created in the previous step) and set Issue Type to Bug.
Configure default values for issue fields. Select each JIRA Field, select a Field Default and then click <Set>. Make sure to configure values for all mandatory fields (marked with *).
Notice
If the user name entered in the previous step is an email address, an actual user name should be entered in the Reporter field for the ticket submission.
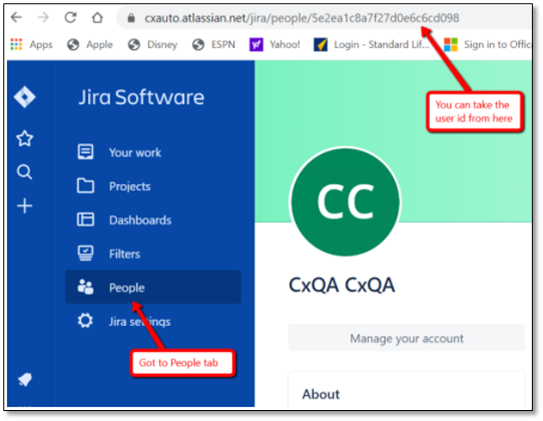
If you use Jira Cloud, you have to enter the user GUID instead of your email and username. For instructions on obtaining the user GUID and updating your Checkmarx project with this user ID, refer to the instructions at the bottom of this page.
Click <Save >to save the settings.
Click <Finish> to complete creating the CxSAST project.
Proceed to the most recent scan results in the Results Viewer for the CxSAST project to check the CxSAST/JIRA Integration usage. For further information, refer to Using the CxSAST / JIRA Integration.
