Checkmarx One Developer Assist
Overview
Checkmarx One Developer Assist empowers developers to identify risks in their code in realtime and harness the power of AI to remediate the risks on the spot. This feature is initially being released as part of the Checkmarx One plugin for VS Code, Cursor and Windsurf IDEs.
CxOne Assist comprises two main elements:
Realtime Scanning - Identify vulnerabilities in realtime during IDE development of both human-generated and AI-generated code. Our super-fast scanners run in the background whenever you edit a relevant file. Our scanners identify vulnerabilities and unmasked secrets in your code. We also identify vulnerable or malicious container images and open source packages used in your project. Results are marked as Problems which are highlighted in the code and annotated with identifying icons.
Agentic-AI Remediation – Initiate an Agentic-AI session to receive remediation suggestions. Checkmarx feeds all relevant info to the AI agent which accesses our MCP server to gather data from our proprietary databases and customized AI models. The AI assistant then uses this data to generate remediated code for your project. You can accept the suggested changes or you can chat with the AI agent to learn more about the vulnerability and fine-tune the remediation suggestion.
Notice
For risks identified by the OSS, Containers and Secret Detection realtime scanners, remediation info is drawn from the Checkmarx MCP server. However, for ASCA and IaC, we currently rely on the IDEs' built-in AI models (Copilot, Cursor or Windsurf).
In order to help you to focus on actionable risks, CxOne Assist enables marking risks as Ignore, so that the risks will no longer be shown in your IDE. You can Revive a risk at any time to resume showing that risk.
Supported Features Table
Feature | Supported IDEs | Scanners |
|---|---|---|
Realtime scanners |
|
|
Ignore Risks |
| same as above |
Agentic AI Remediation - limited access |
| same as above |
Agentic AI Remediation - full access |
| same as above |
Realtime Scanning
The following sections describe the various realtime scanners that are included in CxOne Assist.
Warning
Realtime scans provide important feedback to developers in realtime. However, realtime results aren't as comprehensive as those provided by actual Checkmarx One scans. Therefore, it is important to also run complete Checkmarx One scans periodically.
Checkmarx AI Secure Coding Assistant (ASCA) Realtime Scanner
The ASCA scanner enables developers to identify secure coding best practice violations in the file that they are working on as they code. The ASCA scanner is a lightweight scan engine that runs in the background as you work in VS Code. Whenever you edit a file in VS Code the ASCA scanner automatically scans that file. The ASCA scan runs on your local machine as a running process and returns results within milliseconds.
Notice
Editing a file triggers new detection after 1 second of inactivity.
Supported Languages
ASCA currently supports Java, JavaScript (Node.js), C#, and Python.
IaC Realtime Scanner
The IaC Realtime scanner (based on the KICS opens source project powered by Checkmarx) examines configuration definitions and scripts used to instantiate infrastructure to ensure the resulting resources are secure.
A scan runs automatically whenever you edit an infrastructure file of a supported type.
Notice
Editing a file triggers new detection after 1 second of inactivity.
Prerequisites
You must have a supported container engine (e.g., Docker, Podman etc.) installed and running in your environment.
Open Source Realtime Scanner (OSS-Realtime)
Checkmarx’s OSS-Realtime scanner is a lightweight version of our SCA scanner that analyzes your manifest files and quickly identifies risks associated with your open source dependencies. This includes vulnerable packages as well as packages that we have identified as malicious.
Scans are triggered when the developer opens a project in the IDE that includes a manifest file (e.g., package.json, requirements.txt). In addition, whenever the developer adds, moves or edits a manifest file within the IDE the project is re-scanned.
Notice
Editing a file triggers new detection after 1 second of inactivity.
Supported Manifest Files
In the initial phase, the plugin supports the following popular manifest files:
Dotnet:
csproj,directory.packages.props,packages.configMaven:
pom.xmlnpm:
package.jsonPyPi:
requirements.txtGo:
go.mod
Containers Realtime Scanner
Checkmarx’s Containers Realtime scanner is a lightweight version of our Container Security scanner that analyzes your container images and quickly identifies risks associated with your images and associated packages. This includes images that use vulnerable packages or packages that we have identified as malicious.
Scans are triggered when the developer edits a project in the IDE that includes a container image file (e.g., Dockerfile). In addition, whenever the developer adds, moves or edits an image file within the IDE the project is re-scanned.
Notice
Editing a file triggers new detection after 1 second of inactivity.
Supported File Types
In the initial phase, the plugin supports the following popular image files:
Dockerfile
DockerCompose
Helm chart (limited support)
Checkmarx Secret Detection Realtime Scanner
Checkmarx Secret Detection reduces risk by quickly identifying sensitive credentials that are exposed in your code, enabling your development and security teams to remove and change the discovered secrets. Checkmarx identifies more than 170 different types of login credentials, access tokens, encryption keys, API keys, SSH keys, webhook URLs, and other unsecured sensitive information.
Whenever you edit a file in the IDE, Secret Detection is run on that file.
Notice
Editing a file triggers new detection after 1 second of inactivity.
Secret Detection Rules
The following table shows the list of rules that are used to detect various types of secrets.
Cx Assist Agentic-AI Remediation
When the user initiates a remediation action for a risk, a session is opened with the IDE’s AI assistant (GitHub Copilot for VS Code or the local AI in Cursor). Checkmarx gathers all relevant data about the risk and submits it to the AI assistant. For supported risk types, the AI assistant sends a request to our MCP which applies the relevant tools and returns a response with suggested remediation steps. The AI assistant implements the changes and offers the user the option to accept the changes or continue a chat session to refine the remediation.
Remediating Vulnerable or Malicious Images and Packages
Remediation for OSS and Container risks is done by identifying the best non-vulnerable package that provides the same functionality as the vulnerable package. When our proprietary databases indicate that a remediated version of the current package is available, the remediated version that is closest to the current version is used. When no remediated version is available, our MCP server uses a dedicated AI tool to identify alternative packages that provide equivalent functionality.
Notice
Our MCP tool for identifying non-vulnerable versions is supported both for OSS and Containers. However, the MCP tool for finding alternative packages is not supported for containers.
When CxOne Assist recommends updating a package version, our Safe Refactor feature searches your entire project for additional usage of that package and determines where and how the code needs to be refactored to accommodate the package update.
Remediation Logic
The following tables describe the logic of the remediation response for various cases.
Remediating Exposed Secrets
Remediation is done by removing the hard coded secret from the code and replacing it with an Environment Variable that can be used to store the secret in a secure manner.
Remediating ASCA and IaC Vulnerabilities
For vulnerabilities in your code that were identified by the ASCA or IaC Realtime scanners, remediation is done by sending a customized prompt including all relevant data about the vulnerability instance to your IDEs AI assistant (Copilot or Cursor). The AI assistant then provides a remediated snippet that can be used in your code.
Notice
These realtime scanners do not currently make use of the Checkmarx MCP server.
Initial Setup and Configuration
Prerequisites
A Checkmarx One account with AI Protection license
You have access to Checkmarx One via:
an API Key (see Generating an API Key), OR
login credentials (Base URL, Tenant name, Username and Password)
The Checkmarx MCP must be activated for your tenant account. This is done in the Checkmarx One web application (UI) on the Settings > Plugins page. This must be done by an account admin.
VS Code users must have GitHub Copilot installed
Installing and Configuring the Plugin
Notice
If there is a problem with the automatic installation, check the troubleshooting section below.
Install the Checkmarx extension in your VS Code or Cursor IDE, as described in the following articles:
Log in to the Checkmarx plugin and set it up for use, as described in the following articles:
Go to the Checkmarx One settings and select CxOne Assist settings.
Make sure that the desired CxOne Assist checkboxes are selected.
If MCP is activated on the tenant level, then these should be selected by default. You can deselect any scanners that you don't want to run.
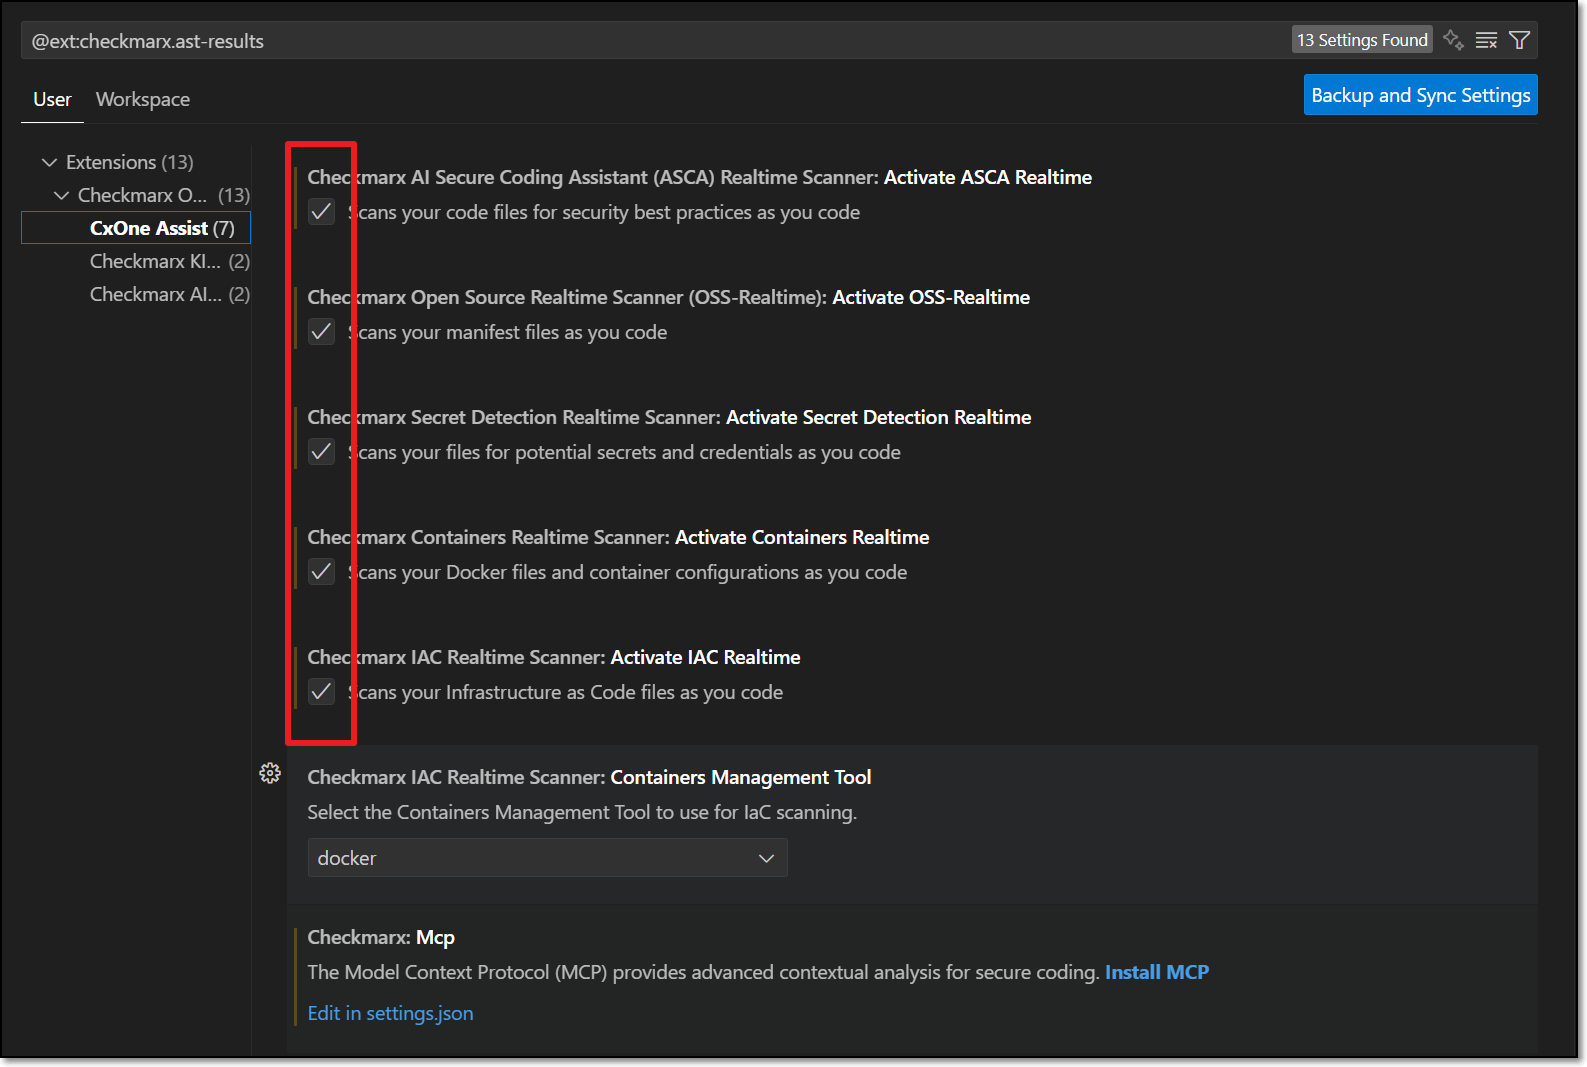
For the IaC Realtime scanner, select the Containers Management Tool used in your environment. Options are docker or podman.
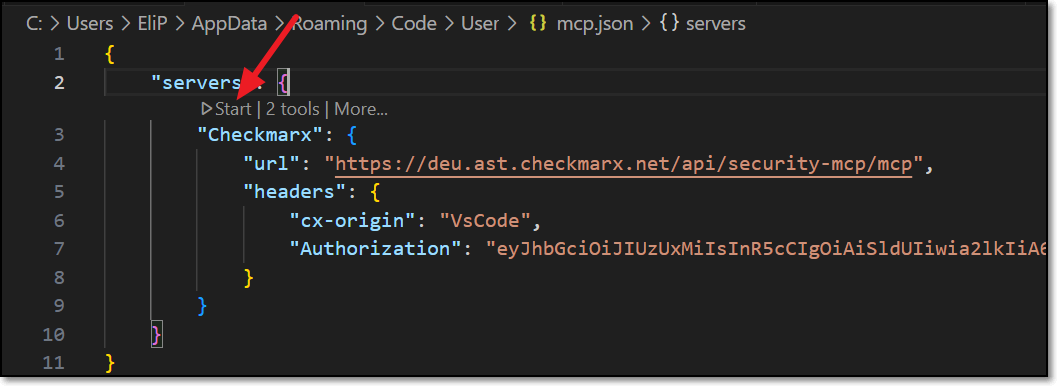
Click on Install MCP.
The Checkmarx MCP is added to your mcp.json file.
If the process doesn't start automatically, you may need to open the file and click Start.
AI Remediation
How to Remediate Risks Using AI
When Checkmarx realtime scanners identify a risk, it is flagged as a Problem, which is marked in the code with a squiggly underline and annotated in the margin with an icon that indicates the type of risk.
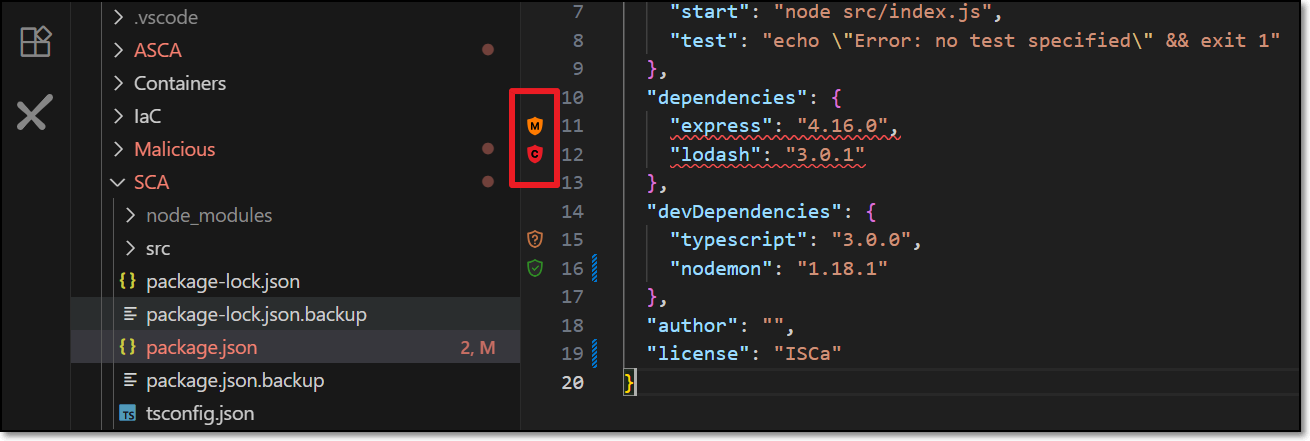
Hover over the vulnerable line of code.
The Checkmarx dialog opens.
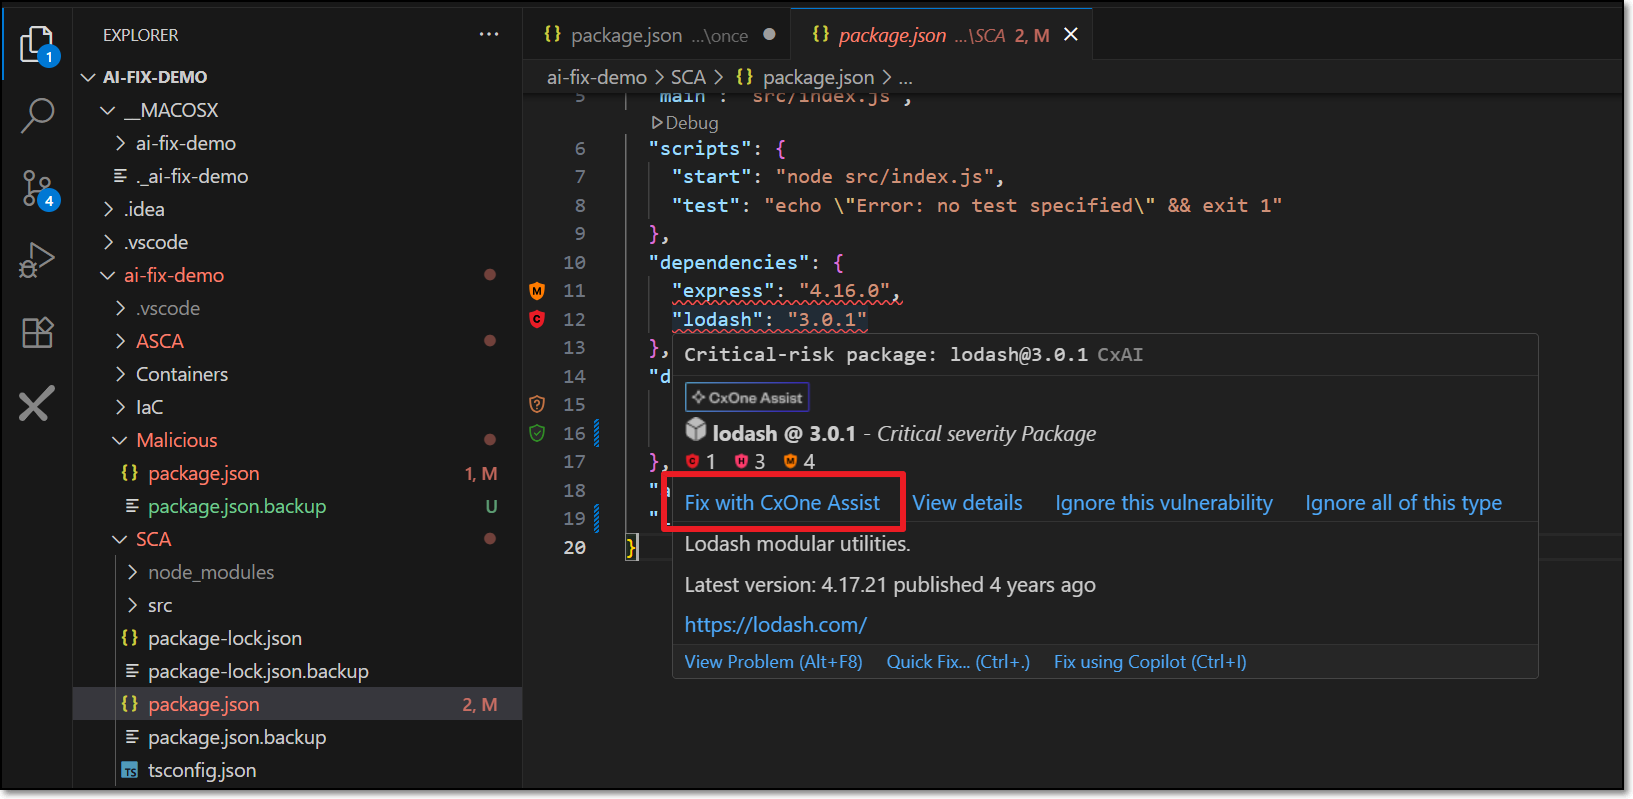
Click on Fix with CxOne Assist.
A Copilot session opens in the side panel and all relevant info is sent for analysis.
Notice
Depending on your IDE configuration, you may need to click Continue several times in order to complete the process.
Copilot automatically makes the necessary changes in the code in order to remediate the risk.
If you approve the change, click Accept.
The change is made and the code is rescanned to verify that the risk is no longer present.
If you want to improve on the suggestion, click Undo. You can then chat with Copilot to determine the best way of remediating the code.
Ignoring Risks
In order to help you to focus on actionable risks, CxOne Assist enables marking risks as Ignore, so that the risks will no longer be shown in your IDE. You can Revive a risk at any time to resume showing that risk. This can be applied to a specific instance of a risk or it can be applied to all instances of that risk in your project. You can revive the risk at any time to resume showing risks for that package.
Notice
For risks identified in open source packages, a risk instance refers to the entire package that the vulnerability is associated with.
To Ignore a risk
When Checkmarx realtime scanners identify a risk, it is flagged as a Problem, which is marked in the code with a squiggly underline and annotated in the margin with an icon that indicates the type of risk.

Hover over the vulnerable line of code.
The Checkmarx dialog opens.
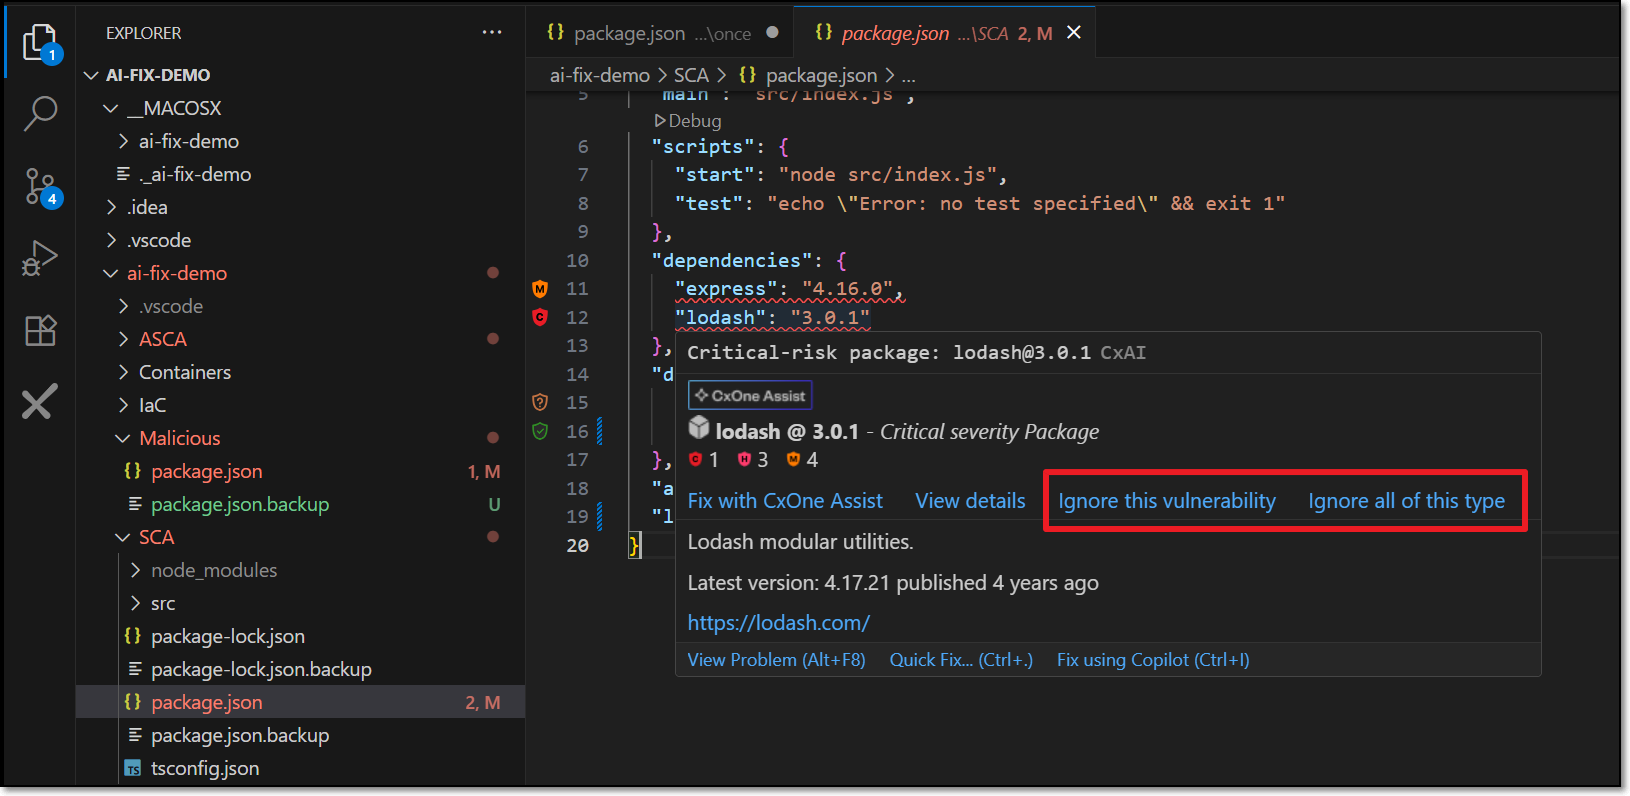
To ignore the risk in this particular instance, click on Ignore this vulnerability.
To ignore all instances of the risk, click on Ignore all of this type.
To revive a package:
Click on the Ignore icon in the bottom bar.

The Ignored Vulnerabilities tab opens.
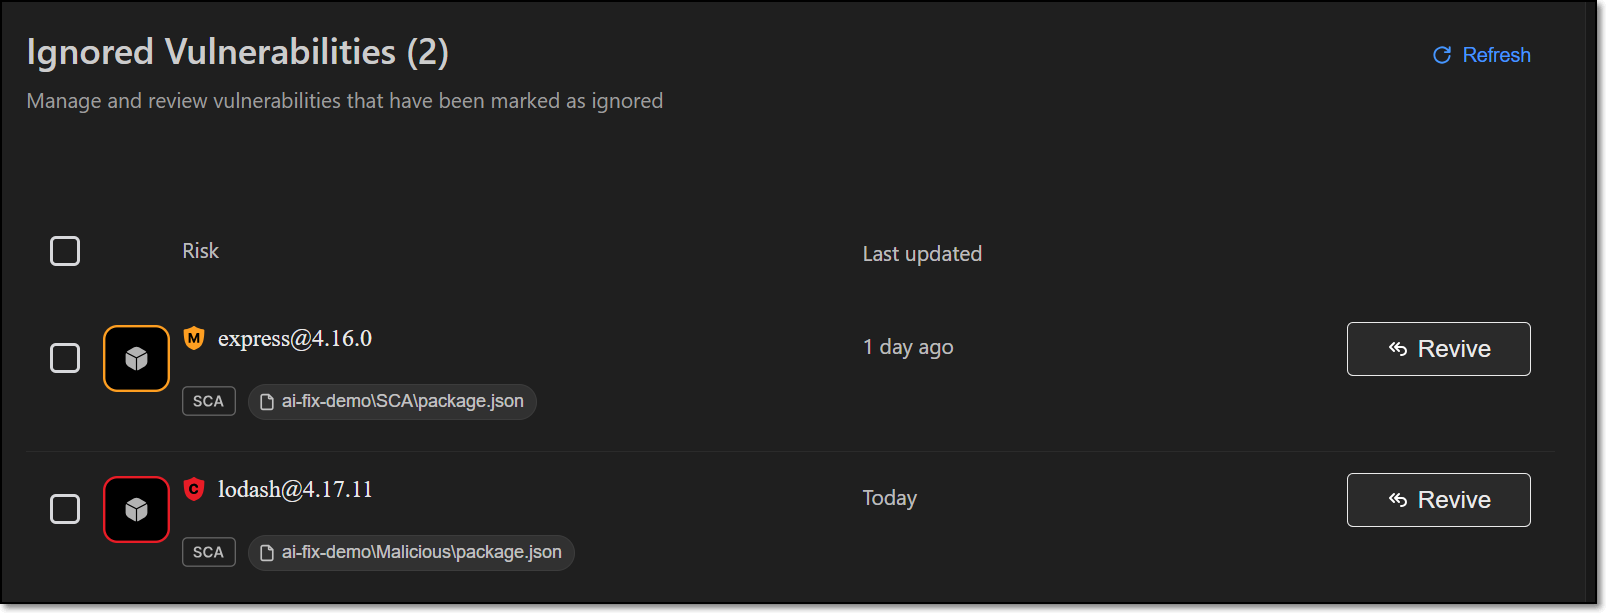
For the desired vulnerabilitiy click on the Revive button.
Notice
This can also be done as a bulk action for all selected items.
Troubleshooting - Manually Configuring the MCP Server
In case the automatic procedure fails. You can manually configure access to the Checkmarx MCP server using the appropriate procedure below, according to your IDE.
Configuring VS Code
Open VS Code Settings.
Search for MCP settings.
In the MCP section, click on the link to open the
settings.jsonfile.Add the following snippet for the Checkmarx MCP server to the file, replacing the placeholders as follows:
Checkmarx_one_base_url - The base url of your Checkmarx One environment.
Checkmarx_one_API_key - An API for your Checkmarx One account.
"mcp": {
    "servers": {
       "checkmarx": {
          "url": "<Checkmarx_one_base_url>/api/security-mcp/mcp",
          "headers": {
              "cx-origin": "VS Code",
              "Authorization": "<Checkmarx_one_API_key>"
          }
      },
}
}
Configuring Cursor
Open Cursor Settings.
Select Tools & Integrations.
Under MCP Tools, click on New MCP Server.
The mcp.json file opens.
Add the following snippet for the Checkmarx MCP server to the file, replacing the placeholders as follows:
Checkmarx_one_base_url - The base url of your Checkmarx One environment.
Checkmarx_one_API_key - An API for your Checkmarx One account.
{
"mcpServers": {
       "checkmarx": {
          "url": "<Checkmarx_one_base_url>/api/security-mcp/mcp",
          "headers": {
              "cx-origin": "Cursor",
              "Authorization": "<Checkmarx_one_API_key>"
          }
      },
}
}