Project Migration
Checkmarx One provides the ability to migrate existing Checkmarx manual projects and convert them to Code Repository projects.
Checkmarx manual projects scan either zip files or code repository paths, with the scans being triggered manually from the Checkmarx One platform.
When migrating a Checkmarx project to a Code Repository based project, the following modifications take place:
Webhooks are created for the organization and repository.
The scan trigger changes to push events and pull requests, initiated from the repository itself.
The entire scanning process is automated.
The migrated project retains its scan history, and all pre-configured scan rules remain unchanged.
The migration process is supported for both cloud hosted and self hosted instances of GitHub, GitLab, Bitbucket, and Azure DevOps.
Important
Migrating projects by creating new import configurations or editing existing configurations requires update-tenant-params permission. Migrating new Projects using an existing configuration requires create-project permission.
In addition, you need to have the required permissions in the code repository that you are connecting to, as described in Code Repository Permissions.
Single Project Migration
The project migration flow is very similar to the code repository integration flow (Cloud-hosted / Self-hosted) that is documented in the Code Repository Integration documentation.
This document includes a migration process example using GitHub code repository. For all the other code repositories please refer to the Code Repository Integrations documentation.
Note
The configuration screens may look different, but the flow is identical.
To migrate a single Checkmarx project, perform the following:
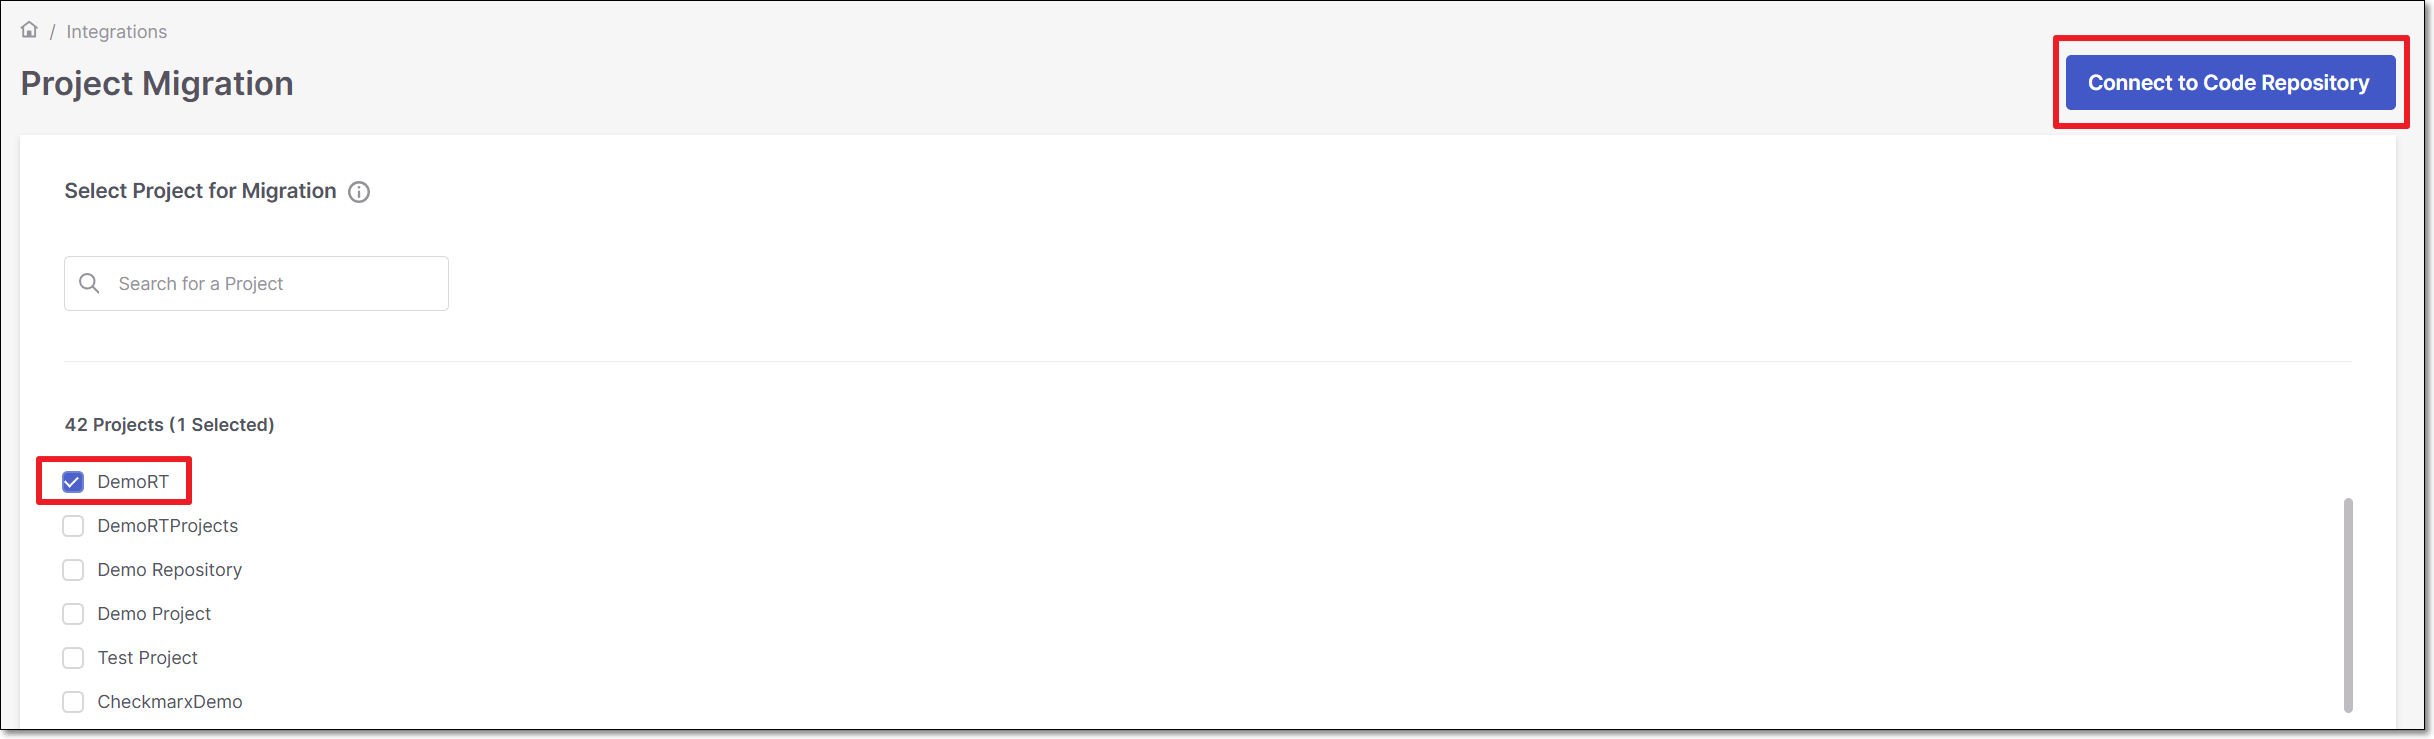
In the main navigation, select Integrations
 > Project Migration.
Select the project that you would like to migrate and click on Connect to Code Repository
To migrate a Checkmarx project to a cloud based code repository, use the following steps:
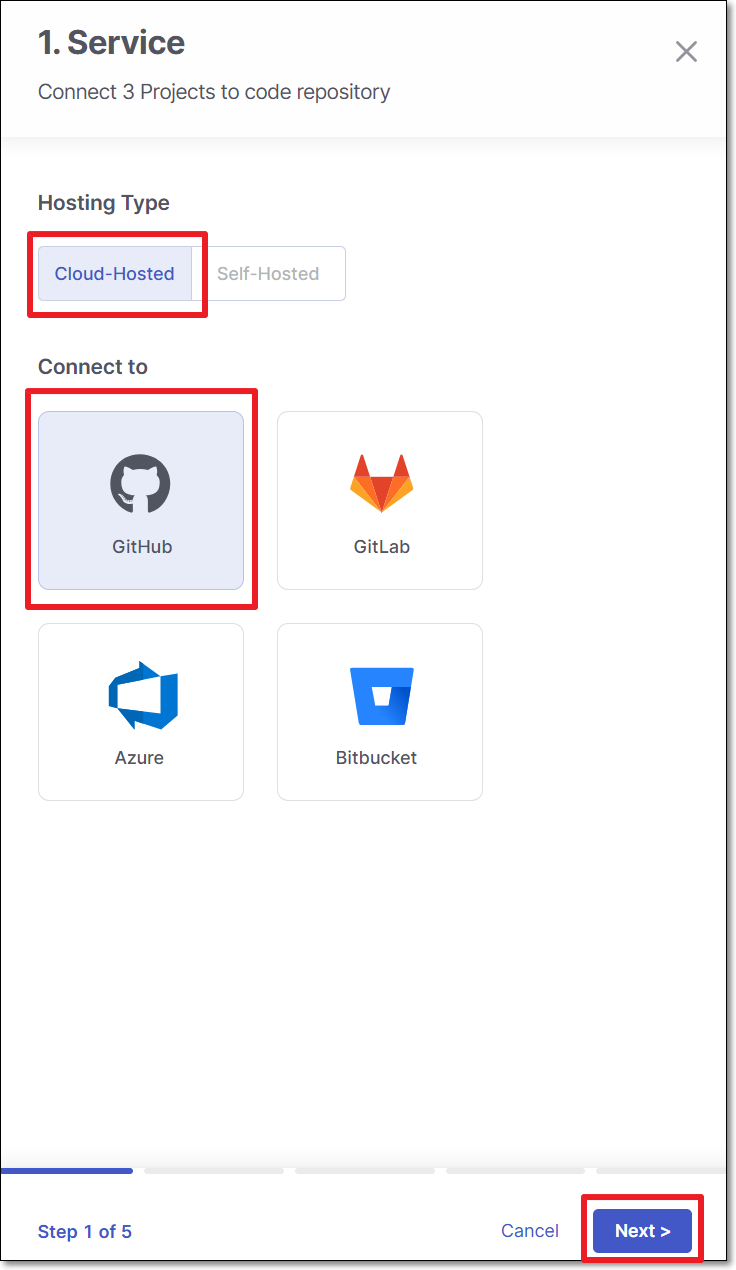
Perform the following:
Select Cloud-Hosted (default).
Select the code repository.
Note
In case this is the first connection to the code repository, Client ID and Client Secret are needed.
Click Next.
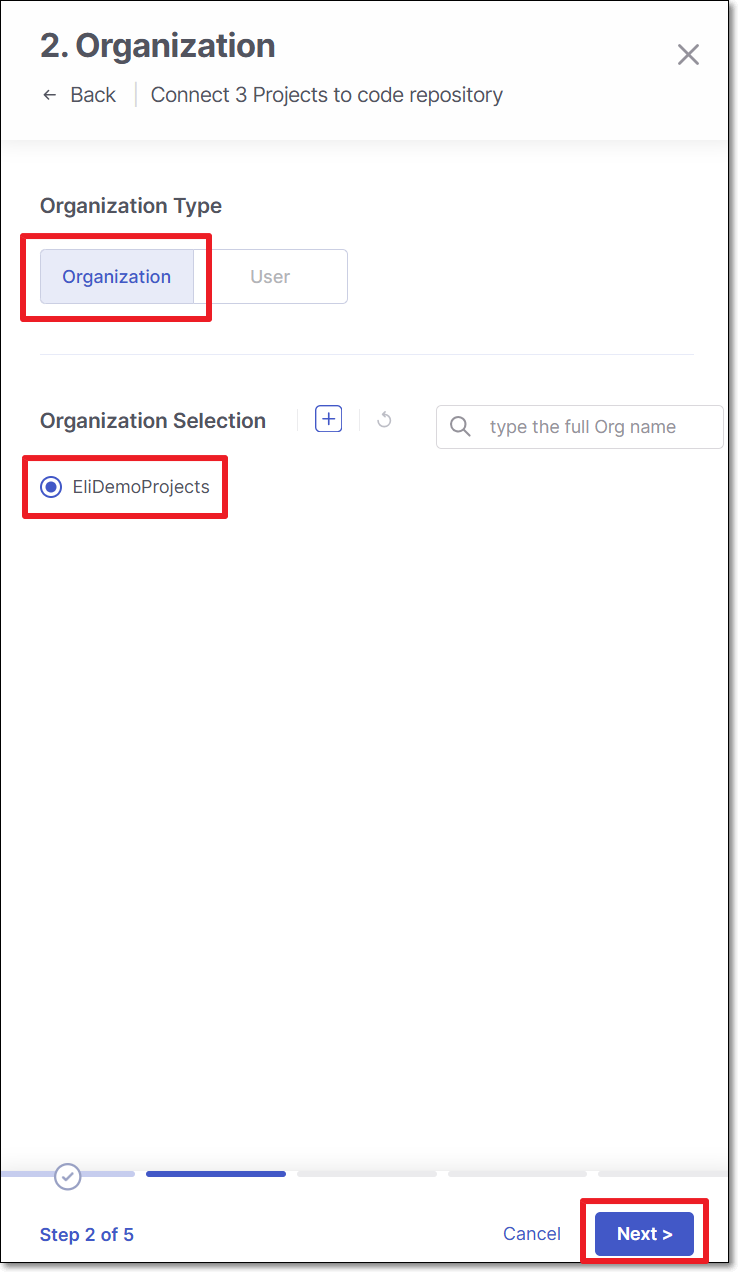
Perform the following:
Select Organization or User as the organization type.
Select the specific organization.
Click Next
Note
To allow other organizations to collaborate and interact with the code repository, use the + icon.
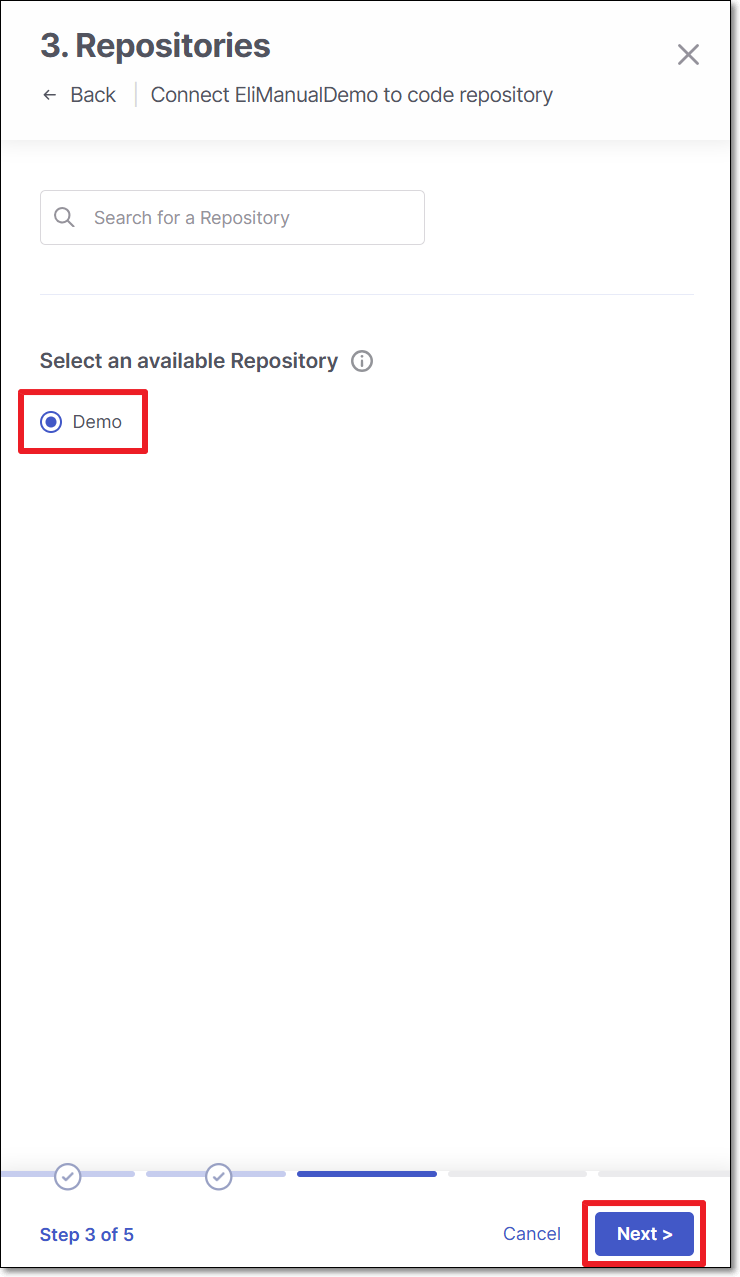
Select the repository for migration and click Next
In 4: Scan Configuration, perform the following:
Permissions - Select the toggle for the permissions that you would like to grant.
Scan Trigger: Push, Pull request - Automatically trigger a scan when a push event or pull request is done in your SCM. (Default: On)
Pull Request Decoration - Automatically send the scan results summary to the SCM. (Default: On)
Scan Type - Select the scanners to be used (By default, all the licensed scanners are enabled).
For the SAST scanner, you can enable Incremental Scan.
For the SCA scanner, you can enable SCA Auto Pull Request. This feature automatically sends PRs to your SCM with recommended changes in the manifest file, in order to replace the vulnerable package versions. (Default: Off)
Click Next
In the 5: Branches, specify the branches to be designated as protected branches.
Notice
Specifying a branch as a Protected Branch affects three main areas: scan triggering (for PR and push), policy violation detection, and Feedback App notifications.
You can also use a wildcard symbol "*" to designate which branches are protected. The wildcard can be used before the string, after the string, or both. All branches that match the wildcard pattern will be treated as protected branches.
Notice
Examples:
*→ all branchesrelease*→ branches that begin with "release"*release→ branches that end with "release"* release *→ branches that contain "release" anywhere in the name
Tags - For each protected branch, you can optionally assign Tags. When a scan is triggered for this branch (e.g., push or pull request), these tags will automatically be applied to the scan.
Tags can be key:value pairs or simple values. For example,
env:prodorsecurity.
In the 6: Scan Branches Upon Creation, you can decide whether to enable the Scan a branch upon creation feature.
For each repository, select the protected branches you want to scan during project creation, and then click Save.
Tip
If you specified a wildcard pattern in the previous step, it will not appear as an option on this list.
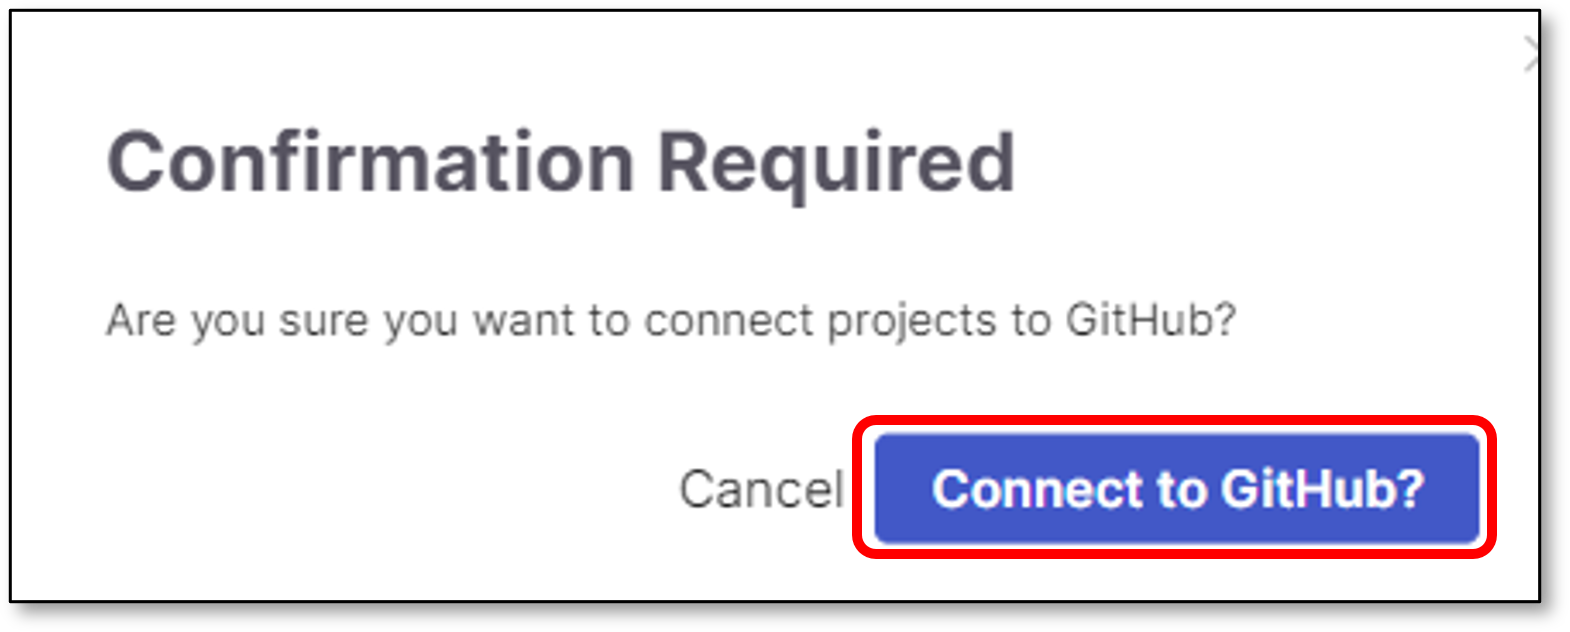
In the Confirmation Required window, click Connect to GitHub.
To migrate a Checkmarx project to a Self-hosted code repository, use the following steps:
Perform the following:
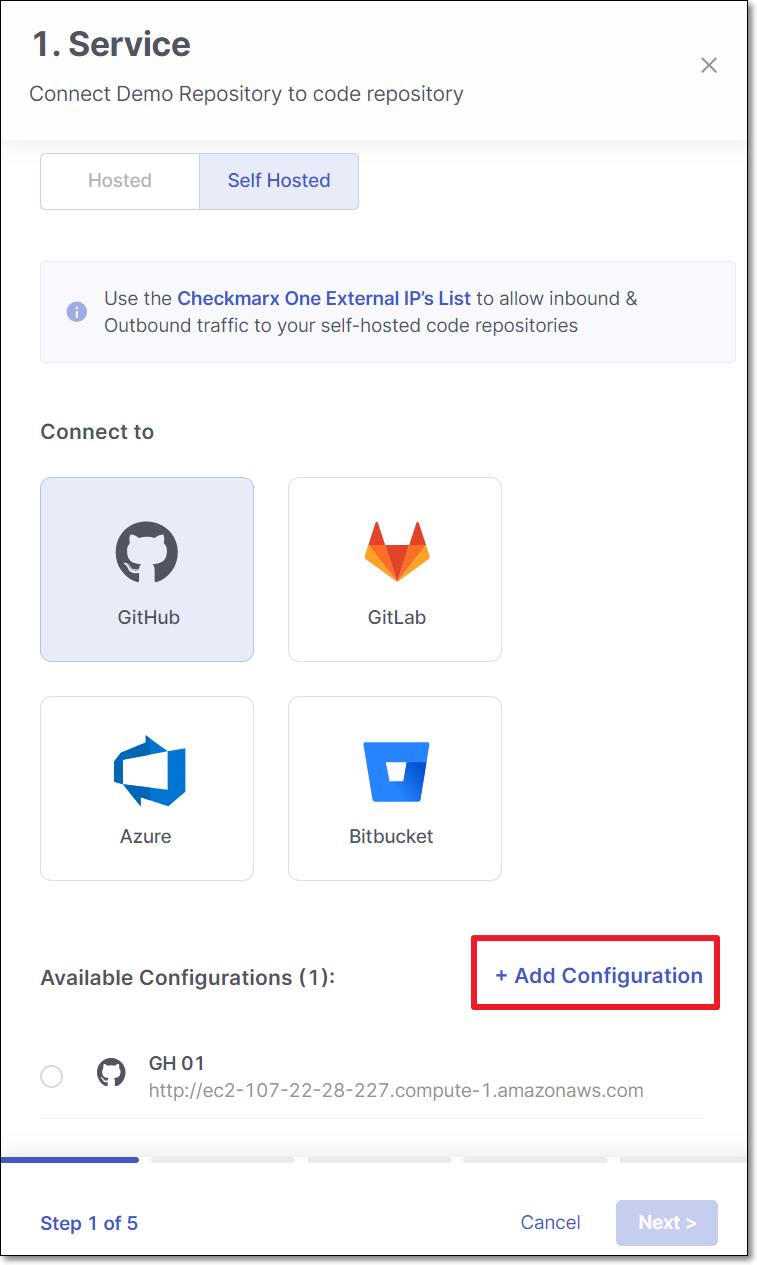
Select Self-Hosted
Select the code repository type.
Note
In case this is the first connection to the code repository, Client ID and Client Secret are needed.
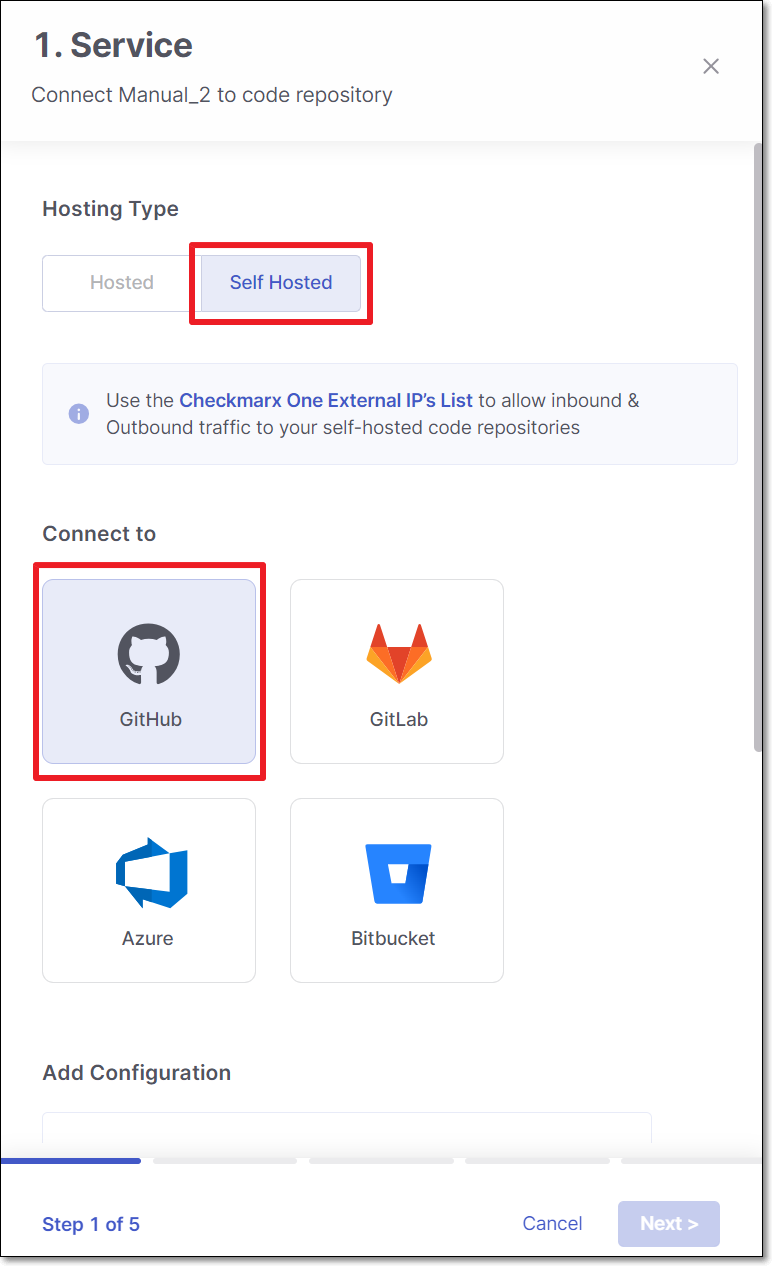
Configure the connection to your code repository, as follows:
If you are setting up an import configuration for the first time, enter data for the following fields and then click Next:
Instance Name - Designate a name for this import configuration.
URL - Your self-managed domain.
For example: https://github.example.com
Client ID - See ??? for retrieving your Client ID.
Client Secret - See ??? for retrieving your Client Secret.
If you are importing Projects using an existing configuration, select the radio button next to the configuration that you would like ot use, and then click Next.
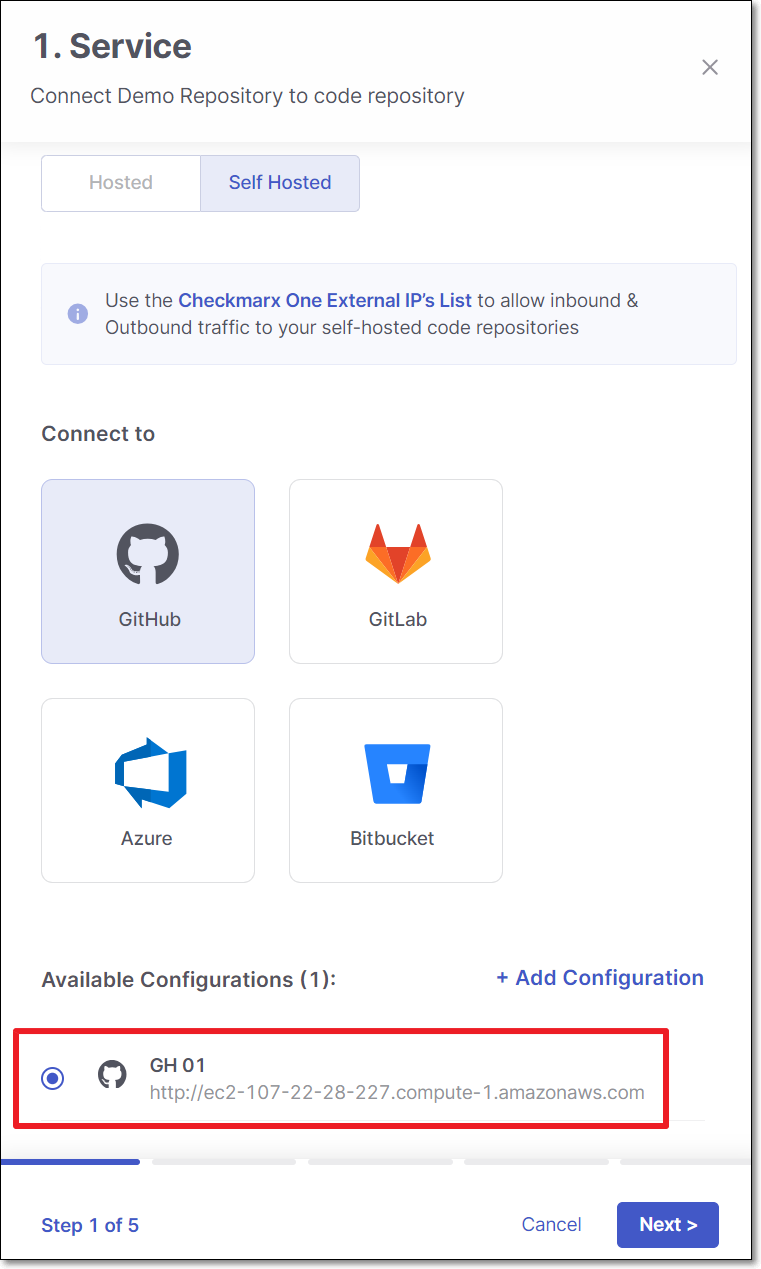
If you are adding a new configuration in addition to an existing configuration, click + Add Configuration, then fill in the data for this configuration as described above, and then click Next.
Notice
If you would like to edit an existing configuration (e.g., change the URL or credentials), go to Global Settings > Code Repository.
Perform the following:
Select Organization or User organization as the organization type.
Select the specific organization.
Click Next
Note
To allow other organizations to collaborate and interact with the code repository, use the + icon.
Select the repository for migration and click Next
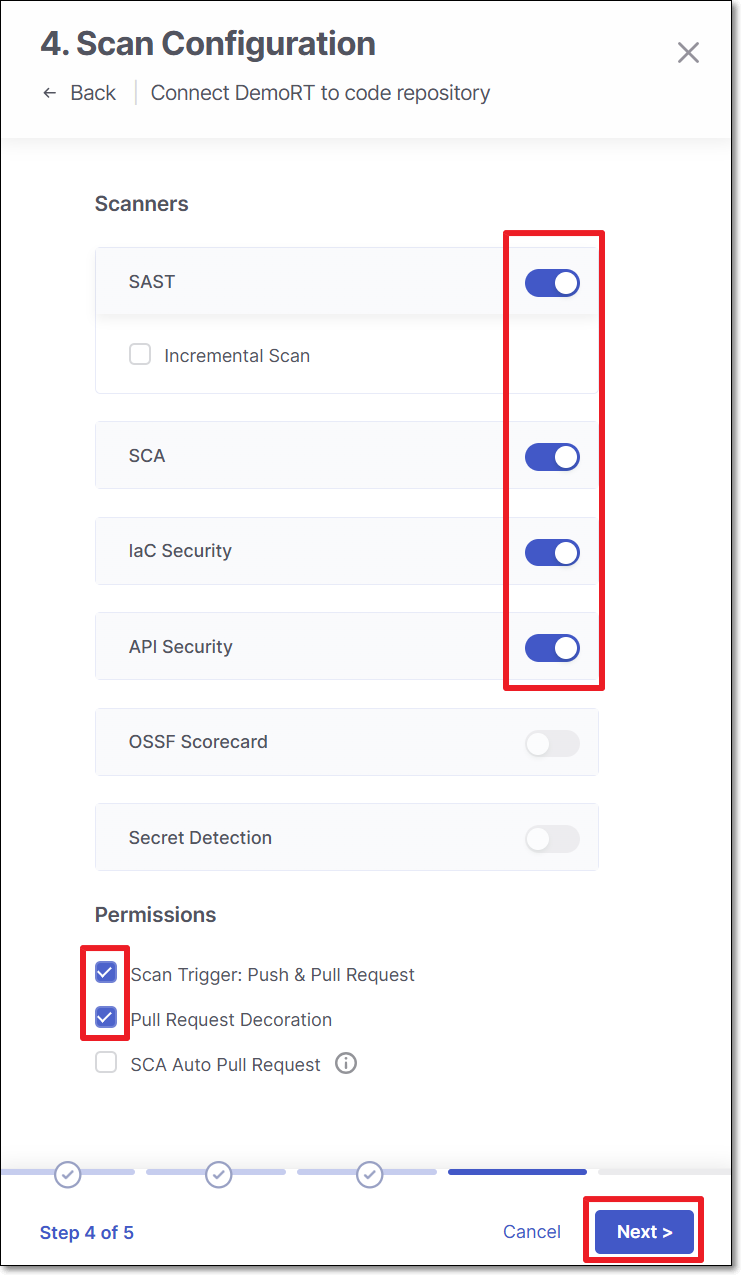
Perform the following:
Scanners - Select the scanners to be used (By default, all the licensed scanners are enabled).
Permissions - Select the checkbox for the permissions that you would like to grant:
Scan Trigger: Push & Pull Request - Automatically trigger scan when a push event or pull request is done in your SCM. (Default: on)
Pull Request Decortation: Automatically send the scan results summary to the SCM. (Default: on)
SCA Auto Pull Request - Automatically send PR to your SCM with recommend changes in the manifest file, in order to replace the vulnerable version. (Default: off)
Click Next
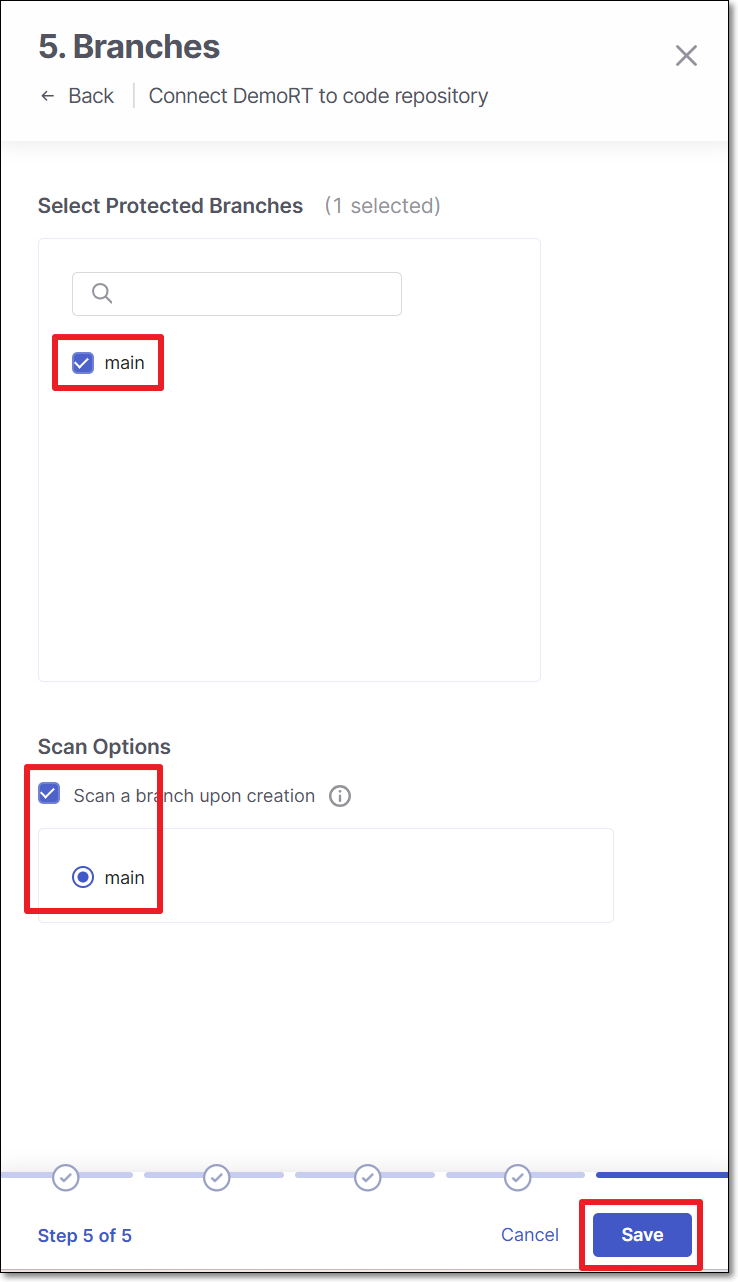
Perform the following:
Select Protected Branches - Specify the branches to be designated as "Protected Branches".
Notice
Specifying a branch as a Protected Branch affects three main areas: scan triggering (for PR and push), policy violation detection, and Feedback App notifications.
You can also use a wildcard symbol "*" to designate which branches are protected. The wildcard can be used before the string, after the string, or both. All branches that match the wildcard pattern will be treated as protected branches.
Notice
Examples:
*→ all branchesrelease*→ branches that begin with "release"*release→ branches that end with "release"* release *→ branches that contain "release" anywhere in the name
Tags - For each protected branch, you can optionally assign Tags. When a scan is triggered for this branch (e.g., push or pull request), these tags will automatically be applied to the scan.
Tags can be key:value pairs or simple values. For example,
env:prodorsecurity.
Select whether to enable a branch scan upon project creation (By default, this option is disabled).
Select the branch for scanning upon project creation.
Tip
Only an explicit branch name can be scanned upon project creation. If you specified a wildcard pattern for branch selection, you will not be given the option of scanning it upon project creation.
Click Save
Click Connect to GitHub
Multiple Projects Migration
Checkmarx One provides the ability to migrate multiple Checkmarx projects to Code Repository ones.
As well as the single project migration, the flow is supported for GitHub, GitLab, Bitbucket and Azure DevOps (Cloud-hosted / Self-hosted).
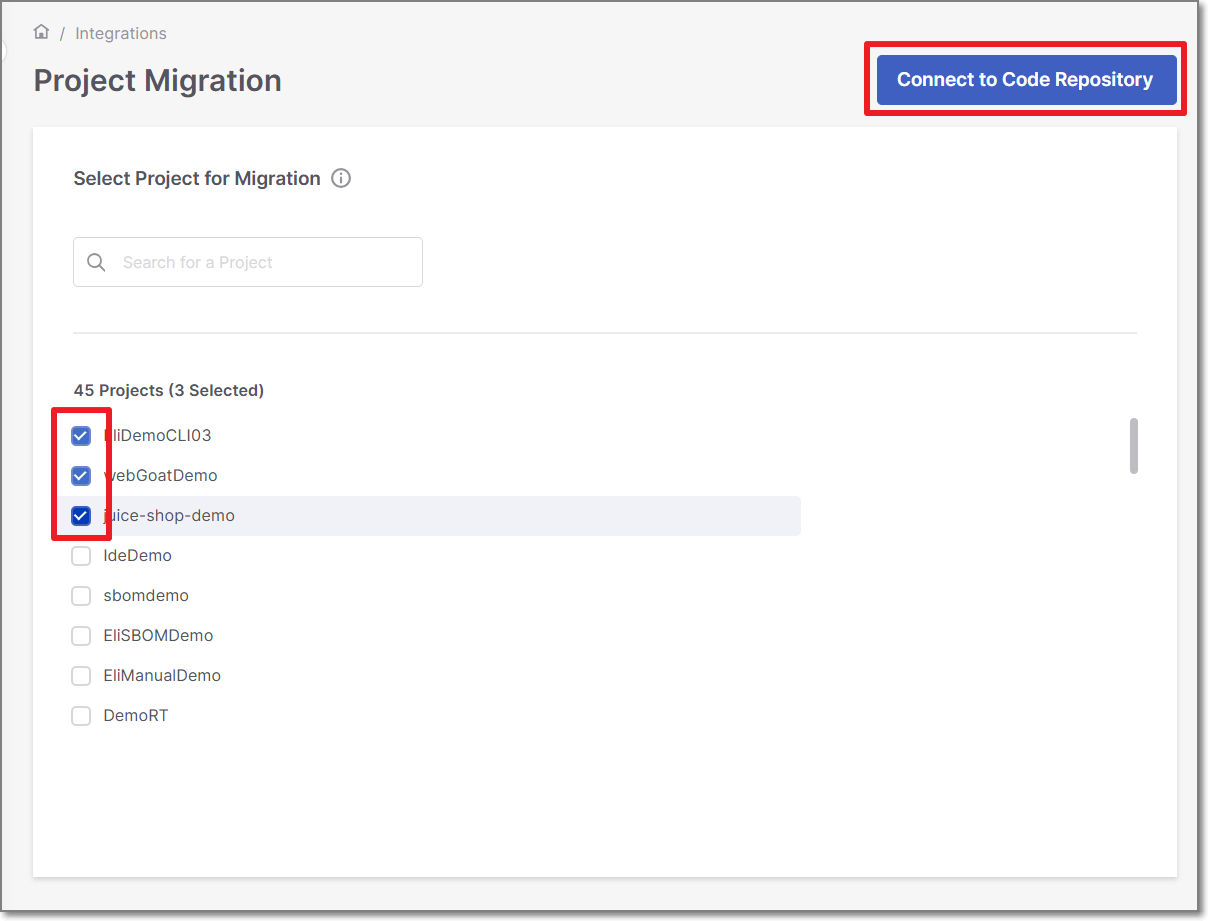
To migrate multiple Checkmarx projects, perform the following:
In the main navigation, select Integrations
> Project Migration.Select the projects and click on Connect to Code Repository
To migrate multiple Checkmarx projects to a cloud based code repository, use the following steps:
Perform the following:
Select Hosted
Select the code repository.
Note
In case this is the first connection to the code repository, Client ID and Client Secret are needed.
Click Next
Perform the following:
Select Organization or User organization as the organization type.
Select the specific organization.
Click Next
Note
To allow other organizations to collaborate and interact with the code repository, use the + icon.
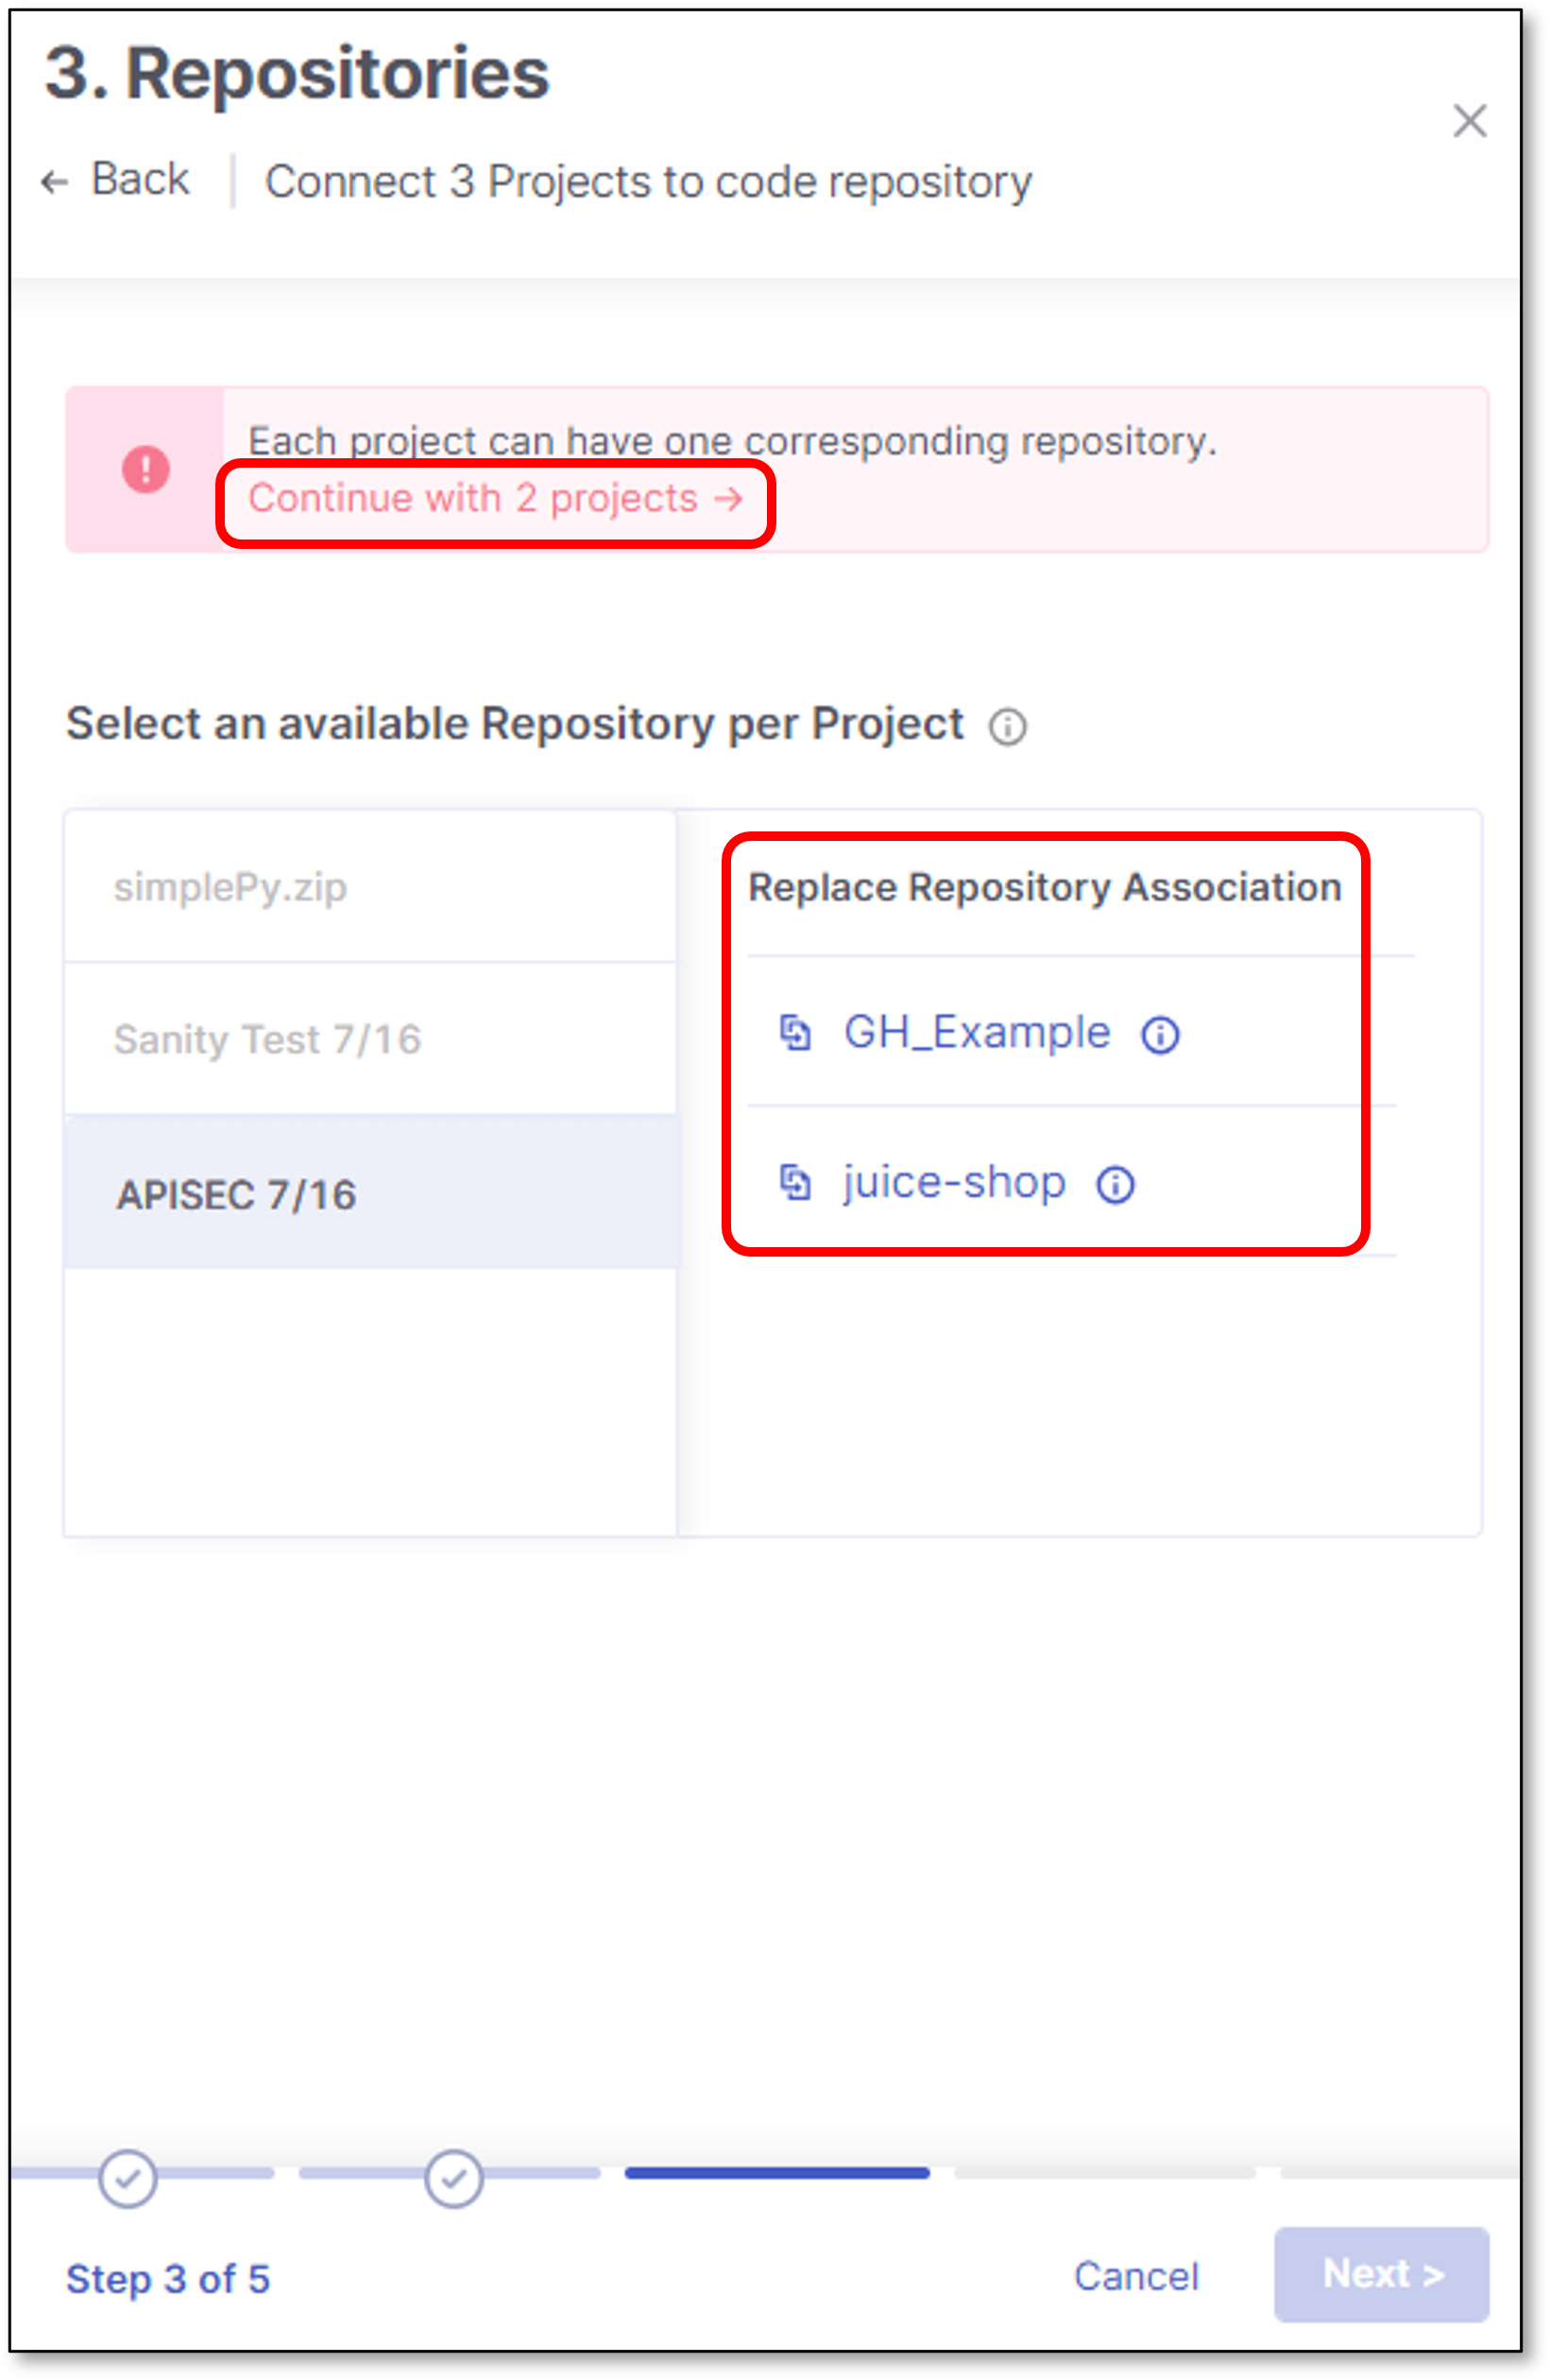
In the Repositories screen, select which project will be connected to which repository.
Important
Every Checkmarx project can be connected to 1 repository
If the number of Checkmarx project is smaller than or equal to the number of repositories, select the mapping and click Next.
If the number of Checkmarx project exceeds the number of repositories, select the mapping and click Continue with "x" projects link.
It is possible to replace any unmapped project with a mapped one.
For example:
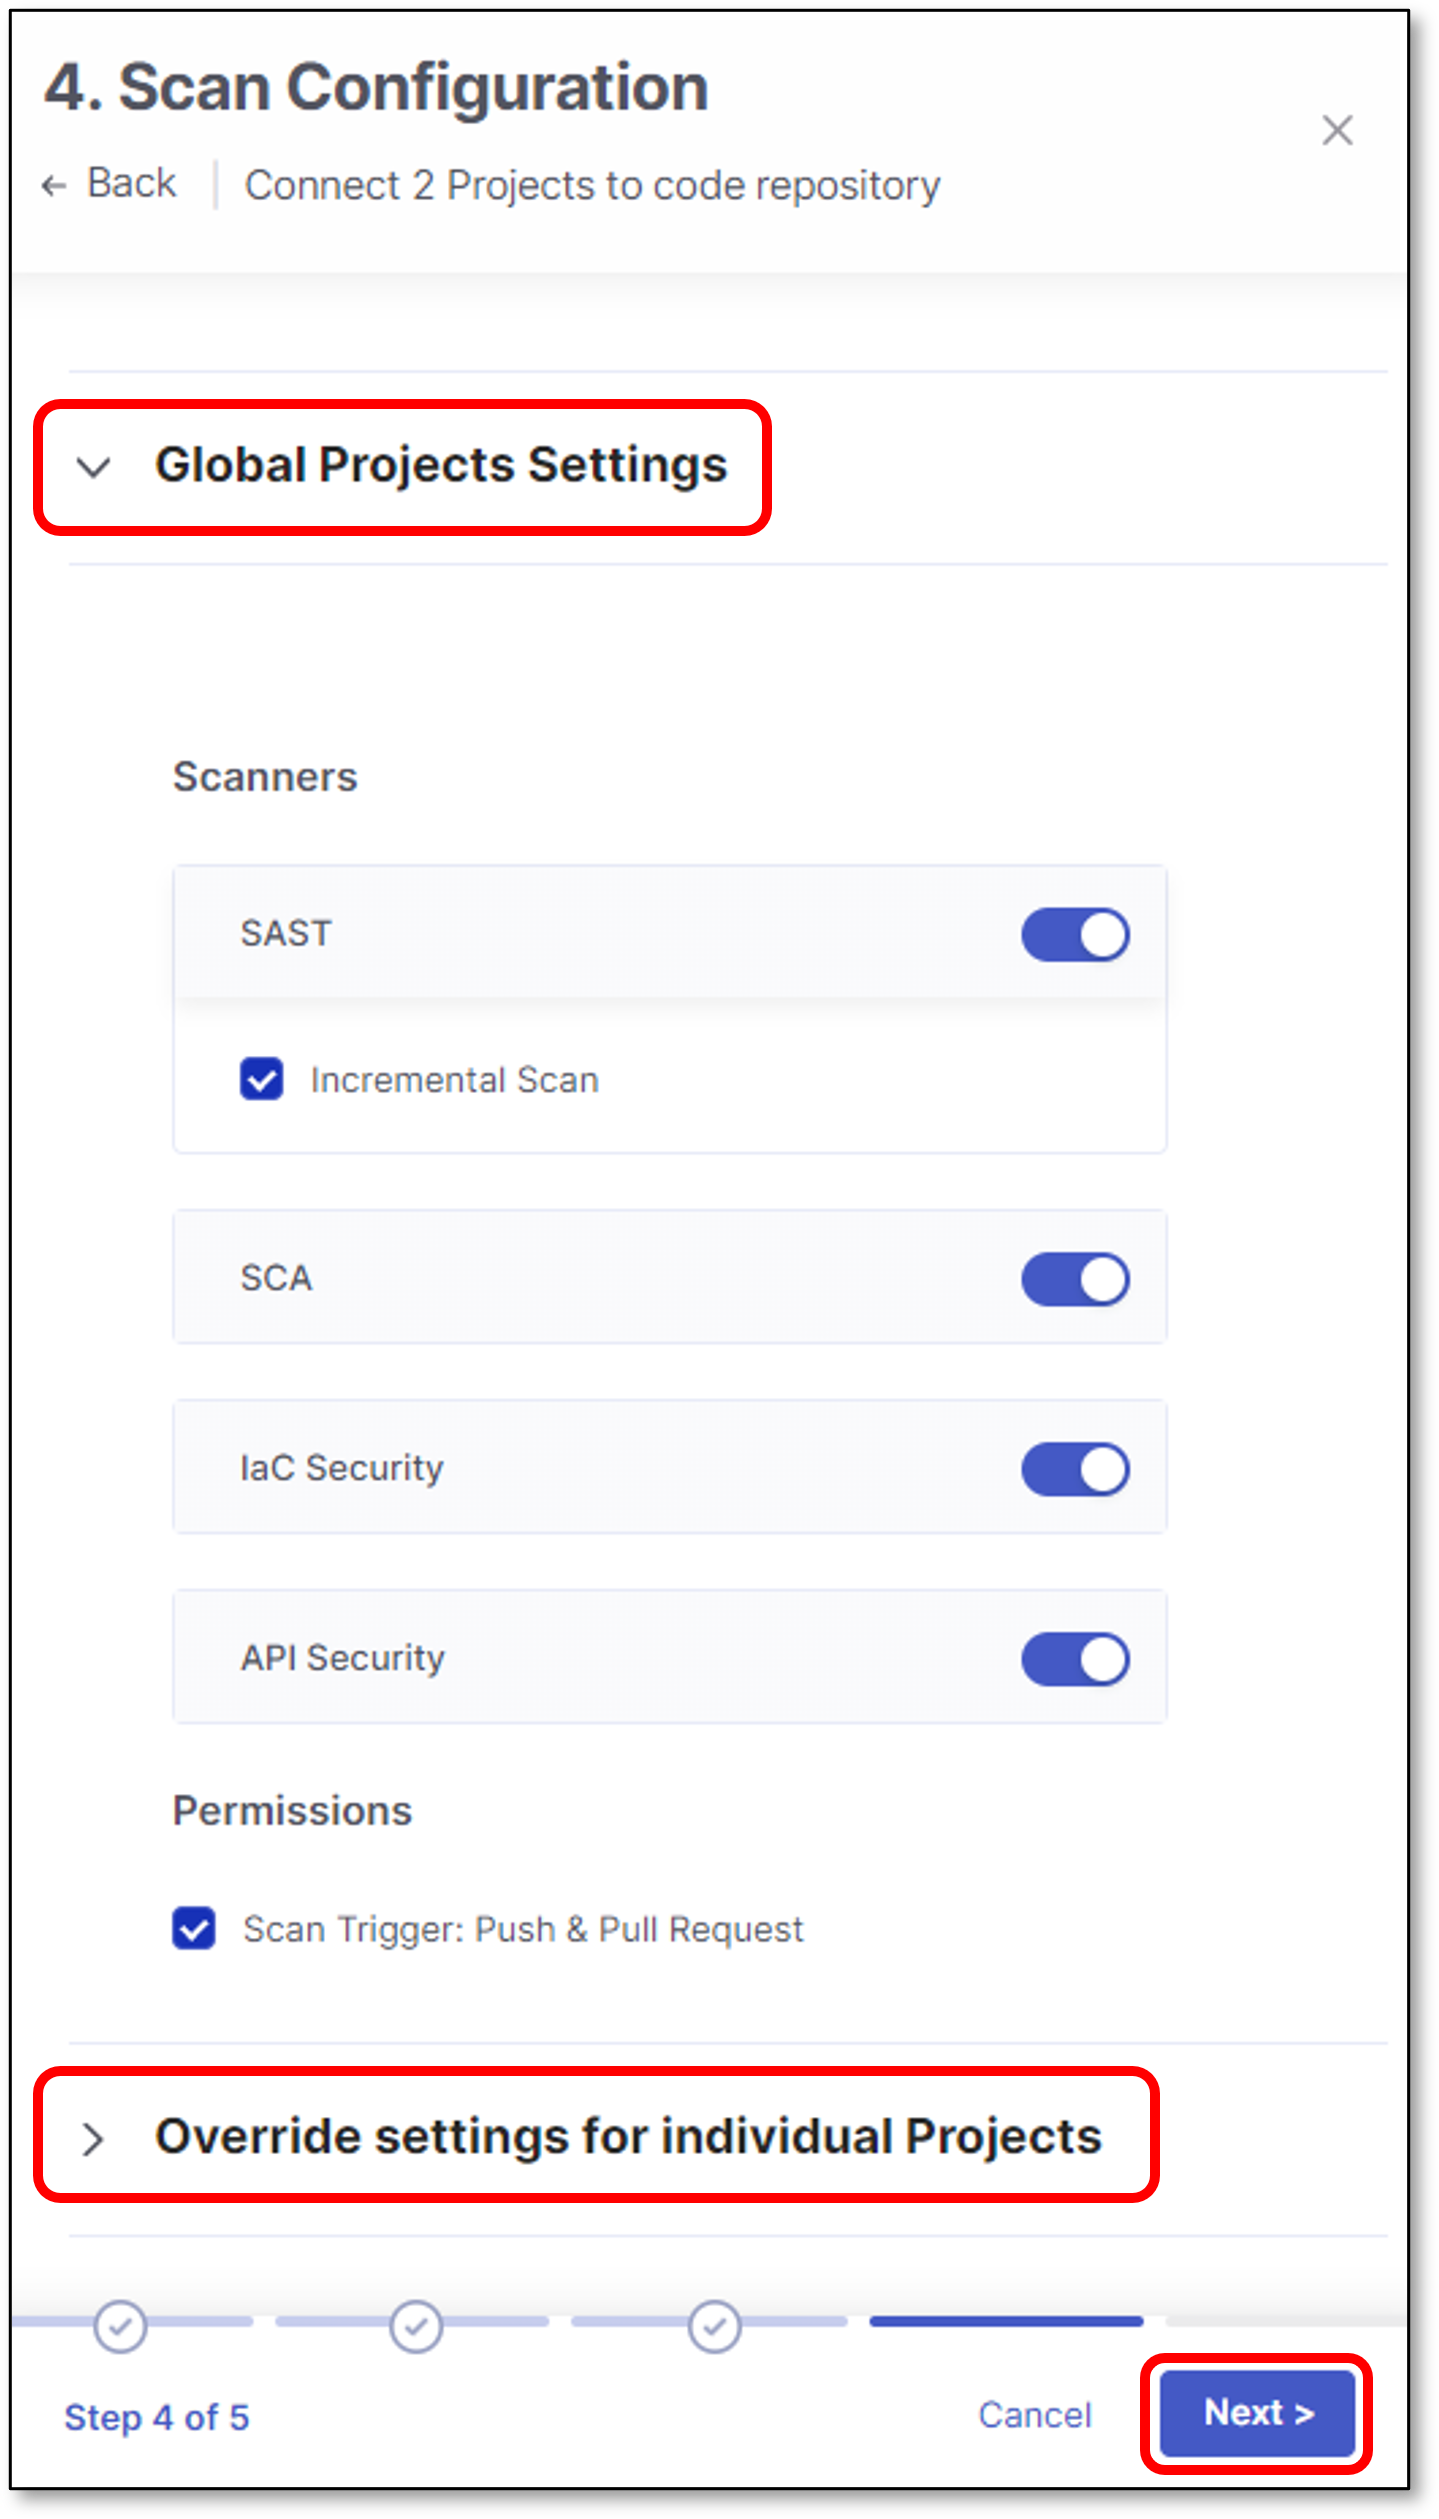
Scan Configuration screen contains 2 configuration sections:
Global Projects Settings:
Scanners - Select the scanners to be used for all the projects (By default, all the licensed scanners are enabled).
Permissions - Select whether to enable Webhooks creation for triggering scans for all the projects (By default, the scan trigger is enabled).
Override Settings for Individual Projects:
Scanners - Select the scanners to be used for a specific project (By default, all the licensed scanners are enabled).
Permissions - Select whether to enable Webhooks creation for triggering scans for a specific project (By default, the scan trigger is enabled).
Click Next
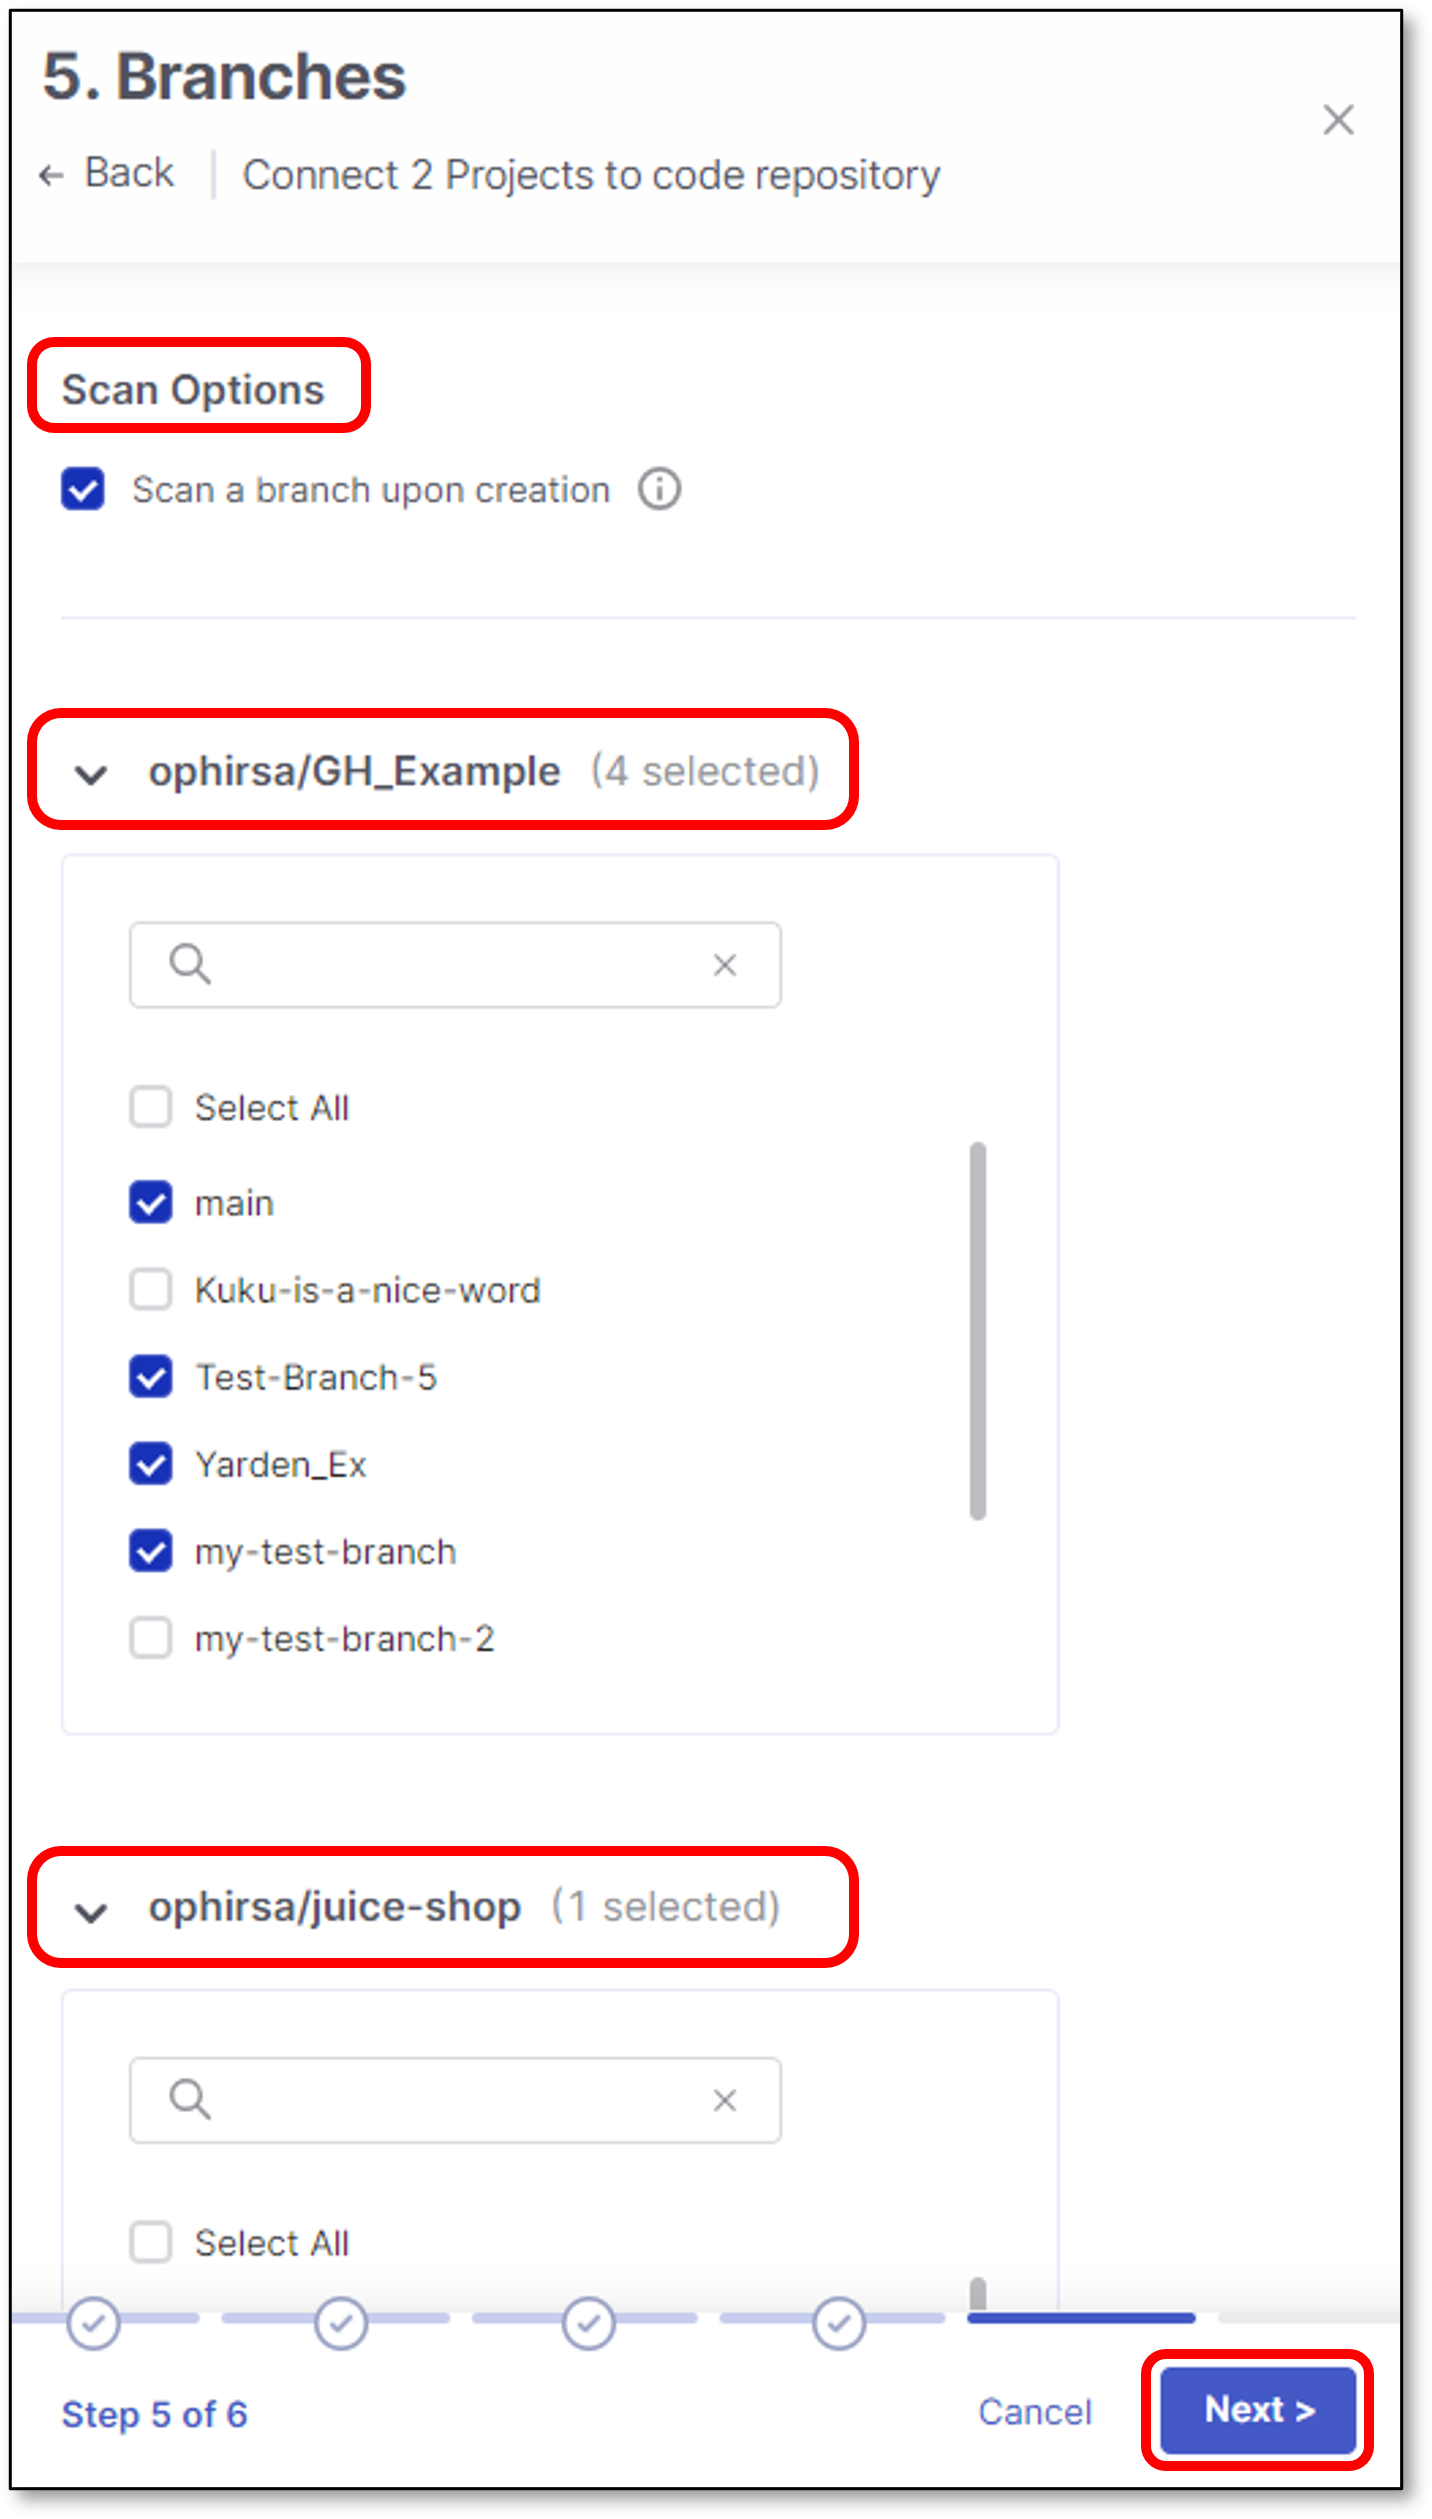
Perform the following:
Select whether to enable a branch scan upon project creation (By default, this option is disabled).
In the next screen there is an option to select which branch to scan upon each project creation.
Select Protected Branches - Specify the branches to be designated as "Protected Branches".
Notice
Specifying a branch as a Protected Branch affects three main areas: scan triggering (for PR and push), policy violation detection, and Feedback App notifications.
You can also use a wildcard symbol "*" to designate which branches are protected. The wildcard can be used before the string, after the string, or both. All branches that match the wildcard pattern will be treated as protected branches.
Notice
Examples:
*→ all branchesrelease*→ branches that begin with "release"*release→ branches that end with "release"* release *→ branches that contain "release" anywhere in the name
Tags - For each protected branch, you can optionally assign Tags. When a scan is triggered for this branch (e.g., push or pull request), these tags will automatically be applied to the scan.
Tags can be key:value pairs or simple values. For example,
env:prodorsecurity.
Click Next
Select which branch to scan upon project creation and click Save
Note
Only one branch can be scanned upon project creation.
The selection is performed individually for each project.
Only an explicit branch name can be scanned upon project creation. If you specified a wildcard pattern for branch selection, you will not be given the option of scanning it upon project creation.
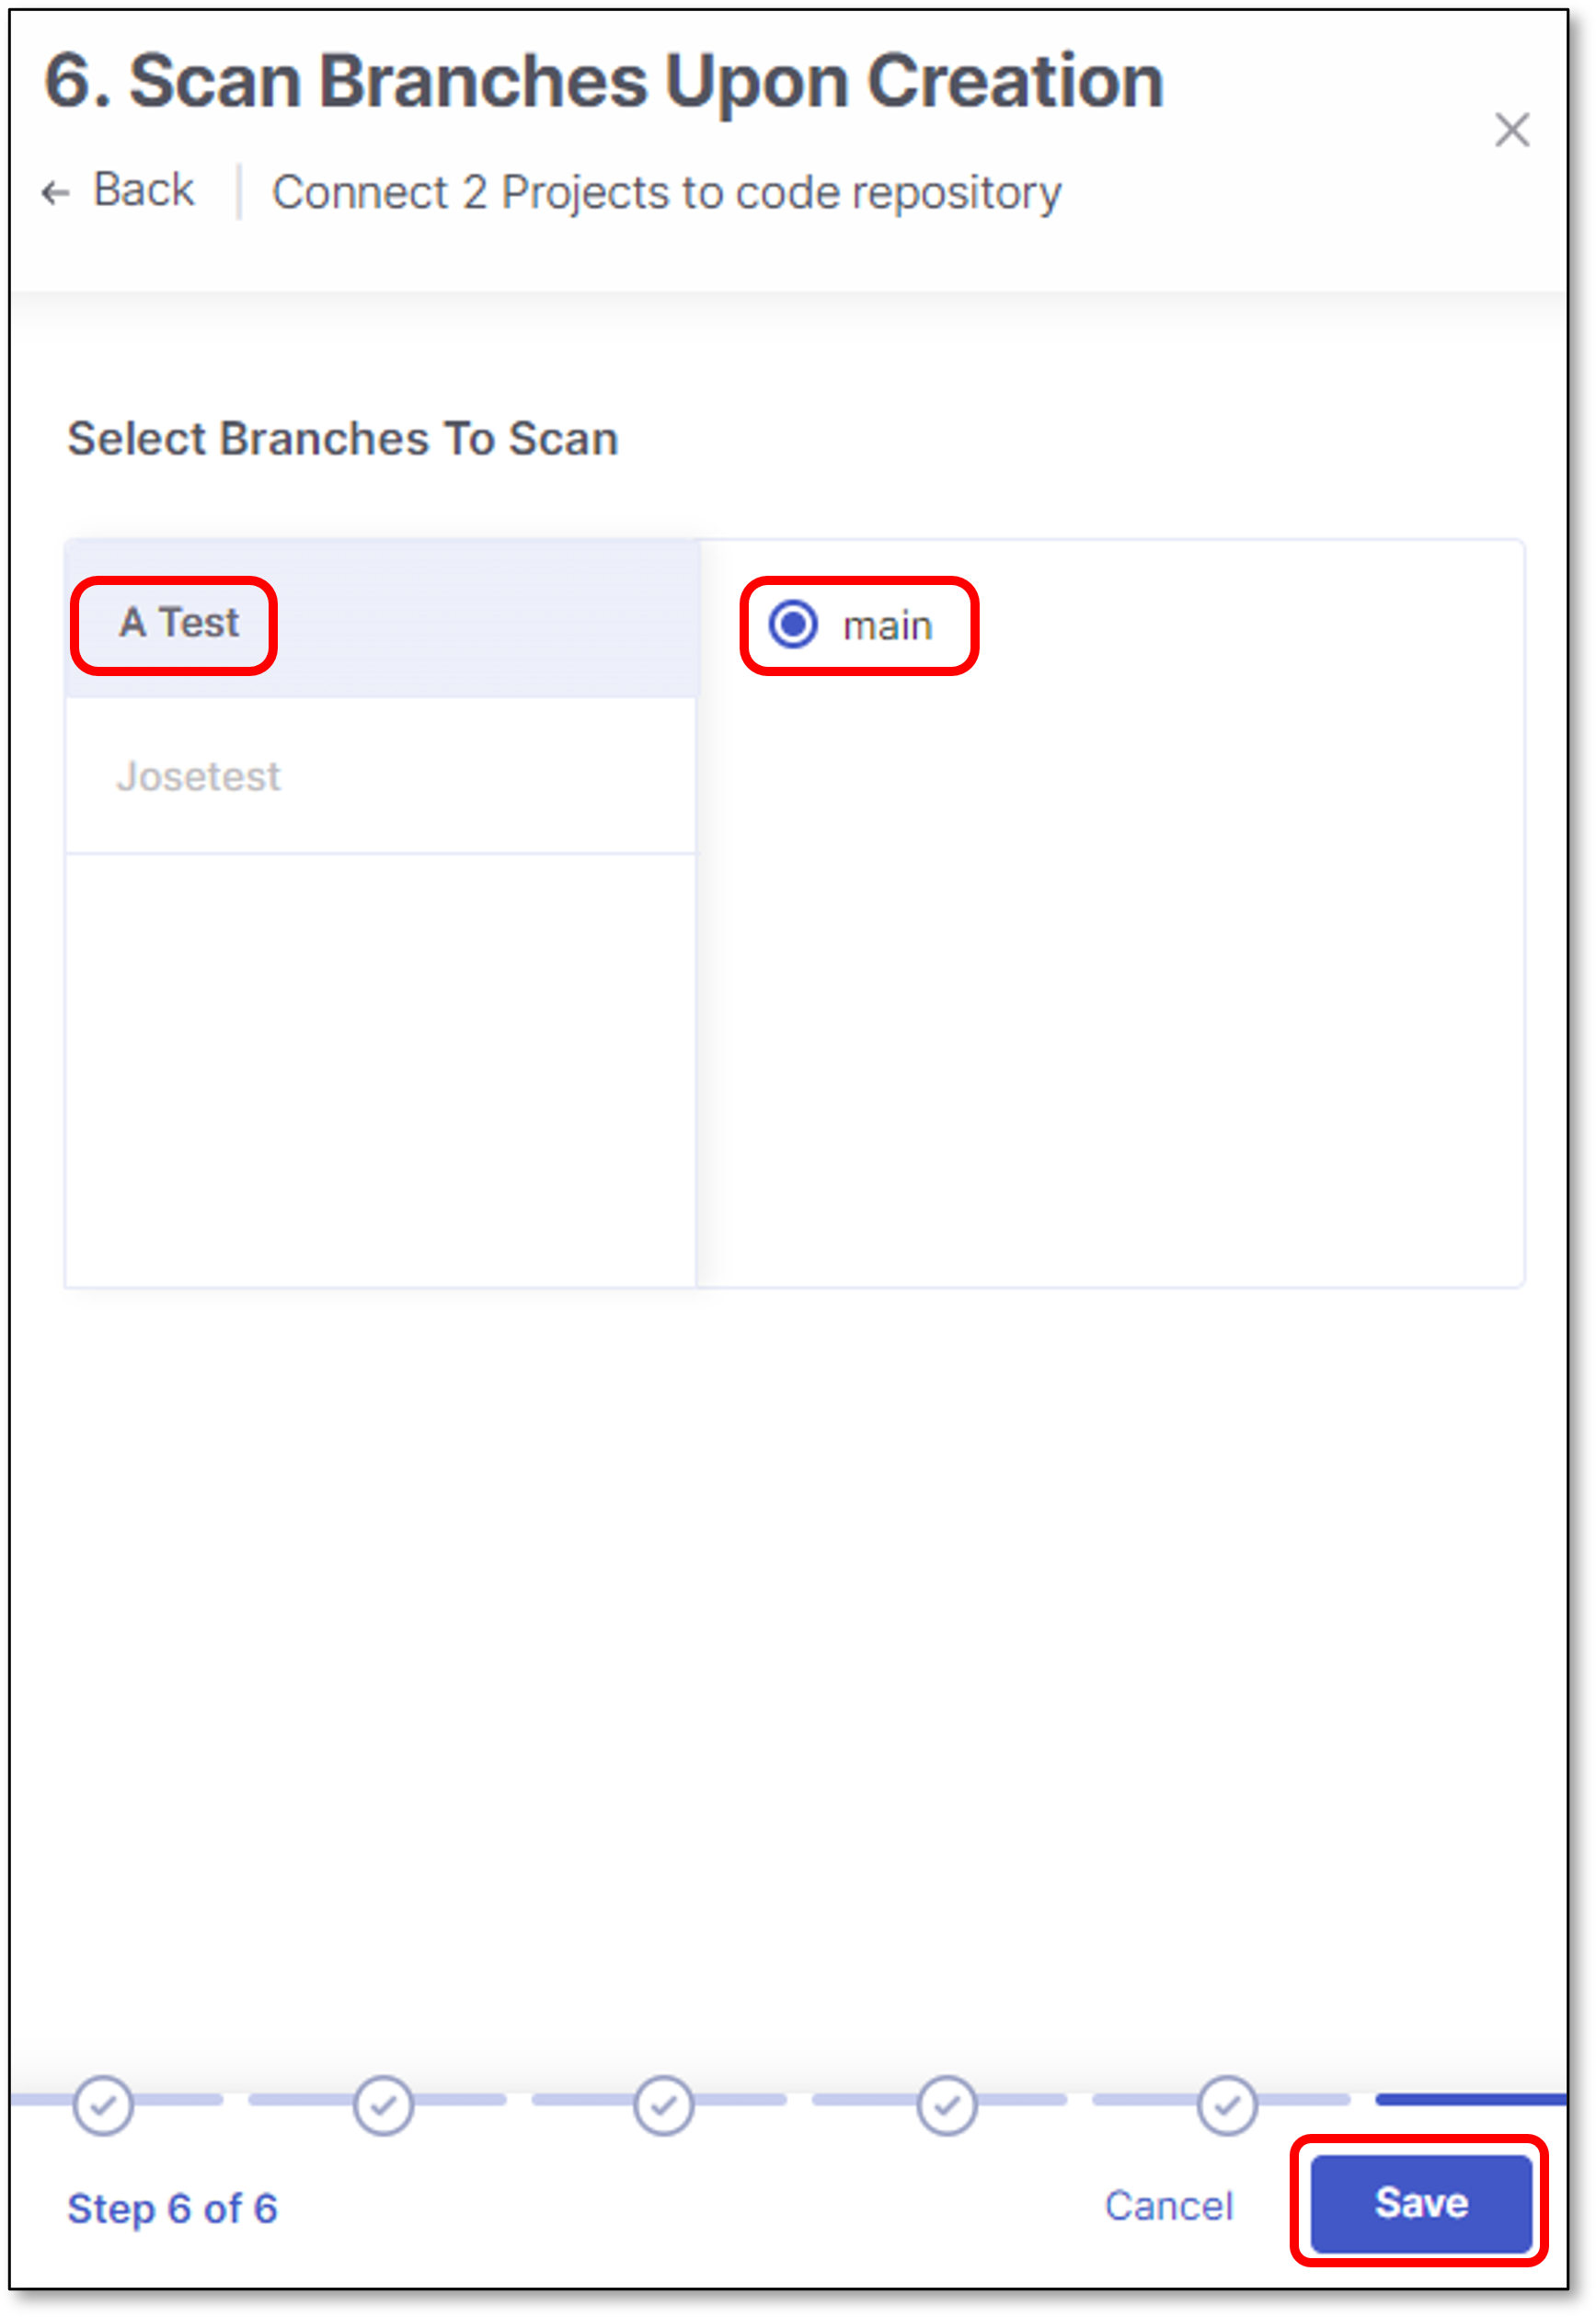
Click Connect to GitHub
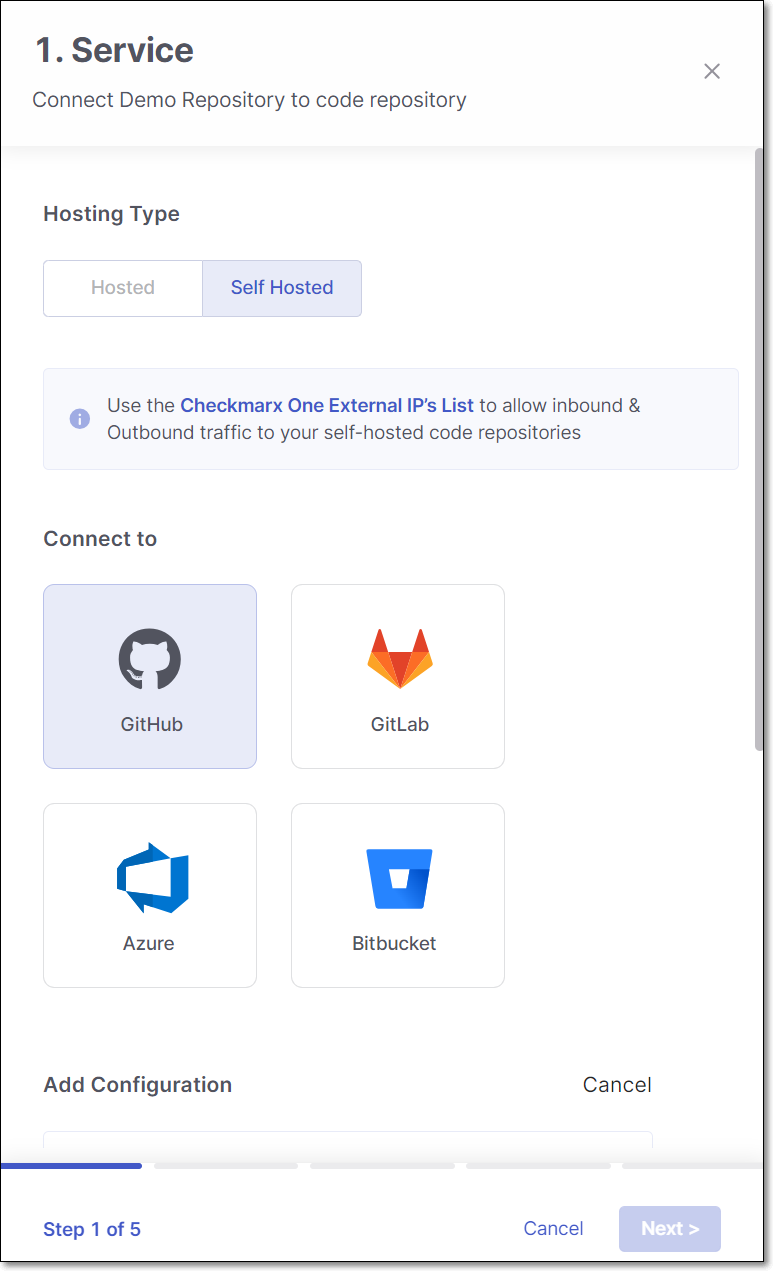
To migrate multiple Checkmarx project to a Self-hosted code repository, use the following steps:
Perform the following:
Select Self-Hosted
Select the code repository type.
Note
In case this is the first connection to the code repository, Client ID and Client Secret are needed.
Configure the connection to your code repository, as follows:
If you are setting up an import configuration for the first time, enter data for the following fields and then click Next:
Instance Name - Designate a name for this import configuration.
URL - Your self-managed domain.
For example: https://github.example.com
Client ID - See ??? for retrieving your Client ID.
Client Secret - See ??? for retrieving your Client Secret.
If you are importing Projects using an existing configuration, select the radio button next to the configuration that you would like ot use, and then click Next.
If you are adding a new configuration in addition to an existing configuration, click + Add Configuration, then fill in the data for this configuration as described above, and then click Next.
Notice
If you would like to edit an existing configuration (e.g., change the URL or credentials), go to Global Settings > Code Repository.
Perform the following:
Select Organization or User organization as the organization type.
Select the specific organization.
Click Next
Note
To allow other organizations to collaborate and interact with the code repository, use the + icon.
In the Repositories screen, select which project will be connected to which repository.
Important
Every Checkmarx project can be connected to 1 repository
If the number of Checkmarx project is smaller or than equal to the number of repositories, select the mapping and click Next.
If the number of Checkmarx project is exceeds the number of repositories, select the mapping and click Continue with "x" projects link.
It is possible to replace any unmapped project with a mapped one.
For example:
Scan Configuration screen contains 2 configuration sections:
Global Projects Settings:
Scanners - Select the scanners to be used for all the projects (By default, all the licensed scanners are enabled).
Permissions - Select the checkbox for the permissions that you would like to grant:
Scan Trigger: Push & Pull Request - Automatically trigger scan when a push event or pull request is done in your SCM. (Default: on)
Pull Request Decortation: Automatically send the scan results summary to the SCM. (Default: on)
SCA Auto Pull Request - Automatically send PR to your SCM with recommend changes in the manifest file, in order to replace the vulnerable version. (Default: off)
Override Settings for Individual Projects:
Scanners - Select the scanners to be used for a specific project (By default, all the licensed scanners are enabled).
Permissions - Select the checkbox for the permissions that you would like to grant:
Scan Trigger: Push & Pull Request - Automatically trigger scan when a push event or pull request is done in your SCM. (Default: on)
Pull Request Decortation: Automatically send the scan results summary to the SCM. (Default: on)
SCA Auto Pull Request - Automatically send PR to your SCM with recommend changes in the manifest file, in order to replace the vulnerable version. (Default: off)
Click Next
Perform the following:
Select whether to enable a branch scan upon project creation (By default, this option is disabled).
In the next screen there is an option to select which branch to scan upon each project creation.
Select Protected Branches - Specify the branches to be designated as "Protected Branches".
Notice
Specifying a branch as a Protected Branch affects three main areas: scan triggering (for PR and push), policy violation detection, and Feedback App notifications.
You can also use a wildcard symbol "*" to designate which branches are protected. The wildcard can be used before the string, after the string, or both. All branches that match the wildcard pattern will be treated as protected branches.
Notice
Examples:
*→ all branchesrelease*→ branches that begin with "release"*release→ branches that end with "release"* release *→ branches that contain "release" anywhere in the name
Tags - For each protected branch, you can optionally assign Tags. When a scan is triggered for this branch (e.g., push or pull request), these tags will automatically be applied to the scan.
Tags can be key:value pairs or simple values. For example,
env:prodorsecurity.
Click Next
Select which branch to scan upon project creation and click Save
Note
Only one branch can be scanned upon project creation.
The selection is performed individually for each project.
Only an explicit branch name can be scanned upon project creation. If you specified a wildcard pattern for branch selection, you will not be given the option of scanning it upon project creation.
Click Connect to GitHub