Viewing Results from All Scans
You can view the results for one selected scan. Depending on your choice, you can either view a list of all scans or individually per selected project.
To view a list of all scans:
Go to Projects & Scans > All Scans. A list with all scans of all projects is displayed.
To view a list of scans for a selected project:
To view a list of all scans of one project, go to Projects & Scans > Projects. A list of all projects is displayed.
Select the desired project and display its scan list
 .
.
To view the scan results of a scan:
Select the desired scan
 from the scan list and then open the results viewer
  to display the results.
Projects and Scan Options
Under Projects & Scans > Projects, various scan and project-related actions are available. For information and instructions on creating and configuring projects, refer to Creating and Configuring Projects.
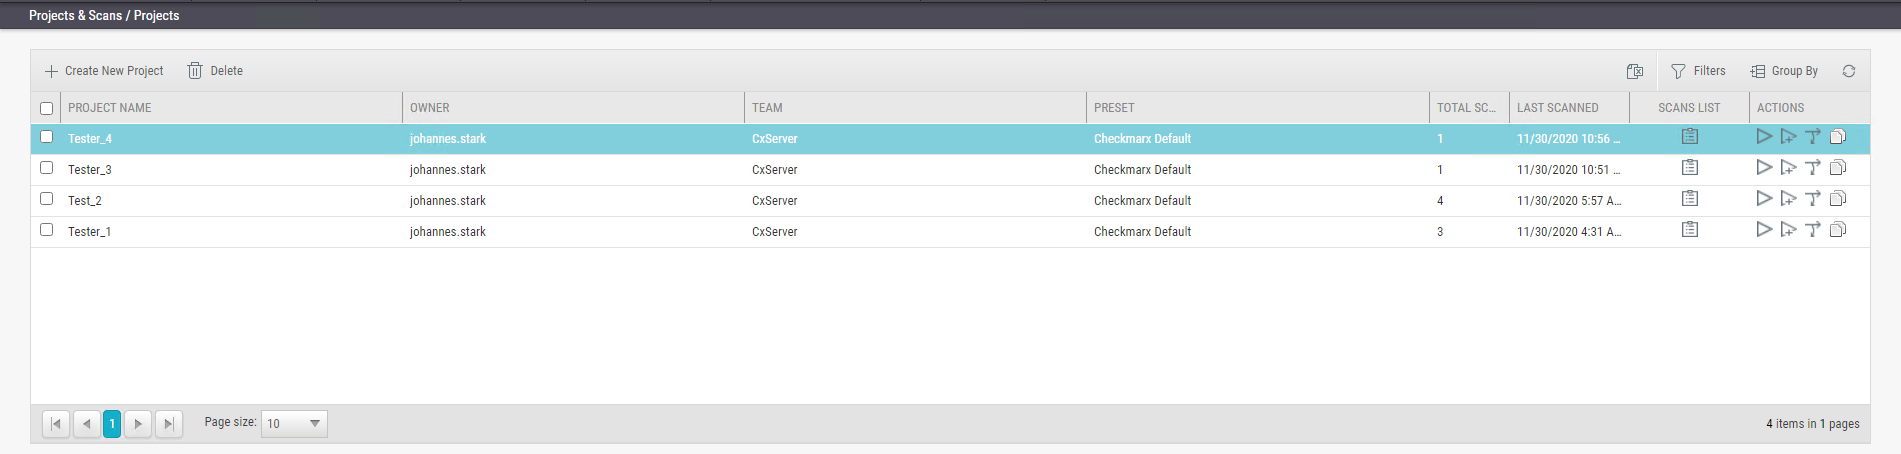 |
Table Columns
Column | Action | Description |
|---|---|---|
Project selector | Check to select project | Selects a project to perform one of the available actions outlined. |
Project Name | Lists the name of the project. | |
Team | Lists the team to which this project is assigned. | |
Preset | The preset you selected when creating the project | |
Total Scans | Number of scans run for this project. | |
Last Scanned | Date and time of the last scan run for the project. | |
Scans List |
| Displays the project in the individual project path, for example, Projects & Scans/View Project Scans/My Java Projects. |
Actions |
| Scans the entire project. If the project is configured for a local location, you have to upload a zip file with the updated source code. |
| Scans only new and modified files since the last scan. NoticeIncremental scan significantly shortens the scan time, but it is not recommended for projects with significant amounts of changes. | |
| The Branch Project operation is similar to copy project, but it copies a different set of properties: Preset, Team and the Last scan from the source project with all results and remarks. | |
| Duplicate Project creates a new project based on the setting of an existing one. From the existing project it will copy the following: Preset, Team, Exclusions, Scheduling, Pre-scan emails, Post-scan emails and Scan failure emails. |


All Scans
Under Projects & Scans > All Scans, all scan results appear in a table with each row representing an individual scan result set. You can sort tables according to Scan Date, Scan Complete Date, Project Name or Risk Level Score. Additional options are available under Managing Tables.
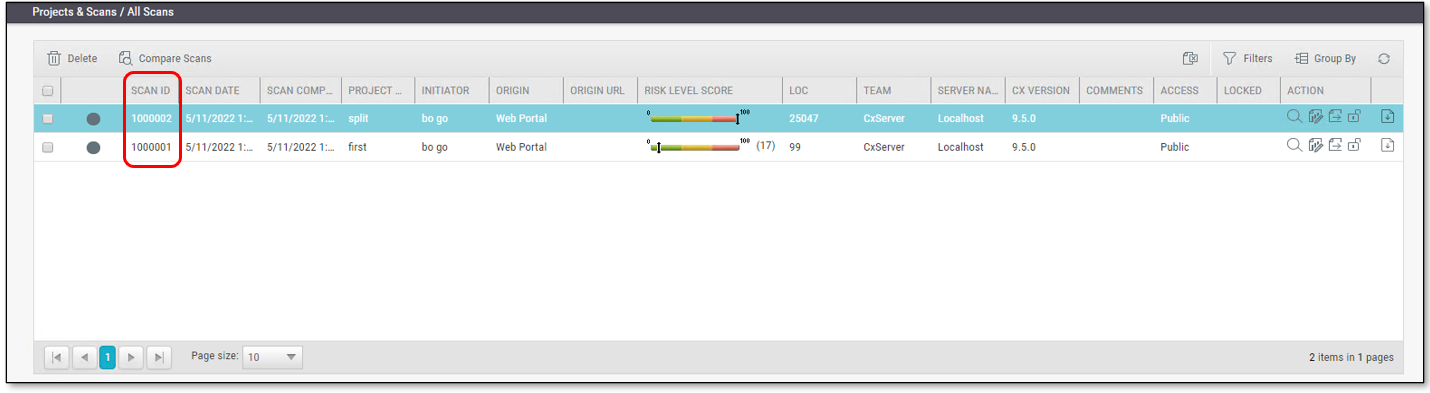 |
Table Columns
Scan selector: Check
 to select a scan to perform one of the available actions outlined at the bottom of this list.
Scan indicator:
 - indicates a full scan
 - indicates an incremental scan
 - indicates a partial scan. A partial scan is a scan that completes but returns limited results, such as when vulnerability queries run, a scanning stage is aborted, or a stage is skipped due to out‑of‑memory or language‑parsing issues.
 - indicates scan in process
Scan ID: The identifier of the scan. The column can searched and sorted.Scan Date: The date when the scan was started
Scan Complete: The date when the scan was completed.
Project Name: The project for which the scan was performed.
Initiator: The user who activated the scan
Origin: The system from which the scan was activated
Origin URL: The triggered URL of origin (e.g., Jenkins URL)
Risk Level Score. A risk indicator bar

indicates the overall risk calculation of all vulnerabilities found in this scan (between 0% and 100%).
LOC (Lines Of Code): The number of lines that the code in the project consists of.
Team: The team that the scan is assigned to
Server Name: The CxEngine server that performed the scan
Cx Version: The CxSAST version at scan time.
Comments: Indicates any comments maintained for the project, for future scans and for instances that continue to be found.
Access: Defines whether the scan is a private scan (not visible to others, but can be viewed by immediate managers) or a public scan.
Locked: If a scan is locked
 , this column marks it as Locked to avoid automated purging of important scan data. Locked scans cannot be deleted. There is no entry in tis column for unlocked
  scans.
Preset: Name of the preset that ran when scanning the code. This column is hidden by default. The column can be searched and sorted.
Action. The following can be performed for selected scans:
 - displays the scan results
 - generates a scan report
 - creates a summary of the scan
 - locks the scan to prevent it from being deleted
 - downloads the scan logs for the selected scan
Summary of All Scans
If a scan has been initiated for a non-local project or if an incremental scan has been initiated for a local project with no code changes since the previous scan, the Comments indicate that the scan was not actually performed.
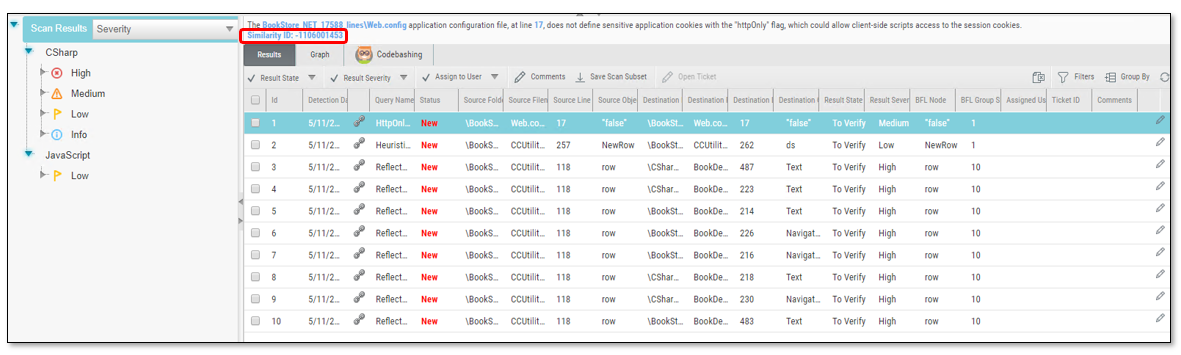
Under Monitoring, scan details are displayed for a selected scan in the table as illustrated below:
 |
The Monitoring tab provides two graphical summaries of found vulnerabilities:
Top 5 Vulnerabilities. This chart displays the five most common high and medium vulnerabilities detected in this scan.
Risk Indicator. This chart represents the correlation between the severity and the quantity of the results.
Severity - Axis X (value between 0 and 100) is calculated according to the number of high, medium and low severity results
Quantity - Axis Y (value between 0 and 100) is calculated according to the number of high, medium and low severity results
The Comments tab allows you to write comments on the scan results.
 |
Scan Results
Notice
You can view the results of one scan at the time.
To view scan results for the desired scan, do the following:
Display all scans or the scans of a certain project as explained above.
Select
he desired scan in the list and click  . The scan results for the selected scan appear.
For detailed information on the scan results, refer to Navigating Scan Results.
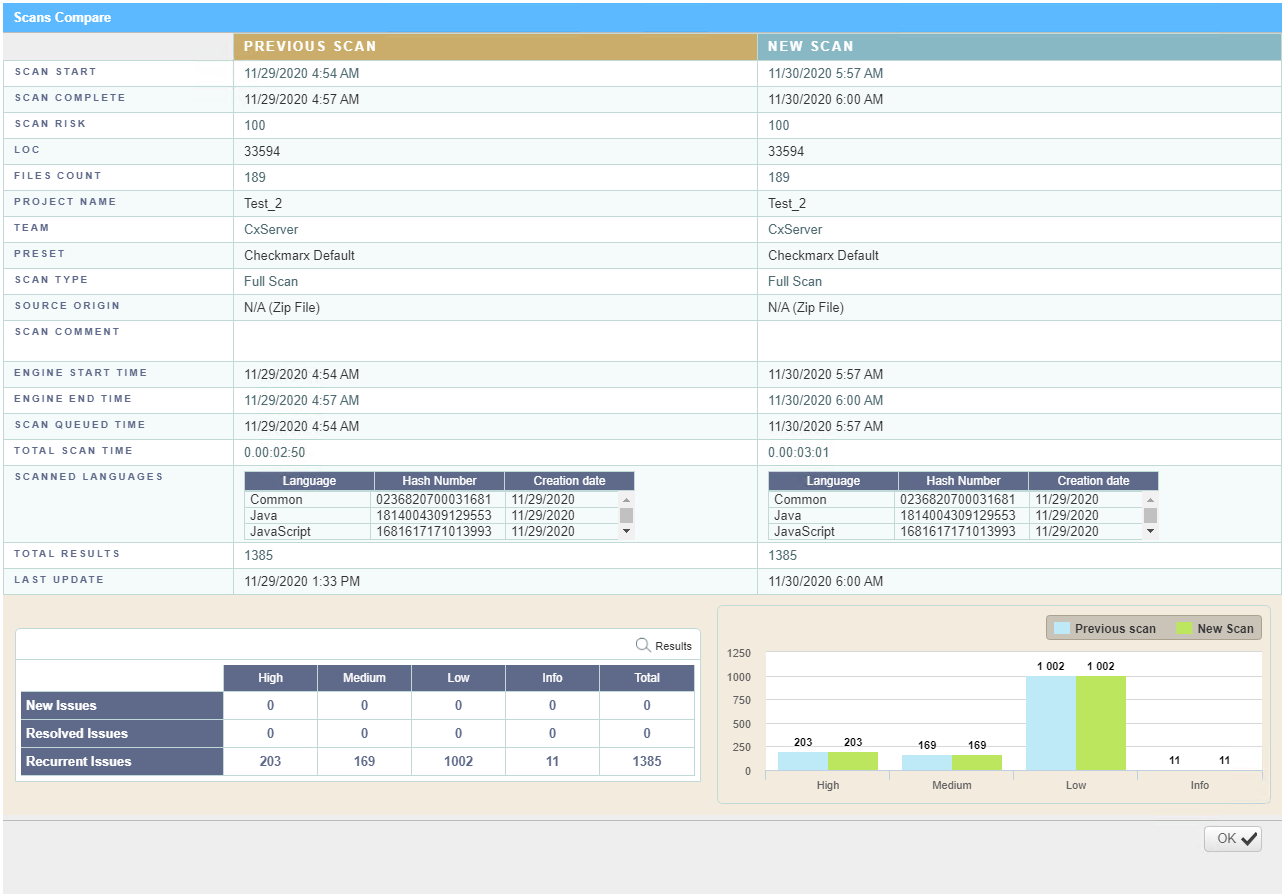
Comparing Scans
To compare two scans, do the following:
Display all scans or the scans of a certain project as explained above.
Select
two scans and click Compare Scans  . The Scans Compare screen is displayed.
Click <Results> in order to see a 'file compare' showing the code differences in each file, grouped by vulnerability/scan result.
 |
Deleting Scans
Delete one or more scans as follows:
Select
the rows of the requested scans.Click
 . You are asked to confirm your request.
Click <OK> to confirm the delete request.
Notice
If the user does not have the authorization required for deleting scans, no scan will be deleted.
Locked scans are not deleted. If, for example, one scan out of three is locked
 , a message appears indicating that only 2 of the 3 scans have been deleted successfully.
To display the details of a locked scan, click Export as CSV File
 to download the DeleteErrors.csv file, which displays the details of the locked scan.
Unlocking all scans indicated in the report enables full deletion of the project.
Usability Enhancements
The Results Viewer is enhanced with the following features:
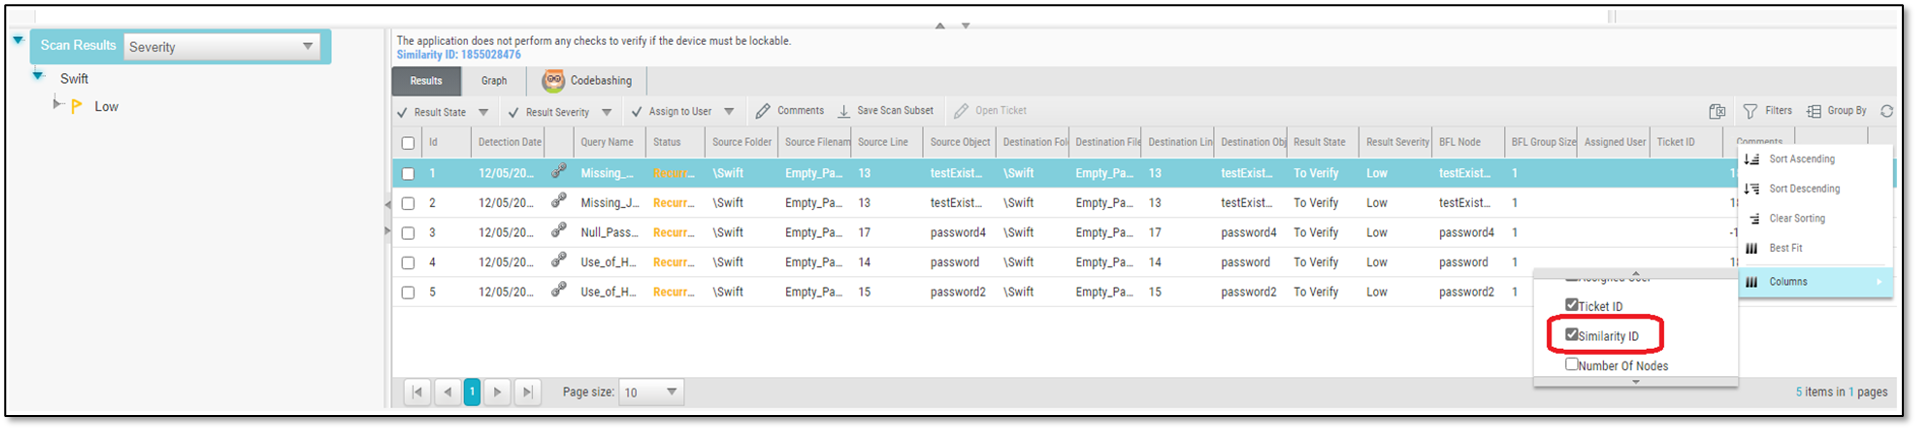
The Similarity ID is displayed in a new column in the Results Viewer. The column, which is searchable, sortable, and groupable, is hidden by default.
To make the column available, you must add it as an additional column, by right-clicking any column header in the Results Viewer, clicking Columns on the drop-down menu and then checking Similarity ID in the list of available columns, as shown below:
Once checked, the new column is available in the results list, as shown below:
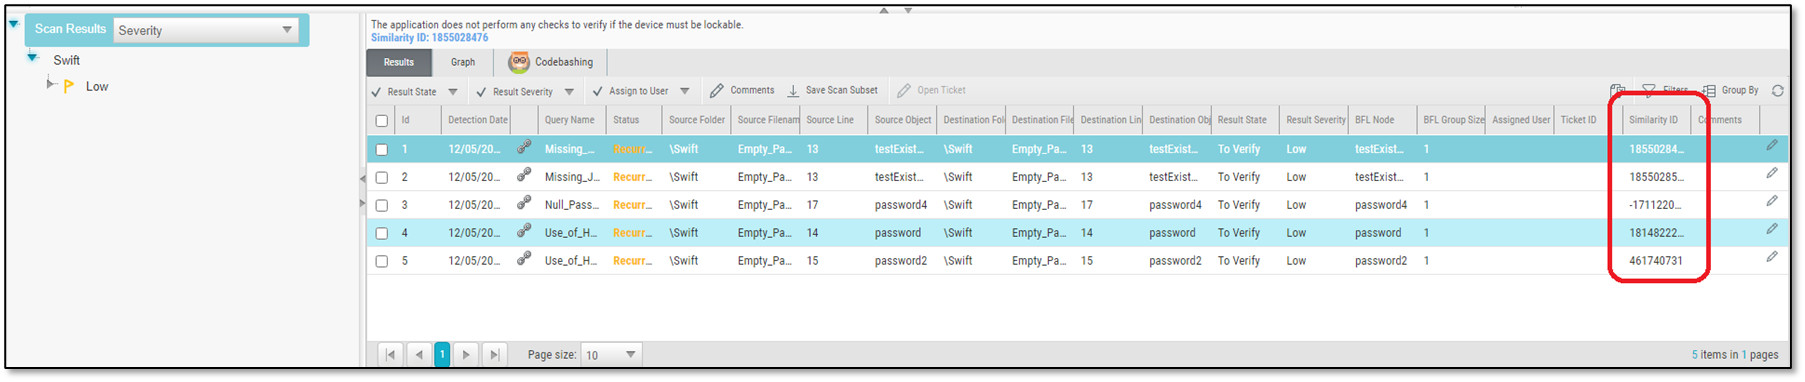
When clicking on a specific result in the Results list, the Similarity ID is included in the displayed details.
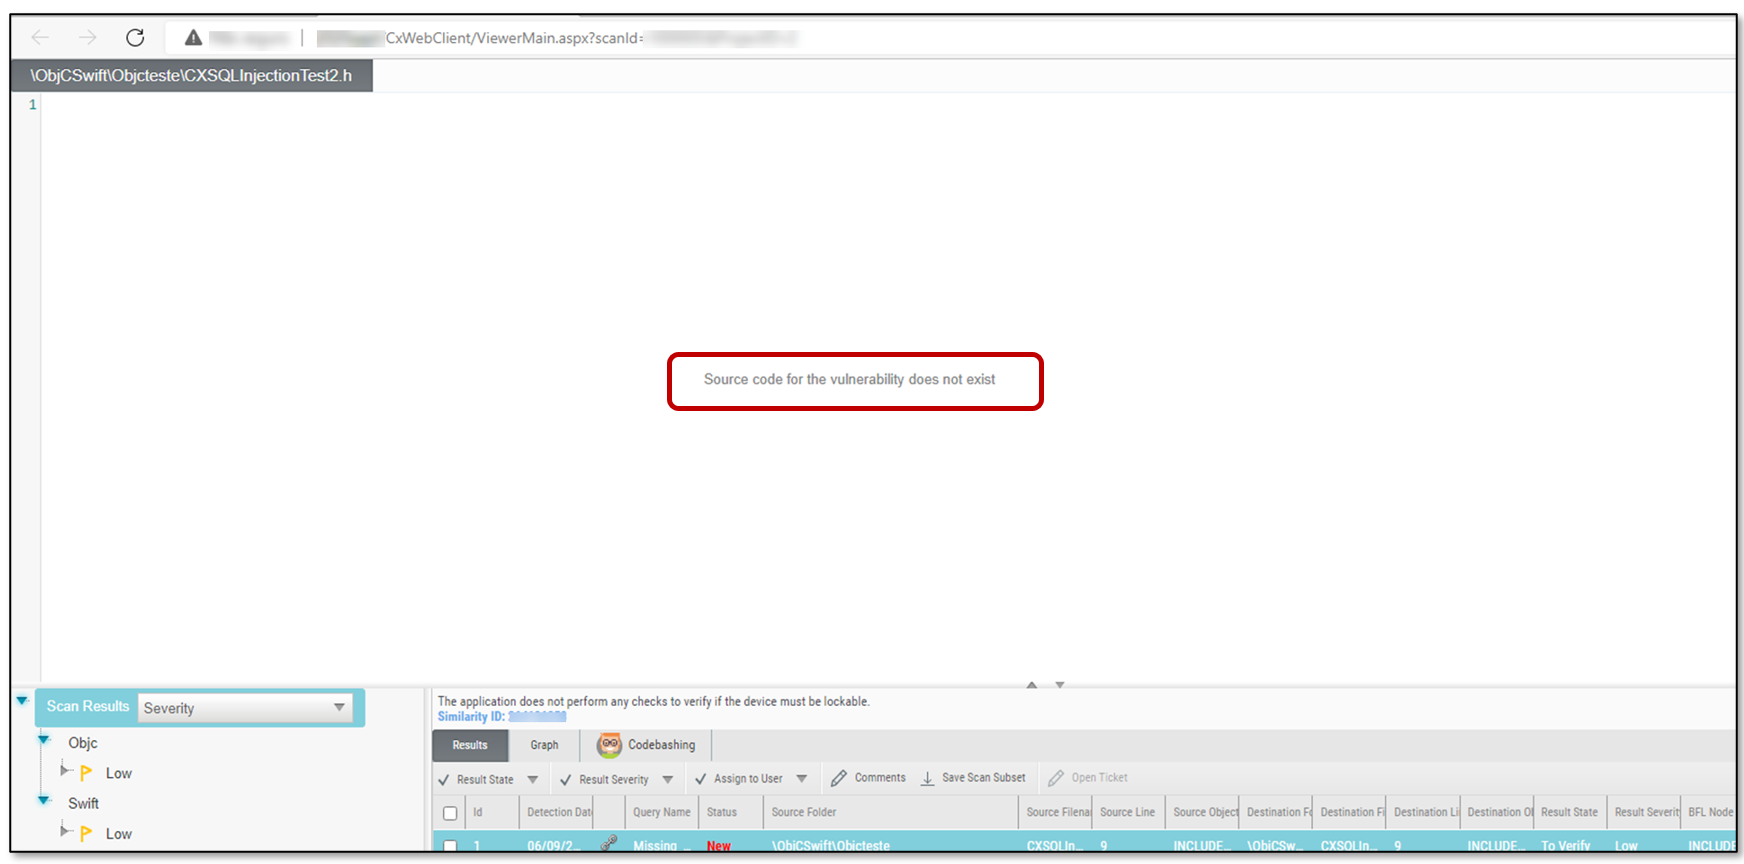
When the source code is deleted, an informative message is displayed. This message is displayed only if the source files in the CxSrc folder are deleted or their names are changed.