SAST Support Content
The following sections represent content related to CxSAST that was created by the support team and imported from Salesforce.
FAQ
Question:
Which Checkmarx components support SAML login?
Answer:
Currently SAML login can be used for CxPortal and the Checkmarx IDE plugins - for all versions.
Codebashing also supports SAML login, but it needs a separate setup.
All other components, such as plugins (CLI, build plugins, etc.), CxAudit and APIs - do not yet support SAML login.
Similarity ID is related to the Vulnerability ID:
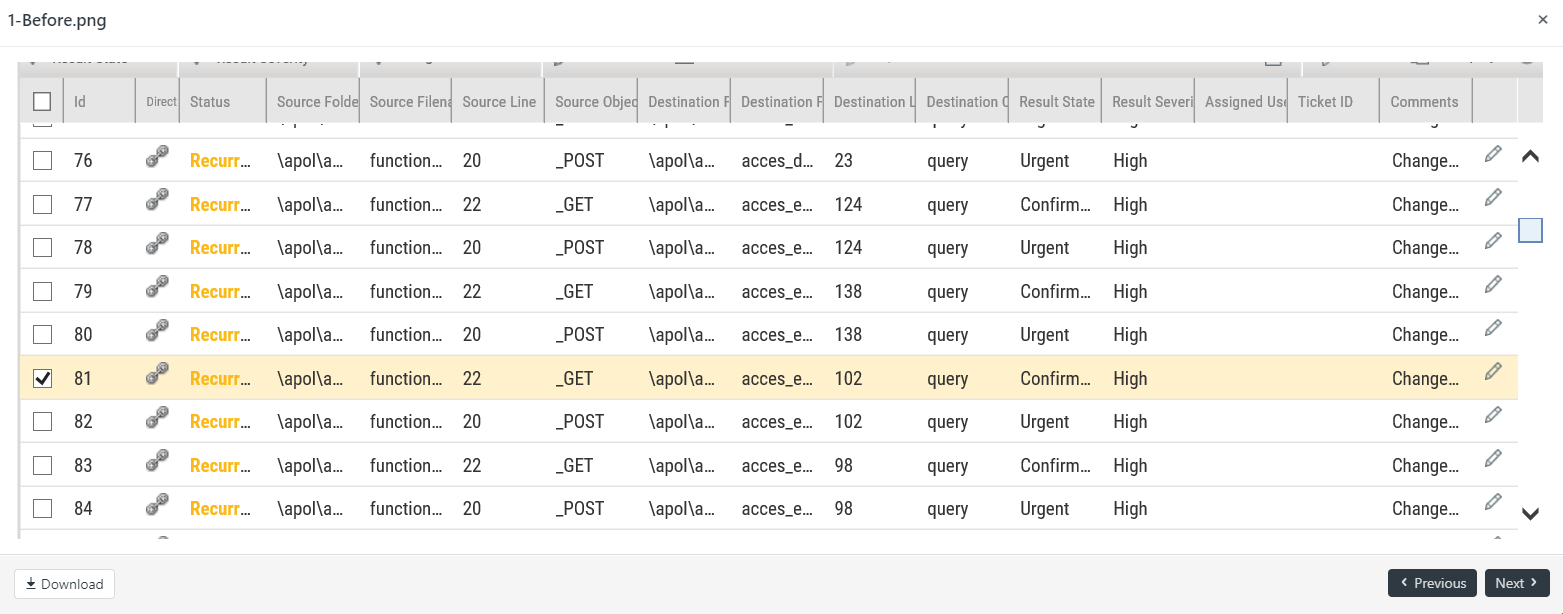
Selecting one Vulnerability ID and changing its result state affects other Vulnerability IDs. See images below for before and after screenshots.
Before:
 |
After:
 |
The Vulnerability IDs probably share the same Similarity ID.
Note
The same Similarity ID is usually observed across multiple files utilizing the same code
For two results to have the same Similarity ID the following needs to happen:
The source and sink should be in the same file (not including the file path, just file name).
The content of the source code on the line with the source or sink should be the same.
The two results are for the same query.
And occasionally, a single file can have two vulnerabilities with the same similarity ID. For example in the code:
String message = “Hello ” + request.getParameter(“username”) + “ today you are “ + request.getParameter(“age”) + “ years old!”;
System.out prinln(message);
In the example above, there are two results for reflected XSS. The first begins with request.getParameter(“username”) and the second begins with
request.getParameter(“age”)
They both will have the same Similarity ID because they are in the same file, the content of the line is the same, and the results are both Reflected_XSS.
This means that if you mark one of them as Not Exploitable, the other will be marked Not Exploitable as well.
Similarity ID is basically a hash that takes into account a fully qualified class name (or file name for some languages), source object, and destination object. Vulnerabilities found in shared code will have the same Similarity ID and will share attributes. A Similarity ID can be set at two levels, either at the team level or the project level. The goal of using a Similarity ID is to facilitate setting of Confirmed and Not Exploitable across common code bases in different projects within the same Checkmarx team. Providing users with an optimal, ongoing findings review process requires optimizing the effort involved in identifying whether a finding is recurrent, new, or fixed, as well as clarifying the uniqueness of findings and vulnerable flows. Moreover, users expect that any finding's state or status change will be reflected in future scans if the finding is recurrent.
The system will automatically check each future scan result per project or per team to see if a vulnerability has already been discovered. If the vulnerability has been previously discovered, it will be marked using the existing Similarity ID. The purpose of this is to reduce the time needed to be spent on similar vulnerabilities.In summation, once the system identifies that a result shares it's Similarity ID with a previous result, the attributes of the two results will be linked.
The goal is to improve and optimize the project's SAST scan, not only in terms of scan time but also in terms of the number of results. Here are some general guideline to go by when determining what files/folder should be excluded from scans.
Test code related:
Usually, in all applications, we have code related to tests, such as UnitTests, for example. We recommend excluding it from the scan, as it will not add any value to the scan, since there is no attack vector in a test code. Furthermore, in some cases/languages, test functions may use a specific syntax that can cause parsing problems.
Example of filter: !**/test/**,!**/tests/**,!**/*.tests.js,!**/*spec.ts,!**/* spec.js
3rd party files and packages:
Third-party files are usually package files that are not under the control of the user but of another third party. A common example of this are libraries like jquery or angular.js.
As another example, when using package managers NPM it is not recommended to scan the node_modules folder, as it is generated from the package.json (holds all the dependencies listed in that json file). The customer can use the SCA to scan the same package.json.
Example of filter: !**/node_modules/**,!**/vendor/**,!**/libs/**
Compiled and generated files:
The compiled folders or files are the result of compiling the original source code.
It is important to analyze the original source code that will result these files and not the compiled source code.
Example of filter: !**/build/**,!**/bin/**,!**/dist/**,!**/release/**
How to articles
Some environments require TLS 1.0 and TLS 1.1 to be disabled to meet certain security standards. In these situations, the CxSAST deployment will require TLS 1.2 enabled in order to provide secure communication between clients, SQL and the CxManager.
TLS 1.2 can be enabled via the Windows registry on the CxManager server by following these steps:
Automated Procedure
Download the attached registry file (TLS 1.2.reg) to the CxManager desktop
Right-click and select Merge.
Reboot the server.
Manual Procdeure
Start the Windows Registry Editor (start / run or search for regedit).
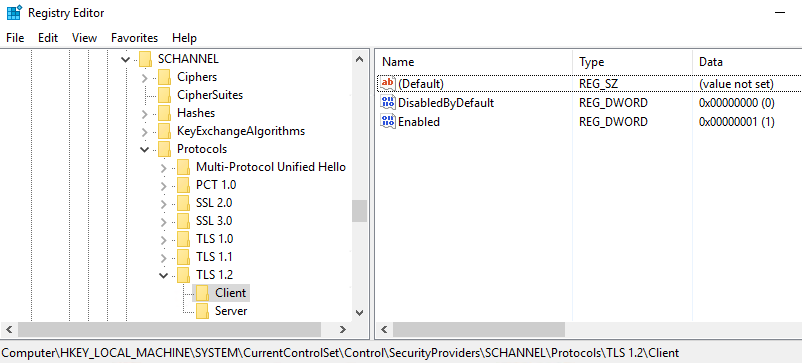
Enable TLS 1.2 client and server keys keys:
Browse to the following registry key:HKEY_LOCAL_MACHINE\SYSTEM\CurrentControlSet\Control\SecurityProviders\SCHANNEL\Protocols.
Right-click on the Protocols folder, then select New > Key. Rename this key/folder TLS 1.2.
Right-click on the key/folder you had just added, then select New > Key. Rename this key/folder Client.
Right-click on the Client key/folder, then select New > DWORD (32-bit) Value. Then rename the DWORD to DisabledByDefault and ensure that the value is set to 0.
Right-click on the Client key/folder, then select New > DWORD (32-bit) Value. Then rename the DWORD to Enabled and set the value to 1.
Right-click on the key/folder you had just added, then select New > Key. Rename this key/folder Server.
Right-click on the Server key/folder, then select New > DWORD (32-bit) Value. Then rename the DWORD to DisabledByDefault and ensure that the value is set to 0.
Right-click on the Server key/folder, then select New > DWORD (32-bit) Value. Then rename the DWORD to Enabled and set the value to 1.
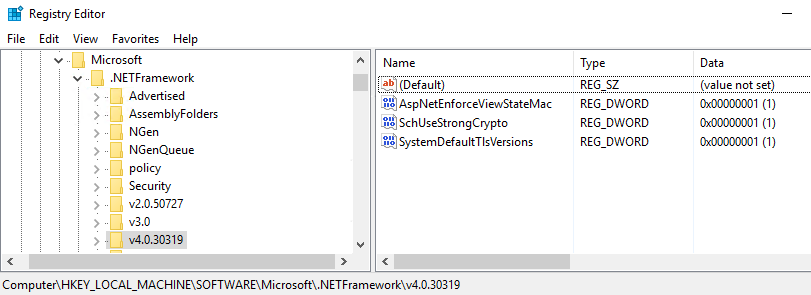
To configure .NET to use TLS 1.2., in regedit, browse to the following registry key:
HKEY_LOCAL_MACHINE\SOFTWARE\Microsoft\.NetFramework\v4.0.30319
Right-click in the right pane and create a new DWORD (32-bit) Value. Then rename the DWORD to SchUseStrongCrypto and set the value to 1
Right-click in the right pane and create a new DWORD (32-bit) Value. Then rename the DWORD to SystemDefaultTlsVersions and set the value to 1
Browse to the following registry key: HKEY_LOCAL_MACHINE\SOFTWARE\Wow6432Node\Microsoft\.NetFramework\v4.0.30319
Right-click in the right pane and create a new DWORD (32-bit) Value. Then rename the DWORD to SchUseStrongCrypto and set the value to 1.
Right-click in the right pane and create a new DWORD (32-bit) Value. Then rename the DWORD to SystemDefaultTlsVersions and set the value to 1
Reboot the server
Powershell scripts for automated and/or remote deployment
New-Item 'HKLM:\SYSTEM\CurrentControlSet\Control\SecurityProviders\SCHANNEL\Protocols\TLS 1.2'
New-Item 'HKLM:\SYSTEM\CurrentControlSet\Control\SecurityProviders\SCHANNEL\Protocols\TLS 1.2\Server'
New-ItemProperty -path 'HKLM:\SYSTEM\CurrentControlSet\Control\SecurityProviders\SCHANNEL\Protocols\TLS 1.2\Server' -name 'Enabled' -value '1' -PropertyType 'DWord'
New-ItemProperty -path 'HKLM:\SYSTEM\CurrentControlSet\Control\SecurityProviders\SCHANNEL\Protocols\TLS 1.2\Server' -name 'DisabledByDefault' -value 0 -PropertyType 'DWord'
New-Item 'HKLM:\SYSTEM\CurrentControlSet\Control\SecurityProviders\SCHANNEL\Protocols\TLS 1.2\Client'
New-ItemProperty -path 'HKLM:\SYSTEM\CurrentControlSet\Control\SecurityProviders\SCHANNEL\Protocols\TLS 1.2\Client' -name 'Enabled' -value '1' -PropertyType 'DWord'
New-ItemProperty -path 'HKLM:\SYSTEM\CurrentControlSet\Control\SecurityProviders\SCHANNEL\Protocols\TLS 1.2\Client' -name 'DisabledByDefault' -value 0 -PropertyType 'DWord'
New-ItemProperty -path 'HKLM:\SOFTWARE\Microsoft\.NetFramework\v4.0.30319' -name 'SchUseStrongCrypto' -value 1 -PropertyType 'DWord' -Force
New-ItemProperty -path 'HKLM:\SOFTWARE\Microsoft\.NetFramework\v4.0.30319' -name 'SystemDefaultTlsVersions' -value 1 -PropertyType 'DWord' -Force
New-ItemProperty -path 'HKLM:\SOFTWARE\Wow6432Node\Microsoft\.NetFramework\v4.0.30319' -name 'SchUseStrongCrypto' -value 1 -PropertyType 'DWord' -Force
New-ItemProperty -path 'HKLM:\SOFTWARE\Wow6432Node\Microsoft\.NetFramework\v4.0.30319' -name 'SystemDefaultTlsVersions' -value 1 -PropertyType 'DWord' -Force
SAST, From version 9.3 and above utilize the server environment variables as well.
Below is a full guide to update CX when using SQL authentication and the password has changed.
* STOP ALL CX SERVICES AND IIS BEFORE YOU START
SAST -
 |
Edit DBConnectionData.config file
Change the encrypted password in DBConnectionData.config file to the actual clear-text new password.
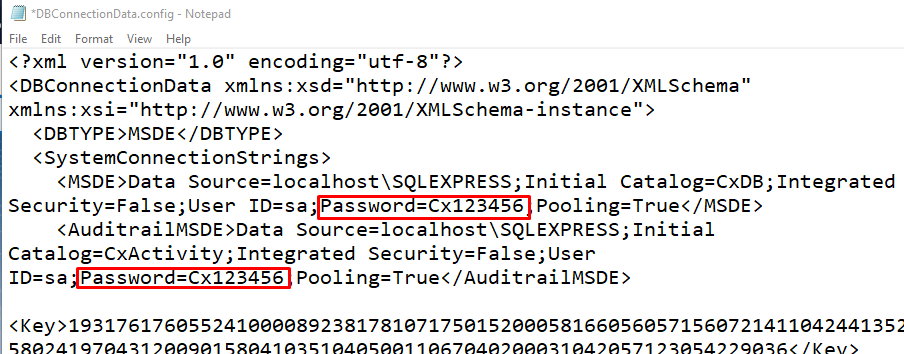
Save the DBConnectionData.config file
Sart all CX services EXCEPT CxARM, CxARMETL. This will encrypt the new password in the config file.
* Perform steps 1-4 on every manager machine
ACCESS CONTROL (9.3 and up) -
In case the SAST database is shared with access control, AFTER you updated the SAST password and restarted services
Open the file .\checkmarx\configuration\DBConnectionData.config located in the CxManager machine
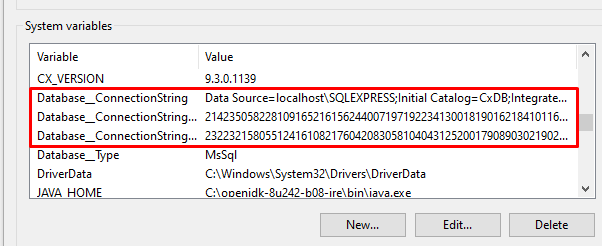
Set the following environment variables, machine-level.
* Database__ConnectionString - Update the Password with the new encrypted password from DBConnectionData.config file.
* Database__ConnectionStringHash - replace the whole string with the value of Key tag
* Database__ConnectionStringSalt - replace the whole string with the value of IV tag
Start IIS.
M&O (ARM) -
Stop services CxARM and CxARMETL
Delete/Rename file <Checkmarx installation folder>\Checkmarx Risk Management\ETL\encryptedKey.txt if it exists.
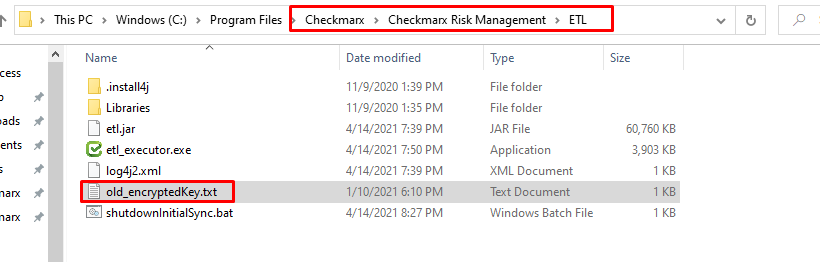
Open cmd prompt and navigate to folder <Checkmarx installation folder>\Checkmarx Risk Management\ETL
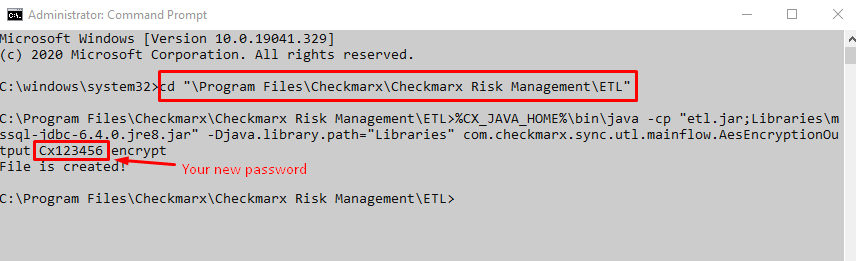
Run the following command in CMD (admin mode) in the ETL path:
%CX_JAVA_HOME%\bin\java -cp "etl.jar;Libraries\mssql-jdbc-6.4.0.jre8.jar" -Djava.library.path="Libraries" com.checkmarx.sync.utl.mainflow.AesEncryptionOutput <PUT_HERE_NEW_PASSWORD> encrypt
Note
8.x Java location is under <Checkmarx installation folder>\Checkmarx Risk Management\jre
check if this file was created: <Checkmarx installation folder>\Checkmarx Risk Management\ETL\encryptedKey.txt
Open file and copy encrypted password.
Update file db.properties under <Checkmarx installation folder>\Checkmarx Risk Management\config with the new encrypted password.

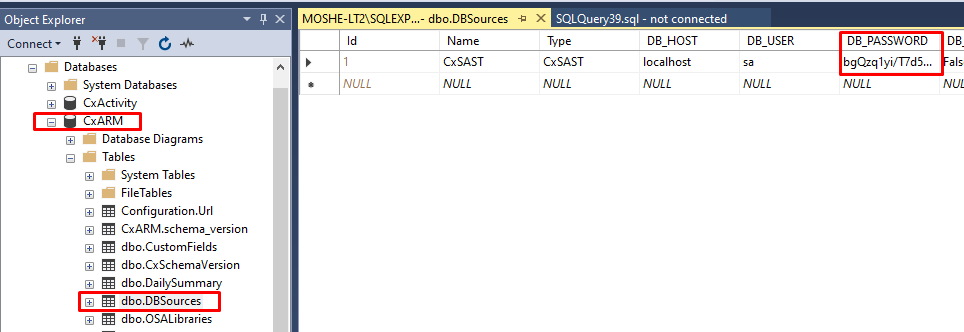
Open SQL Management Studio and Right click -> Edit database table CxARM - DB_SOURCES. Update the DB_PASSWORD column with the new encrypted password.
Go to folder <Checkmarx installation folder>\Checkmarx Risk Management\ThirdParties
Make a copy of file prunmgr.exe and rename to new file to CxARMETL.exe. Double click to run it.

Go to startup tab and change the encrypted password value to the new encrypted password. press OK to close it.
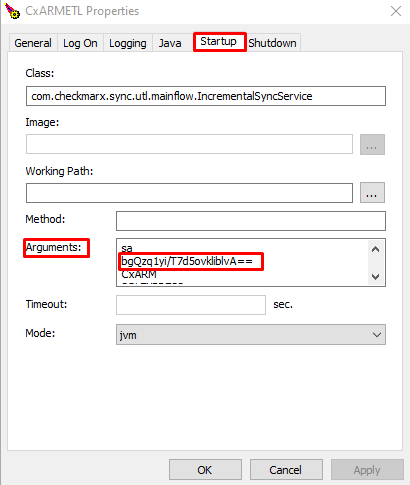
Delete the newly created file CxARMETL.exe.
Start Services CxArm and CxARMETL.
Verify that "Integrated Security" is set to true for both MSDE and AuditrailMSDE in the following file:
<installation directory>\Checkmarx\Configuration\DBConnectionData.config
Update Windows Services
Open windows services
Right click on the service and select Properties.
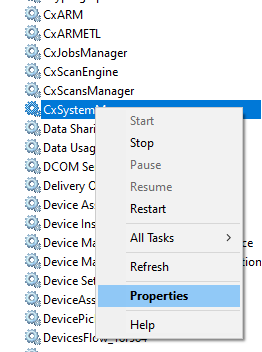
Select the Lon On tab and update the password for the service account
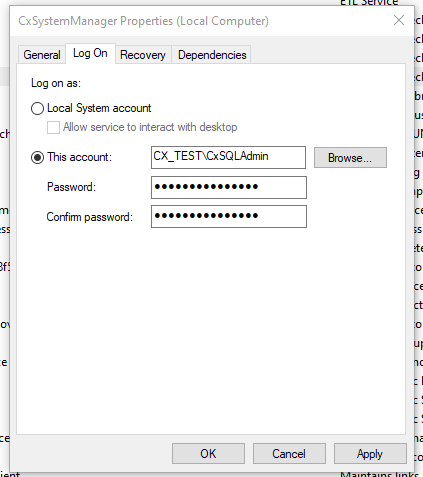
Click Apply
Close the Properties window and restart the service.
Repeat this for each service
Update IIS Application Pools
Open Internet Information Services (IIS) Manager
Expand the server and select Application Pools
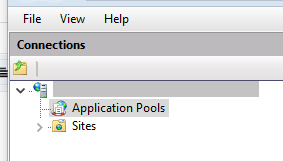
Right click the Cx applications and select Advanced Settings
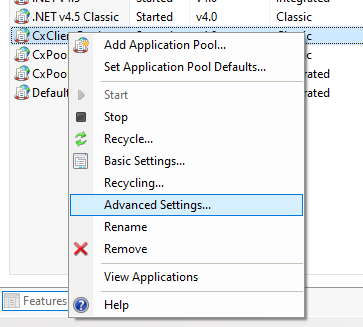
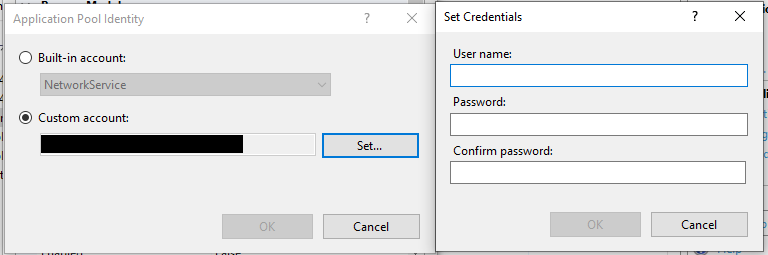
Select "Identity" under Process Model and click the 3 dots to the right
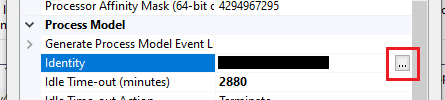
Click "Set" and update the password
Repeat this process for all Cx applications
Restart IIS
Verify Checkmarx portal is loading without issue
Modify this config file: "<install path>\Checkmarx\Checkmarx Audit\CxAudit.exe.config
Change the following key to your URL:
<add key="SERVER_ADDRESS" value="https://cx-sast.cx.local/" />
Change the following key to your desired Audit User Role:
<add key="LOGON_USER" value="MyCxAuditor" />
:::
<appSettings>
<add key="SOURCE_REPOSITORY" value="CxAuditSrc" />
<add key="TEMP_DIR" value="Temp" />
<add key="CWE_CACHE" value="CWECache" />
<add key="SERVER_ADDRESS" value="https://cx-sast.cx.local/" />
<add key="SERVICE_NAME" value="Cxwebinterface/CxWSResolver.asmx" />
<add key="LOGON_USER" value="MyCxAuditor" />
<add key="MAX_NUM_OF_RESULTS" value="10000" />
<add key="MAX_NUM_OF_RESULTS_TO_SAVE" value="100000" />
<add key="TIME_OUT_IN_MIN" value="10" />
<add key="ClientSettingsProvider.ServiceUri" value="" />
<add key="ACCESS_CONTROL_LOGIN_ENABLED" value="false" />
</appSettings>
<system.web>
:::
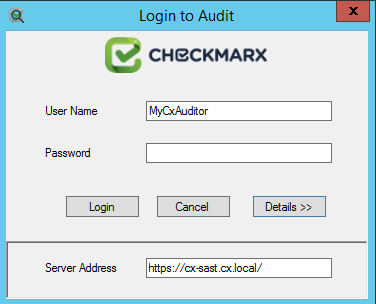 |
Note
When logging in to CxAudit , the [User Name] field value is from User Management under the column [USER NAME].
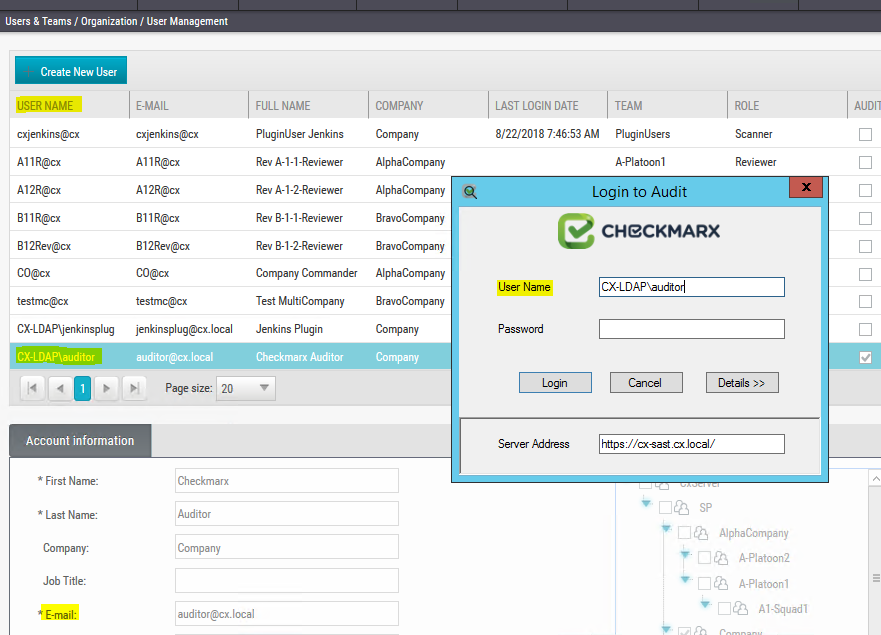 |
Applies to versions: from 9.x
Incremental scans are performed based on the last full scan of a project. Incremental scan results could be inaccurate if too many files had been changed since the last full scan was performed. Therefore, we recommend running a full scan every few incremental scans.
The default threshold value for requiring a full scan to be performed (if the default action is changed to “perform full scan”) is if more than 7% of the files were changed.The default threshold percentage can be changed through the CxDB database. Also the default action can be changed to do one of the following when the threshold limit is reached:
Perform full scan
Fail scan
Query to check current threshold limit
SELECT *
FROM [CxDB].[dbo].[CxComponentConfiguration]
WHERE [Key] = 'INCREMENTAL_SCAN_THRESHOLD'
Update command to change threshold limit
USE [CxDB]
GO
UPDATE [CxDB].[dbo].[CxComponentConfiguration]
SET [Value] = '{DESIRED THRESHOLD}'
WHERE [Key] Like 'INCREMENTAL_SCAN_THRESHOLD'
GO
In case of threshold limit is reached, the default action will take place (“fail the scan”) – unless it is changed to “perform full scan”.
Query to check current default action:
USE [CxDB]
GO
SELECT *
FROM [CxDB].[dbo].[CxComponentConfiguration]
Where [Key] = 'INCREMENTAL_SCAN_THRESHOLD_ACTION'
Update command to change default action
To set the default action to “perform a full scan”:
USE [CxDB]
GO
UPDATE [CxDB].[dbo].[CxComponentConfiguration]
SET [Value] = 'FULL'
WHERE [Key] Like 'INCREMENTAL_SCAN_THRESHOLD_ACTION'
GO
To set the default action to “fail the scan”:
USE [CxDB]
GO
UPDATE [CxDB].[dbo].[CxComponentConfiguration]
SET [Value] = 'FAIL'
WHERE [Key] Like 'INCREMENTAL_SCAN_THRESHOLD_ACTION'
GO
By default, CxSAST stores the source code of scanned projects and the reports in folders at the root drive of the <Checkmarx Installation Path>.
Note
If you are changing this location to a network share, the Cx services and Cx IIS App Pools must be signed on with an account which has access to the new folder locations. If you are changing the location to a local drive, skip to step 4.
Change the login user for all of the 4 Cx services on the manager server to use a domain account designated for access. If you don't have one already, you can create one but it also needs to be added to the SQL logins to access the CxDB and CxActivity databases. Verify the services start with the new account. If they do not start, either the password is incorrect or the account does not have proper rights to the Checkmarx databases on SQL. Once you confirm they will start successfully, stop them to proceed with folder changing process.
Change the login identity for all of the 3 Checkmarx IIS app pools to use the same Cx service account.
Create a root folder on the destination volume, and inside create the 3 folders: CxSrc, ExtSrc, CxReports
Create a share of that root folder and give your Cx service account full permissions to that share.
Log into the CxManager with Cx service account and verify you can access the new share.
Change the paths to point to the new location for all the components.
First, stop all Checkmarx services on the Checkmarx server(s).
From SQL, query the database to find IDs for the folder path references you wish to change. (Important - CxSrc and ExtSrc must reside on same drive, so these must be moved together!)
SELECT * FROM [CxDB].[dbo].[CxComponentConfiguration] where [value] like '%:\%'--find IDs for the
EX_SOURCE_PATH
SOURCE_PATH
REPORTS_PATHUpdate your paths with your share paths and ids:
update [CxDB].[dbo].[CxComponentConfiguration] set value= '\\Newvolume\ExtSrc' where id=ID#
update [CxDB].[dbo].[CxComponentConfiguration] set value= '\\Newvolume\CxSrc' where id=ID#
update [CxDB].[dbo].[CxComponentConfiguration] set value= '\\Newvolume\CxReports' where id=ID#copy/paste contents of CxSrc, ExtSrc, CxReports folders to the new folders.
Start Checkmarx services.
Test by creating a new project for scanning and generating a report of an existing scan and new scan.
For version 9.5 and above, log settings are in the following JSON files:
..\Checkmarx\Checkmarx Access Control\appsettings.json
..\Checkmarx\Checkmarx Jobs Manager\bin\JobsManager.logging.config.json
..\Checkmarx\Checkmarx Scans Manager\bin\ScansManager.logging.config.json
..\Checkmarx\Checkmarx System Manager\bin\SystemManager.logging.config.json
..\Checkmarx\Checkmarx Web RestAPI\CxRestAPI\bin\WebAPIHost.logging.config.json
..\Checkmarx\Checkmarx Web Services\CxWebInterface\bin\WebServices.logging.config.json
Example 1: Change Scan Manager to record at DEBUG level.
Edit ScansManager.logging.config.json at this line to debug level under the TRACE section: "minimumLevel": "Debug"
Restart the CxScansManager service to load the new settings
<Install Path>\Checkmarx\Checkmarx Scans Manager\bin\ScansManager.logging.config.json
{
   "service":{
      "identifier":"ScansManager""<<CLIPPED>>"{
         "path":"$rootDir$/../../Logs/ScansManager/Trace",
         "fileName":"CxScanManagerAll",
         "minimumLevel":"Debug",
         "dateTimeFormat":"yyyy-MM-dd HH:mm:ss,fff",
         "jsonFormat":false,
         "showCaller":false,
         "showCorrelation":false,
         "showService":false,
         "showGuid":false,
         "retention":5,
         "rotation":{
            "size":10,
            "period":"Infinite"
         }"<<CLIPPED>>"
      }
Example 2: Change how many log files to maintain
Edit individual *.logging.config.json at these attributes: "retention":
For Access Control, edit appsettings.json at these attributes: "retainedFileCountLimit":
Restart the services to load the new settings
For CxSAST 9.2 or less:
To migrate your CxSAST and SQL Server databases to a different server, follow the steps below.
Request a New License File:
Go to the address below to download the HID generator to the new server. https://download.checkmarx.com/CXPS/CxServices/HidGenerator.zip
Run the utility to obtain a new HID.
Fill out the attached HID replacement form.
Send the newly created form to Checkmarx support, will provide you with a new license file.
Note
any changes to the hardware (CPU, Storage) may change the HID, thereby requiring a new license file.
To perform CxSAST Migration:
Stop all CxSAST services and IIS Web Server.
Back up the following files and folders:
<Checkmarx Folder>\Checkmarx Audit\DefaultConfig.xml
<Checkmarx Folder>\Checkmarx Engine Server\DefaultConfig.xml"<Checkmarx Folder>\Executables\*.*
<Checkmarx Folder>\Configuration\DBConnectionData.config
X:\CxSrc\*.*
Install CxSAST on the new server.
During the installation, when prompted to import a license file, select the new license file.
When prompted for SQL connection details, ensure that the correct SQL instance is selected and click Test Connection.
Note
If SQL Server databases are migrated to a different SQL Server Instance, you are prompted to use an existing databases on that server. In this case, click OK to proceed.
After the installation, restore all files/folders that were backed up from the previous system in step 2.
Update all Cx Services and Cx IIS App Pools to use the SQL Server domain account set up for database access, as mentioned in the following article:
To migrate SQL Server Databases:
Stop Checkmarx Services.
For CxSAST 9.2 or less: In the existing Checkmarx Server, go to folder <Checkmarx Install Path>\Configuration\ and back up the file DBConnectionData.config file.
Back up all of the Cx databases on the old database server.
Restore the backed-up databases on new database server.
For CxSAST 9.2 or less: Restore theDBConnectionData.config you backed up earlier into the new server.
For CxSAST 9.2 or less: Change the following according to new server details:
<MSDE>Data Source=[NEW_DB_SERVER_NAME];Initial Catalog=CxDB;Integrated Security=True;Pooling=True</MSDE>
<AuditrailMSDE>Data Source=[NEW_DB_SERVER_NAME];Initial Catalog=CxActivity;Integrated Security=True;Pooling=True</AuditrailMSDE>
For CxSAST 9.3 and higher: Open Environmental Variables under Advanced System Settings. Edit Database_ConnectionString. Update the parameter "Data Source" to point to the new SQL server.
Ensure that you have the same permissions set on the new SQL Server instance to match the existing login, by giving the new login permissions for the two restored databases:
Go to <Server_Name>\Security\Logins\<Login_Properties page>\User Mapping
Click the database name
Select the check box for DB_OWNER
If using Risk Management:
Update the DB_HOST value in the file db.properties (Checkmarx\Checkmarx Risk Management\Config\db.properties) to have the new database server name.
Update the configuration of the database connection in the CxARM database with the following SQL query:
UPDATE CxARM..DBSources
SET DB_HOST='{put your new host name here}'
WHERE [Name]='CxSAST'
Question:
When scanning a project not all coding languages are being scanned. How do we enable a scan of all existing coding languages in our project?
Answer:
MULTI_LANGUAGE_MODE can be set both at the project level, as well as the server level.
For Project Level (version 8.4.2 and up): Select the configuration from the Create Project menu as shown here:
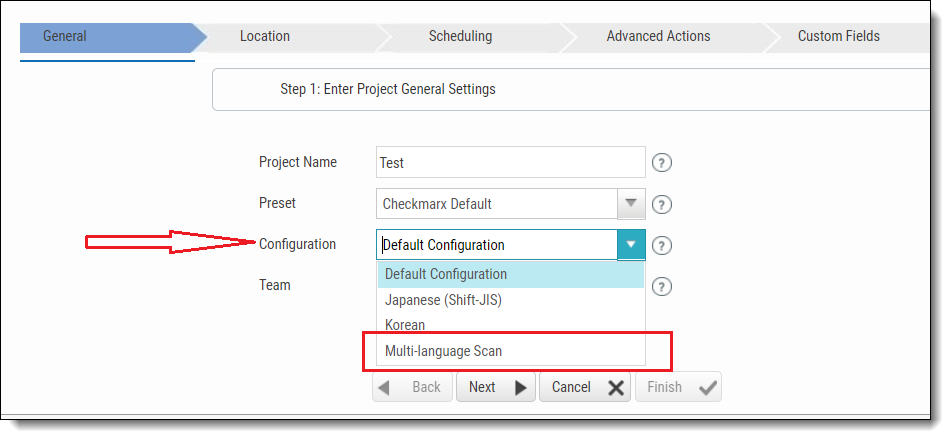 |
For Server Level configuration (all versions): Follow these steps:
1) Run the following SQL script on your CxDB:
update [CxDB].[Config].[CxEngineConfigurationKeysMeta]
set DefaultValue=2
where KeyName = 'MULTI_LANGUAGE_MODE';
update [CxDB].[Config].[CxEngineConfigurationKeysMeta]
set DefaultValue=0.001
where KeyName = 'LANGUAGE_THRESHOLD';
Note
he LANGUAGE_THRESHOLD is useful when one primary language is much smaller in scope than another, but it still contains production code that you want to scan.
NOTE: the LANGUAGE_THRESHOLD is useful when one primary language is much smaller in scope than another, but it still contains production code that you want to scan.
2) Restart Cx services and IIS.
Troubleshooting
Problem: Logging into CxAudit from a remote machine fails, and the error message shown below is displayed.
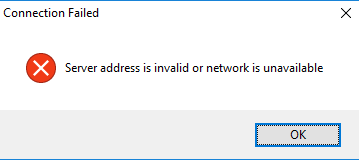 |
Conditions:
SSO is enabled (Anonymous is disabled for Cx IIS site authentication)
A Self-Signed certificate is used for Checkmarx IIS site binding
CxAudit login is successful on the Checkmarx server
Possible Log Errors (%localappdata%\Checkmarx\CxAudit\Log):
[MainThread_CxAudit] INFO Available memory: 962 Used memory: 123 Elapsed
Time: 00:00:22.3670518 [Unspecified] - Login login exception:
System.Net.WebException: The underlying connection was closed: Could not
establish trust relationship for the SSL/TLS secure channel. --->
System.Security.Authentication.AuthenticationException: The remote
certificate is invalid according to the validation procedure.
[MainThread_CxAudit] INFO Available memory: 17120 Used memory: 161 Elapsed
Time: 00:00:03.9690000 [Unspecified] - Login login exception:
System.Net.WebException: The request failed with HTTP status 401: Unauthorized.
Cause: Certificate error, such as the server name and the name on the certificate do not match.
Resolution:
Verify that the Self-signed certificate name is identical with the server name. If the two names do not match, create a new certificate with a name matching the server name.
Export the SSL certificate from the Manager server and then import the certificate into the CxAudit machine's Trusted Root Certification Authorities folder, by following the instructions below.
To export the SSL certificate from the manager server:
Export or back up the SSL certificate from Checkmarx server to a .pfx file.
On the Start menu, click Run and then type mmc to open Microsoft Management Console.
Go to File > Add/Remove Snap-in.
Select Certificates > Add.
Select Computer Account and click Next.
Select Local Computer and click Finish.
Close the add standalone snap-in window and the add/remove snap-in window.
Click the + icon to expand the certificates (local computer) console tree and look for the personal directory/folder.
Expand the certificates folder.
Right-click on the certificate you would like to back up and select ALL TASKS > Export.
When prompted to confirm the operation click Yes and select the option to export the private key and include all certificates in certificate path, if possible.
Warning: Do not select the option delete private key.
Leave the default settings and then enter your password if required.
Choose to save the file and then click Finish.
The message Export successful should now be displayed, and the .pfx file is now saved to the location you indicated.
Copy the .pfx file to the CxAudit machine and proceed to follow the instructions below.
To import a .pfx file to your machine:
From the Windows' Start menu, click Run and then type mmc to open Microsoft Management Console.
Go to File > Add/Remove Snap-in.
Select Certificates > Add.
Select the option Computer Account and click Next.
Select Local Computer and click Finish.
Close the add standalone snap-in window and the add/remove snap-in window.
Click the + icon to the left of the Certificates (Local Computer) console tree, to expand it.
Expand the console tree Trusted Root Certification Authorities.
Right click on the certificates folder and select ALL TASKS > Import.
Run the certificate import wizard to import your primary certificate from the .pfx file. When prompted, choose to install into the Trusted Root Certification Authorities console tree.
Problem: A specific vulnerability is showing as having one severity in the “Results Summary” view and a different severity in the “Scan Results Details” areas of a Report. As represented below:
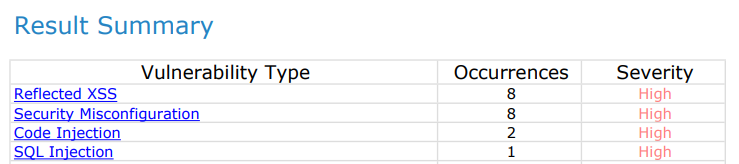 |
 |
Cause:
The difference in the severity of the result in the report are occurring because Queries have a severity that they mark findings as by default and Results have a severity that can be changed individually
The “Results Summary” will show the severity of the query.
The “Scan Results Details” will show the severity of the result.
This is caused by marking the results in the "Result Viewer" as a different severity than that of the query:
 |
Resolution: This functionality is by design.
Problem: When I edit one vulnerability - for instance, by changing its result state or severity, assigning it to a user or adding a comment - I notice other vulnerabilities are updated with the same change. Why is this happening?
Cause: This is happening due to the fact that these findings are marked with the same "similarity id".
Note that the same similarity id is usually observed across different files with the same code.
Resolution: Generally for the two results (source or sink of the result) to have the same similarity id, the following needs to happen:
The source / sink should be in the same file (not including the file path - just the file name)
The content of the source code on the line with the source / sink should be the same
The two results are for the same query
And occasionally a single file can have two vulnerabilities with the same similarity id. For example:
String message = “Hello ” + request.getParameter(“username”) + “ today you are “ + request.getParameter(“age”) + “ years old!”; System.out prinln(message);
In the code above, there are two results for reflected XSS - one starting with request.getParameter(“username”) and one starting with request.getParameter(“age”).
But both will have the same similarity id because they are in the same file, the content of the line is the same, and the results are both Reflected_XSS.
This means that if you mark one of them as “not exploitable”, the other will be marked as well.
When scanning code with Checkmarx, we expect the system to save changes we did from one scan (such as changing a result to "not exploitable") to the next scan if the same flow (similarity id) was discovered.
The Checkmarx system supports that feature in two configurations:
Per Team
Per Project
The configuration is done in the "CxDB" SQL database, in
the "CxComponentConfiguration" table, with
the "RESULT_ATTRIBUTES_PER_SIMILARITY" key name
Options:
true: Per Team (default)
false: Per Project
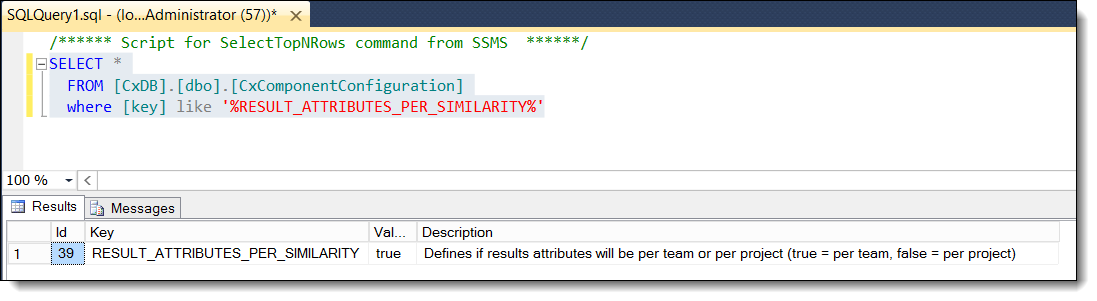 |
If you want to switch to "Per Project", and not have the results updated per team across all your projects, run the following SQL on your CxDB, and once finished reset IIS:
update [CxDB].[dbo].[CxComponentConfiguration]
set [value] = 'false'
where [key] = 'RESULT_ATTRIBUTES_PER_SIMILARITY'
Problem: Scan submitted via CLI fails with error:
Exception in thread "main" java.lang.OutOfMemoryError: Java heap space
Cause: Java heap space exhausted on machine running the CLI.
Resolution: In the runCxConsole.cmd there should be a line similar to the following.
java -Xmx1024m -jar CxConsolePlugin-CLI-##.#.#.jar %*
Example for version; java -Xmx1024m -jar CxConsolePlugin-CLI-1.1.36.jar %*
The -Xmx1024m in the above command is the current heap size (1GB in this case). Changing this to a larger number will correct the issue at hand, and what you'll need to use depends both on how large the project is and now much memory is in the machine running the CLI.
We would recommend starting at -Xmx6g (6GB) and verifying that works.
Example: java -Xmx6g -jar CxConsolePlugin-CLI-##.#.#.jar %*
For plugin issues, please check the following logs on the CxSAST Manager Server:
<Checkmarx installation>\Checkmarx\Logs\JobsManager
<Checkmarx installation>\Checkmarx\Logs\ScanManager
<Checkmarx installation>\Checkmarx\Logs\WebAPI
Additionally, please check for the logs corresponding to the plugin that you are experiencing issues with:
Bamboo
In Bamboo, navigate to the Build page>Logs>Download
CLI
<CLI Installation folder>\<Project Name>\project name.log
>CLI Installation folder>\logs\cx_console.log
Eclipse
<Eclipse installation folder>\eclipse\logs\cx_plugin.log
IntelliJ
In IntelliJ, navigate to Help>Show Log in Explorer
idea.log
Jenkins
On Windows
<Jenkins Install Path>\Jenkins\jobs\<job name>\builds\<specific build>\Checkmarx\
<Jenkins_Install_Dir>\logs
On Linux
/var/log/jenkins/jenkins.log
Maven
To get the logs for a Maven build, please redirect the console output to a file using the following command:
mvn <your parameters> --log-file log.txt
Sonarqube
To get the Checkmarx plugin logs for a Sonarqube project, please redirect the console output to a file.
Team City
In Team City, navigate to the Build page>Build log>Download full build log
TFS
Visual Studio
VS 2012
C:\Users\xxx\Documents\Visual Studio 2012\Addins\CxVsPlugin.log
VS 2015
C:\Users\xxx\Documents\Visual Studio 2015\Settings\CxVsPlugin.log
VSTS
In VSTS, navigate to the Build page>Download all logs as a zip.
Problem: Checkmarx Pipeline/GitHub Actions scans are failing with error code 208 Logs:
2025-12-01T13:22:36.6011075Z 2025/12/01 13:22:36 POST /api/projects HTTP/1.1
2025-12-01T13:22:36.6011569Z Host: us.ast.checkmarx.net
2025-12-01T13:22:36.6011910Z Authorization: ***
2025-12-01T13:22:36.6012112Z Cx-Origin: CLI
2025-12-01T13:22:36.6012425Z User-Agent: Github Action/2.3.39
----
---
2025-12-01T13:22:36.8516746Z 2025/12/01 13:22:36 Receiving API response:
2025-12-01T13:22:36.8517542Z 2025/12/01 13:22:36 HTTP/1.1 400 Bad Request
Failed creating a project: CODE: 208, Failed to create a project, project name 'webapp' already exists
Cause: O-Auth client permissions and authorization issue.
Resolution:
Add the O-auth client to the required authorization level.
Assign the roles update-access, create-projectto the O-auth Client
Problem: Receiving an error message when logging in with SAML.
The following error is logged in the <Checkmarx>\Logs\WebAPI\Trace\WebAPIAll.log log file
Cx.CrossCutting.CxInfrastructure.Exceptions.CxException: User profile can't be created/updated due to email duplication.
Cause: This means that the email address for the user signing in via SAML already exists in the CxPortal. However, an email address is a unique key in the DB and cannot be used for more than one entry.
Resolution: To work around this issue, do the following:
Login to CxPortal with an account that has Admin permissions.
Go to the User Management page.

Find the user in question, edit the information, and then update the email by just adding "1" to the email address as per this example: user1@domain.com. The email is not used for communication, so there is no problem.
Save the changes, and perform the SAML login again.
Problem: Any HTTP PUT request from the Checkmarx will fail with the IIS logs indicating 405 error.
An example of the PUT failing with error 405 is when trying to initiate a scan for a new project it will go through but when initiating a scan for an existing project it will fail with the following error in IIS logs:
2020-01-16 16:05:34 10.179.199.74 PUT /cxrestapi/sast/scanSettings - 443 Fname+LName 10.175.190.160 Apache-HttpClient/4.5.10+(Java/1.8.0_231) - 405 0 0 15
Cause: HTTP PUT request method being blocked.
Resolution:
After removing WebDAV the issue was fixed and all is working.
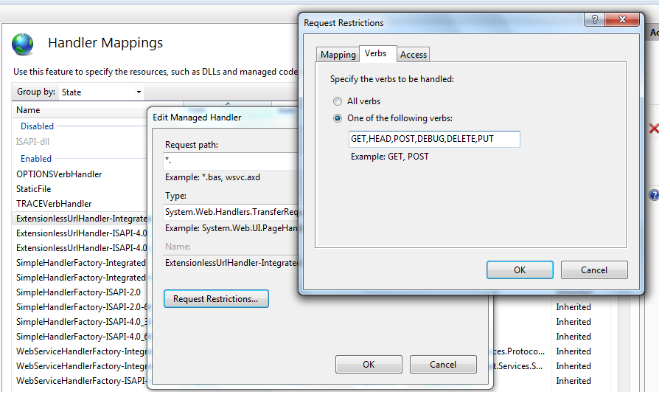
WebDAV can be removed by 2 ways:
Go to Handler Mappings in your IIS Manager. Find ExtensionlessUrlHandler-Integrated-4.0, double click it. Click Request Restrictions... button and on Verbs tab, add both DELETE and PUT.
Go to <Checkmarx install directory>Checkmarx\CheckmarxWebPortal\Web and backup your web.config file and add the following lines of code in your web.config
<system.webServe>
<security>
<requestFiltering>
<verbs allowUnlisted="false">
<add verb="GET" allowed="true" />
<add verb="POST" allowed="true" />
<add verb="DELETE" allowed="true" />
<add verb="PUT" allowed="true" />
</verbs>
</requestFiltering>
</security>
AND
<modules>
<remove name="WebDAVModule" />
</modules>
<handlers>
<remove name="WebDAV" />
</handlers>
Problem: Scans are stuck in 99% in the queue
Cause: AMQ corruption
Resolution:
Stop AMQ broker service, CxSastResult and CxScansManager services in all Managers
Rename to .old the KahaDB
Start AMQ broker service, CxSastResult and CxScansManager services in all Managers
Find and delete the stuck scans in queue (be very careful with this step, if there is not recent backup of the DB and for some reason the Delete statement is not performed correctly, it could be deleting other important things in the DB, please, Delete in a DB is always risky, this specific table is a table that holds temporal values, it is ok to delete from it, but, we need to always warn about the risks of the Delete):
select * from cxdb.dbo.ScanRequests
where Stage = 4 and TotalPercent = 99
Then proceed to delete them:
Delete from cxdb.dbo.ScanRequests
where Stage = 4 and TotalPercent = 99
Restart CxSastResult and CxScansMan ,
Problem: User unable to sign into CxSast portal with error “invalid credentials.” Resetting password does not help.
Cause: The user ID is likely expired.
Resolution: Go to Access Control and edit the user and check the expiration date. You can change that date if it is expired.
Problem: Upgrade or Fresh installation gets stuck on "Installing Windows Feature WCF-Http-Activation" and never gets past this.
Cause: This is a windows iis component (https://learn.microsoft.com/en-us/dotnet/framework/wcf/feature-details/how-to-install-and-configure-wcf-activation-components) and when this problem happens, its likely already on their system, but updating it is breaking in the installer.
Resolution: Open Windows Task manager, go to processes and kill the "Windows Module Installer" process. It gets the installer to continue.
Problem: After applying 9.5 HF5, in some cases the AMQ data is getting filled up with log files causing the manager non-functional.
These logs are using huge disk space, and the AMQ is not deleting them.
Cause: Applying the hotfixes below overwrites the customization:
SAST 9.5 (after HF 5)
Resolution: Our recommendation to fix this issue is:
Backup ~Checkmarx\Checkmarx ActiveMQ\conf\activemq.xml
Stop ActiveMQ service.
Edit ~Checkmarx\Checkmarx ActiveMQ\conf\activemq.xml as below:
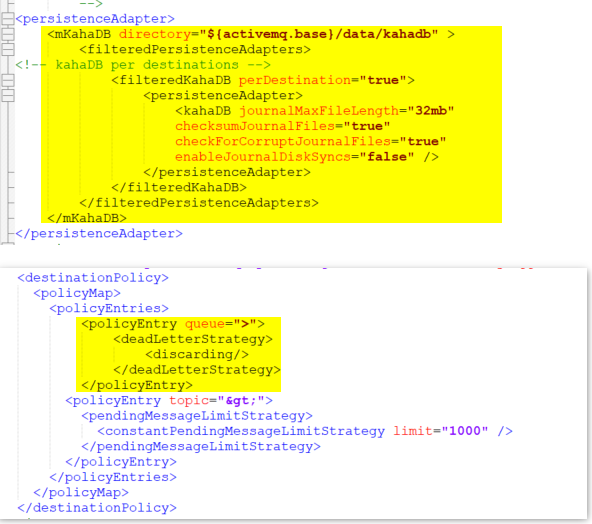
Rename the folder ~Checkmarx\Checkmarx ActiveMQ\data\kahadb to kahadb.old
Start ActiveMQ service and ensure it stays in the running state.
Perform a 'small' full scan from the UI and ensure it completes successfully.
Problem: The test connection to Git fails while setting up a project and using SSH to connect.
Cause: There can be either networking or connectivity issues as well as certificate issues.
Resolution:
Connectivity issues: First, rule out connectivity issues to the Git repository over port 22 (SSH) (or another custom port specified for SSH to this repository).
Certificate Issues: Once networking/connectivity issues are ruled out, the next step is to confirm there are not certificate issues and that the certificate in use is actually accepted by the Git server. For this second step, the best idea is to take Checkmarx out of the picture and confirm this from git-bash client:
Git client is normally installed here: C:\Program Files\Git\ or locate the Git folder inside the Cx Server.
Run git-bash.exe with elevated privileges
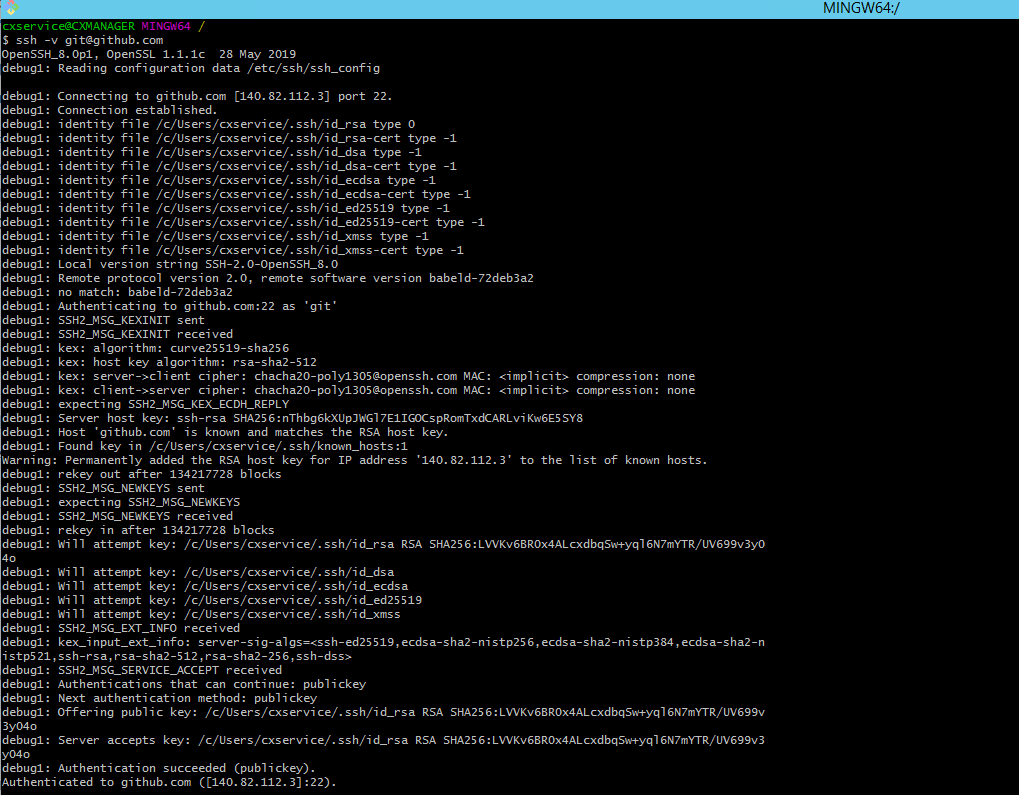
Test command: ssh -v git@<repo-server-fqdn>
Replace the <repo-server-fqdn> with the actual repo-server-fqdn
Example fqdn: git@github.com
Make sure to place the id_rsa file (SSH key file) here: IdentityFile ~/.ssh/id_rsa
Above, the tilde character ~ should be replaced with the User folder of the account that is running git-bash, for example C:\Users\cxservice\.ssh and the id_rsa is stored in this location. Alternately, you can specify another IdentityFile location by configuring it in file C:\Program Files\Git\etc\ssh\sshconfig (the IdentityFile parameter points to the ssh key file)
The authentication should succeed (see screenshot below), meaning Git client was able to connect to the Git server using the ssh key provided. If not, confirm that the SSH key is valid for this Git server.
If the step above succeeds, run the following command: git ls-remote <git-repo-ssh-url>
If this succeeds, you should be able to connect via test connection.
At times there may be a need to change the CxSAST installation directory's location due to:
Company's policy for installing on specific folders
Disc space issue
Changing the Entire Installation Folder
For changing the installation folder from C:\ to D:\ for example, it is recommended to uninstall and re-install CxSAST.
Before uninstalling, make sure to backup the following:
CxDB and CxActivity databases
CxSrc and Executables folders
Configuration files:
DBConnectionData (located under C:\Program Files\Checkmarx\Configuration )
web.config (located under C:\Program Files\Checkmarx\CheckmarxWebPortal\Web )
license (located under C:\Program Files\Checkmarx\Licenses )
After the installation to the desired location, copy the backup files to the newly created folders.
Changing the Location to Overcome Disc Space Issues
To change the location of the folders containing log files (which are increasing in size due to the increasing number of scans), you can change the configuration in the DB and config files by following this procedure:
Execute one of the following two SQL queries to show the current paths:
Query 1:
select * from CxDB.[dbo].[CxComponentConfiguration] where [Key] like '%PATH'Query 2:
SELECT [Id], [Key], [Value], [Description]
FROM [CxDB].[dbo].[CxComponentConfiguration]
WHERE Value like '%c:%'Update the path to the required one:
update [dbo].[CxComponentConfiguration] set [Value]='D:\CxSRC' where [Key]= 'SOURCE_PATH'update [dbo].[CxComponentConfiguration] set [Value]='D:\ExtSrc' where [Key]= 'EX_SOURCE_PATH'update [dbo].[CxComponentConfiguration] set [Value]='D:\CxReports' where [Key]= 'REPORTS_PATH'Change the config files for the new logs location pre 9.3:
Open each of the log4net configuration files in the installation:
JobsManager – <Checkmarx Installation Path>\Checkmarx Jobs Manager\bin\CxJobsManagerLog4Net.config
ScansManager – <Checkmarx Installation Path>\Checkmarx Scans Manager\bin\CxScansManagerLog4Net.config
SystemManager – <Checkmarx Installation Path>\Checkmarx System Manager\bin\ CxSystemManagerLog4Net.config
WebServices – <Checkmarx Installation Path>\Checkmarx Web Services\CxWebInterface\log4Net.config
RestAPI - <Checkmarx Installation Path>\Checkmarx Web RestAPI\CxRestAPI\Log4Net.config
WebPortal - <Checkmarx Installation Path>\CheckmarxWebPortal\Web\log4net.config
Open the files for editing and find both file tags. The first one is for the log file, and the second one is for the trace file. Example for the WebPortal log configuration:
<file value="..\..\Logs\WebClient\${COMPUTERNAME}\Portal.log" >;
Change both files to refer to the storage path you are using:<file value="\\SharedStorage\MyShare\Logs\WebClient\${COMPUTERNAME}\Portal.log" />
Example:\\XXXXXX\CXS_Prod_Data\CXS\Logs\WebClient\${COMPUTERNAME}\Logs\ScansManager\Trace\CxScanManagerAll.log
For versions 9.3 and up follow this guide for changing log locations: https://checkmarx.force.com/CheckmarxCustomerServiceCommunity/s/article/How-to-change-the-Manager-s-log-location-for-SAST-9-3-and-up-no-M-O
Repeat this procedure for all the following configuration files.
As part of the scan process, before assigning a scan to an engine, the CxSAST Manager estimates how much memory the scan will use and tries to reserve this amount of memory on the engine (to avoid a situation where the engine "runs out of memory" mid-scan and crashes). If the engine cannot reserve this memory, the CxSAST Manager will move to the next engine and do the same.
When the CxSAST Manager tries to reserve memory in all available engines but all fail to reserve the needed amount of memory, you will see the message in the UI "No engine can be assigned to this scan, please check the log for more information".
There could be various reasons why all engines are unable to reserve memory (engines are offline, insufficient RAM, and more). To investigate this further we would require further information:
The CxSAST Manager logs, most importantly the ScansManager logs ([install path]\Checkmarx\Logs\ScansManager) but preferably all the logs under [install path]\Checkmarx\Logs.
Screenshot of the failed scan from the UI which shows time stamps, to correlate with the logs.
Screenshot of the 'Engines Management' page, so we can see the engine's configurations.
Question:
I'm trying to set up Git in the source control dialog, but the connection keeps failing. What can I do to troubleshoot?
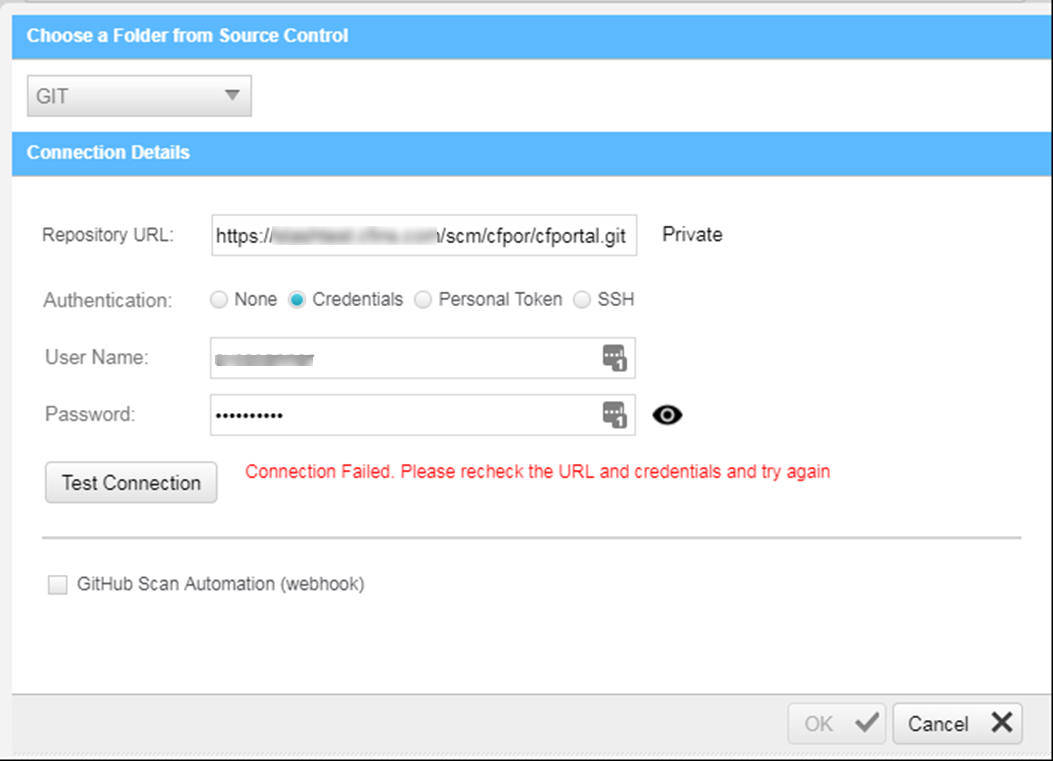 |
Answer: To troubleshoot, try the following:
First of all, login as an admin to your Cx portal, and ensure "Path to Git client executable" setting is configured correctly:
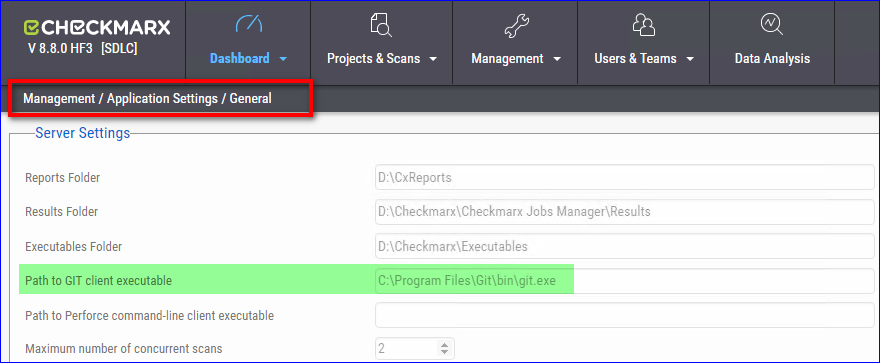 |
Then, perform the following steps:
RDP into your CxManager
Go to your local Git client installation, open the Git shell under <git client install>\bin
Run the following command (provide the username/password):
git ls-remote <your git repo URL>
See the following example for connecting to a Webgoat repository:
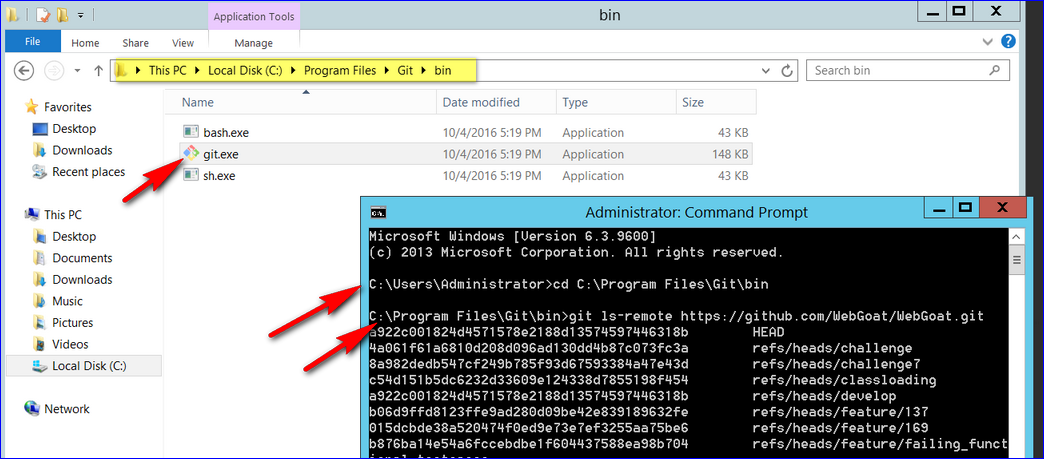
Note
This would help clarify that if the Git Client connection fails, the problem is not Checkmarx-related.
If you have a certificate on your GitLab env, make sure you've set it up (or have your IT help):
You'll also need to import the certificate through mmc (start > type mmc.exe) to your Trusted Root Certificates on the CxManager. This article (see link below) is discussing the SAML certificate, but the process for your SSL certificate would be the same):
Note
If the procedure listed above doesn't help, try re-installing local Git and choose the ‘Use Windows Certificate Store’ option, which should help resolve the issue.
Problem:
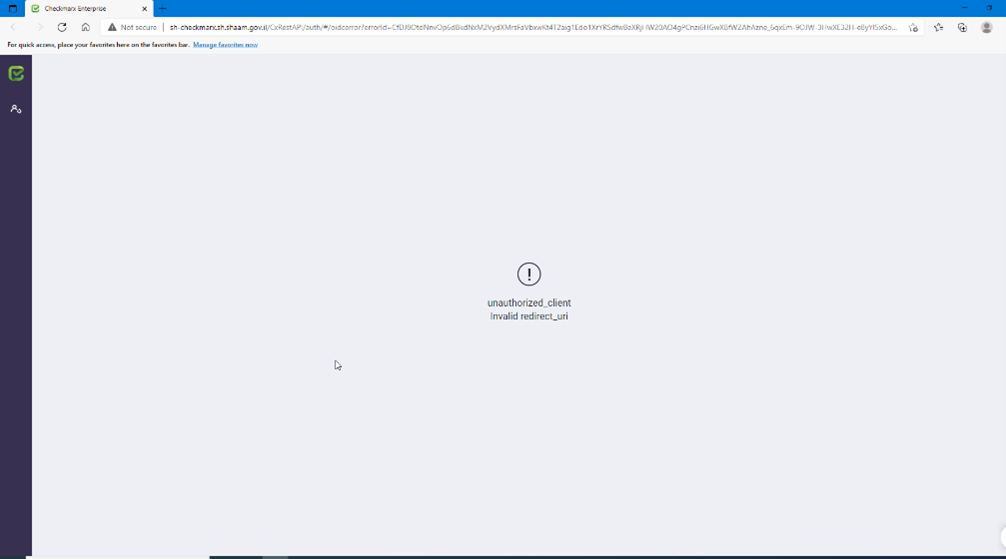 |
Cause: This occurs when the redirect URI for Visual Studio Code has not been properly configured in the Checkmarx database.
Resolution:
IF NOT EXISTS (SELECT * FROM [CxDB].[accesscontrol].[ClientRedirectUris]
WHERE RedirectUri = 'vscode://Checkmarx.cxvscode')
BEGIN INSERT INTO [CxDB].[accesscontrol].[ClientRedirectUris]
VALUES((SELECT TOP 1 id
FROM [CxDB].[accesscontrol].[Clients]
WHERE clientId = 'ide_client'), 'vscode://Checkmarx.cxvscode');
END
Steps:
Open your SQL management tool connected to the Checkmarx database.
Run the provided query to insert the correct redirect URI if it does not already exist in the
ClientRedirectUristable.Retry the operation in Visual Studio Code.
This should resolve the unauthorized redirect URI error and allow the integration between VS Code and Checkmarx to function correctly.