AI Triage & Remediation
Notice
This feature is now generally available. Please contact your Checkmarx sales representative for a free trial.
Overview
AI Triage & Remediation is an agentic AI capability that dramatically streamlines triage and remediation workflows. This feature comprises two distinct tools:
The AI Triage agent evaluates new vulnerabilities identified in your project and provides insights into the Reachability and Exploitability of each vulnerability. It incorporates risk context to determine whether the exploitable method is reachable by your application and checks if masking and sanitization measures are in place to prevent exploitation. This allows teams to distinguish between findings that are theoretically vulnerable and those that present a concrete risk in the running application.
The AI Remediation agent complements this analysis by generating suggested code fixes for supported vulnerabilities. For GitHub Code Repository Integration projects, remediation creates a pull request containing the proposed fix. For other supported project types, remediation guidance is provided within Checkmarx One.
Together, these capabilities dramatically reduce manual analysis effort and accelerate remediation without disrupting existing development workflows.
Methods for Running AI Triage & Remediation
There are three ways to run AI Triage & Remediation on risks identified by Checkmarx One:
Manual Activation - You can launch the AI Triage & Remediation activities for specific risks identified in a Checkmarx One scan. This is done via the Risk Orchestration screen by selecting a project, drilling down to a specific risk and clicking on the button to launch the desired action.
Automated Workflow - You can create an automated workflow on the global or project level in which you define criterion for AI triage and AI remediation to run automatically upon scan creation. If both AI triage and AI remediation are enabled, remediation runs immediately after the triage process completes.
Pull Request Workflow - For GitHub Code Repository integration projects, you can configure the project to run AI triage based on pre-defined criterion. You can also interact with Checkmarx One from the PR created by a Checkmarx scan.
Automatic State Change
When AI Triage determines that a change in triage state is justified, the State is adjusted automatically, based on the following logic:
When a vulnerability is determined to be Reachable and Exploitable, the state is set as Confirmed.
When a vulnerability is determined to be not Reachable or not Exploitable, the state is set as Proposed Not Exploitable.
Notice
When the state has been set by AI, the AI icon
 is shown next to the state.
Notice
AI Triage state changes are applied to all results considered identical, following the same behavior as manual triage changes. For SAST, identical results are determined by a shared Similarity ID or Attack Vector ID, depending on your account settings. For SCA, results are considered identical when they have the same package version and package manager. Triage changes are applied to identical results in subsequent scans. For SAST, they are also applied retroactively to identical results in previous scans. For SCA, changes are not applied to results from previous scans.
Requirements
Your account must have sufficient available Checkmarx Credits, see Monitoring Credit Usage.
Current Limitations
Currently supported for the SAST and SCA scanners only
Creating a pull request with remediated code is only available for GitHub Code Repository integration projects
In the PR workflow, there are limits of max. 10 risks automatically triaged and 5 risks remediated with a single comment
Running AI Triage & Remediation
The following sections explain how to run AI Triage & Remediation using the various available methods.
Running Manual AI Triage & Remediation
You can initiate AI triage and/or remediation for an individual vulnerability directly from Risk Orchestration.
Notice
This method is currently supported only for SAST and SCA risks.
In the Checkmarx One web application, navigate to ASPM > Risk Orchestration.
Open the project containing the vulnerability you want to review.
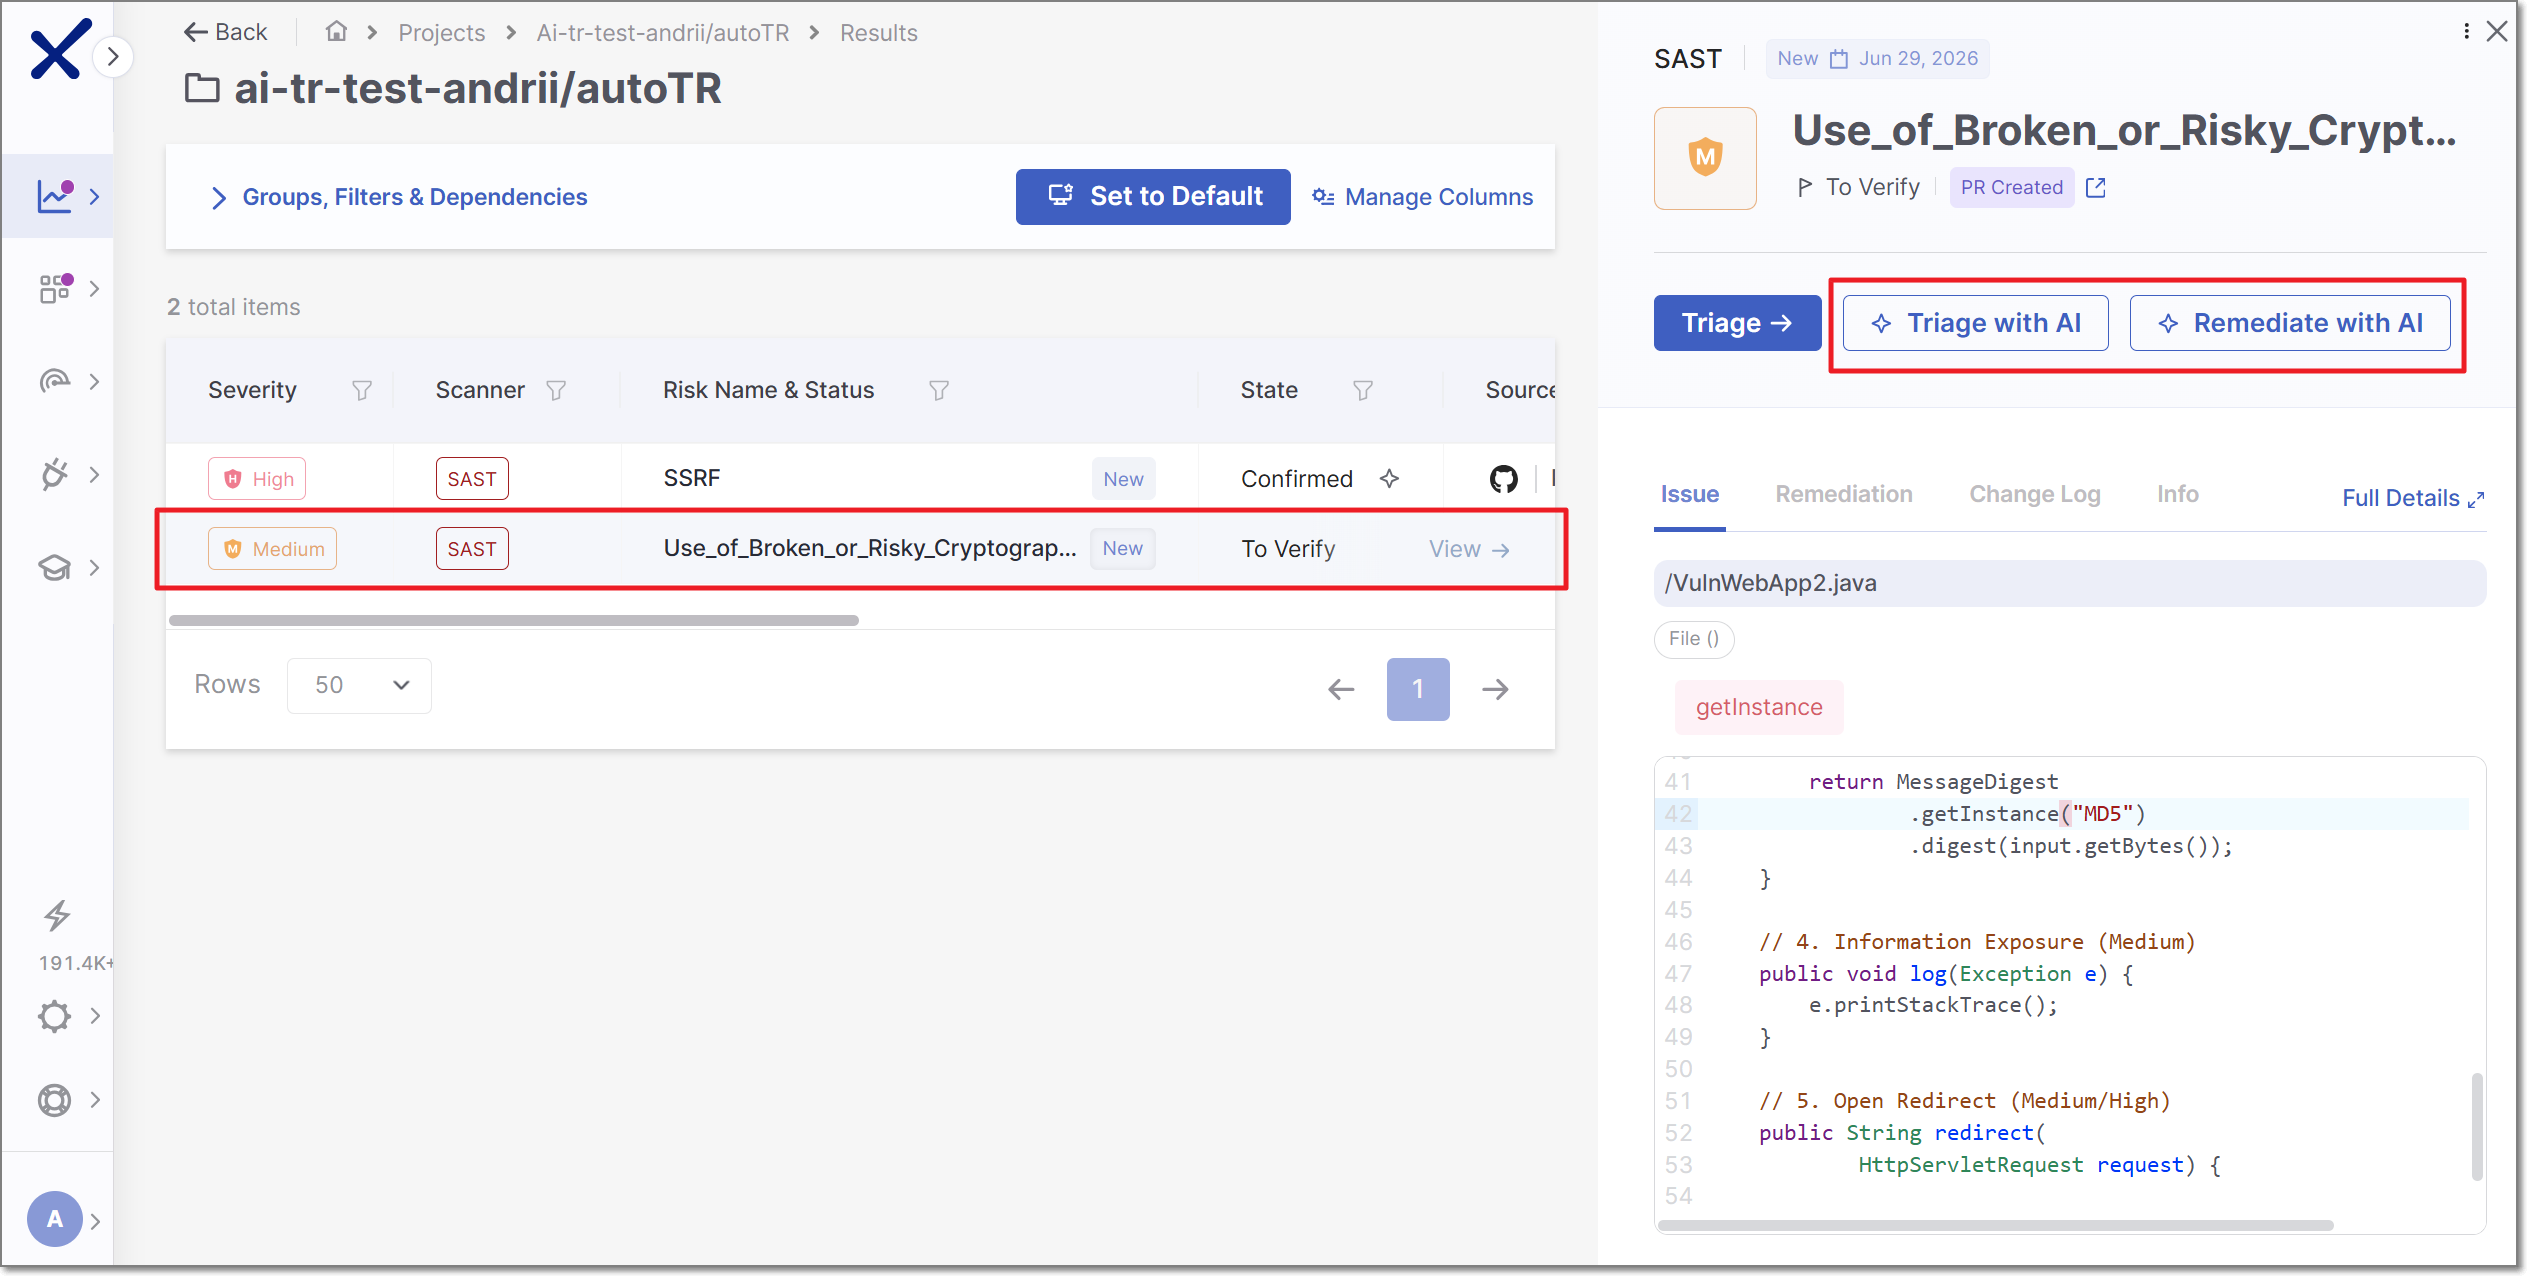
Select the vulnerability in the results table.
The selected vulnerability opens in the side panel, where you can choose to run  or
or  on the selected risk.
 |
Running Automated AI Triage & Remediation
AI Triage and AI Remediation can be configured to run automatically upon scan completion. If both AI triage and AI remediation are enabled, remediation runs immediately after the triage process completes. Automatic execution rules can be defined at the global account level and optionally overridden for individual projects.
Configuring AI Triage in Global Account Settings
In the global account settings you can define the default rules that determine when AI Triage is automatically run across your organization.
In the Checkmarx One web application, navigate to Global Settings > AI Assist.
Activate the Auto-triage toggle.
The Auto-triage configuration options are shown:
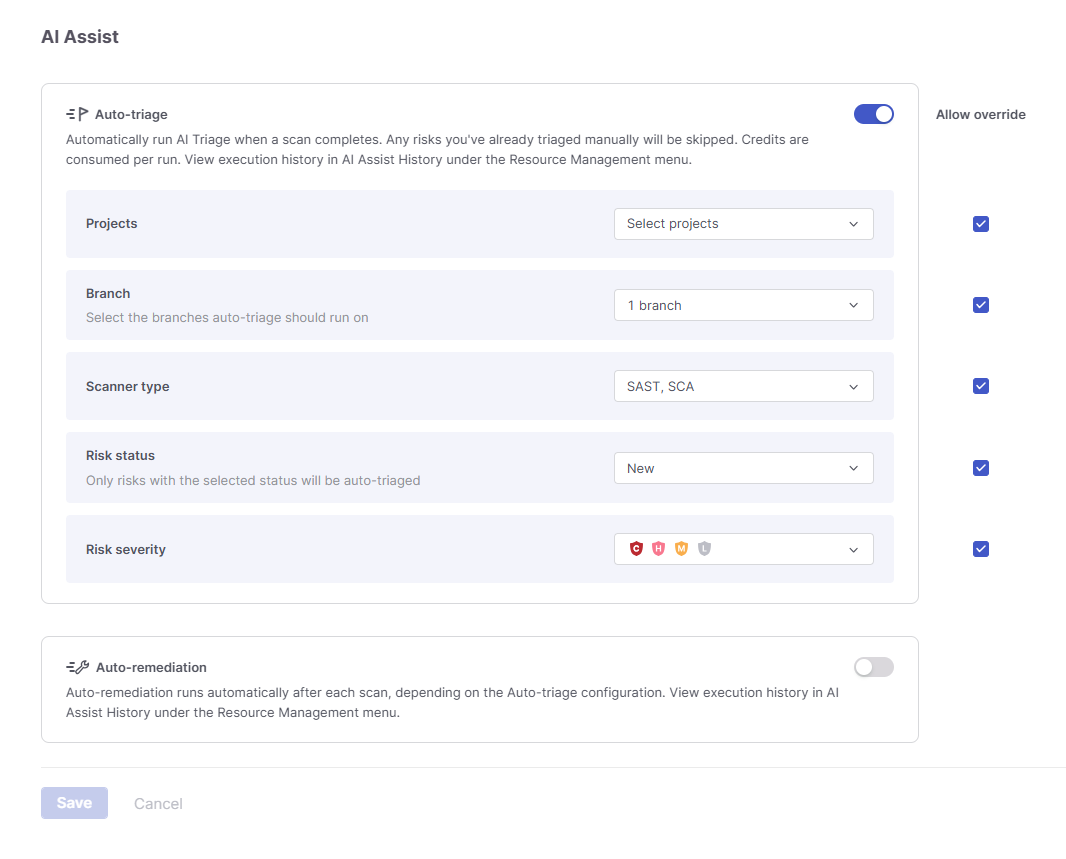
Specify values for the following parameters:
Projects – The projects to which the following rules for running AI Triage apply.
Branch – The branches which trigger automatic AI Triage.
Scanner type – The scanners whose results trigger AI Triage.
Risk status – The vulnerability status values that trigger AI Triage.
Risk severity – The vulnerability severity levels to include.
For each parameter, select the Allow Override checkbox to permit individual projects to customize their own Auto-Triage settings.
Click Save.
Configuring AI Remediation in Global Account Settings
In the global account settings you can define the default rules that determine when AI Remediation is automatically run across your organization.
In the Checkmarx One web application, navigate to Global Settings > AI Assist.
Activate the Auto-remediation toggle.
The Auto-remediation configuration options are shown:
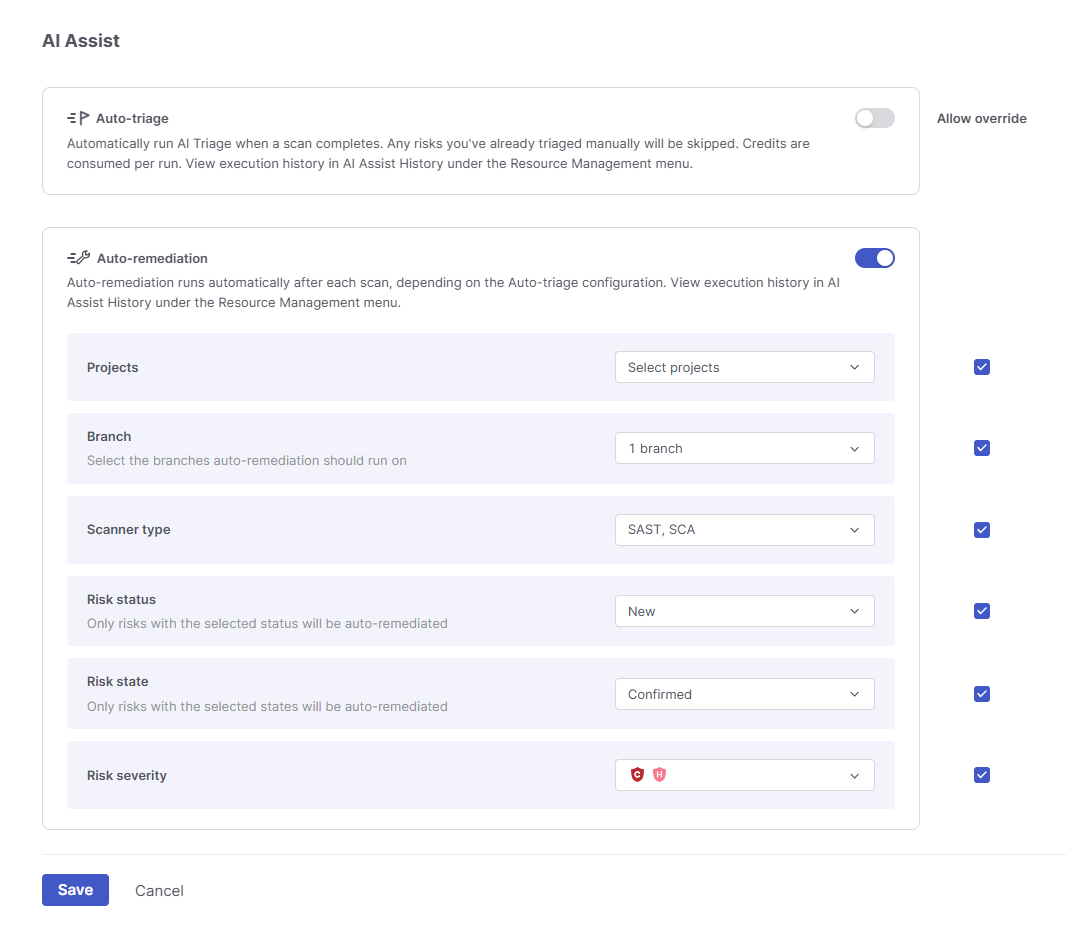
Specify values for the following parameters:
Projects – The projects to which the following rules for running AI Remediation apply.
Branch – The branches which trigger automatic AI Remediation.
Scanner type – The scanners whose results trigger AI Remediation.
Risk status – The vulnerability status values that trigger AI Remediation.
Risk state - The vulnerability state values that trigger AI Remediation.
Risk severity – The vulnerability severity levels to include.
For each parameter, select the Allow Override checkbox to permit individual projects to customize their own Auto-Remediation settings.
Click Save.
Configuring AI Triage & Remediation in Project Settings
Automatic AI Triage and Remdiation can also be configured for individual projects. Project settings can be used when AI Triage has not been configured at the account level, or to customize the settings for a specific project when Allow Override is enabled.
Navigate to the desired project's Project Settings > AI Assist tab.
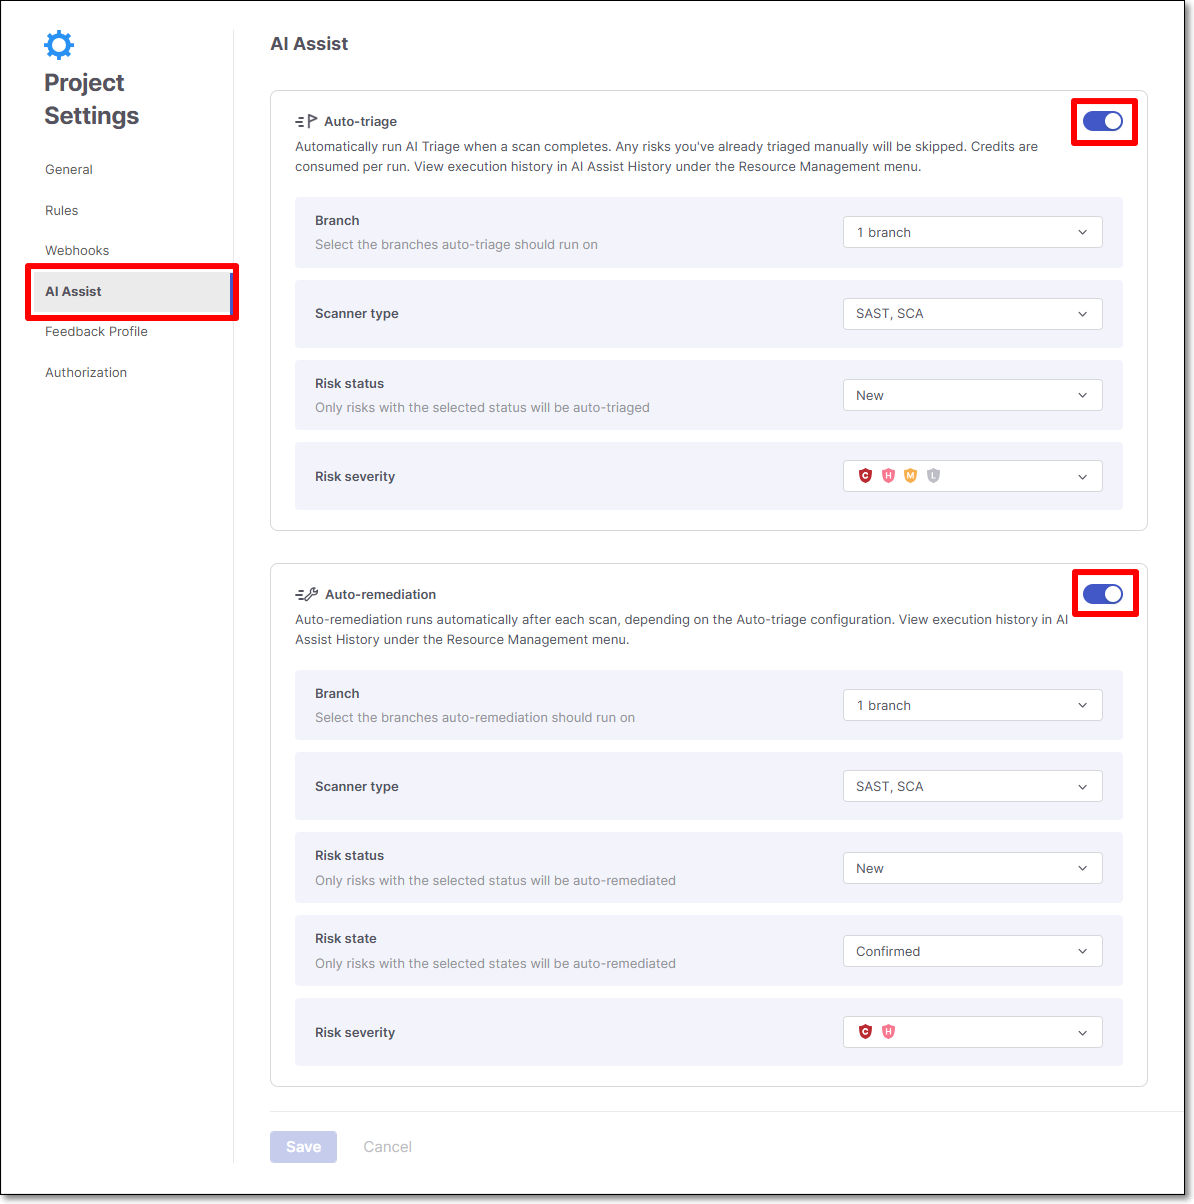
Configure the Auto-triage and Auto-remediation settings as explained above.
Click Save.
The available configuration options are the same as the organization-wide settings, except that the project is already selected.
Running AI Triage & Remediation via GitHub PR Workflow
For GitHub Code Repository Integration projects, AI Triage & Remediation integrates directly into the pull request workflow. When a pull request triggers a Checkmarx scan, AI Triage runs automatically on "Net New" risks (i.e., new vulnerabilities being introduced into the protected branch by a pull request) according to the pre-configured criterion set for that project. The triage results are displayed in the pull request decoration. Developers can then request AI Remediation directly from the pull request. When remediation is generated, Checkmarx creates a separate pull request containing the suggested code changes for review.
Enable AI Triage & Remediation for a Code Repository Integration Project
AI Triage & Remediation is configured at the project level in the Checkmarx One web application (UI). It can be enabled during project creation, or at a later time by updating the project settings. Users control which projects have AI Triage & Remediation enabled and which severity vulnerabilities are included in the triage analysis and remediation workflow.
In the Workspace
 > Projects screen, hover over the desired code repository integration project's row, click on More Options
  > Project Settings.
In the Project Settings, navigate to the Code Repository tab.
In the permissions section, activate the toggle for AI Triage & Remediation.
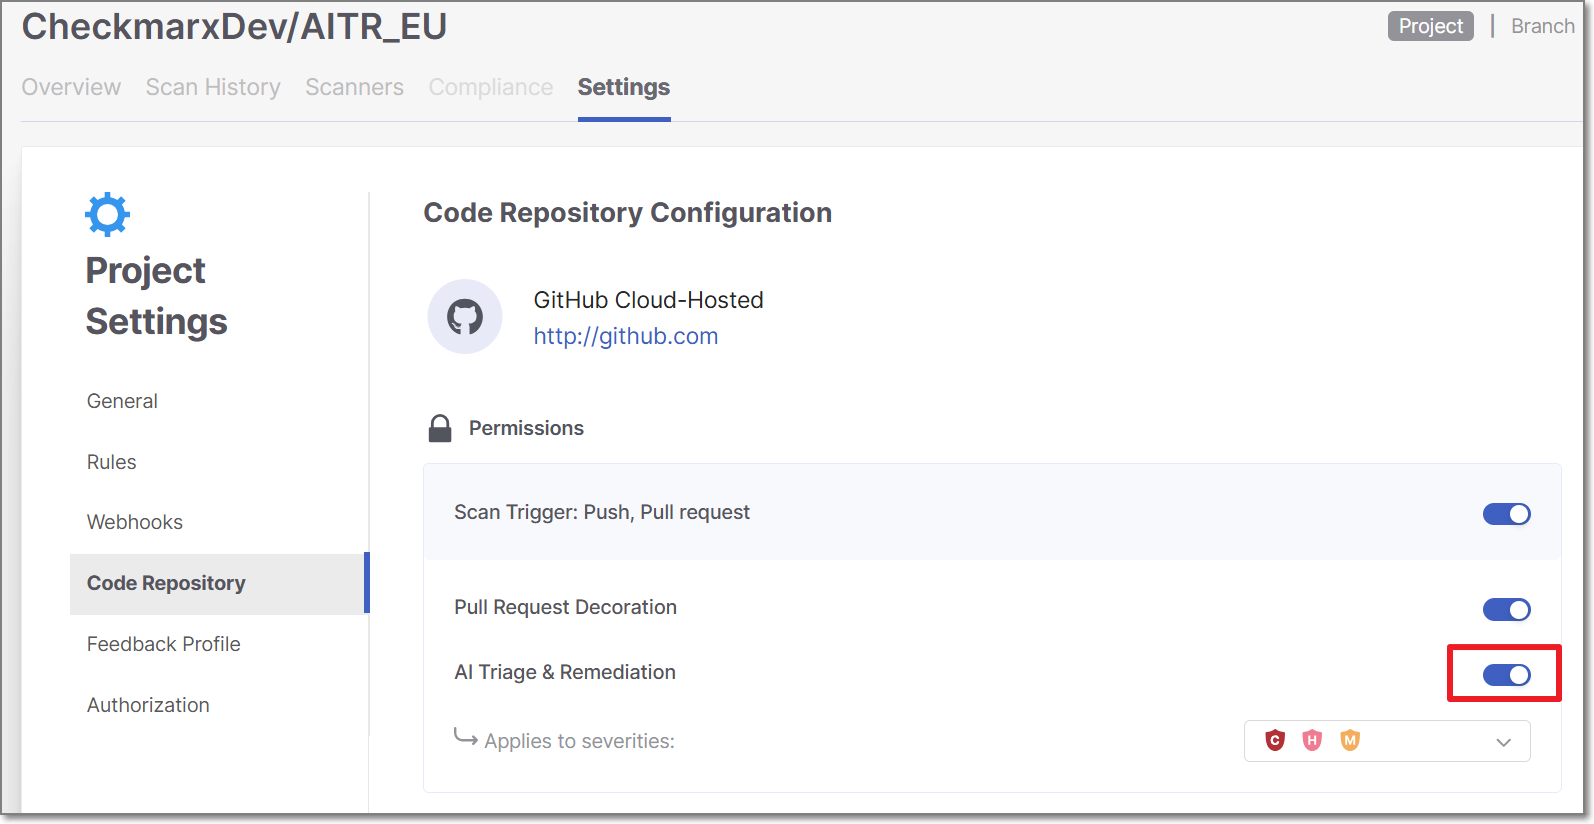
A confirmation dialogue is displayed.
Click Activate to enable the feature.
For the Applies to severities threshold, select the severity levels that this feature will apply to.
Click Save.
AI Triage & Remediation Workflow
Create a pull request
In GitHub, open a pull request from a feature branch into a branch that is associated with a Checkmarx project where PR scanning and AI Triage & Remediation are enabled (as configured in the Checkmarx One web application).
Checkmarx One scan runs and triggers triage
A Checkmarx scan runs on the pull request. The results are added as a comment through PR decoration, including a table of New Issues (vulnerabilities introduced in this PR) and Fixed Issues (vulnerabilities that were resolved in this PR).
The AI Triage agent automatically analyzes each of the New Issues that meet the designated severity threshold and the PR decoration shows the results of the Triage analysis.
Notice
The maximum number of risks automatically triaged for a PR is 10 (selected in order listed in New Issues report).
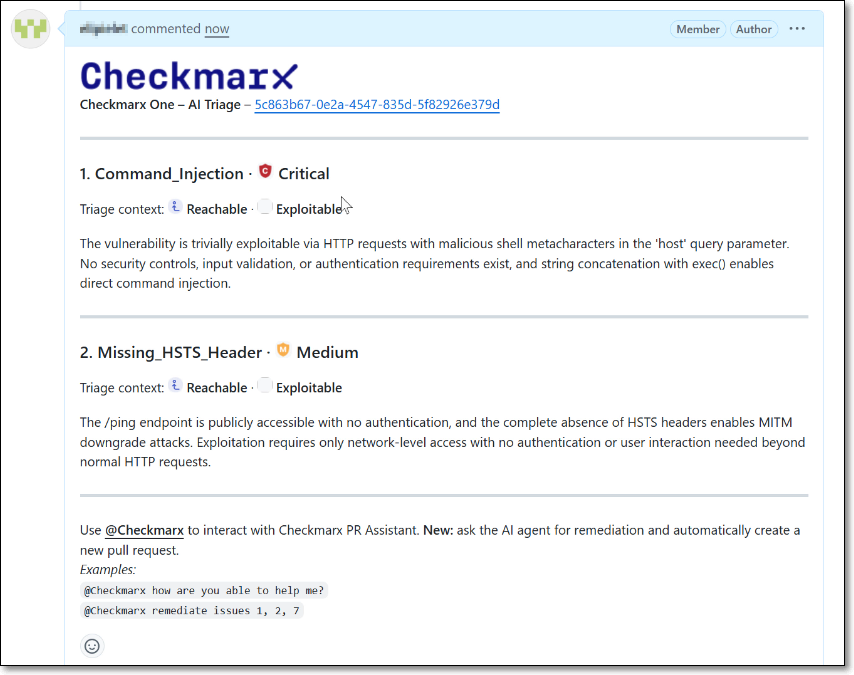
Trigger remediation for a vulnerability
Request a fix for one or more vulnerabilities by submitting a comment with
@checkmarxfollowed by a natural language request for remediation, e.g.,@checkmarx remediate issue 1or@checkmarx fix all issues.Notice
The maximum number of remediations that can be triggered by a single comment is 5.
Review remediation output
The Remediation agent responds with a comment indicating that a remediation pull request has been created. A link is provided to view the generated pull request.
Open the remediation pull request, and review the suggested code change.
Notice
The remediation PR title uses the following format:
Checkmarx AI Remediation - <risk_identifier>. For SCA,<risk_identifier>is the CVE (for example, CVE-2026-39830). For SAST, it is the query name (for example, Plain_Text_Transport_Layer_in_Server).Merge the remediation changes
If you approve the changes, merge the fixed branch into the source branch of your original pull request.
Complete the original pull request
Once the required fixes are applied, proceed with merging the original pull request according to your standard workflow.
Viewing AI Triage & Remediation Results
Results from AI Triage & Remediation are shown in the Risk Orchestration screen, when the relevant project is opened and the relevant risk is selected.
AI Triage Results
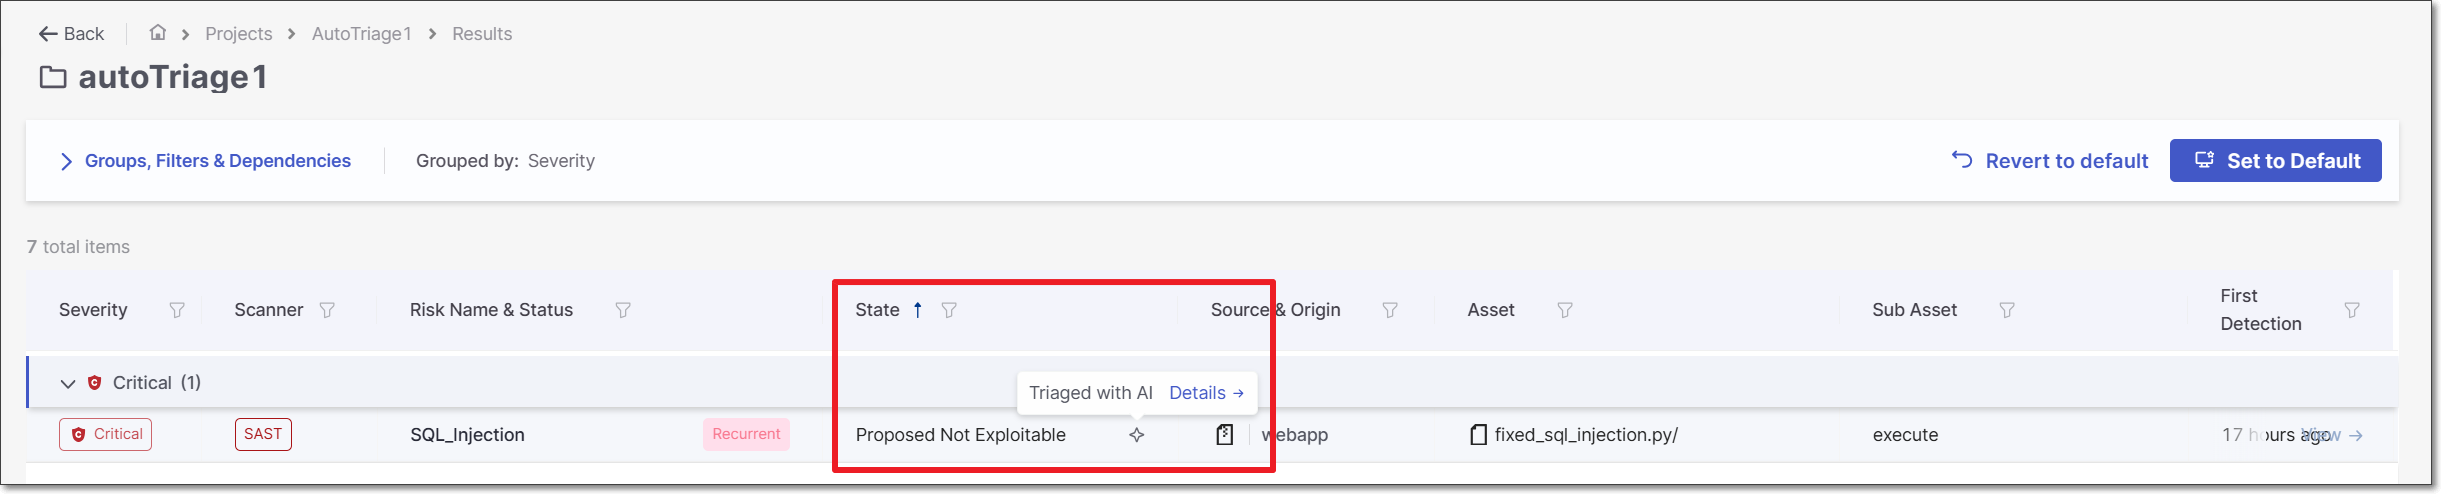
When AI Triage causes an automatic state change, the AI icon is shown in the risks table in the State column. Hover over the icon to show a link to additional details.
 |
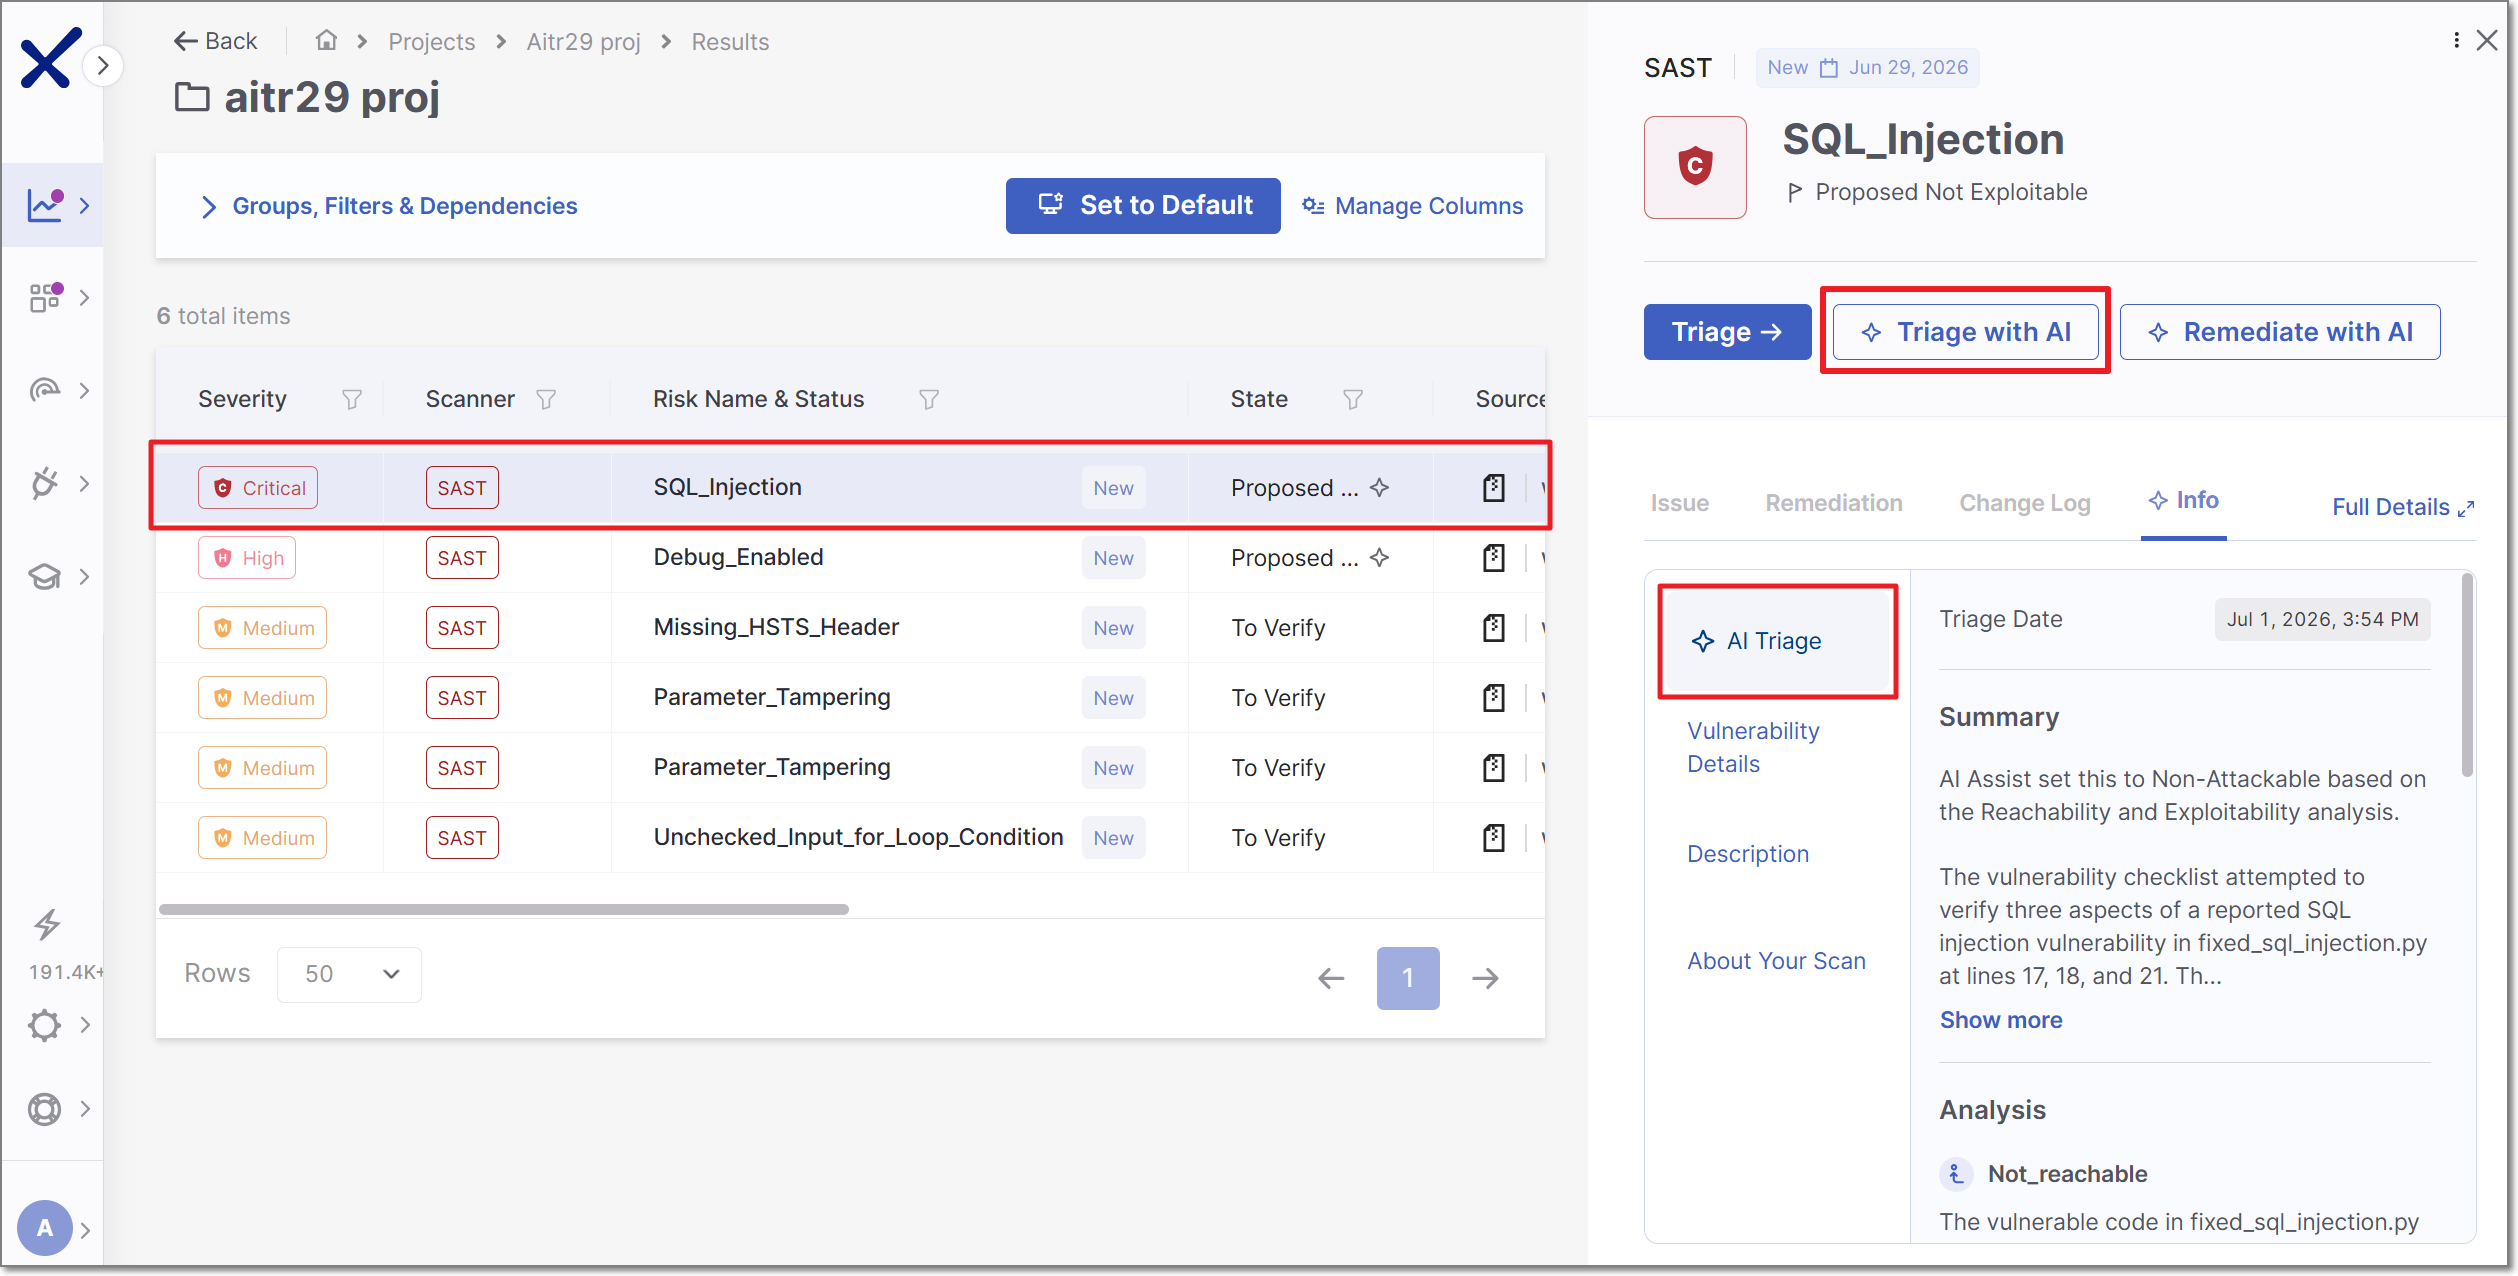
In the side panel that opens the AI Triage results are shown in the Info tab. The results include a summary of the risk assessment as well as an Analysis section with AI's determination of whether or not the vulnerability is Reachable and/or Exploitable.
 |
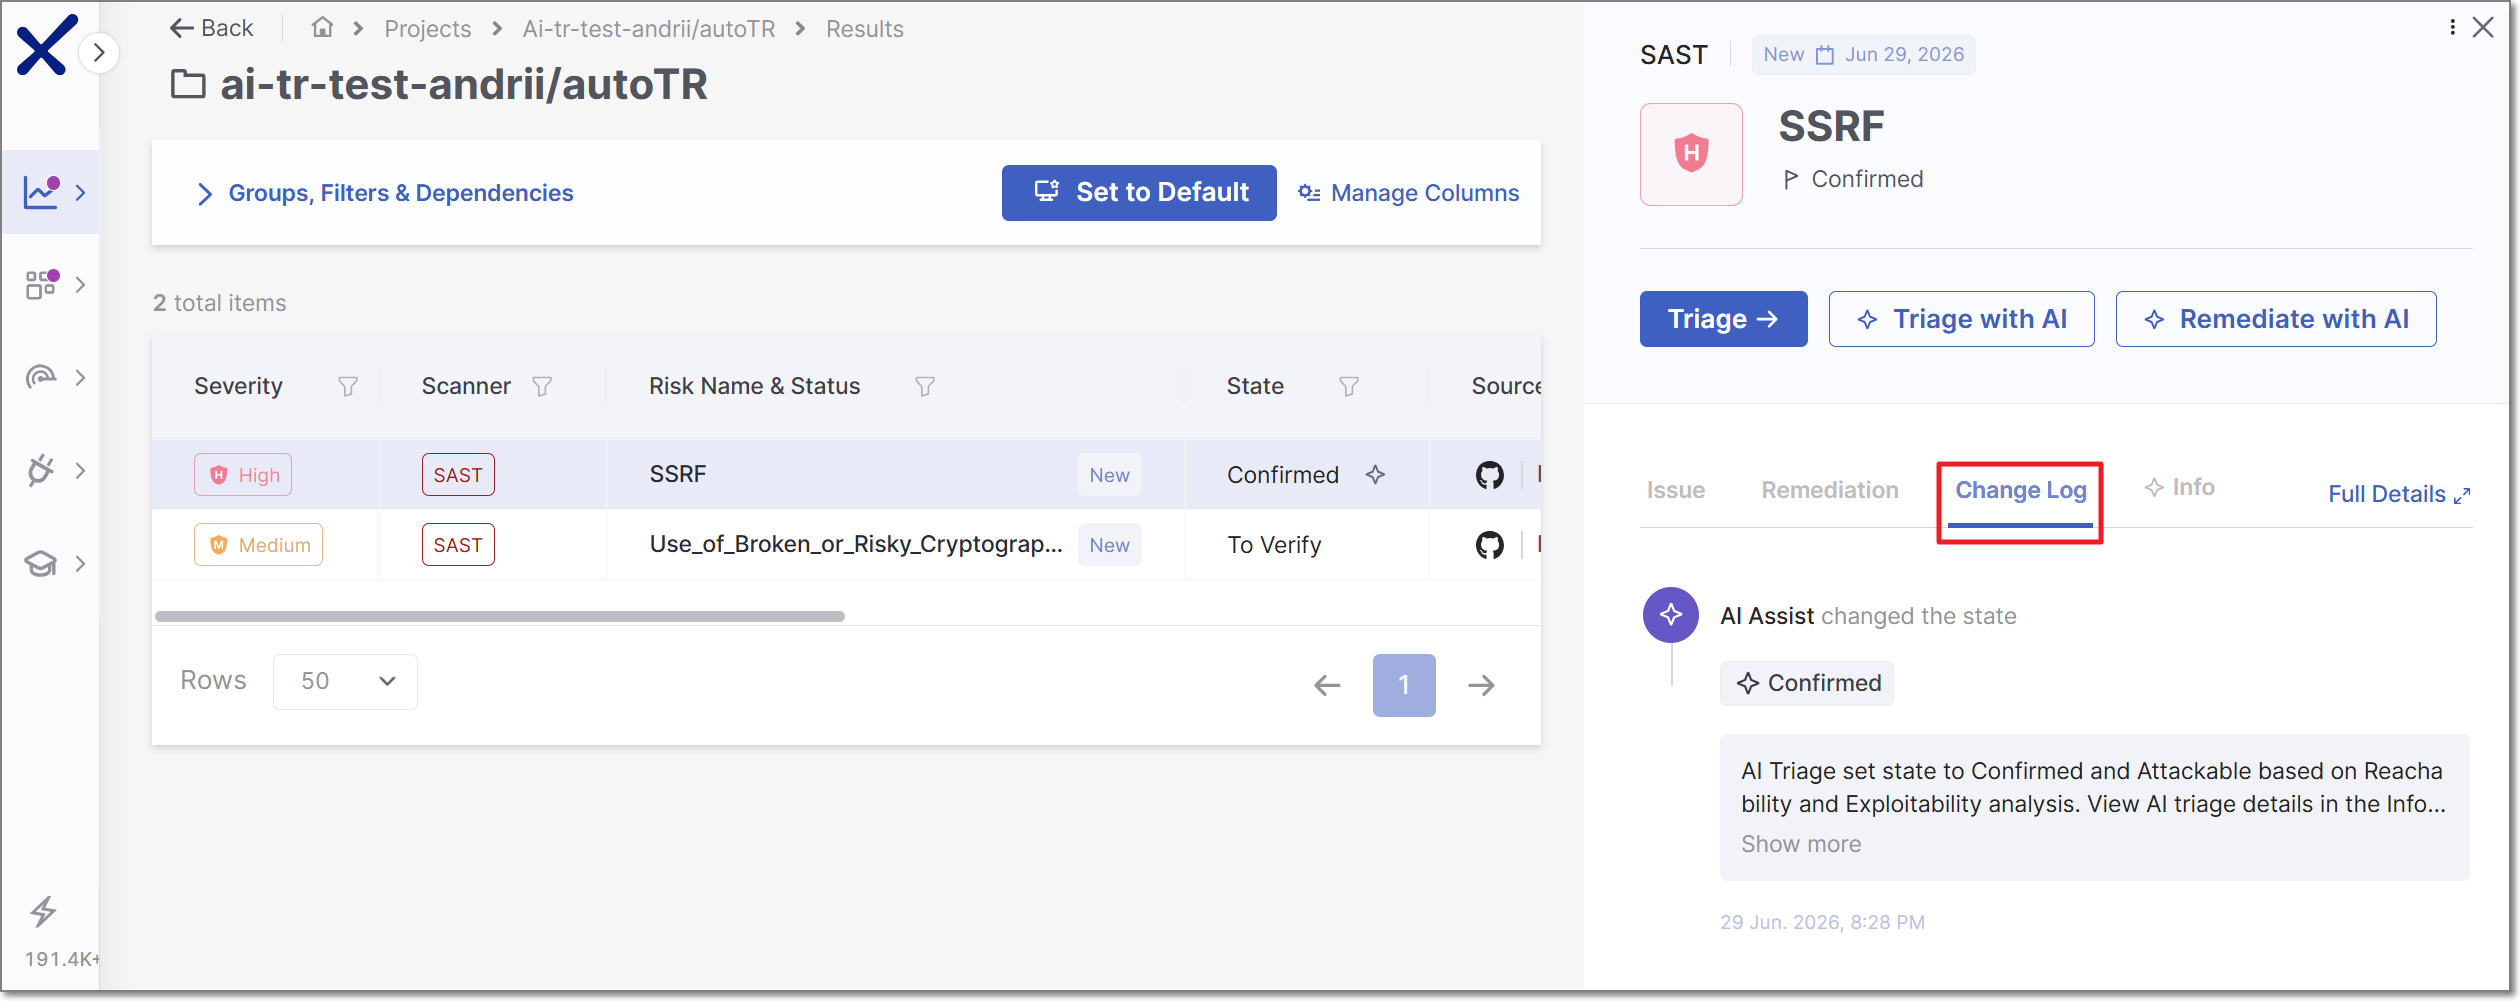
AI triage changes are also recorded in the Change Log.
 |
Viewing AI Remediation
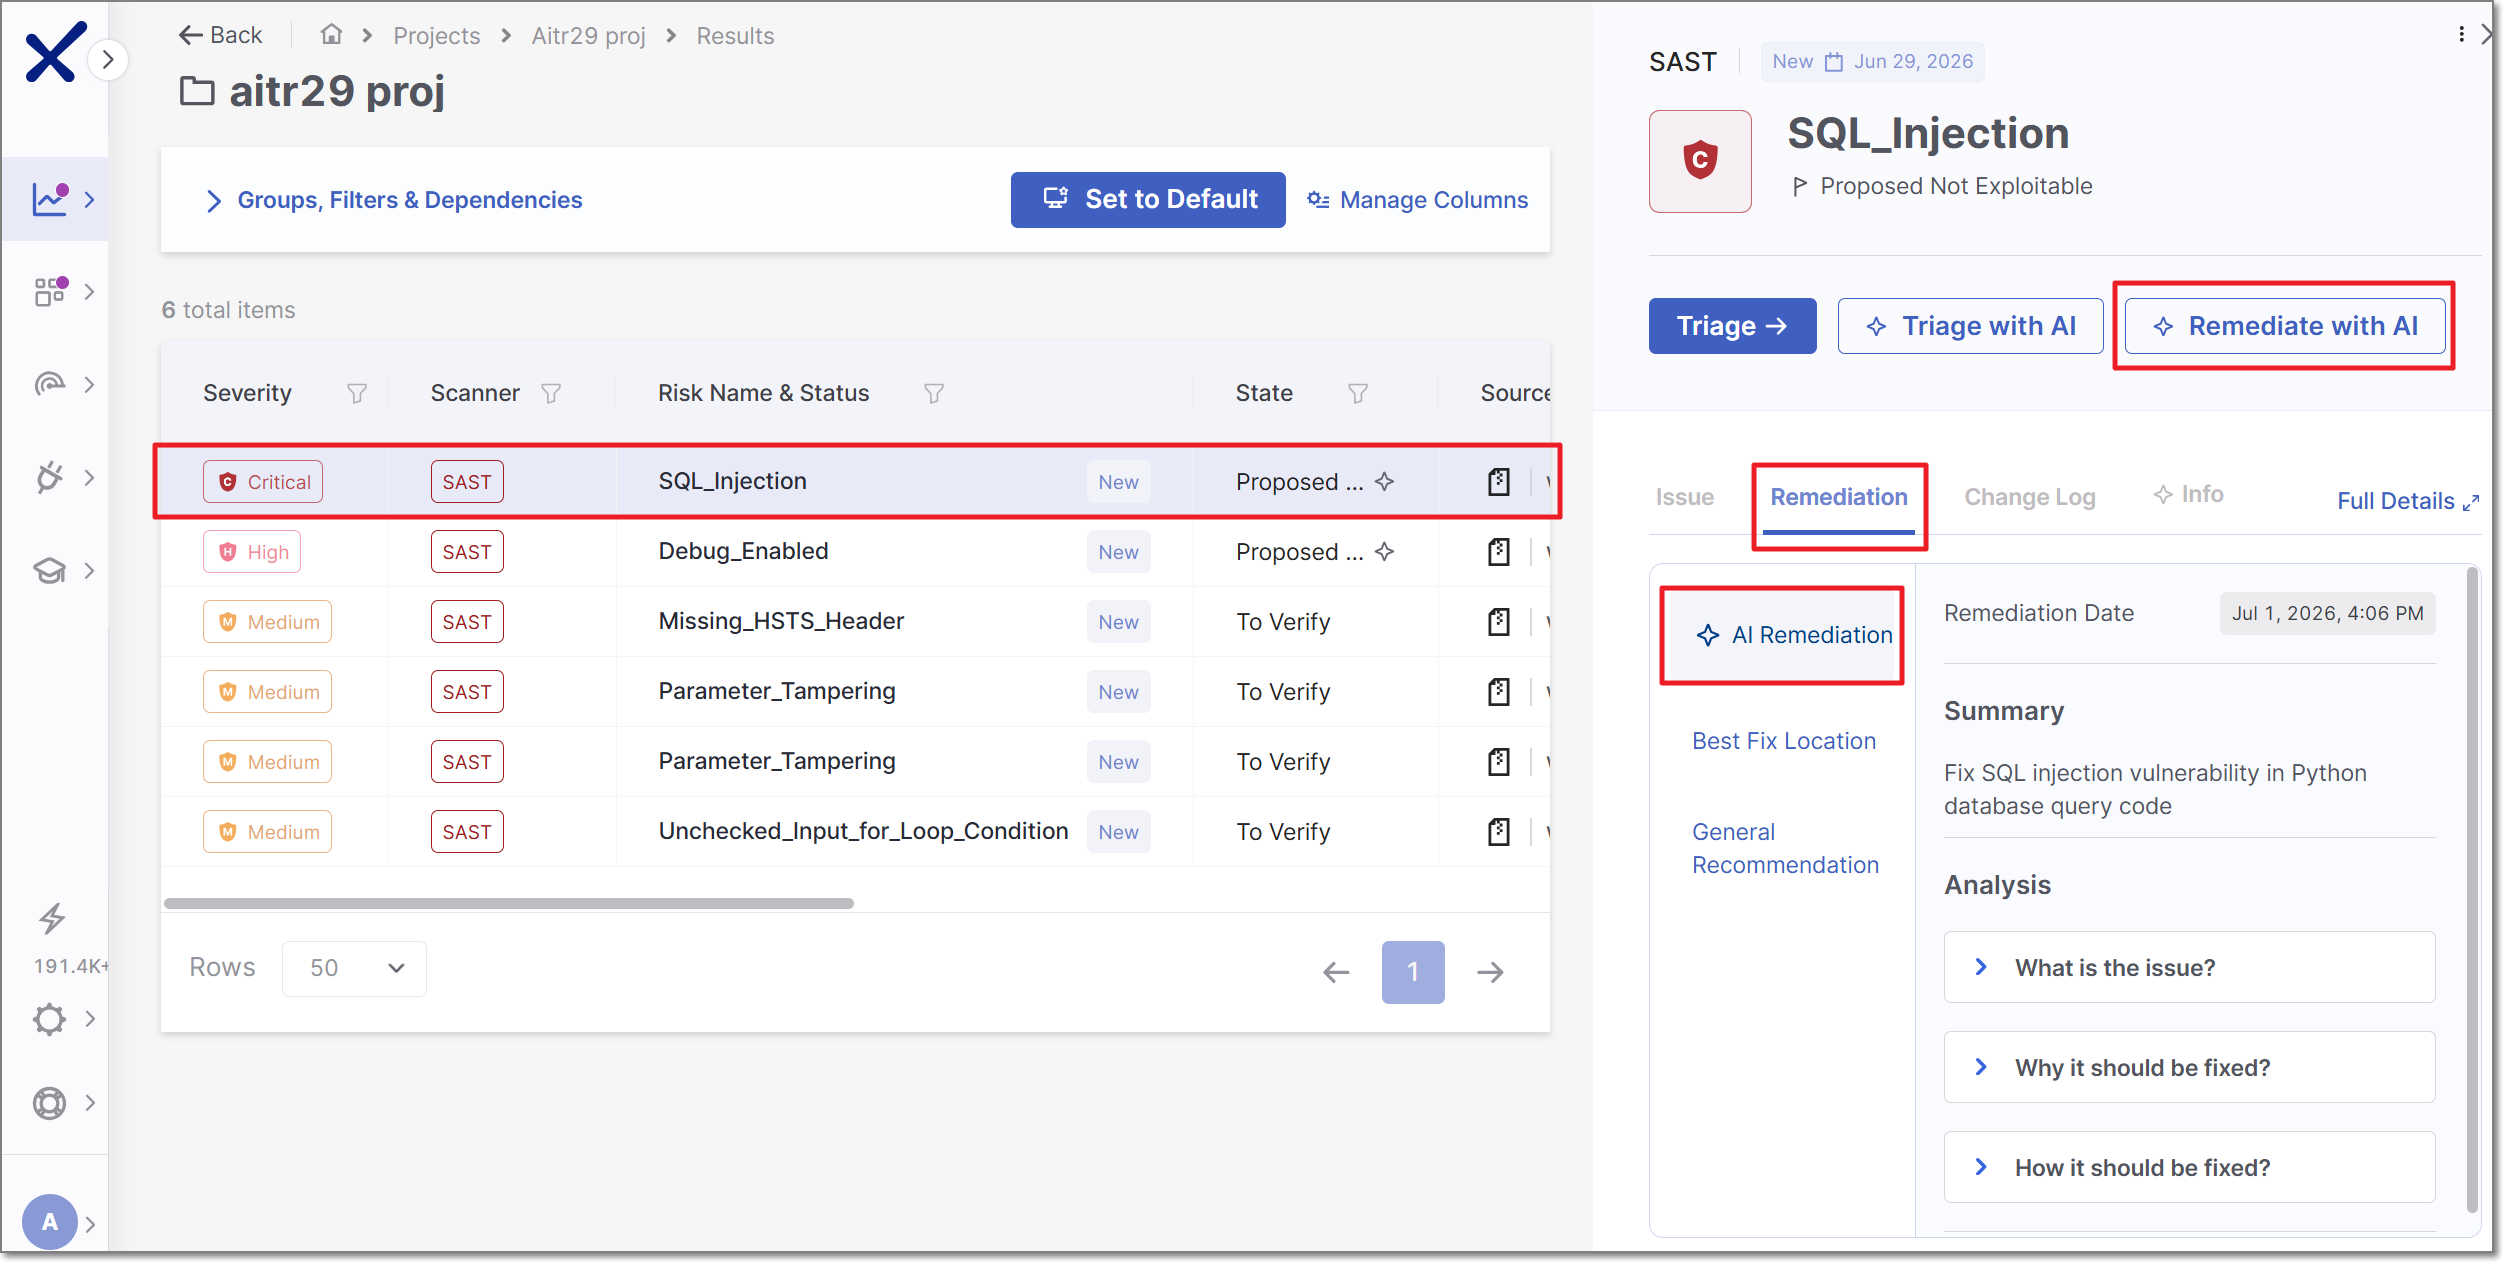
In the side panel that opens when a risk is selected, AI Remediation results are shown under Remediation > AI Remediation. The remediation includes a summary of the recommended fix, an explanation of the issue, why it should be addressed, and the actual code changes that will remediate it.
 |
Notice
For GitHub Code Repository Integration projects, a pull request is also created in GitHub containing the suggested fix. For other SCM integrations and manual projects, the remediation is available within Checkmarx One but no pull request is created.
Monitoring AI Triage & Remediation Usage
To view AI Triage & Remediation analytics:
In the Checkmarx One web application, navigate to
 ASPM > Analytics & Dashboard.
Select the AI Assist Usage tab.
Select AI Triage & Remediation.
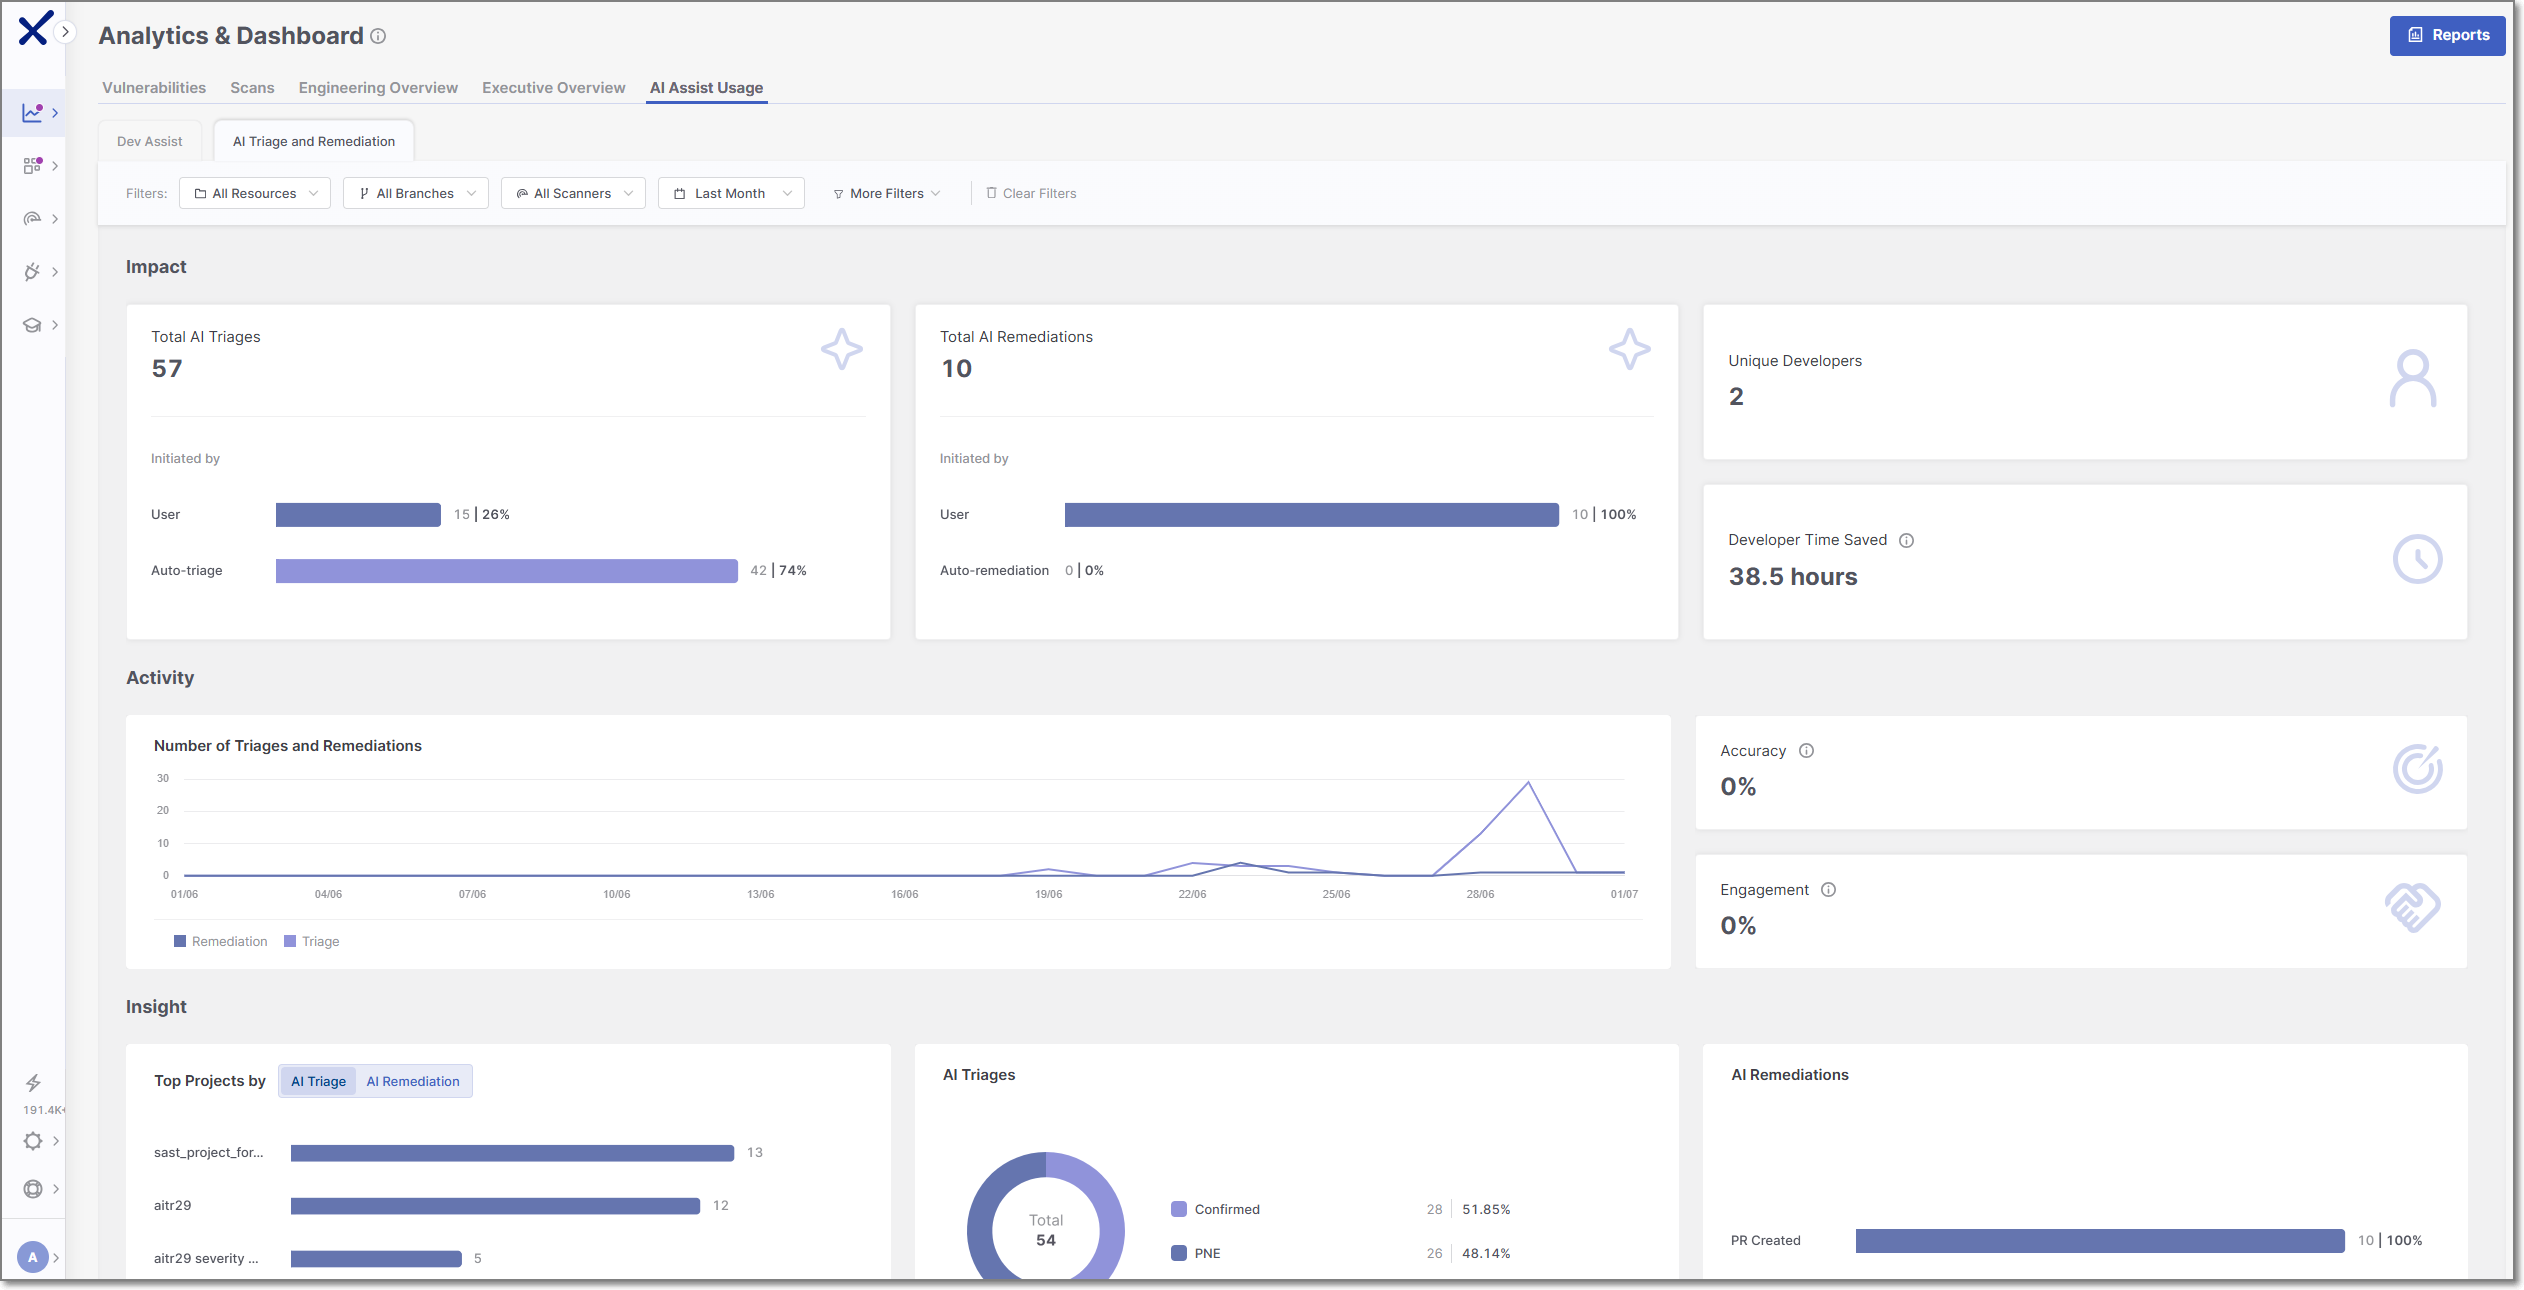 |
The AI Triage & Remediation dashboard provides an overview of how AI Triage & Remediation is being used across your organization. It includes high-level metrics such as the number of AI triages and remediations performed, unique developers using the feature, and estimated developer time saved. The dashboard also displays activity trends over time and provides insights into adoption patterns, triage outcomes, remediation results, and project usage. Use the filters at the top of the page to view analytics for specific resources, branches, scanners, time periods, or other criteria.
Checkmarx Credits
AI Triage and AI Remediation consume Checkmarx Credits. Credits are used each time that a Triage or Remediation action is run. If triage has already run on a risk and it is triggered again for an identical instance, it will not run again and no credits will be used.
Warning
However, when the Group Similar Results setting for SAST is changed, previously run AI Triage is no longer applicable. Therefore, if you subsequently run AI Triage on the same result, AI Triage will run again and consume additional credits.
Checkmarx One provides both a high-level summary of your available credits and detailed reporting on credit consumption.
Important
Credit consumption data is only visible to admin users.
Monitoring Credit Usage
The Account Settings > License tab provides an overview of your organization's current credit usage and projected consumption.
In the Checkmarx One web application, click the Credits indicator in the left navigation pane.
In the pop-up, click Details.
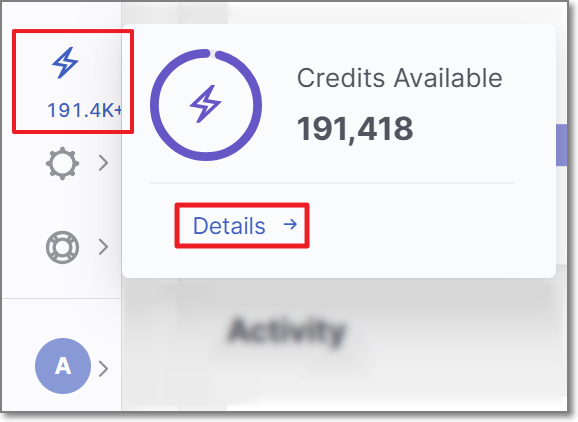
The License page opens and displays the Credit Usage section, which provides a high-level overview of your organization's AI credit consumption.
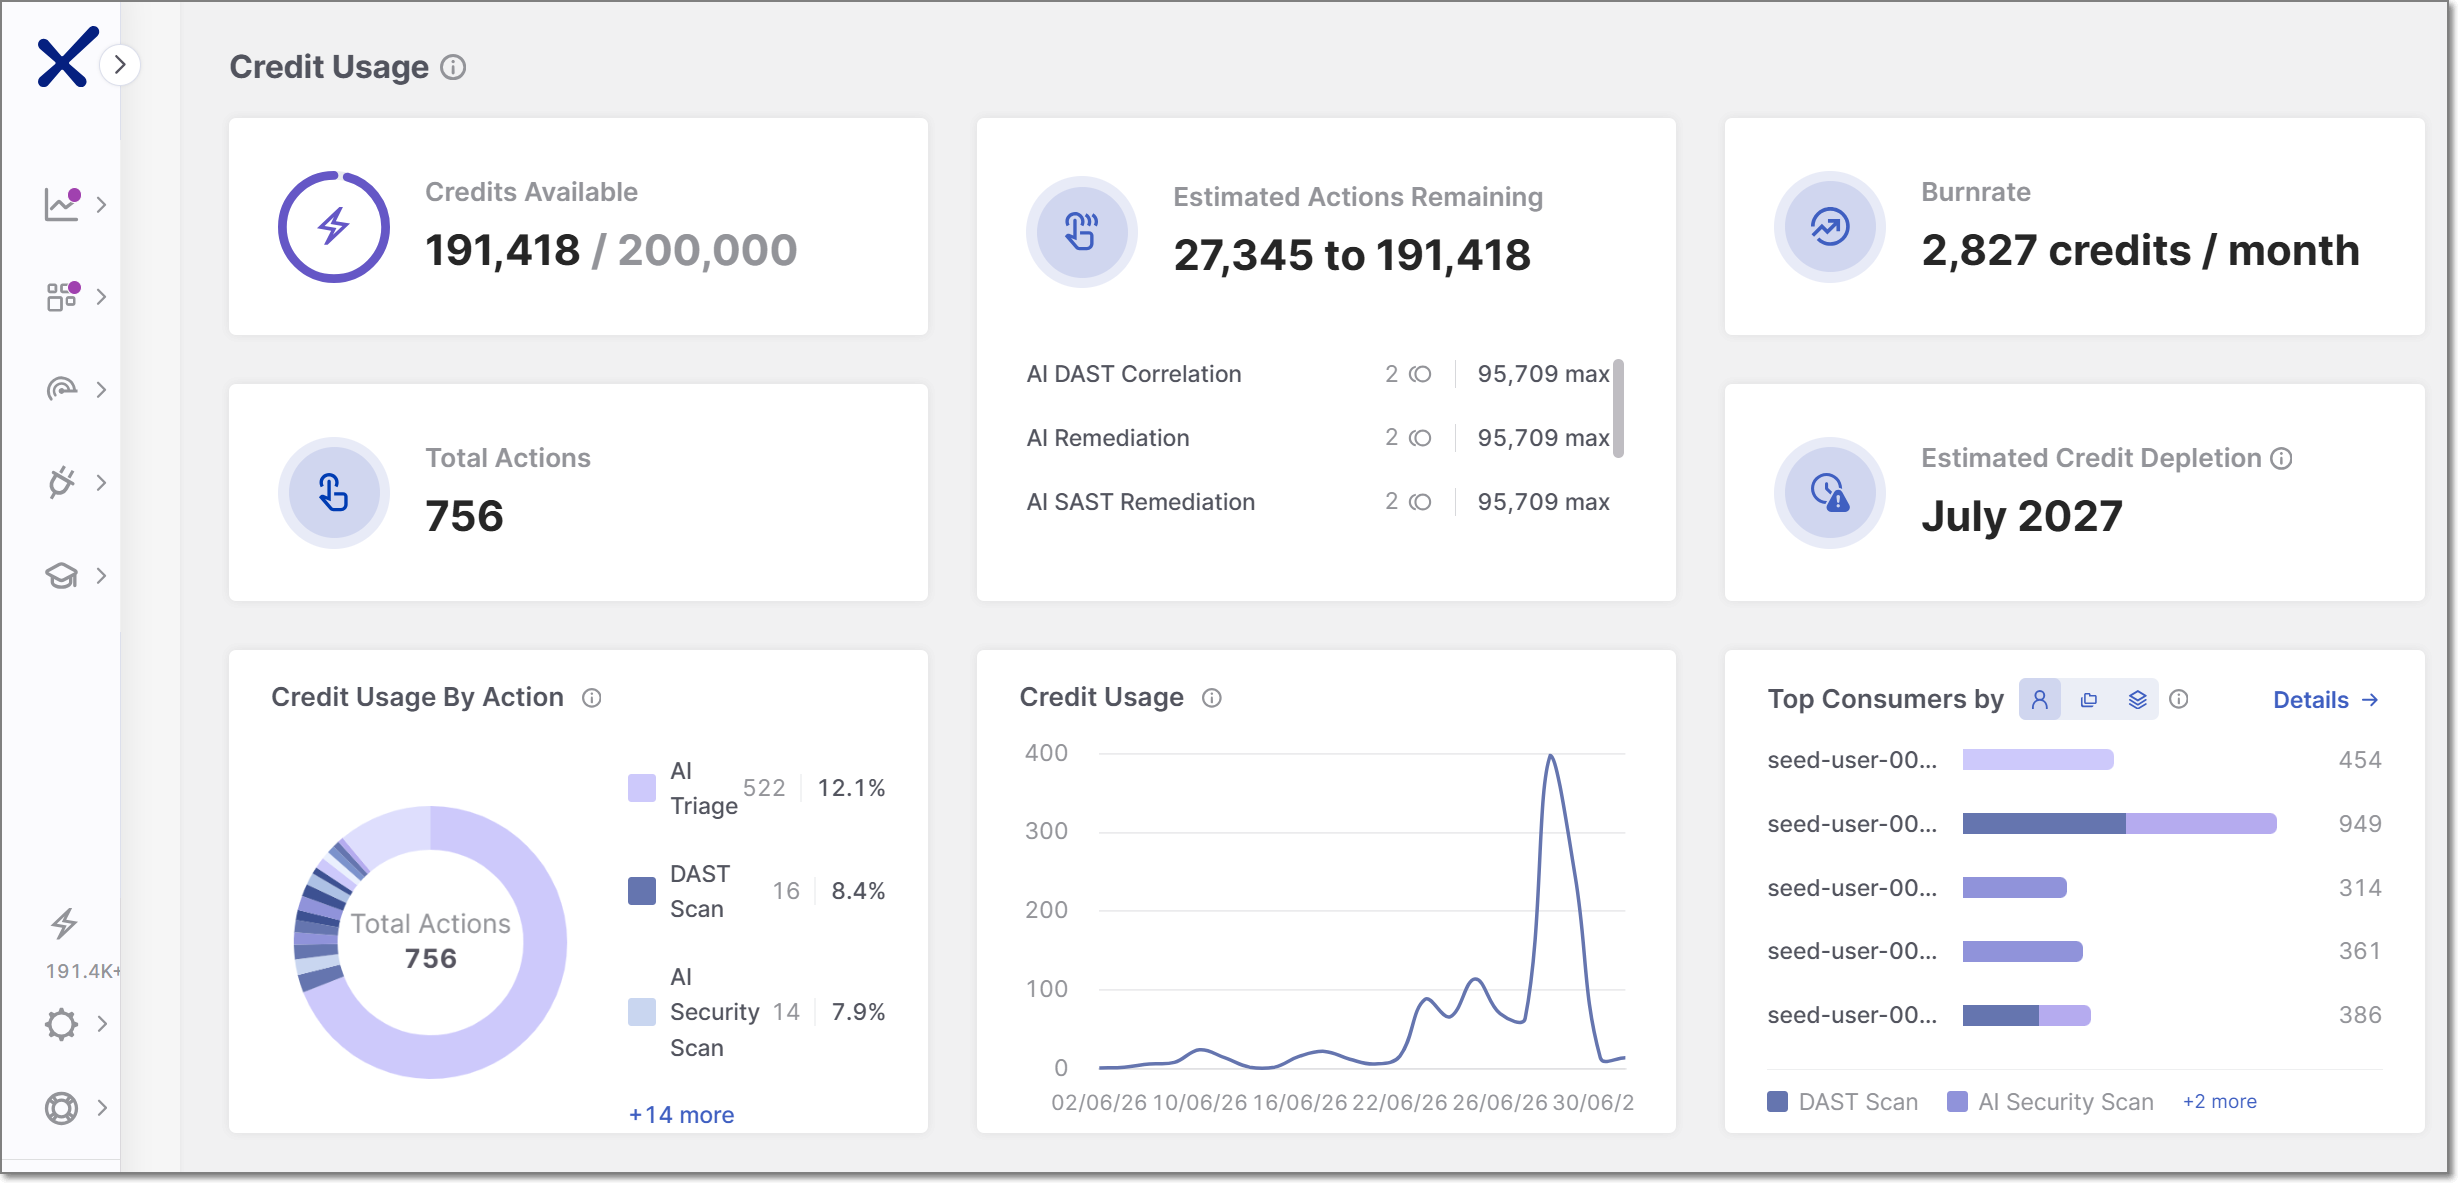 |
The Credit Usage section displays the following widgets:
Credits Available – The number of remaining credits available under your license.
Estimated Actions Remaining – The estimated number of additional AI actions that can be performed with the remaining credits.
Burn Rate – The average rate at which credits are being consumed.
Estimated Credit Depletion – The projected date on which the available credits will be exhausted based on the current burn rate.
Total Actions – The total number of AI actions performed.
Viewing Credit Usage Details
You can view additional details about credit usage by clicking on the Credit Usage tab.
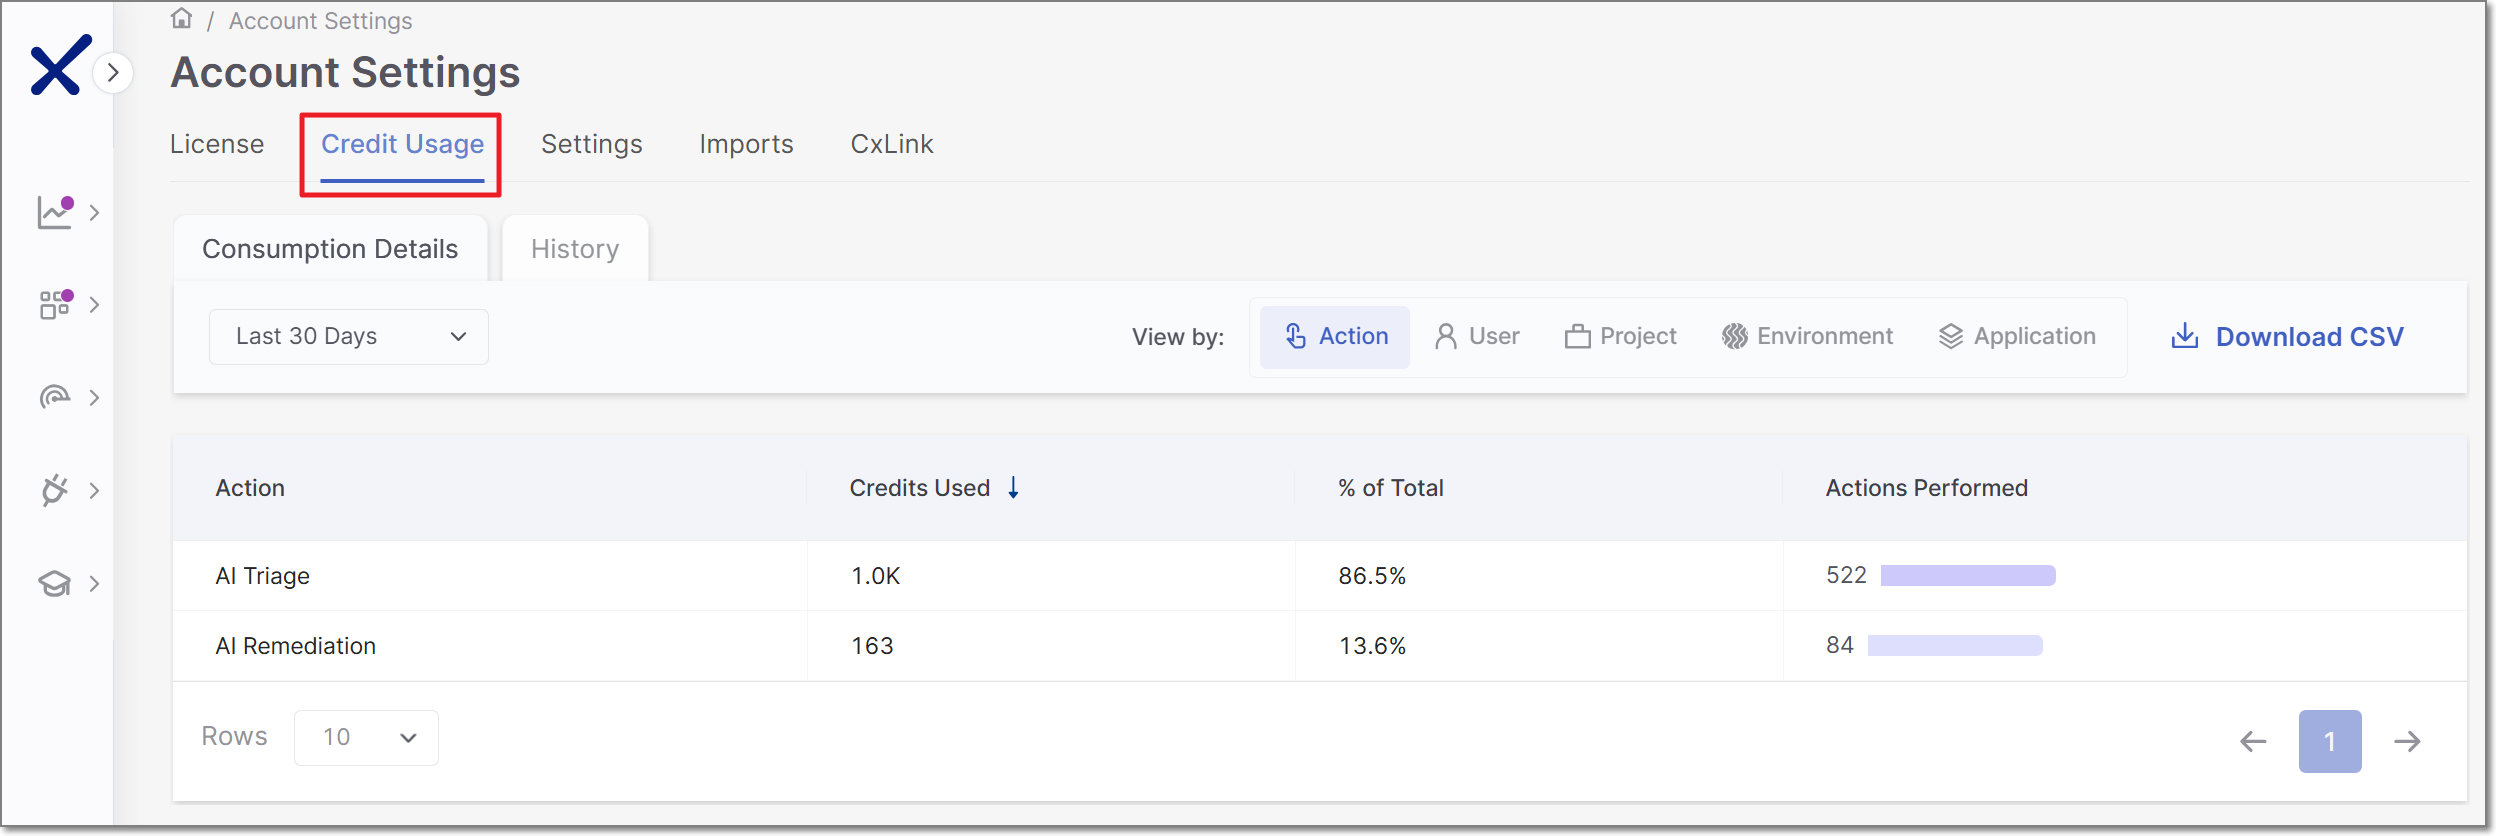 |
The Credit Usage tab contains two sub-tabs, Consumption Details and History.
Both tabs enable the following actions:
Filter the displayed data by time period.
Export the displayed data as a CSV file.
Consumption Details Tab (default)
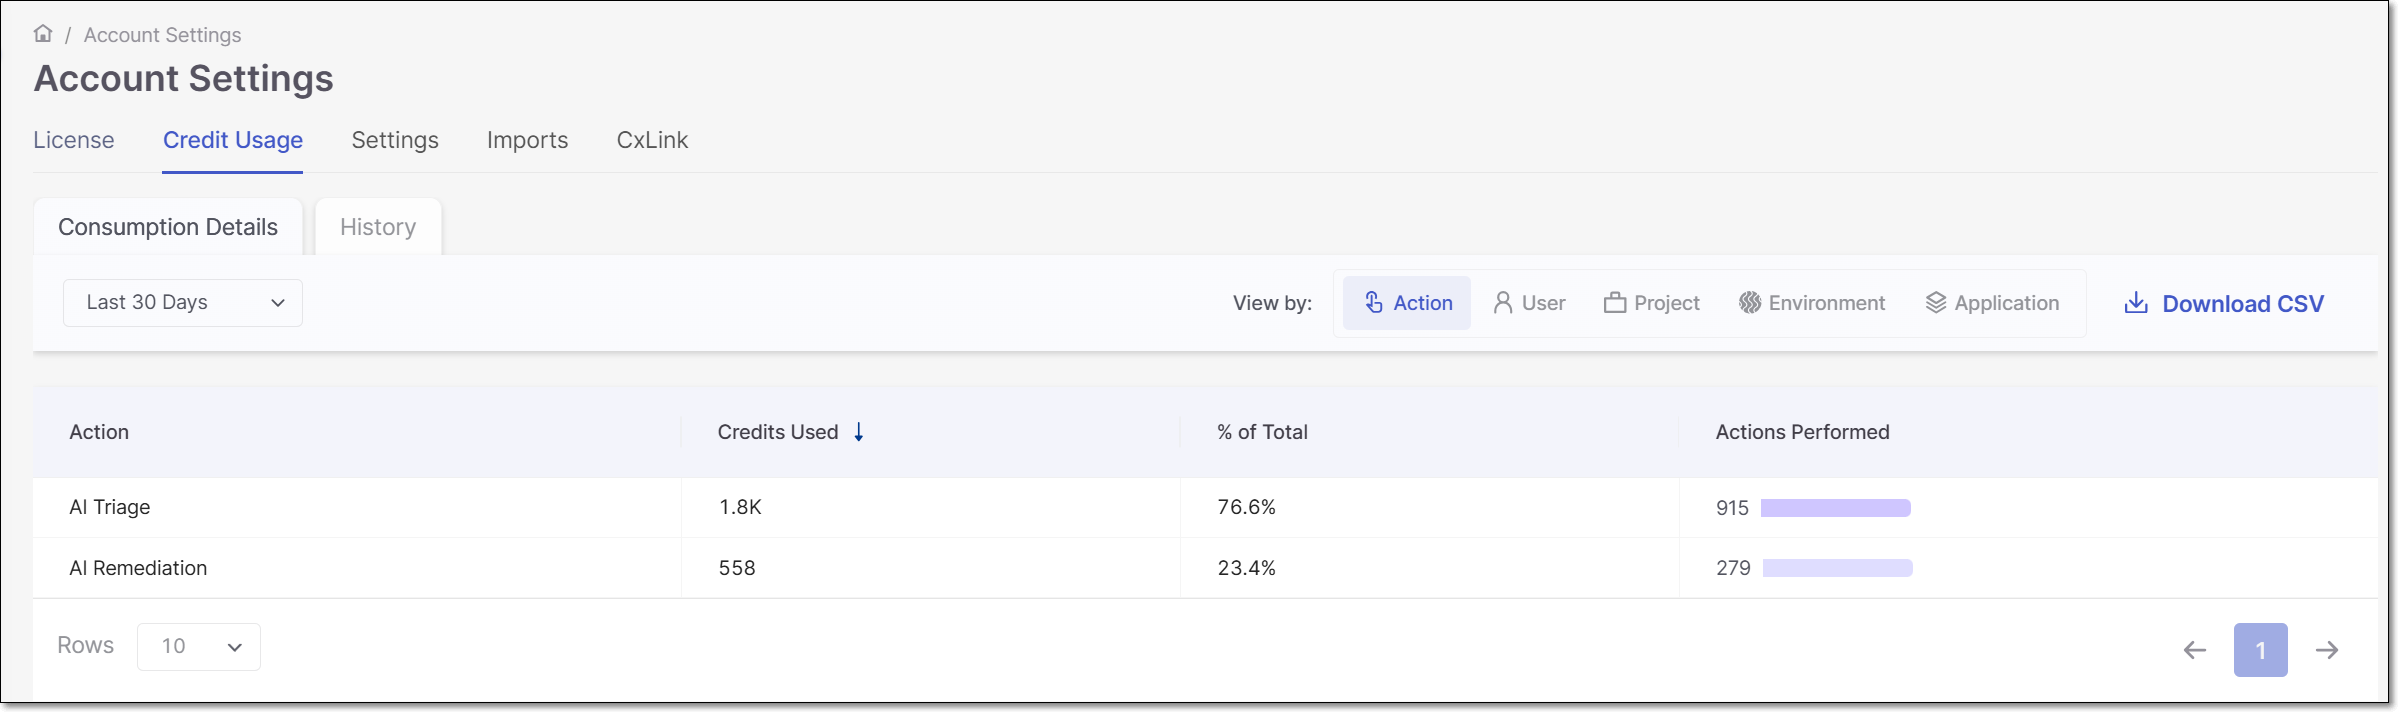
The Consumption Details tab lets you view credit consumption broken down by Action, User, Project, Environment, or Application.
For each item displayed, the table shows the number of credits used, the percentage of total credits used by that entity and the number of actions performed.
History Tab
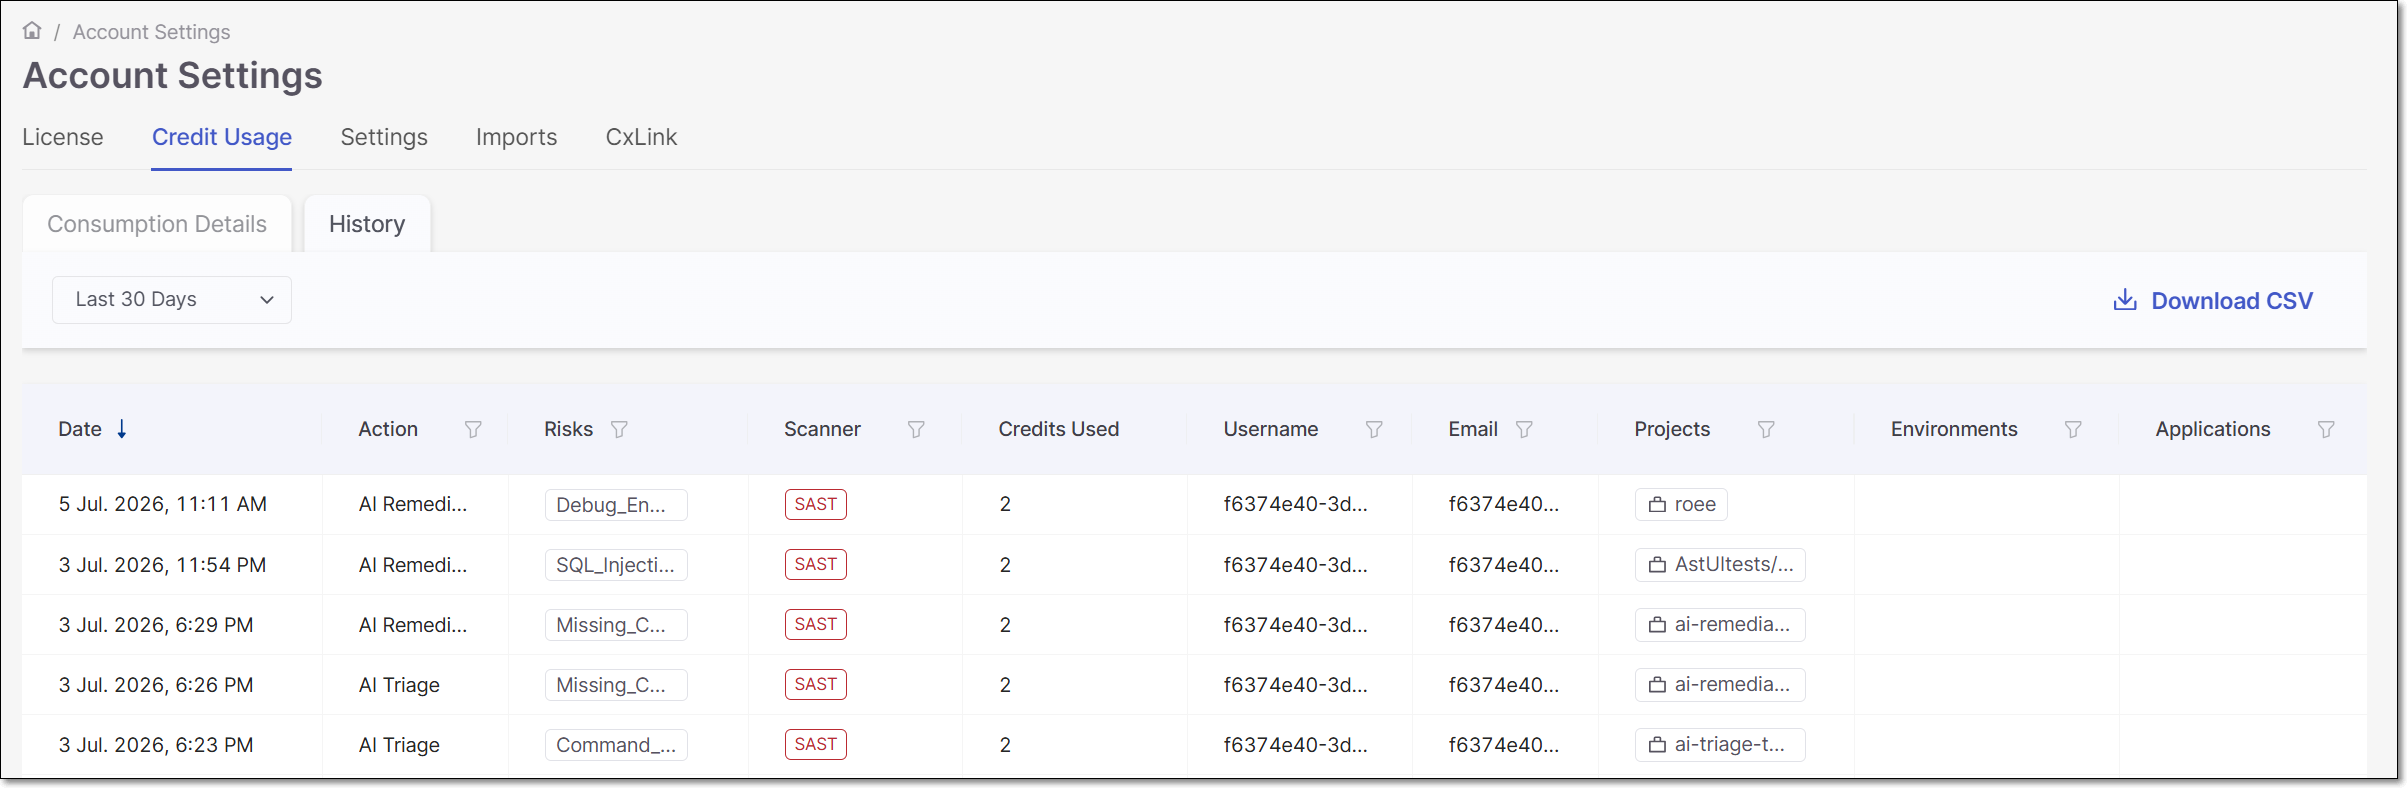
The History tab shows a list of actions taken that consumed AI Credits. For each action details are given about the action taken, the number of credits used and the user who initiated the action.
Ordering Additional Credits
It is possible to order additional Checkmarx Credits to enable additional usage of AI Triage & Remediation.
Go to Account Settings > License tab, and in the Solution Overview section, click on Checkmarx Credits.
The Request License Upgrade panel opens with the Upgrade Type set as Solutions and Checkmarx Credits specified in the Solutions field.
You can edit the info in the form as needed and optionally add Notes.
Click Submit.
A Checkmarx representative will contact you.
.